
Popular categories
Looking for a yarn?


|
|
Arianna |
|
|
|
|
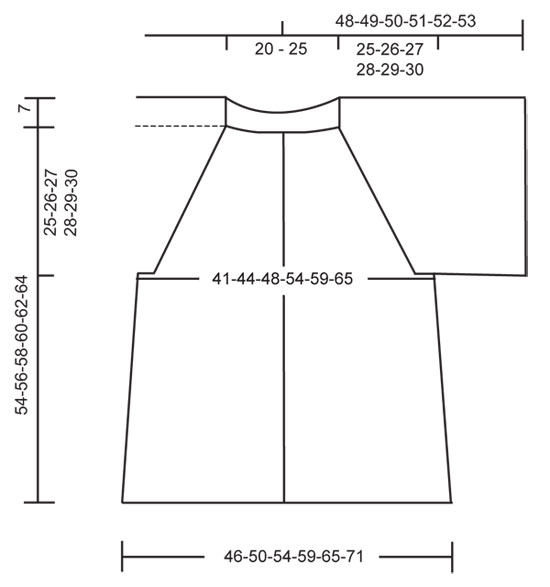
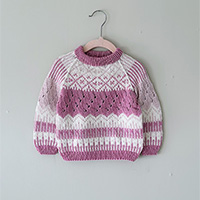
DROPS jacket with raglan in ”Alaska”. Size S to XXXL.
DROPS 122-31 |
|
|
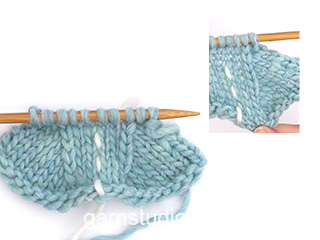
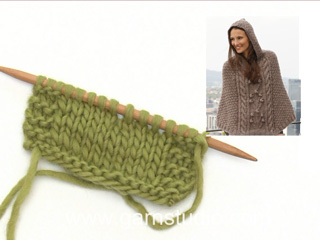
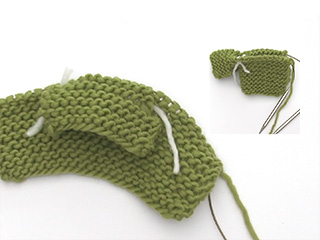
GARTER ST (back and forth on needle): K all rows. PATTERN: Row 1 (from RS): * K1, 1 garter st *, repeat from *-*. Row 2 (from WS): * 1 garter st, P1 *, repeat from *-*. Repeat row 1 and 2 (= garter st over garter st and K over K) DECREASING TIP (applies to raglan): From RS: Dec as follows before marker: Beg 4 sts before st with marker: K2 tog, P1, K3 (marker sits in the second of these 3 sts), P1 Dec as follows after marker: Beg 2 sts before marker: P1, K3 (marker sits in the second of these 3 sts), P1, slip 1 st as if to K, K1, psso. From WS: Before marker: Beg 4 sts before st with marker: P2 tog into back of loop, K1, P3 (marker sits in the second of these 3 sts), K1. After marker: Beg 2 sts before marker: K1, P3 (marker sits in the second of these 3 sts), K1, P2 tog. (Work the 5 sts between the dec like this even it is not a row with dec, the remaining sts continue in pattern). KNITTING TIP: If your knitting tension is too tight in the height the raglan will be too short and the armhole too small. You may compensate for this by working 2 extra rows without dec with regular intervals between the dec. BUTTONHOLES: Make buttonholes on right front band. 1 buttonhole = work 4th and 5th st tog and make 1 YO. Make buttonholes when piece measures: Size S: 5, 15, 25, 35 and 45 cm. Size M: 5, 13, 21, 29, 38 and 47 cm. Size L: 5, 13, 22, 31, 40 and 49 cm. Size XL: 5, 13, 22, 31, 40 and 49 cm. Size XXL: 5, 14, 23, 32, 41 and 51 cm. Size XXXL: 5, 13, 21, 29, 37, 45 and 54 cm. --------------------------------------------------------- JACKET: Worked back and forth on circular needle. Cast on 177-191-201-223-241-263 sts on circular needle size 5 mm with Alaska. K 3 rows and work next row from RS as follows: 10 GARTER STS – see above, PATTERN – see above – on the next 29-33-35-41-45-51 sts, 20 garter sts, pattern on the next 59-65-71-81-91-101 sts, 20 garter sts, pattern on the next 29-33-35-41-45-51 sts, finish with 10 garter sts. Work the 10 sts each side in garter st throughout. Continue in pattern like this. AT THE SAME TIME when piece measures 5 cm make BUTTONHOLES – see above – on right front band. REMEMBER THE KNITTING TENSION! Insert 2 markers in piece, 49-53-55-61-65-71 sts in from each side (Back piece = 79-85-91-101-111-121 sts). When piece measures 8 cm dec 1 st each side of both markers by K2 tog from RS. Repeat the dec on every 4-4-4.5-4.5-5-5 cm a total of 5 times = 157-171-181-203-221-243 sts. When piece measures 29-30-31-32-33-34 cm - adjust so that next row is from WS – cast off 10 sts mid under sleeve each side (5 sts each side of marker) = 137-151-161-183-201-223 sts. Put piece aside. SLEEVE: Worked back and forth on circular needle. Cast on 115-117-121-125-127-131 sts (includes 1 edge st each side) on circular needle size 5 mm. K 3 rows and work next row from RS as follows: 1 edge st in garter st, 1 garter st, pattern until 1 st remain, finish with 1 edge st in garter st. When piece measures 13-13-12-12-11-11 cm cast off 6 sts at the beg of the next 2 rows, beg from RS = 103-105-109-113-115-119 sts. Put piece aside and knit the other sleeve. YOKE: Slip sleeves on the same circular needle as body piece where cast off for armholes = 343-361-379-409-431-461 sts. Insert a marker in first and last st on back piece and in last st on each front piece (towards the sleeves) = 4 markers. READ ALL OF THE FOLLOWING SECTION BEFORE CONTINUING! Continue in Pattern, AT THE SAME TIME dec for RAGLAN as follows – See DECREASING TIP and KNITTING TIP: ON BODY PIECE (make all dec from RS): Dec on every 6th row a total of 8-5-2-0-0-0 times, on every 4th row 3-8-13-14-11-10 times and on every other row 0-0-0-4-11-15 times, ON SLEEVE (make dec from RS and from WS): Dec on every other row (i.e. on every row from RS) a total of 17-18-18-19-19-20 times, then on every row a total of 22-22-24-25-26-27 times. AT THE SAME TIME when piece measures 46-48-50-50-52-54 cm slip 10-12-12-12-12-15 sts towards mid front on a stitch holder for neck. Cast off to shape the neckline at beg of row each side as follows: 2 sts 5 times and 1 st 2-2-2-5-5-5 times. After all dec are complete there are 6 sts left on each front piece, 37-39-41-45-47-51 sts left on back piece and 25 sts left on each sleeve = a total of 99-101-103-107-109-113 sts. Cut the thread. Work next row from RS and mid front as follows: K all sts, AT THE SAME TIME pick up 14-14-14-18-18-18 sts on each neckline and slip sts on stitch holders back on needle = 147-153-155-167-169-179 sts (includes sts on stitch holders). On next row from WS K all sts, AT THE SAME TIME dec 41-43-41-49-47-53 sts evenly = 106-110-114-118-122-126 sts. K 3 rows on all sts. Change to circular needle size 4.5 mm. P 1 row from WS, AT THE SAME TIME inc 31-33-35-37-39-41 sts evenly (do not inc on front bands) = 137-143-149-155-161-167 sts. Work next row as follows - from RS: 10 garter sts, rib K3/P3 until 13 sts remain, finish with K3 and 10 garter sts. Continue in rib and garter st. Cast off with K over K and P over P when neckline measures 14-14-14-15-15-15 cm. ASSEMBLY: Sew sleeve seams inside 1 edge st. Sew the opening under sleeves. Sew buttons on left front piece. |
|
|
|
|
Have you made this or any other of our designs? Tag your pictures in social media with #dropsdesign so we can see them! Do you need help with this pattern?You'll find tutorial videos, a Comments/Questions area and more by visiting the pattern on garnstudio.com. © 1982-2024 DROPS Design A/S. We reserve all rights. This document, including all its sub-sections, has copyrights. Read more about what you can do with our patterns at the bottom of each pattern on our site. |


With over 40 years in knitting and crochet design, DROPS Design offers one of the most extensive collections of free patterns on the internet - translated to 17 languages. As of today we count 304 catalogues and 11422 patterns - 11422 of which are translated into English (UK/cm).
We work hard to bring you the best knitting and crochet have to offer, inspiration and advice as well as great quality yarns at incredible prices! Would you like to use our patterns for other than personal use? You can read what you are allowed to do in the Copyright text at the bottom of all our patterns. Happy crafting!
Comments / Questions (57)
Selma wrote:
Bonsoir.une question concernant les manches:a 13cm de hauteur totale on rabat 6m. sur l'endroit en dbt de rg puis une 2eme fois ,soit au totale 12m.Donc si j'ai bien compris le rabat est fait que d'un seul cote de la manche,ou doit on le faire de chaque cote de la manche.Merci d'avance pour vos explications.
01.03.2015 - 15:32DROPS Design answered:
Bonjour Selma, on rabat 6 m au début des 2 rangs suivants, c'est-à-dire que l'on rabat 6 m au début du rang suivant sur l'endroit, puis au début du rang suivant sur l'envers, on rabat les 6 premières m (= 6 m rabattues de chaque côté= 12 m rabattues au total). Bon tricot!
02.03.2015 - 09:52Selma wrote:
Bonsoir. pour le commencement de la veste,juste apres les 3Rgs end,je doit tricoter le Rg suivant en faisant:pt mousse(10),pt fantaisie(33m),20m pt. mousse,pt fantaisie sur 65m,........et je termine par 10m pt. mousse.Ma question est:si cette alternance Pt mousse,Pt fantaisie ne concerne que le rang apres les 3 premiers rangs end.,ou dois-je tricoter tous les rgs de la veste ainsi en alternant?merci d'avance pour votre aide.
29.01.2015 - 16:59DROPS Design answered:
Bonjour Selma, on continue ainsi, c'est-à-dire avec les bordures des devants + 20 m sur les côtés au point mousse et 33 m (taille M) pour chaque devant + 65 m pour le dos en point fantaisie. À partir de 8 cm de hauteur totale, on diminue sur les côtés, dans les sections point mousse. Bon tricot!
29.01.2015 - 17:48Selma wrote:
Merci pour votre reponse!
27.01.2015 - 17:31Selma wrote:
Bonjour a vous!je vous ai ecrit precedement au sujet du point fantaisie.En suivant vos explications,j'ai realise un echantillon et j'aurai besoin de votre aide: le 1er Rg tout est tricote a l'endroit,ou au pt mousse,le 2o Rg on tricote en alternant 1m.mousse-1m.env,1m.mousse-1m.env......jusqu'a la fin du rang? Sur mon echantillon le point obtenu ressemble a des cotes avec une petite "vague"entre les cotes. je voudrais savoir si le point fait sur mon echantillon est exact?merci d'avance.
27.01.2015 - 12:24DROPS Design answered:
Bonjour Selma, vous tricotez les m end sur l'end en jersey end (donc à l'env sur l'env) et une maille au point mousse entre ces m end, donc vu sur l'endroit, vous avez 1 m end (jersey end)/1 m point mousse, un peu comme des côtes 1/1 sauf que vous n'avez pas de m env entre les m end mais 1 m point mousse. Bon tricot!
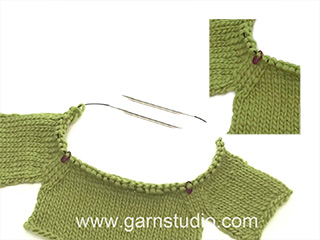
27.01.2015 - 13:54Je ne comprend pas l explication pour commencer le col, pouvez vous m'aider ? Merci :)
13.08.2014 - 19:39DROPS Design answered:
Bonjour Sylvie, quand les diminutions pour l'encolure sont faites et qu'il vous reste 99-113 m (cf taille), coupez le fil et relevez les mailles de chaque côté de l'encolure en reprenant celles en attente entre les 2 et tricote 3 rangs end sur toutes ces mailles, puis répartissez des augmentations et tricotez en côtes 3/3 avec 10 m point mousse de chaque côté pendant 14-15 cm. Bon tricot!
14.08.2014 - 12:52Selma wrote:
Bonjour. je ne comprends pas tres bien le point fantaisie.rg 1:quelle est la difference entre la m. jersey endroit et la m.mousse?parce qu en lisant vos explications j ai compris que le rg 1 est entierement a l endroit ou au point mousse.c est le rg 1 qui me pose des problemes. merci d avance.
05.05.2014 - 12:25DROPS Design answered:
Bonjour Selma, 1 m jersey end se tricote à l'env sur l'envers, la m point mousse se tricote à l'end tous les rangs (sur l'endroit et sur l'envers). Ainsi, le 1er rang sera en effet tricoté tout à l'end, mais la m point mousse se tricotera tous les rangs à l'end et la m jersey end à l'env sur l'env. Bon tricot!
05.05.2014 - 13:32Qq un voudrait il que l'on echange plus longuement via nos mails ? merci
25.01.2013 - 10:29DROPS Design answered:
Je vous recommande de vous inscrire sur le forum DROPS où vous pourrez obtenir de l'aide si nécessaire. Bon tricot !
25.01.2013 - 14:17Doit on diminuer en plus des diminutionS comprises dans le raglan ? SI OUI ? JUSTE AVANT ALORS? les explications ne sont pas assez detaillées , si qq veut bien m expliquer je voudrai pas rater mon pull!!!
25.01.2013 - 10:17DROPS Design answered:
On diminue pour le raglan comme indiqué dans les diminutions (raglan) au début des explications, soit avant, soit après le marqueur, soit sur l'endroit (dos et devants et manches), soit sur l'envers (manches).
25.01.2013 - 14:16Je bloque , help. qq un peut il m expliquer cette histoire de raglan et de diminution en // ???? merci bien . meme ma vendeuse de laine n'y comprend rien
25.01.2013 - 10:12DROPS Design answered:
Bonjour Madame Vinini, les diminutions des raglans ne se font pas de la même façon pour le dos/devants et pour les manches. Vos marqueurs doivent être comme indiqués au niveau du dos et des devants. Vous diminuez ensuite différemment sur le dos/devants (tous les 6-4 puis 2 rangs) et sur les manches (tous les 2 rangs puis tous les rangs).
25.01.2013 - 14:15Je viens de lire le modéle et avant de me lancer je souhaite savoir: pt fantaisie : 1 jersey en puis 1 pt mouusse ( mais le pt mousse c'est tous les rangs à l end ) rg 2 : 1m mousse ( soit end ) et 1 m env ? apres c'est quoi un marqueur ? EST CE UN BOUT DE FIL QUE L ON GLISSE ENTRE 2 MAILLES POUR REPERER L ENDROIT ? EST CE UN MODELE DIFFICILE OU PAS ? merci bien
14.12.2012 - 12:46DROPS Design answered:
Bonjour Vinini, Le point fantaisie se tricote bien ainsi. Un marqueur est un fil de couleur contrastée de grosseur inférieure ou égale au fil tricoté ou bien un anneau (on en trouve en magasin). Vous trouverez dans notre vidéothèque des vidéos qui expliquent comment utiliser les 2. Pour toute aide individuelle sur ce modèle, n'hésitez pas à contacter votre magasin DROPS et / ou à demander de l'aide sur le forum DROPS. Bon tricot !
14.12.2012 - 13:43