
Popular categories
Looking for a yarn?


|
|||||||||||||
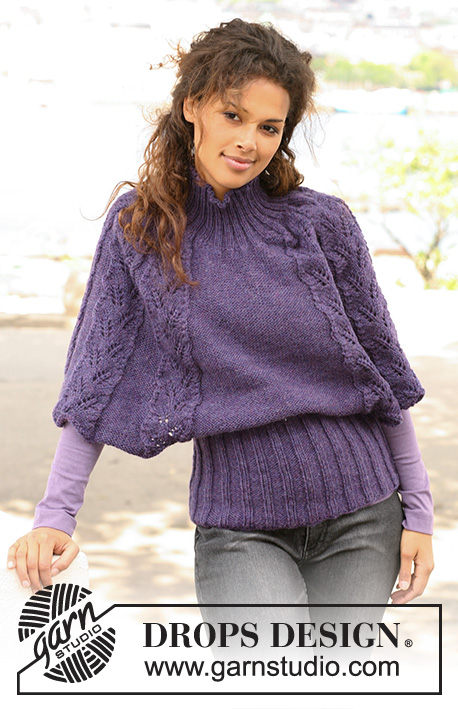
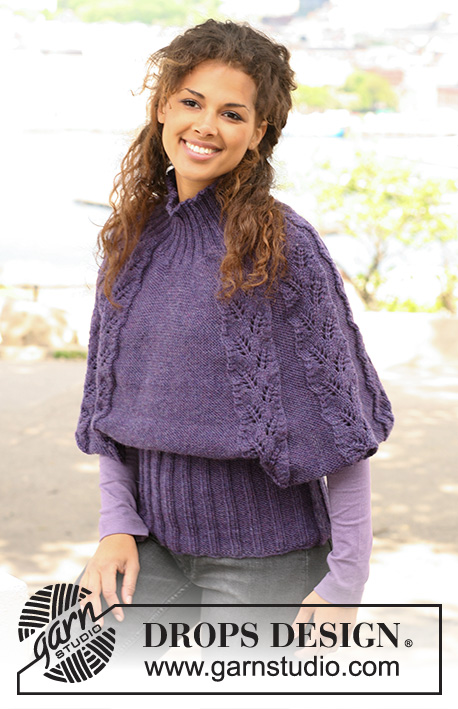
Twilight Leaves |
|||||||||||||
 |
 |
||||||||||||
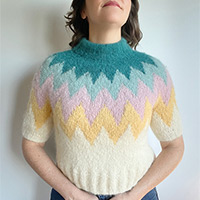
Knitted DROPS poncho / top in ”Alaska” with rib and lace pattern. Size S to XXXL
DROPS 126-30 |
|||||||||||||
|
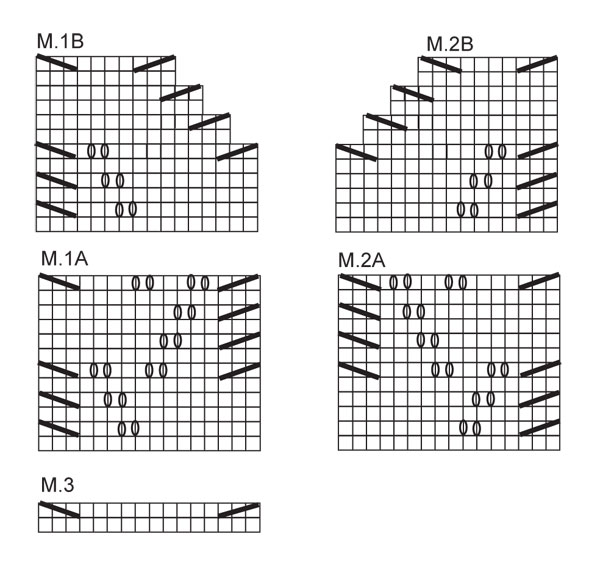
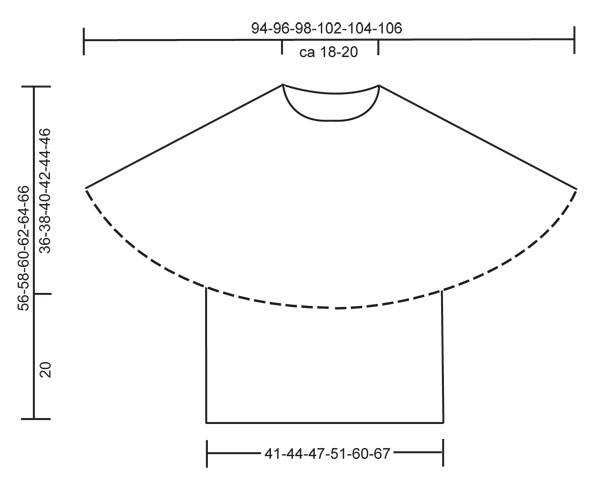
PATTERN: See diagrams M.1 to M.3. Diagrams show the pattern from RS. -------------------------------------------------------- BODY PIECE: Worked in the round. Cast on 156-168-180-192-216-240 sts on circular needle size 4 mm with Alaska. Work 1 round stocking st and continue in rib as follows: * K2, P4 *, repeat from *-*. When piece measures 20 cm for all sizes work next row as follows: cast off the first 8-8-8-14-14-14 sts for armhole (= Size S, M and L: K2, P4, K2, Size XL, XXL, XXXL: K2, P4, K2, P4, K2), work the next 70-76-82-82-94-106 sts as before (= front piece), cast off the next 8-8-8-14-14-14 sts for armhole and work the last 70-76-82-82-94-106 sts as before (= back piece). Change to circular needle size 5 mm. Now LOOSELY cast on 112-118-136-144-166-176 new sts (= over sleeve), P sts on front piece AT THE SAME TIME dec evenly to 60-66-70-72-82-84 sts, LOOSELY cast on 112-118-136-144-166-176 new sts (= over the other sleeve) and P sts on back piece AT THE SAME TIME dec evenly to 60-66-70-72-82-84 sts = 344-368-412-432-496-520 sts. Round now beg between back piece and one of the sleeves. NOW MEASURE PIECE FROM HERE! P 1 round on all sts. Continue as follows: SIZE S: * M.1A (= 16 sts), P16 *, repeat from *-* a total of 3 times, M.1A, P 60 (= front piece), * M.2A, P16 *, repeat from *-* a total of 3 times, finish with M.2A, P 60 (= back piece). SIZE M: * M.1A (= 16 sts), P18 *, repeat from *-* a total of 3 times, M.1A, P 66 (= front piece), * M.2A, P18 *, repeat from *-* a total of 3 times, finish with M.2A, P 66 (= back piece). SIZE L: * M.1A (= 16 sts), P14 *, repeat from *-* a total of 4 times, M.1A, P 70 (= front piece), * M.2A, P14 *, repeat from *-* a total of 4 times, finish with M.2A, P 70 (= back piece), SIZE XL: * M.1A (= 16 sts), P16 *, repeat from *-* a total of 4 times, M.1A, P 72 (= front piece), * M.2A, P16 *, repeat from *-* a total of 4 times, finish with M.2A, P72 (= back piece). SIZE XXL: * M.1A (= 16 sts), P14 *, repeat from *-* a total of 5 times, M.1A, P 82 (= front piece), * M.2A, P14 *, repeat from *-* a total of 5 times, finish with M.2A, P82 (= back piece). SIZE XXXL: * M.1A (= 16 sts), P16 *, repeat from *-* a total of 5 times, M.1A, P 84 (= front piece), * M.2A, P16 *, repeat from *-* a total of 5 times, finish with M.2A, P 84 (= back piece). REMEMBER THE KNITTING TENSION! READ ALL OF THE FOLLOWING SECTION BEFORE CONTINUING! When piece measures 5-5-3-2-3-2 cm dec on the P sts mid front and mid back by P tog the 2 first sts and P tog the last 2 sts. Repeat the dec on every 6-5-5-5-4-4 round a total of 13-16-17-18-22-23 times. AT THE SAME TIME when piece measures 5-6-7-7-9-9 cm P tog the first 2 sts and P tog the last 2 sts on each P-section over sleeves Repeat the dec on every 12-10-14-12-14-12 round a total of 7-8-6-7-6-7 times. AT THE SAME TIME when piece measures approx 30-32-34-36-38-40 cm (adjust so that there is one round left in pattern repeat) slip the middle 12-12-14-14-16-16 sts mid front on a stitch holder for neck. Work remaining sts on round, cut the thread. Continue back and forth from mid front – beg from WS and continue as follows: Over the first repeat of M.2A work M.2B, and over the last repeat of M.1A work M.1B (i.e. work the B-diagram each side of mid front), work the remaining repeats as before, but replace the last 2 rows in each repeat with M.3 (i.e. no YO on the last row). AT THE SAME TIME cast off to shape the neckline at the beg of every row from mid front: 2 sts 1 time and 1 st 5 times (continue the other dec as before). When all dec are complete there are 138-138-168-168-198-198 sts on needle. Work next row from RS as follows: P2 tog 2 times, continue as follows over the first sleeve: K3 tog 2 times, P2 *, K2 tog 6 times, P2 * repeat from *-* a total of 2-2-3-3-4-4 times, finish with K2 tog 6 times, continue as follows over back piece: P2 tog 8-8-7-7-9-9 times, P 2-2-8-8-2-2, P2 tog 8-8-7-7-8-8 times, continue as follows over the other sleeve: * K2 tog 6 times, P2 *, repeat from *-* a total of 3-3-4-4-5-5 times, and finish with K3 tog 2 times, P2 tog 2 times, now pick up 30-30-30-30-34-34 sts along neckline at front (includes sts on stitch holder) = 104-104-122-122-140-140 sts. NECK: Change to small circular needle size 4 mm and continue in rib, P2/K2 – make sure to have P2 over the P2 between the pattern repeats on sleeves. When neck measures 10 cm cast off loosely with K over K and P over P. |
|||||||||||||
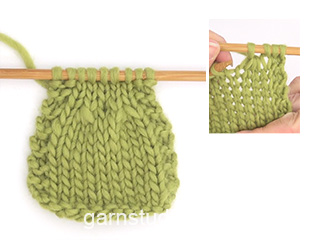
Diagram explanations |
|||||||||||||
|
|||||||||||||
|
|||||||||||||
|
|||||||||||||
|
Have you made this or any other of our designs? Tag your pictures in social media with #dropsdesign so we can see them! Do you need help with this pattern?You'll find tutorial videos, a Comments/Questions area and more by visiting the pattern on garnstudio.com. © 1982-2024 DROPS Design A/S. We reserve all rights. This document, including all its sub-sections, has copyrights. Read more about what you can do with our patterns at the bottom of each pattern on our site. |
|||||||||||||


With over 40 years in knitting and crochet design, DROPS Design offers one of the most extensive collections of free patterns on the internet - translated to 17 languages. As of today we count 304 catalogues and 11422 patterns - 11422 of which are translated into English (UK/cm).
We work hard to bring you the best knitting and crochet have to offer, inspiration and advice as well as great quality yarns at incredible prices! Would you like to use our patterns for other than personal use? You can read what you are allowed to do in the Copyright text at the bottom of all our patterns. Happy crafting!
Comments / Questions (74)
Pour le modèle 126-30 à 32 cm Que veut dire AJUSTER pour qu'il reste un tour du motif à répéter,merci pour votre aide, cordialement
10.04.2015 - 09:49DROPS Design answered:
On met en attente les mailles de l'encolure à 32 cm de hauteur totale ou, ajustez la hauteur en fonction de votre tension, lorsqu'il reste 1 tour du motif à tricoter avant de mettre les mailles en attente. Bon tricot!
10.04.2015 - 14:02Bonjour, pour le modèle 126-30 à 6 cm de hauteur total que veut dire l'expression - dans chaque section envers au-dessus des manches,merci pour votre réponse, cordialement.
10.04.2015 - 09:47DROPS Design answered:
Au-dessus des manches, vous avez des sections de 16 m env, diminuez 1 m au début + 1 m à la fin de cette section (= 2 diminutions) 8 fois (taille M) tous les 10 tours = il reste 2 m env entre les motifs M1A/M2A quand toutes les diminutions sont faites. Bon tricot!
10.04.2015 - 14:00Bonjour, pour le modèle 126-30 taille M, arrivée aux manches j'ai 4 X le point ajouré au lieu de trois et 3 X les 18 mailles envers sur chaque manche. merci pour votre aide. Cordialement
10.04.2015 - 09:44DROPS Design answered:
Bonjour Mme Duret, c'est tout à fait exact, on a 3 fois (M1A, 18 m env) puis encore une fois M1A avant les 66 m env du devant et 3 fois (M2A, 18 m env) et encore une fois M2A avant les 66 m env du dos, soit 4 fois le point fantaisie M1A/M2A au total. Bon tricot!
10.04.2015 - 13:58Danke für die Antwort! Laut Diagramm muss ich dann jede 2te Reihe glatt rechts stricken?
18.01.2015 - 20:14DROPS Design answered:
Ja genau, jede 2. Runde bzw. später Reihe wird glatt re gestrickt (in Runden also immer re). Dazwischen stricken Sie die Loch-Rd.
19.01.2015 - 10:15Hallo, was heisst "re. auf der Vorderseite und li. auf der Rückseite"? Und die erste Reihe im Diagramm verwirrt mich. Muss ich die jedes mal re ( oder li) stricken? Habe ich dann nicht streifen??
18.01.2015 - 12:53DROPS Design answered:
re auf der Vorderseite + li auf der Rückseite heißt, dass Sie in Hin-R die M re stricken und in Rück-R die M li stricken, in Runden stets re (also glatt re). Die 1. Rd der Muster stricken Sie re (glatt re). Streifen haben Sie dadurch nicht, die Rd ist als Zwischenrunde für das Lochmuster nötig, ebenso wie die anderen re gestrickten Rd.
18.01.2015 - 18:40I don't understand the part when you cast on new stitches then...P sts on back piece AT THE SAME TIME dec evenly to 60-66-70-72-82-84 sts = 344-368-412-432-496-520 sts. How do I p and decrease?
05.03.2014 - 17:20DROPS Design answered:
Dear Connie, you dec evenly sts on front and back piece on a P round with P2 tog evenly distributed. Happy knitting!
05.03.2014 - 18:08How many stitches should I have when I get to start neckline shaping?
25.02.2014 - 08:05DROPS Design answered:
Dear Lesley, when all dec are done, 138-138-168-168-198-198 sts remain on needle. Work then next row from RS as stated and pick -up 30-34 sts (see size) along neckline (including sts on st holder) = 104-104-122-122-140-140 m to work neck edge. Happy knitting!
25.02.2014 - 09:12"vorne in der Mitte 14 M. für den Hals auf einen Hilfsfaden legen" Ich lege die Maschen still & stricke diese Reihe mit dem Hilfsfaden zu Ende? Die Runde endet doch am Übergang zwischen Rückenteil und linkem Ärmel,oder? Und dann?????? Bitte geben Sie mir die Anleitung Schritt für Schritt vielleicht bis kurz vor Stilllegung der 14 Maschen Vielen Dank
26.01.2014 - 21:27DROPS Design answered:
Liebe Frau Salomon, der Hilfsfaden ist nur zum Stilllegen, mit diesem wird nicht gestrickt. Dürfen wir Sie bitten, sich für weitere Strickhilfe zur Umsetzung dieser Anleitung an den Laden zu wenden, in dem Sie die Wolle gekauft haben? Dort hilft man Ihnen gerne weiter!
27.01.2014 - 10:54Bij het patroon 126-30 heb ik een probleem. Moet ik de 14 steken cab het voorpand op een hulpnaald zetten? Alvast bedankt
12.11.2013 - 11:41DROPS Design answered:
Hoi mevrouw Van Houten. De 14 st kant je af aan beide kanten (= armsgaten). Je breit steeds in de rondte en zet in de volgende nld nieuwe st op boven de afgekante st aan beide zijkanten en breit verder in de rondte over voorpand, mouw, achterpand en mouw.
12.11.2013 - 12:12I understand the pattern until it states to K from RS, P from WS on the diagrams Do they mean p every second row but then some of the rows have both symbols on the same line? We are using circular needles. Please help?
04.03.2013 - 13:59DROPS Design answered:
Dear Louise, diagram show every row from pattern, from RS and from WS, when you work pattern in the round, it will be only RS, but then when you will work back and forth, you will K from RS and then P from WS. Happy knitting!
04.03.2013 - 16:12