The yarn cost is calculated from the pattern’s smallest size and the yarn’s cheapest product type. Looking for an even better price? You might find it on the DROPS Deals!
-------------------------------------------------------
Alternative Yarn – See how to change yarns here
Yarn Groups A to F – Use the same pattern and change the yarn here
Yarn usage using an alternative yarn – Use our yarn converter here
-------------------------------------------------------
The yarn cost is calculated from the pattern’s smallest size and the yarn’s cheapest product type. Looking for an even better price? You might find it on the DROPS Deals!
This pattern has been corrected. Click here to see the correction/s.
= K from RS, P from WS | |
= P from RS, K from WS |
Each of our patterns has specific tutorial videos to help you.
These step-by-step tutorials might also help you:
Why is the knitting/crochet tension so important?
Knitting tension is what determines the final measurements of your work, and is usually measured per 10 x 10 cm. It is provided like so: number of stitches in width x number of rows in height - eg: 19 stitches x 26 rows = 10 x 10 cm.
The knitting tension is very individual; some people knit/crochet loosely while others work tightly. You adjust the knitting tension with the needle size, which is why the suggested needle size is only meant as a guide! You need to adjust this (up or down) to ensure that YOUR knitting tension matches the knitting tension provided in the pattern. If you work with a different knitting tension than provided you will have a different yarn consumption, and your work will have different measurements than what the pattern suggests.
The knitting tension also determines which yarns can replace each other. As long as you achieve the same knitting tension you can replace one yarn with another.
See DROPS lesson: How to measure your tension/gauge
See DROPS video: How to make a gauge tension swatch
How do I know how many balls of yarn I need?
The required amount of yarn is provided in grams, eg: 450 g. To calculate how many balls you’ll need you first need to know how many grams are in 1 ball (25g, 50g or 100g). This information is available if you click on the individual yarn quality on our pages. Divide the amount required with the amount of each ball. For example, if each ball is 50g (the most common amount), the calculation will be as follows: 450 / 50 = 9 balls.
Can I use a different yarn than what the pattern suggests?
The important thing when changing from one yarn to another is that the knitting/crochet tension remains the same. This is so that the measurements of the finished piece will be the same as on the sketch provided. It is easier to achieve the same knitting tension using yarns from the same yarn group. It is also possible to work with multiple strands of a thinner yarn to achieve the knitting tension of a thicker one. Please try our yarn converter. We recommend you to always work a test swatch.
Please NOTE: when changing yarn the garment might have a different look and feel to the garment in the photo, due to individual properties and qualities of each yarn.
See DROPS lesson: Can I use a different yarn than the one mentioned in the pattern?
What are the yarn groups?
All our yarns are categorised into yarn groups (from A to F) according to thickness and knitting tension – group A contains the thinnest yarns and group F the thickest. This makes it easier for you to find alternative yarns to our patterns, should you wish to switch yarn. All yarns within the same group have a similar knitting tension and can easily replace each other. However, different yarn qualities have different structures and properties which will give the finished work a unique look and feel.
How do I use the yarn calculator?
At the top of all our patterns you’ll find a link to our yarn calculator, which is a helpful tool should you wish to use a different yarn than suggested. By filling in the yarn quality you wish to replace, the amount (in your size) and number of strands, the calculator will present good alternative yarns with the same knitting tension. Additionally it will tell you how much you’ll require in the new qualities and whether you’ll need to work with multiple strands. Most skeins are 50g (some are 25g or 100g).
If the pattern is worked with multiple colours, every colour will have to be calculated separately. Similarly, if the pattern is worked with several strands of different yarns (for example 1 strand Alpaca and 1 strand Kid-Silk) you will have to find alternatives for each, individually.
Why do you show discontinued yarns in the patterns?
Since different yarns have different qualities and textures we have chosen to keep the original yarn in our patterns. However, you can easily find options among our available qualities by using our yarn calculator, or simply pick a yarn from the same yarn group.
It is possible that some retailers still have discontinued yarns in stock, or that someone has a few skeins at home that they would like to find patterns for.
The yarn calculator will provide both alternative yarn as well as required amount in the new quality.
What size should I knit?
If you think it's hard to decide what size to make, it can be a good idea to measure a garment you own already and like the size of. Then you can pick the size by comparing those measures with the ones available in the pattern's size chart.
You'll find the size chart at the bottom of the pattern.
See DROPS lesson: How to read size chart
Why do I get the wrong knitting tension with the suggested needle size?
The needle size provided in the pattern serves only as a guide, the important thing is to follow the knitting tension. And since knitting tension is very individual, you will have to adjust the needle size to ensure that YOUR tension is the same as in the pattern – maybe you’ll have to adjust 1, or even 2 needle sizes, up or down to achieve the correct tension. For this, we recommend that you work test swatches.
Should you work with a different knitting tension than the one provided, the measurements of the finished garment might deviate from the measurement sketch.
See DROPS lesson: How to measure your tension/gauge
See DROPS video: How to make a tension/gauge swatch
Why is the pattern worked top-down?
Working a garment top-down provides more flexibility and room for personal adjustment. For example it is easier to try the garment on while working, as well as making adjustments to length of yoke and shoulder caps.
The instructions are carefully explaining every step, in the correct order. Diagrams are adjusted to the knitting direction and are worked as usual.
How do I work according to a knitting diagram?
The diagram depicts all rows/rounds, and every stitch seen from the right side. It is read from bottom to top, from right to left. 1 square = 1 stitch.
When working back and forth, every other row is worked from the right side and every other row is worked from the wrong side. When working from the wrong side, the diagram will have to be worked reversed: from left to right, knit stitches are purled, purl stitches are knit etc.
When working in the round every round is worked from the right side and the diagram are worked from right to left on all rounds.
See DROPS lesson: How to read knitting diagrams
How do I work according to a crochet diagram?
The diagram depicts all rows/rounds, and every stitch seen from the right side. It is worked from bottom to top, from right to left.
When working back and forth every other row is worked from the right side: from right to left and every other row is worked from the wrong side: from left to right.
When working in the round, every row in the diagram are worked from the right side, from right to left.
When working a circular diagram you start in the middle and work your way outwards, counter clockwise, row by row.
The rows usually start with a given number of chain stitches (equivalent to the height of the following stitch), this will either be depicted in the diagram or explained in the pattern.
See DROPS lesson: How to read crochet diagrams
How do I work several diagrams simultaneously on the same row/round?
Instructions for working several diagrams after each other on the same row/round, will often be written like so: “work A.1, A.2, A.3 a total of 0-0-2-3-4 times". This means you work A.1 once, then A.2 is worked once, and A.3 is repeated (in width) the number of times provided for your size – in this case like so: S = 0 times, M = 0 times, L=2 times, XL= 3 times and XXL = 4 times.
The diagrams are worked as usual: begin with the first row in A.1, then work the first row in A.2 etc.
See DROPS lesson: How to read knitting diagrams
See DROPS lesson: How to read crochet diagrams
Why are the sleeves shorter in larger sizes?
The total width of the garment (from wrist-to-wrist) will be larger in the larger sizes, despite the actual sleeves being shorter. The larger sizes have longer sleeve caps and wider shoulders, so there will be a good fit in all sizes.
Where on the garment is the length measured?
The measurement sketch/schematic drawing provides information regarding the full length of the garment. If it’s a jumper or a jacket the length is measured from the highest point on the shoulder closest to the neckline, and straight down to the bottom of the garment. It is NOT measured from the tip of shoulder. Similarly, the length of yoke is measured from the highest point on the shoulder and down to where yoke is split into body and sleeves.
On a jacket measures are never taken along bands, unless specifically stated. Always measure inside band stitches when measuring the length.
See DROPS lesson: How to read a schematic drawing
What is a repeat?
Diagrams are often repeated on the round or in height. 1 repeat is the diagram the way it appears in the pattern. If it says to work 5 repeats of A.1 in the round, then you work A.1 a total of 5 times after/next to each other in the round. If it says to work 2 repeats of A.1 vertically/in height you work the entire diagram once, then begin again at the start and work the entire diagram one more time.
Why does the piece start with more chain stitches than it’s worked with?
Chain stitches are slightly narrower than other stitches and to avoid working the cast-on edge too tight, we simply chain more stitches to begin with. The stitch count will be adjusted on the following row to fit the pattern and measurement sketch.
Why increase before the rib edge when the piece is worked top-down?
The rib edge is more elastic and will contract slightly compared to, for example, stocking stitch. By increasing before the rib edge, you avoid a visible difference in width between the rib edge and the rest of the body.
Why increase in the cast-off edge?
It’s very easy to cast off too tightly, and by making yarn overs while casting off (and simultaneously casting these off) you avoid a too tight cast off edge.
See DROPS video: How to bind off with yarn overs (yo)
How do I increase/decrease on every 3rd and 4th row/round alternately?
To achieve an even increase (or decrease) you can increase on, for example: every 3rd and 4th row alternately, like so: work 2 rows and increase on the 3rd row, work 3 rows and increase on the 4th. Repeat this until the increase is complete.
See DROPS lesson: Increase or decrease 1 st on every 3rd and 4th row alternately
How can I work a jacket in the round instead of back and forth?
Should you prefer to work in the round instead of back and forth, you may of course adjust the pattern. You’ll need to add steeks mid-front (usually 5 stitches), and follow the instructions. When you would normally turn and work from the wrong side, simply work across the steek and continue in the round. At the end you’ll cut the piece open, pick up stitches to work bands, and cover the cut edges.
See DROPS video: How to knit steeks and cut open
Can I work a jumper back and forth instead of in the round?
Should you prefer to work back and forth instead of in the round, you may of course adjust the pattern so you work the pieces separately and then assemble them at the end. Divide the stitches for the body in 2, add 1 edge stitch in each side (for sewing) and work the front and back pieces separately.
See DROPS lesson: Can I adapt a pattern for circular needles into straight needles?
Why is the pattern slightly different than what I see in the photo?
Pattern repeats can vary slightly in the different sizes, in order to get the correct proportions. If you’re not working the exact same size as the garment in the photo, yours might deviate slightly. This has been carefully developed and adjusted so that the complete impression of the garment is the same in all sizes.
Make sure to follow instructions and diagrams for your size!
How do I make a women’s size garment into a men’s size one?
If you have found a pattern you like which is available in women’s size it’s not very difficult to convert it to men’s size. The biggest difference will be the length of sleeves and body. Start working on the women size that you think would fit across the chest. The additional length will be worked right before you cast off for the armhole/sleeve cap. If the pattern is worked top-down you can add the length right after the armhole or before the first decrease on sleeve.
Regarding additional yarn amount, this will depend on how much length you add, but it is better with a skein too many than too few.
How do I prevent a hairy garment from shedding?
All yarns will have excess fibres (from production) that might come off as lint or shedding. Brushed yarns (ie hairier yarns) have more of these loose, excess fibres, causing more shedding.
Shedding also depends on what is worn under or over the garment, and whether this pulls at the yarn fibres. It’s therefore not possible to guarantee that there will be no shedding
Below are some tips on how to get the best result when working with hairier yarns:
1. When the garment is finished (before you wash it) shake it vigorously so the looser hairs come off. NOTE: do NOT use a lint roller, brush or any method that pulls at the yarn.
2. Place the garment in a plastic bag and put it in your freezer - the temperature will cause the fibres to become less attached to each other, and excess fibres will come off easier.
3. Leave in the freezer for a few hours before taking it out and shaking it again.
4. Wash the garment according to the instructions on the yarn label.
Why does my garment pill?
Pilling is a natural process that happens to even the most exclusive of fibers. It's a natural sign of wear and tear that is hard to avoid, and that is most visible in high friction areas of your garment like a sweater's arms and cuffs.
You can make your garment look as new by removing the pilling, using a fabric comb or a pill/lint remover.
Sweet Sorbet |
|||||||
|
|
||||||
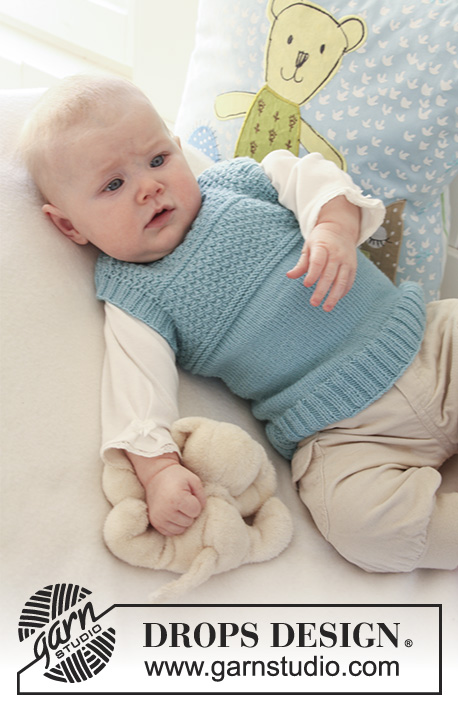
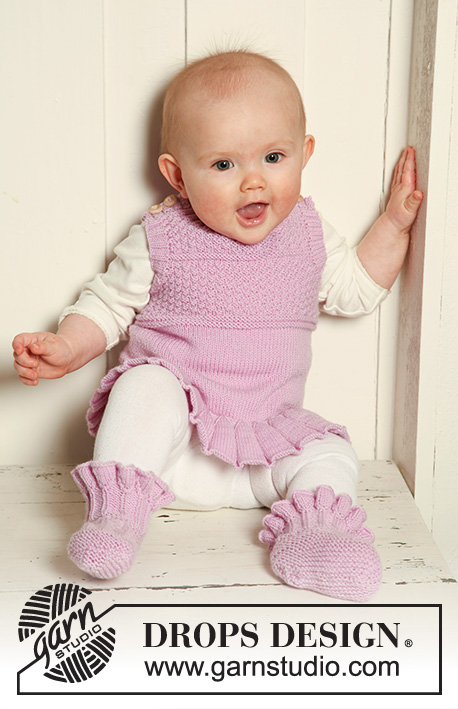
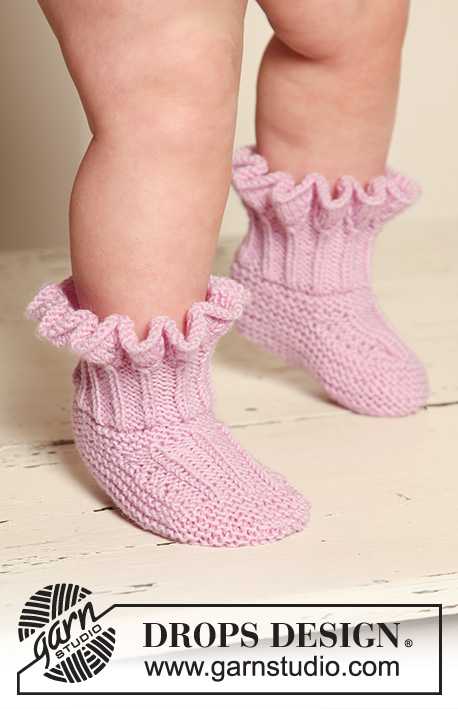
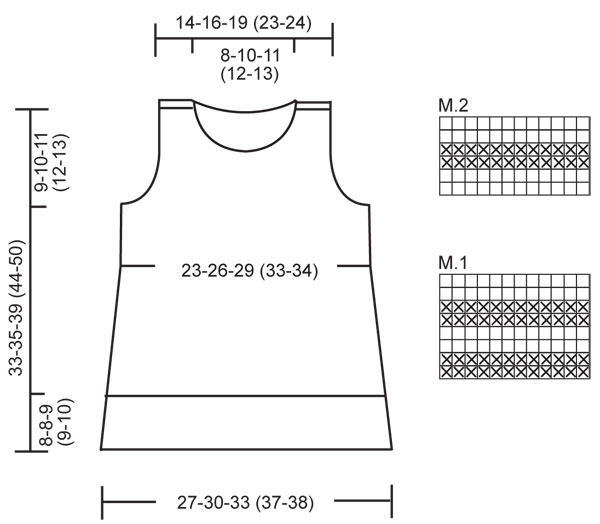
Set of dress with textured pattern plus booties with ruffles for baby and children in DROPS BabyMerino
DROPS Baby 19-19 |
|||||||
DRESS: GARTER ST (back and forth on needle): K all rows. DOUBLE MOSS ST: Row 1: * K2, P2 *, repeat from *-*. Row 2: K over K and P over P. Row 3: P over K and K over P. Row 4: like row 2. Repeat row 1-4. DECREASING TIP: Dec as follows before marker, beg 2 sts before marker: slip 1 st as if to K, K1, psso. Dec as follows after marker: K2 tog. PATTERN: See diagrams M.1 and M.2. Diagrams show the pattern from RS. -------------------------------------------------------- -------------------------------------------------------- DRESS: Worked in the round on circular needle. Cast on 392-420-448 (476-504) sts on circular needle size 2.5 mm with Baby Merino. Work rib as follows: P2, * K10, P4 *, repeat from *-* until 12 sts remain and finish with K10 and P2. Continue like this for 5-5-6 (6-7) cm. Now dec 1 st on both sides of each K-section by working the K10 as follows (work the P4 as before): slip 1 st as if to K, K1, psso, K sts until 2 sts remain, K2 tog. Repeat this dec on every other round a total of 4 times = 168-180-192 (204-216) sts. Work 1 round with K over K and P over P. Change to circular needle size 3 mm and K 1 round on all sts, AT THE SAME TIME dec 36-36-32 (28-32) sts evenly = 132-144-160 (176-184) sts. Insert 1 marker at beg of round and 1 marker after 66-72-80 (88-92) sts (to mark the sides). Now measure piece from here! Continue in stocking st on all sts. When piece measures 2-2-3 (3-3) cm from marker dec 1 st on each side of both markers – see DECREASING TIP - on every 2-2-2 (3-3.5) cm a total of 5 times = 112-124-140 (156-164) sts. Continue until piece measures 11-12-13 (16-18) cm from marker. Now work M.1 on all sts. After 1 vertical repeat of M.1 continue in DOUBLE MOSS ST – see above - on all sts. When piece measures 16-17-19 (23-27) cm from marker cast off 6 sts each side (i.e. 3 sts on each side of marker) for armhole. Now complete front and back pieces separately. BACK PIECE: = 50-56-64 (72-76) sts. Continue back and forth on needle in double moss st. AT THE SAME TIME cast off to shape the armhole each side on every other row: 2 sts 4 times and 1 st 1 time = 32-38-46 (54-58) sts. Now work M.2 on all sts. After 1 vertical repeat of M.2 continue in double moss st until piece measures 24-26-29 (34-39) cm from marker. Now cast off the middle 18-22-24 (26-30) sts for neck and complete each side separately. Cast off 1 st on neckline on next row = 6-7-10 (13-13) sts left on shoulder. Piece now measures approx 25-27-30 (35-40) cm from marker. Slip sts on a stitch holder. FRONT PIECE: = 50-56-64 (72-76) sts. Continue back and forth on needle in double moss st, AT THE SAME TIME cast off for armhole as described for back piece = 32-38-46 (54-58) sts. Now work M.2 on all sts. After 1 vertical repeat of M.2 continue in double moss st until piece measures approx 21-22-25 (29-34) cm from marker. Now cast off the middle 10-14-16 (18-22) sts for neck and complete each side separately. RIGHT SHOULDER: = 11-12-15 (18-18) sts. Continue in double moss st. AT THE SAME TIME cast off to shape the neckline at the beg of every row from mid front: 2 sts 2 times and 1 st 1 time = 6-7-10 (13-13) sts left on shoulder. Continue until piece measures 25-27-30 (35-40) cm. Slip sts on a stitch holder. LEFT SHOULDER: Like right shoulder. NECKLINE: Pick up 48 to 64 sts (divisible by 4) from RS round neck on front piece on circular needle size 2.5 mm. K 1 row from WS and continue as follows from RS: 1 GARTER ST – see above, * K2, P2 *, repeat from *-* and finish with K2 and 1 garter st. Continue like this back and forth on needle until neckline measures 2-2-2 (3-3) cm. Cast off with K over K and P over P. Pick up 32 to 48 sts (divisible by 4) from RS round neck on back piece. K 1 row from WS and continue as follows from RS: 1 garter st, * K2, P2 *, repeat from *-* and finish with K2 and 1 garter st. Continue like this back and forth on needle until neckline measures 2-2-2 (3-3) cm. Cast off with K over K and P over P. EDGE ROUND ARMHOLE: Beg by shoulder. Pick up 52 to 84 sts (divisible by 4) from RS round armhole on circular needle size 2.5 mm. K 1 row from WS and continue as follows from RS: 1 garter st, * K2, P2 *, repeat from *-* and finish with K2 and 1 garter st. Continue like this back and forth on needle until edge measures 2-2-2 (3-3) cm. Cast off with K over K and P over P. BUTTON BAND FRONT PIECE: Right shoulder: Pick up 6-6-6 (8-8) sts inside 1 garter st on neckline on circular needle size 2.5 mm, work the 6-7-10 (13-13) sts from stitch holder on shoulder back on needle and then pick up 6-6-6 (8-8) sts inside 1 garter st on armhole edge = 18-19-22 (29-29) sts. K 1 row from WS, AT THE SAME TIME inc 2-1-2 (3-3) sts evenly = 20-20-24 (32-32) sts. Continue as follows from RS: 1 garter st, * K2, P2 *, repeat from *-* and finish with K2 and 1 garter st. Continue like this until edge measures approx 1 cm. Now make buttonholes as follows (from RS): 1 garter st, K2, P2, K2 tog, 1 YO, P2, * K2, P2 *, repeat from *-* until 7 sts remain, 1 YO, K2 tog, P2, K2 and 1 garter st. Continue in rib as before until edge measures 2 to 3 cm. Cast off with K over K and P over P. Left shoulder: Like right shoulder. BUTTON EDGE BACK PIECE: Work edge for 2-3 cm on each shoulder as described for front piece, but WITHOUT buttonholes. ASSEMBLY: Sew buttons on shoulders. --------------------------------------------------------------------- BOOTIE: Worked back and forth on needle from mid back. Cast on 122-122-134 (134-146) sts (includes 1 edge st each side) on needle size 2.5 mm with Baby Merino. P 1 row from WS and work 2 rows rib P3/K9 with 1 edge st each side. On next row dec all K9 to K7 as follows (work all P3 and 1 edge st each side as before): slip 1 st as if to K, K1, psso, K sts in K-section until 2 sts remain, K2 tog = 102-102-112 (112-122) sts. Work 1 row with K over K and P over P. On next row dec all K7 to K5 in the same way as before = 82-82-90 (90-98) sts. Work 1 row with K over K and P over P. On next row dec all K5 to K3 in the same way as before = 62-62-68 (68-74) sts. Work 1 row with K over K and P over P. On next row dec all K3 to K1 as follows (work all P3 and 1 edge st each side as before): slip 1 st as if to K, K2 tog, psso = 42-42-46 (46-50) sts. Now continue in rib P3/K1 with 1 edge st each side until piece measures 5-6-6 (7-7) cm - adjust to a row from WS. P 1 row from WS, AT THE SAME TIME dec 7-3-7 (3-7) sts evenly = 35-39-39 (43-43) sts. K 6 rows on all sts. Now slip 12-12-12 (16-16) sts each side on stitch holders = 11-15-15 (11-11) sts left on needle (= upper foot). Work 4-4.5-5 (6-8) cm rib on these sts as follows (as seen from RS): * P3, K1 *, repeat from *-* and finish with P3. Now pick up 10-11-13 (16-21) sts each side of upper foot and slip sts from stitch holders back on needle = 55-61-65 (75-85) sts in total. Continue K these sts back and forth on needle from mid back - AT THE SAME TIME after 1.5-2.5-3 (3-4) cm dec as follows: K2 tog at the beg and end of row and each side of the middle st. Repeat the dec on every other row until piece measures 3-4-5 (5-6) cm from where sts were picked up. Cast off and sew seam under foot in outer loops of sts. Sew seam up along rib mid back inside 1 edge st. |
|||||||
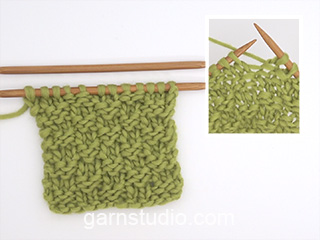
Diagram explanations |
|||||||
|
|||||||
Have you made this or any other of our designs? Tag your pictures in social media with #dropsdesign so we can see them! Do you need help with this pattern?You'll find tutorial videos, a Comments/Questions area and more by visiting the pattern on garnstudio.com. © 1982-2024 DROPS Design A/S. We reserve all rights. This document, including all its sub-sections, has copyrights. Read more about what you can do with our patterns at the bottom of each pattern on our site. |
With over 40 years in knitting and crochet design, DROPS Design offers one of the most extensive collections of free patterns on the internet - translated to 17 languages. As of today we count 304 catalogues and 11422 patterns - 11422 of which are translated into English (UK/cm).
We work hard to bring you the best knitting and crochet have to offer, inspiration and advice as well as great quality yarns at incredible prices! Would you like to use our patterns for other than personal use? You can read what you are allowed to do in the Copyright text at the bottom of all our patterns. Happy crafting!
Comments / Questions (38)
Julia wrote:
Hallo, ich habe gleich mal eine Basisfrage. Was bedeuten die Sternchen in der Anleitung? :) Vielen Dank
26.10.2013 - 19:31Malin answered:
Sternchen bedeutet: von Sternchen bis Sternchen wiederholen!
26.10.2013 - 21:18Anna Kumpulainen wrote:
I knitted size 1/3 and needed almost 150 g of yarn. 100 g as advised in the instructions was indeed not enough!
24.07.2013 - 14:25Hnixon wrote:
Just completed this dress 2nd size. And teamed it with 20-14 jacket , it looks fantastic!
18.04.2013 - 18:30Nashwaahmed wrote:
Well hello there, i have a question considering this dress its my first time to work something in the round and till now it's going pretty well but when i reached the casting off for arm holes one stitch remained at the end of the round so how should i do this part ? thank you :)
09.04.2013 - 14:36DROPS Design answered:
Dear Mrs Nashwaahmed, after casting off your 6 sts for armholes, you should have 50-56-64 (72-76)sts (see size) for front + for back piece.
09.04.2013 - 15:28Cristina wrote:
En tegelijkertijd 36 st minderen.waar en hoe moet ik minderen?de techniek weet ik wel maar hoe moet ik die 36 st mind?
09.03.2013 - 12:24DROPS Design answered:
U mindert ze verdeeld over de naald. Hier mindert u 36 st van de 168 st, dus minder zo dat u 132 st overhoudt.
15.03.2013 - 08:37Cristina wrote:
Wat recht boven recht en av boven av betekend?
09.03.2013 - 12:19DROPS Design answered:
Je breit recht boven een recht st en av boven een av steken.
12.03.2013 - 21:33Suzanne wrote:
I'm having trouble picking up enough stitches around the front neckline. I'm knitting the 1-3 mos size. I can only get 24, which is nowhere near the minimum 48 I'm supposed to get! Has anyone else had this problem? My gauge is otherwise fine.
05.03.2013 - 14:59DROPS Design answered:
Dear Suzanne, To get more sts, you can pick stitch from front and back loop of stitch, meaning you pick up 2 sts from one st. Happy knitting!
05.03.2013 - 19:27Carla wrote:
Is het garen Drops Safran geschikt voor dit model. Ik ben hier mee aan het werk geweest, maar liep direct vast doordat de laatste 12 steken gebreid moeten worden als volgt: 10 recht 2 averecht. Ik kom niet uit op 10 recht, 2 averecht. Hoe kan dit? Dan loopt volgens mij het patroon niet door. Kunt u mij helpen Bedankt
28.12.2012 - 22:21DROPS Design answered:
Je kan Drops Safran gebruiken voor dit model, maar let op de stekenverhouding en dat Safran is een katoenen garen en het model is gemaakt in wol. Het zal dan minder elastisch zijn. Je begint met 2 av en eindigt met 2 averecht, dan loopt het motief door.
29.12.2012 - 14:41DROPS Deutsch wrote:
Die Anleitung stimmt so. 392 M. - 224 (4 x 56 M. (28 rapporte re.-Partien) = 168 Maschen.
31.12.2011 - 19:14Canan wrote:
Ich arbeite gerade die kleinste Grösse, habe aber eine Frage gleich beim Anfang. Nach den Abnahmen müssen 168-M übrig bleiben. Bei mir sind aber 140 M übrig. Obwohl ich auch 4Xje 2 M abgenommen habe, und bei der letzten Reihe noch die restlichen 2 M. zusammenstrickte. Die 4 Linke M sind immer gleich geblieben.
26.12.2011 - 15:29