DROPS Alpaca
DROPS Alpaca
100% Alpaca
from 4.85 $ /50g
Get the yarn to make this pattern from 48.50$.

The yarn cost is calculated from the pattern’s smallest size and the yarn’s cheapest product type. Looking for an even better price? You might find it on the DROPS Deals!

DROPS SS24

Marit

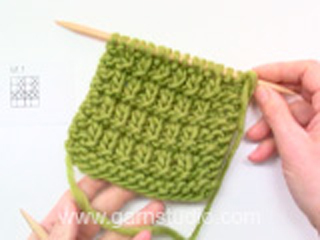
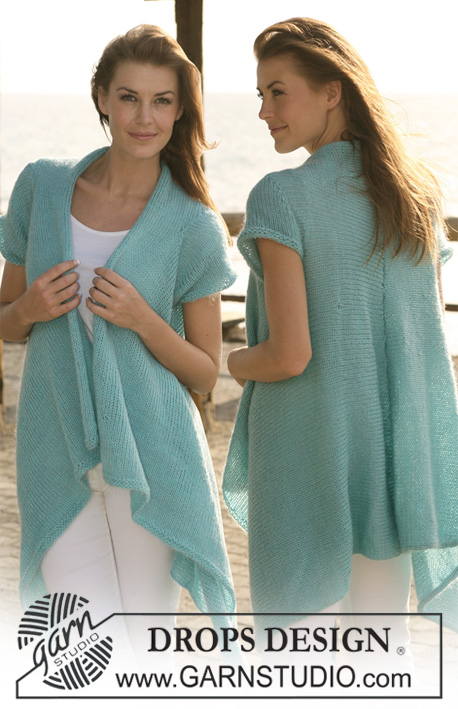
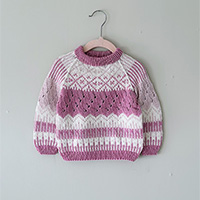
Knitted DROPS jacket with textured pattern and collar in 2 threads ”Alpaca”. Size S - XXXL.

DROPS 119-6
DROPS design: Pattern no Z-472
--------------------------------------------------------
Size: S - M - L - XL - XXL - XXXL
Finished measurements:
Bust: 78-88-94-106-116-130 cm / 30¾"-34⅝"-37"-41¾"-45¾"-51"
Full length: 54-56-58-60-62-64 cm / 21¼"-22"-22¾"-23⅝"-24⅜"-25¼"

Materials: DROPS ALPACA from Garnstudio
color no 7120, light grayish green: 500-600-650-700-750-850 g

DROPS DOUBLE POINTED NEEDLES and
CIRCULAR NEEDLE (80 cm / 32") size 4.5 mm/US 7 – or size needed to get 18 sts x 23 rows in pattern with 2 threads Alpaca = 10 x 10 cm / 4" x 4".

DROPS MOTHER OF PEARL BUTTONS W/HOLE, no 522: 3 pcs.

-------------------------------------------------------

Alternative Yarn – See how to change yarns here
Yarn Groups A to F – Use the same pattern and change the yarn here
Yarn usage using an alternative yarn – Use our yarn converter here

-------------------------------------------------------

DROPS Alpaca
DROPS Alpaca
100% Alpaca
from 4.85 $ /50g
Get the yarn to make this pattern from 48.50$.

The yarn cost is calculated from the pattern’s smallest size and the yarn’s cheapest product type. Looking for an even better price? You might find it on the DROPS Deals!

Pattern instructions

NOTE: This pattern is written in American English. All measurements in charts are in cm. For conversion from inches to cm - click here. There are different terms for crocheting in American and British English. If this pattern includes crochet, click for "crochet terms" here. For this pattern in British English, please click here.
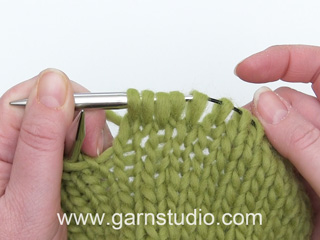
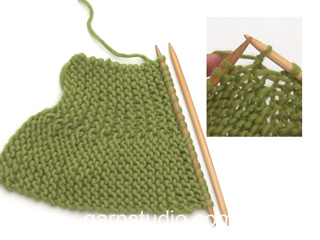
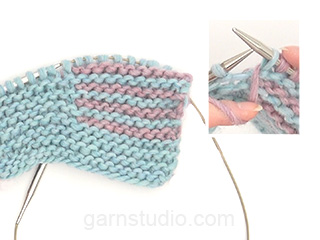
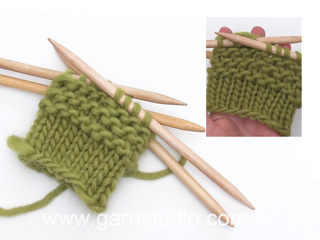
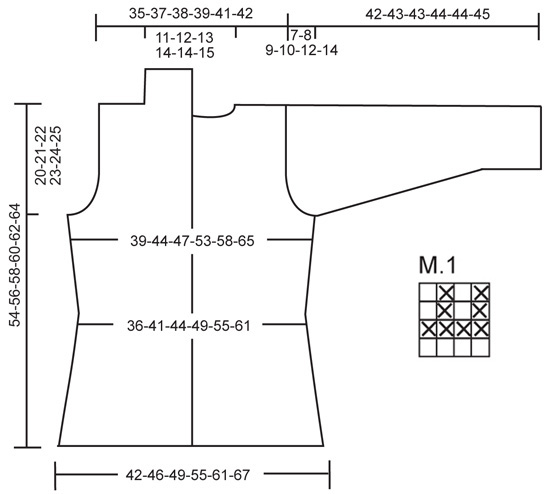
GARTER ST (back and forth on needle): K all rows.

GARTER ST (in the round): K 1 round, P 1 round.

PATTERN: See diagram M.1. Diagram shows the pattern from RS.

BUTTONHOLES:
Make buttonholes on right front band.
1 buttonhole = bind off 3rd front band st from mid front and cast on 1 new st on return row. Make buttonholes when piece measures:
SIZE S, M, L: 14, 21 and 28 cm / 5½", 8¼" and 11".
SIZE XL, XXL, XXXL: 15, 22 and 29 cm / 6", 8¾" and 11⅜".
--------------------------------------------------------
--------------------------------------------------------

BODY PIECE:
Worked back and forth on circular needle from mid front. Cast on 163-179-193-211-233-257 sts on circular needle size 4.5 mm / US 7 with 2 threads Alpaca. Insert a marker 44-48-52-56-62-68 sts in from each side (back piece = 75-83-89-99-109-121 sts). Work 4 rows GARTER ST – SEE ABOVE, and continue as follows from RS: 6 garter sts, M.1 on the next 29-33-37-41-47-53 sts, 18 garter sts (marker sits in the middle of these sts), M.1 on the next 57-65-71-81-91-103 sts, 18 garter sts (marker sits in the middle of these sts), M.1 on the next 29-33-37-41-47-53 sts, and finish with 6 garter sts. REMEMBER THE GAUGE! Continue in pattern like this, AT THE SAME TIME when piece measures 5 cm / 2" dec 1 st each side of garter sts each side by K2 tog, repeat the dec on every 2.5 cm / ⅞" a total of 5 times = 143-159-173-191-213-237 sts. Remember BUTTONHOLES on right front band – SEE ABOVE!! When piece measures 20 cm / 8" inc 1 st each side of garter sts each side, and repeat the inc on every 6-6-6-7-7-7 cm / 2⅜"-2⅜"-2⅜"-2¾"-2¾"-2¾" a total of 3 times = 155-171-185-203-225-249 sts. AT THE SAME TIME when piece measures 28-28-28-29-29-29 cm / 11"-11"-11"-11⅜"-11⅜"-11⅜" work 1 st from M.1 into front band (i.e. number of sts remain the same but no of garter sts on front band inc and no of sts in M.1 dec), and repeat this on every 2 cm / ¾" a total of 10-11-13-13-14-15 times (= 16-17-19-19-20-21 garter sts on front band). Continue in M.1 and garter st until piece measures 34-35-36-37-38-39 cm / 13⅜"-13¾"-14¼"-14½"-15"-15¼". Now bind off 6 sts each side for armhole (= 3 sts each side of marker) and complete each piece separately.

BACK PIECE:
= 65-73-79-89-99-111 sts. Continue in M.1 on all sts. Bind off for armhole each side at the beg of every row: 2 sts 0-1-2-3-4-6 times and 1 st 0-1-1-3-5-6 times = 65-67-69-71-73-75 sts. When piece measures 52-54-56-58-60-62 cm / 20½"-21¼"-22"-22¾"-23⅝"-24⅜" bind off the middle 17-19-21-23-23-25 sts for neck and complete each shoulder separately. Bind off 1 st on neckline on next row = 23-23-23-23-24-24 sts left on shoulder. Bind off when piece measures 54-56-58-60-62-64 cm / 21¼"-22"-22¾"-23⅝"-24⅜"-25¼".

LEFT FRONT PIECE:
Continue with garter st on front band and M.1 on remaining sts. Bind off for armhole at the side as described for back piece = 39-40-42-42-44-45 sts. When piece measures 54-56-58-60-62-64 cm / 21¼"-22"-22¾"-23⅝"-24⅜"-25¼" bind off the first 23-23-23-23-24-24 sts from RS for shoulder = 16-17-19-19-20-21 sts left on collar. Work remaining sts on row. Now work shortened rows on collar (with start from WS) as follows: * 2 rows on the first 8-8-8-9-9-10 sts only, 2 rows on all sts *, repeat from *-* until collar measures approx 6-6-7-7-8-8 cm / 2½"-2½"-2¾"-2¾"-3"-3" on the shorter side (measured from shoulder). Bind off.

RIGHT FRONT PIECE:
Like left front piece, but mirrored.

SLEEVE:
Worked in the round on double pointed needles. Cast on 44-46-48-50-52-54 sts on double pointed needles size 4.5 mm / US 7 with 2 threads Alpaca. Insert a marker at beg of round = mid under sleeve. Work 8 rows GARTER ST – SEE ABOVE, and continue in M.1 on all sts. When piece measures 5 cm / 2" inc 1 st each side of marker, and repeat the inc on every 3-2.5-2-2-1.5-1.5 cm / 1⅛"-⅞"-¾"-¾"-½"-½" a total of 9-11-12-14-15-16 times = 62-68-72-78-82-86 sts. Incorporate inc sts in M.1 as you go along. When piece measures 35-35-34-34-32-31 cm / 13¾"-13¾"-13⅜"-13⅜"-12½"-12¼" - NOTE! Less for the larger sizes because of longer sleeve cap and wider shoulder – bind off for sleeve cap each side at the beg of every row: 3 sts 1 time, 2 sts 3 times, 1 st 0-1-2-4-5-7 times, then 2 sts each side until piece measures 41-42-42-43-43-44 cm / 16⅛"-16½"-16½"-17"-17"-17¼", now bind off 3 sts 1 time each side and bind off remaining sts. Piece measures approx 42-43-43-44-44-45 cm / 16½"-17"-17"-17¼"-17¼"-17¾".

ASSEMBLY:
Sew shoulder seams. Set in sleeves. Sew collar tog mid back and sew to neckline on back piece. Sew on buttons.

Diagram

All measurements in charts are in cm.

symbols = K from RS, P from WS
symbols = P from RS, K from WS
diagram
Do you have a question? See a list of frequently asked questions (FAQ)

Knitting tension is what determines the final measurements of your work, and is usually measured per 10 x 10 cm. It is provided like so: number of stitches in width x number of rows in height - eg: 19 stitches x 26 rows = 10 x 10 cm.

The knitting tension is very individual; some people knit/crochet loosely while others work tightly. You adjust the knitting tension with the needle size, which is why the suggested needle size only serve as a guide! You need to adjust this (up or down) to ensure that YOUR knitting tension matches the knitting tension provided in the pattern. If you work with a different knitting tension than provided you will have a different yarn consumption, and your work will have different measurements than what the pattern suggests.

The knitting tension also determines which yarns can replace each other. As long as you achieve the same knitting tension you can replace one yarn with another.

See DROPS lesson: How to measure your tension/gauge

See DROPS video: How to make a gauge tension swatch

The required amount of yarn is provided in grams, eg: 450 g. To calculate how many balls you’ll need you first need to know how many grams are in 1 ball (25g, 50g or 100g). This information is available if you click on the individual yarn quality on our pages. Divide the amount required with the amount of each ball. For example, if each ball is 50g (the most common amount), the calculation will be as follows: 450 / 50 = 9 balls.

The important thing when changing from one yarn to another is that the knitting/crochet tension remains the same. This is so that the measurements of the finished piece will be the same as on the sketch provided. It is easier to achieve the same knitting tension using yarns from the same yarn group. It is also possible to work with multiple strands of a thinner yarn to achieve the knitting tension of a thicker one. Please try our yarn converter. We recommend you to always work a test swatch.

Please NOTE: when changing yarn the garment might have a different look and feel to the garment in the photo, due to individual properties and qualities of each yarn.

See DROPS lesson: Can I use a different yarn than the one mentioned in the pattern?

All our yarns are categorised into yarn groups (from A to F) according to thickness and knitting tension – group A contains the thinnest yarns and group F the thickest. This makes it easier for you to find alternative yarns to our patterns, should you wish to switch yarn. All yarns within the same group have a similar knitting tension and can easily replace each other. However, different yarn qualities have different structures and properties which will give the finished work a unique look and feel.

Click here for an overview of the yarns in each yarn group

At the top of all our patterns you’ll find a link to our yarn converter, which is a helpful tool should you wish to use a different yarn than suggested. By filling in the yarn quality you wish to replace, the amount (in your size) and number of strands, the converter will present good alternative yarns with the same knitting tension. Additionally it will tell you how much you’ll require in the new qualities and whether you’ll need to work with multiple strands. Most skeins are 50g (some are 25g or 100g).

If the pattern is worked with multiple colours, every colour will have to be converted separately. Similarly, if the pattern is worked with several strands of different yarns (for example 1 strand Alpaca and 1 strand Kid-Silk) you will have to find alternatives for each, individually.

Click here to see our yarn converter

Since different yarns have different qualities and textures we have chosen to keep the original yarn in our patterns. However, you can easily find options among our available qualities by using our yarn converter, or simply pick a yarn from the same yarn group.

It is possible that some retailers still have discontinued yarns in stock, or that someone has a few skeins at home that they would like to find patterns for.

The yarn converter will provide both alternative yarn as well as required amount in the new quality.

If you think it's hard to decide what size to make, it can be a good idea to measure a garment you own already and like the size of. Then you can pick the size by comparing those measures with the ones available in the pattern's size chart.

You'll find the size chart at the bottom of the pattern.

See DROPS lesson: How to read size chart

The needle size provided in the pattern serves only as a guide, the important thing is to follow the knitting tension. And since knitting tension is very individual, you will have to adjust the needle size to ensure that YOUR tension is the same as in the pattern – maybe you’ll have to adjust 1, or even 2 needle sizes, up or down to achieve the correct tension. For this, we recommend that you work test swatches.

Should you work with a different knitting tension than the one provided, the measurements of the finished garment might deviate from the measurement sketch.

See DROPS lesson: How to measure your tension/gauge

See DROPS video: How to make a gauge tension swatch

Working a garment top-down provides more flexibility and room for personal adjustment. For example it is easier to try the garment on while working, as well as making adjustments to length of yoke and shoulder caps.

The instructions are carefully explaining every step, in the correct order. Diagrams are adjusted to the knitting direction and are worked as usual.

The diagram depicts all rows/rounds, and every stitch seen from the right side. It is read from bottom to top, from right to left. 1 square = 1 stitch.

When working back and forth, every other row is worked from the right side and every other row is worked from the wrong side. When working from the wrong side, the diagram will have to be worked reversed: from left to right, knit stitches are purled, purl stitches are knit etc.

When working in the round every round is worked from the right side and the diagram are worked from right to left on all rounds.

See DROPS lesson: How to read knitting diagrams

The diagram depicts all rows/rounds, and every stitch seen from the right side. It is worked from bottom to top, from right to left.

When working back and forth every other row is worked from the right side: from right to left and every other row is worked from the wrong side: from left to right.

When working in the round, every row in the diagram are worked from the right side, from right to left.

When working a circular diagram you start in the middle and work your way outwards, counter clockwise, row by row.

The rows usually start with a given number of chain stitches (equivalent to the height of the following stitch), this will either be depicted in the diagram or explained in the pattern.

See DROPS lesson: How to read crochet diagrams

Instructions for working several diagrams after each other on the same row/round, will often be written like so: “work A.1, A.2, A.3 a total of 0-0-2-3-4 times". This means you work A.1 once, then A.2 is worked once, and A.3 is repeated (in width) the number of times provided for your size – in this case like so: S = 0 times, M = 0 times, L=2 times, XL= 3 times and XXL = 4 times.

The diagrams are worked as usual: begin with the first row in A.1, then work the first row in A.2 etc.

See DROPS lesson: How to read knitting diagrams

See DROPS lesson: How to read crochet diagrams

The total width of the garment (from wrist-to-wrist) will be larger in the larger sizes, despite the actual sleeves being shorter. The larger sizes have longer sleeve caps and wider shoulders, so there will be a good fit in all sizes.

The measurement sketch/schematic drawing provides information regarding the full length of the garment. If it’s a jumper or a jacket the length is measured from the highest point on the shoulder (usually closest to the neckline), and straight down to the bottom of the garment. It is NOT measured from the tip of shoulder. Similarly, the length of yoke is measured from the highest point on the shoulder and down to where yoke is split into body and sleeves.

See DROPS lesson: How to read a schematic drawing

Diagrams are often repeated on the round or in height. 1 repeat is the diagram the way it appears in the pattern. If it says to work 5 repeats of A.1 in the round, then you work A.1 a total of 5 times after/next to each other in the round. If it says to work 2 repeats of A.1 vertically/in height you work the entire diagram once, then begin again at the start and work the entire diagram one more time.

Chain stitches are slightly narrower than other stitches and to avoid working the cast-on edge too tight, we simply chain more stitches to begin with. The stitch count will be adjusted on the following row to fit the pattern and measurement sketch.

The rib edge is more elastic and will contract slightly compared to, for example, stocking stitch. By increasing before the rib edge, you avoid a visible difference in width between the rib edge and the rest of the body.

It’s very easy to cast off too tightly, and by making yarn overs while casting off (and simultaneously casting these off) you avoid a too tight cast off edge.

See DROPS video: How to bind off with yarn overs (yo)

To achieve an even increase (or decrease) you can increase on, for example: every 3rd and 4th row alternately, like so: work 2 rows and increase on the 3rd row, work 3 rows and increase on the 4th. Repeat this until the increase is complete.

See DROPS lesson: Increase or decrease 1 st on every 3rd and 4th row alternately

Should you prefer to work in the round instead of back and forth, you may of course adjust the pattern. You’ll need to add steeks mid-front (usually 5 stitches), and follow the instructions. When you would normally turn and work from the wrong side, simply work across the steek and continue in the round. At the end you’ll cut the piece open, pick up stitches to work bands, and cover the cut edges.

See DROPS video: How to knit steeks and cut open

Should you prefer to work back and forth instead of in the round, you may of course adjust the pattern so you work the pieces separately and then assemble them at the end. Divide the stitches for the body in 2, add 1 edge stitch in each side (for sewing) and work the front and back pieces separately.

See DROPS lesson: Can I adapt a pattern for circular needles into straight needles?

Pattern repeats can vary slightly in the different sizes, in order to get the correct proportions. If you’re not working the exact same size as the garment in the photo, yours might deviate slightly. This has been carefully developed and adjusted so that the complete impression of the garment is the same in all sizes.

Make sure to follow instructions and diagrams for your size!

If you have found a pattern you like which is available in women’s size it’s not very difficult to convert it to men’s size. The biggest difference will be the length of sleeves and body. Start working on the women size that you think would fit across the chest. The additional length will be worked right before you cast off for the armhole/sleeve cap. If the pattern is worked top-down you can add the length right after the armhole or before the first decrease on sleeve.

Regarding additional yarn amount, this will depend on how much length you add, but it is better with a skein too many than too few.

All yarns will have excess fibres (from production) that might come off as lint or shedding. Brushed yarns (ie hairier yarns) have more of these loose, excess fibres, causing more shedding.

Shedding also depends on what is worn under or over the garment, and whether this pulls at the yarn fibres. It’s therefore not possible to guarantee that there will be no shedding

Below are some tips on how to get the best result when working with hairier yarns:

1. When the garment is finished (before you wash it) shake it vigorously so the looser hairs come off. NOTE: do NOT use a lint roller, brush or any method that pulls at the yarn.

2. Place the garment in a plastic bag and put it in your freezer - the temperature will cause the fibres to become less attached to each other, and excess fibres will come off easier.

3. Leave in the freezer for a few hours before taking it out and shaking it again.

4. Wash the garment according to the instructions on the yarn label.

Pilling is a natural process that happens to even the most exclusive of fibers. It's a natural sign of wear and tear that is hard to avoid, and that is most visible in high friction areas of your garment like a sweater's arms and cuffs.

You can make your garment look as new by removing the pilling, using a fabric comb or a pill/lint remover.

Still can't find the answer you need? Then scroll down and leave your question so one of our experts can try to help you. This will be done normally within 5 to 10 working days.
In the meantime, you can read the questions and answers that others have left to this pattern or join the DROPS Workshop on Facebook to get help from fellow knitters/crocheters!

You might also like...

Post a comment to pattern DROPS 119-6

We would love to hear what you have to say about this pattern!

If you want to leave a question, please make sure you select the correct category in the form below, to speed up the answering process. Required fields are marked *.

Comments / Questions (161)

country flag Christine wrote:

Bonjour j'aimerais savoir si les diminution de ce modèle se font sur le côté (sur les 18m en mousse ) ou sur le tour de l ouvrage Merci

16.12.2020 - 22:19

DROPS Design answered:

Bonjour Christine, les diminutions et les augmentations se font au début et à la fin des sections au point mousse des côtés, autrement dit, c'est le nombre de mailles au point mousse de chaque côté qui va diminuer puis augmenter. Bon tricot!

17.12.2020 - 08:53

country flag Ann wrote:

Vad gäller stickfastheten så får jag 10 cm på 18 maskor som man ska men på 23 varv får jag endast 9 cm och inte 10 cm som man ska. Vad kan jag göra för att åtgärda det? Är det något jag kan ändra på i hur jag stickar, om jag stickar lösare lär väl bredden bli större än 10 cm för 18 maskor, eller? Med vänlig hälsning Ann

12.12.2020 - 22:58

DROPS Design answered:

Hej Ann. Ja stickar du lösare så kommer du antagligen få fler maskor på bredden. Det är viktigare att maskantalet stämmer på bredden än höjden och i detta mönster när det inte är raglan så bör det gå fint ändå. Se bara till att följa de mått som uppges på höjden. Mvh DROPS Design

15.12.2020 - 12:18

country flag Ann wrote:

Hej, M1. innehåller 4 maskor men det antal maskor på bakstycket respektive framstyckena som mönstret ska stickas över är inte jämnt delbart med 4. Hur ska man hantera det? Ska man bara göra en del av M.1s fyra maskor på slutet innan man går över till rätstickningsdelen?

10.12.2020 - 22:41

DROPS Design answered:

Hej Ann. Ja precis, då stickar du så många maskor du får plats med av M.1 sista gången. Mvh DROPS Design

11.12.2020 - 12:31

country flag Sandrine wrote:

Pour ce modèle vous indiquez des aiguilles 4,5 et 12 pelotes pour une taille L mais sur la pelote est indiqué des aiguilles 3,5 et 8 pelotes pour une taille 38/40 Je souhaite allonger les manches à 66cms, combien de pelotes dois-je commander ? D’avance merci

30.11.2020 - 22:32

DROPS Design answered:

Bonjour Sandrine, en taille L il faut 650 g/50 g la pelote DROPS Alpaca = 13 pelotes; en taille M, il vous faut 600 g / 50 g = 12 pelotes - nous ne sommes malheureusement pas en mesure de pouvoir adapter chacun de nos modèles à chaque demande, votre magasin DROPS saura vous conseiller - même par mail ou téléphone. Merci pour votre compréhension. Bon tricot!

01.12.2020 - 09:24

country flag Delrieu Bernadette wrote:

Bonjour je voulais savoir pour les diminutions elle se font sur les mailles en point mousse ou sur le M1

20.11.2020 - 16:04

DROPS Design answered:

Bonjour Mme Delrieu, c'est la partie point mousse qui va diminuer et augmenter, par la partie tricoté en point fantaisie M.1. Bon tricot!

20.11.2020 - 16:21

country flag Joanna Delabays wrote:

Bonjour, J'ai essayé de faire un échantillon avec les aig. 4,5 puis 5 , mais il reste trop petit 9x6. L'échantillon se fait bien en point fantaisie? Merci pour votre réponse.

06.10.2020 - 08:43

DROPS Design answered:

Bonjour Mme Delabays, tout à fait, l'échantillon se tricote en point fantaisie du diagramme M.1 et doit mesurer 10 x 10 cm avec 18 m x 23 rangs. Vous pouvez laver votre échantillon et le mesurer de nouveau après séchage - et recommencer avec des aiguilles plus grosses si besoin - plus d'infos sur l'échantillon ici. Bon tricot!

06.10.2020 - 11:26

country flag Monika wrote:

Hallo! Ich wundere mich über die Maschenzahlen. In Größe XXL werden 233 M angeschlagen. Dann nimmt man 10M ab und soll dann 213 M haben? Dann soll man 6 M aufnehmen und 225 M haben? Diese Rechnung verstehe ich nicht. Könnten Sie das erklären? Bei der angegebenen Maschenprobe kommt man mit dieser Maschenzahl nicht auf die richtige Größe. Oder liegt ein Fehler in der Anleitung vor? Ich habe es für mich jetzt selber gerechnet und es passt ganz genau. Danke für Ihre Antwort.

06.05.2020 - 17:32

DROPS Design answered:

Liebe Monika, es wird zuerst 10 Maschen auf beiden Seiten abgenommen (= 1 Masche beidseitig von den beiden Partien die krausrechts gestrickt sind = 4 Abnahmen/Reihe), dh 20 Maschen werden insgesamt abgenommne = 213 M sind noch übrig, dann nehmen Sie 3 Mal 4 Maschen (1 Masche beidseitig von den beiden Partie die krausrechts gestrickt sind = 4 Zunamen) = 213-12= 225 Maschen. Viel Spaß beim stricken!

07.05.2020 - 09:27

country flag Birgit Thiele wrote:

Ich habe sehr lange herumgerechnet, um die Maschenzahl für meine Wolle umzurechnen. Dabei habe ich festgestellt, dass bei der vorgegebenen Maschenprobe 18 M für 10cm angegeben sind. In Größe L werden 193 M angeschlagen, dies entspricht dann aber 107cm. In der Zeichnung sind für Größe L aber nur 98 cm angegeben. Außerdem sind die Maschenanzahlen für Muster 1 nie durch 4 teilbar, die man für ein jeweiliges Muster braucht. Wie kann das sein?

16.03.2020 - 23:01

DROPS Design answered:

Liebe Frau Thiele, vergessen Sie die Blendemaschen nicht, es sind 89 Maschen für den Rückenteil bei Größe L dh ca 49 cm mit 18 M = 10 cm. Wenn Sie das Muster über 37 Maschen stricken Sollen, wiederholen Sie 9 Mal die 4 Maschen = 36 M und stricken dann die 1. Masche in M.1, so ist das Muster symetrisch. Viel Spaß beim stricken!

17.03.2020 - 10:13

country flag Albano wrote:

Est il possible de tricoter ce modèle en baby merino ? Si oui, combien faut il de pelotes pour la taille L ? Merci d'avance pour vos conseils . Marie

25.01.2020 - 08:33

DROPS Design answered:

Bonjour Marie, BabyMerino et Alpaca appartiennent au même groupe, vous pouvez ainsi tricoter ce modèle avec 2 fils BabyMerino au lieu de 2 fils Alpaca - utilisez notre convertisseur pour connaître la quantité nécessaire. Bon tricot!

27.01.2020 - 08:12

country flag Maritha Magnusson wrote:

Hej igen. En sista fråga tror jag. Hur många maskor ungefär finns på stickan när ärmen är 43 cm (storlek M)och den sista avmaskningen ska göras. Tack!

05.11.2019 - 22:00

DROPS Design answered:

Hei Maritha. Det er det ikke beskrevet, man må bare følge nøye med på de fellingen som er beskrevet og overholde strikkefastheten, så skal mål og maskeantallet stemme. God Fornøyelse!

11.11.2019 - 10:02