DROPS Puddel
DROPS Puddel
94% Mohair, 6% Polyester
Discontinued
find alternatives
DROPS Super Sale

Bouclette

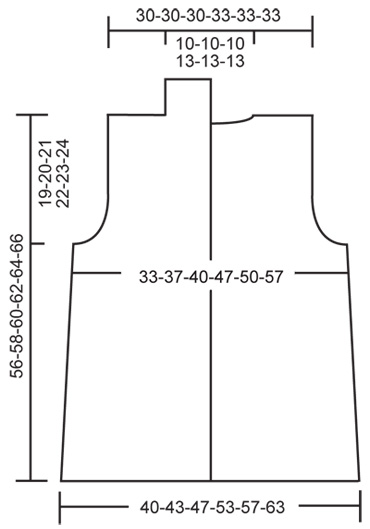
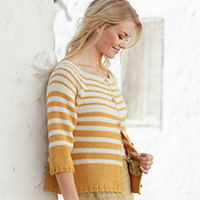
Knitted DROPS sleeveless top in garter st in 2 threads Puddel or 4 threads Alpaca Boucle. Size S-XXXL.

DROPS 115-29
DROPS design: Pattern no V-044.

Size: S - M - L - XL - XXL - XXXL
Materials: DROPS PUDDEL from Garnstudio
300-350-350-400-450-450 g colour no 07 medium grey

Or use:
DROPS ALPACA BOUCLE from Garnstudio
250-250-300-300-350-350 g colour no 5110 light grey

DROPS CIRCULAR NEEDLE (80 cm) size 15 mm – or size needed to get 6 sts x 9 rows in stocking st with 2 threads Puddel og 4 threads Alpaca Boucle = 10 x 10 cm.
DROPS Mother-of-Pearl buttons no 540: 1 pc.

-------------------------------------------------------

Alternative Yarn – See how to change yarns here
Yarn Groups A to F – Use the same pattern and change the yarn here
Yarn usage using an alternative yarn – Use our yarn converter here

-------------------------------------------------------

DROPS Puddel
DROPS Puddel
94% Mohair, 6% Polyester
Discontinued
find alternatives

Pattern instructions

NOTE: This pattern is written in British English. All measurements in charts are in cm. For conversion from cm to inches - click here. There are different terms for crocheting in British and American English. If this pattern includes crochet, click for "crochet terms" here. For this pattern in American English, please click here.
GARTER ST (back and forth on needle):
K all rows.
--------------------------------------------------------

BACK PIECE:
Worked back and forth on circular needle. Cast on 26-28-30-34-36-40 sts (includes 1 edge st each side) on circular needle size 15 mm with 2 threads Puddel or 4 threads Alpaca Boucle. Work 4 rows GARTER ST – see above. Insert 2 markers in piece, 7-8-9-10-11-13 sts in from each side (= 12-12-12-14-14-14 sts between markers). Continue in stocking st. REMEMBER THE KNITTING TENSION! When piece measures 15 cm dec 1 st on the outside (i.e. towards the sides) of both markers (= 2 dec sts per row) and repeat the dec when piece measures 30-31-32-33-34-35 cm = 22-24-26-30-32-36 sts. When piece measures 37-38-39-40-41-42 cm cast off for armhole each side at the beg of every row as follows: Size S-L: 2 sts 1 time, Size XL-XXXL: 3 sts 1 time (continue with 1 garter st towards the side with remaining sts in stocking st as before). All sizes: Cast off for armhole each side inside the garter st on every other row (i.e. every row from RS): 1 st 0-1-2-2-3-5 times = 18-18-18-20-20-20 sts. Continue in stocking st with 1 garter st each side. When piece measures 54-56-58-60-62-64 cm cast off the middle 6-6-6-8-8-8 sts for neck = 6 sts left on each shoulder. Work 2 rows on shoulder and cast off. Piece measures approx 56-58-60-62-64-66 cm.

LEFT FRONT PIECE:
Worked back and forth on circular needle.
Cast on 15-16-17-19-20-22 sts (includes 1 edge st at the side) with 2 threads Puddel or 4 threads Alpaca Boucle on circular needle size 15 mm. Work 4 rows garter st and continue as follows from RS: 8-9-10-11-12-14 stocking sts, 7-7-7-8-8-8 garter sts towards mid front. When piece measures 15 cm dec 1 st at the side, and repeat the dec when piece measures 30-31-32-33-34-35 cm = 13-14-15-17-18-20 sts. When piece measures 37-38-39-40-41-42 cm cast off for armhole at the side as described for back piece = 11-11-11-12-12-12 sts. When piece measures 42-44-44-46-48-50 cm inc 1 st inside the 7-7-7-8-8-8 garter st towards mid front (inc from RS). Repeat the inc when piece measures 49-51-52-53-55-58 cm = 13-13-13-14-14-14 sts. When piece measures 56-58-60-62-64-66 cm cast off 6 sts from shoulder towards neckline = 7-7-7-8-8-8 sts left on needle for collar. On next row from WS work shortened rows, back and forth on collar as follows: * 2 rows on all sts, 2 rows on 4 sts towards neckline only *, repeat from *-*. Cast off when collar measures 5-5-5-6-6-6 cm (measured at the shorter side from shoulder).

RIGHT FRONT PIECE:
Like left front piece, but mirrored.

ASSEMBLY:
Sew shoulder seams. Sew collar tog mid back and sew to neckline. Sew side seams inside 1 edge st. Sew button to left front piece 22- 23-24-25-26-27 cm from shoulder. Use st on right front band as buttonhole.

Diagram

diagram measurements
Do you have a question? See a list of frequently asked questions (FAQ)

Knitting tension is what determines the final measurements of your work, and is usually measured per 10 x 10 cm. It is provided like so: number of stitches in width x number of rows in height - eg: 19 stitches x 26 rows = 10 x 10 cm.

The knitting tension is very individual; some people knit/crochet loosely while others work tightly. You adjust the knitting tension with the needle size, which is why the suggested needle size is only meant as a guide! You need to adjust this (up or down) to ensure that YOUR knitting tension matches the knitting tension provided in the pattern. If you work with a different knitting tension than provided you will have a different yarn consumption, and your work will have different measurements than what the pattern suggests.

The knitting tension also determines which yarns can replace each other. As long as you achieve the same knitting tension you can replace one yarn with another.

See DROPS lesson: How to measure your tension/gauge

See DROPS video: How to make a gauge tension swatch

The required amount of yarn is provided in grams, eg: 450 g. To calculate how many balls you’ll need you first need to know how many grams are in 1 ball (25g, 50g or 100g). This information is available if you click on the individual yarn quality on our pages. Divide the amount required with the amount of each ball. For example, if each ball is 50g (the most common amount), the calculation will be as follows: 450 / 50 = 9 balls.

The important thing when changing from one yarn to another is that the knitting/crochet tension remains the same. This is so that the measurements of the finished piece will be the same as on the sketch provided. It is easier to achieve the same knitting tension using yarns from the same yarn group. It is also possible to work with multiple strands of a thinner yarn to achieve the knitting tension of a thicker one. Please try our yarn converter. We recommend you to always work a test swatch.

Please NOTE: when changing yarn the garment might have a different look and feel to the garment in the photo, due to individual properties and qualities of each yarn.

See DROPS lesson: Can I use a different yarn than the one mentioned in the pattern?

All our yarns are categorised into yarn groups (from A to F) according to thickness and knitting tension – group A contains the thinnest yarns and group F the thickest. This makes it easier for you to find alternative yarns to our patterns, should you wish to switch yarn. All yarns within the same group have a similar knitting tension and can easily replace each other. However, different yarn qualities have different structures and properties which will give the finished work a unique look and feel.

Click here for an overview of the yarns in each yarn group

At the top of all our patterns you’ll find a link to our yarn calculator, which is a helpful tool should you wish to use a different yarn than suggested. By filling in the yarn quality you wish to replace, the amount (in your size) and number of strands, the calculator will present good alternative yarns with the same knitting tension. Additionally it will tell you how much you’ll require in the new qualities and whether you’ll need to work with multiple strands. Most skeins are 50g (some are 25g or 100g).

If the pattern is worked with multiple colours, every colour will have to be calculated separately. Similarly, if the pattern is worked with several strands of different yarns (for example 1 strand Alpaca and 1 strand Kid-Silk) you will have to find alternatives for each, individually.

Click here to see our yarn calculator

Since different yarns have different qualities and textures we have chosen to keep the original yarn in our patterns. However, you can easily find options among our available qualities by using our yarn calculator, or simply pick a yarn from the same yarn group.

It is possible that some retailers still have discontinued yarns in stock, or that someone has a few skeins at home that they would like to find patterns for.

The yarn calculator will provide both alternative yarn as well as required amount in the new quality.

If you think it's hard to decide what size to make, it can be a good idea to measure a garment you own already and like the size of. Then you can pick the size by comparing those measures with the ones available in the pattern's size chart.

You'll find the size chart at the bottom of the pattern.

See DROPS lesson: How to read size chart

The needle size provided in the pattern serves only as a guide, the important thing is to follow the knitting tension. And since knitting tension is very individual, you will have to adjust the needle size to ensure that YOUR tension is the same as in the pattern – maybe you’ll have to adjust 1, or even 2 needle sizes, up or down to achieve the correct tension. For this, we recommend that you work test swatches.

Should you work with a different knitting tension than the one provided, the measurements of the finished garment might deviate from the measurement sketch.

See DROPS lesson: How to measure your tension/gauge

See DROPS video: How to make a tension/gauge swatch

Working a garment top-down provides more flexibility and room for personal adjustment. For example it is easier to try the garment on while working, as well as making adjustments to length of yoke and shoulder caps.

The instructions are carefully explaining every step, in the correct order. Diagrams are adjusted to the knitting direction and are worked as usual.

The diagram depicts all rows/rounds, and every stitch seen from the right side. It is read from bottom to top, from right to left. 1 square = 1 stitch.

When working back and forth, every other row is worked from the right side and every other row is worked from the wrong side. When working from the wrong side, the diagram will have to be worked reversed: from left to right, knit stitches are purled, purl stitches are knit etc.

When working in the round every round is worked from the right side and the diagram are worked from right to left on all rounds.

See DROPS lesson: How to read knitting diagrams

The diagram depicts all rows/rounds, and every stitch seen from the right side. It is worked from bottom to top, from right to left.

When working back and forth every other row is worked from the right side: from right to left and every other row is worked from the wrong side: from left to right.

When working in the round, every row in the diagram are worked from the right side, from right to left.

When working a circular diagram you start in the middle and work your way outwards, counter clockwise, row by row.

The rows usually start with a given number of chain stitches (equivalent to the height of the following stitch), this will either be depicted in the diagram or explained in the pattern.

See DROPS lesson: How to read crochet diagrams

Instructions for working several diagrams after each other on the same row/round, will often be written like so: “work A.1, A.2, A.3 a total of 0-0-2-3-4 times". This means you work A.1 once, then A.2 is worked once, and A.3 is repeated (in width) the number of times provided for your size – in this case like so: S = 0 times, M = 0 times, L=2 times, XL= 3 times and XXL = 4 times.

The diagrams are worked as usual: begin with the first row in A.1, then work the first row in A.2 etc.

See DROPS lesson: How to read knitting diagrams

See DROPS lesson: How to read crochet diagrams

The total width of the garment (from wrist-to-wrist) will be larger in the larger sizes, despite the actual sleeves being shorter. The larger sizes have longer sleeve caps and wider shoulders, so there will be a good fit in all sizes.

The measurement sketch/schematic drawing provides information regarding the full length of the garment. If it’s a jumper or a jacket the length is measured from the highest point on the shoulder closest to the neckline, and straight down to the bottom of the garment. It is NOT measured from the tip of shoulder. Similarly, the length of yoke is measured from the highest point on the shoulder and down to where yoke is split into body and sleeves.

On a jacket measures are never taken along bands, unless specifically stated. Always measure inside band stitches when measuring the length.

See DROPS lesson: How to read a schematic drawing

Diagrams are often repeated on the round or in height. 1 repeat is the diagram the way it appears in the pattern. If it says to work 5 repeats of A.1 in the round, then you work A.1 a total of 5 times after/next to each other in the round. If it says to work 2 repeats of A.1 vertically/in height you work the entire diagram once, then begin again at the start and work the entire diagram one more time.

Chain stitches are slightly narrower than other stitches and to avoid working the cast-on edge too tight, we simply chain more stitches to begin with. The stitch count will be adjusted on the following row to fit the pattern and measurement sketch.

The rib edge is more elastic and will contract slightly compared to, for example, stocking stitch. By increasing before the rib edge, you avoid a visible difference in width between the rib edge and the rest of the body.

It’s very easy to cast off too tightly, and by making yarn overs while casting off (and simultaneously casting these off) you avoid a too tight cast off edge.

See DROPS video: How to bind off with yarn overs (yo)

To achieve an even increase (or decrease) you can increase on, for example: every 3rd and 4th row alternately, like so: work 2 rows and increase on the 3rd row, work 3 rows and increase on the 4th. Repeat this until the increase is complete.

See DROPS lesson: Increase or decrease 1 st on every 3rd and 4th row alternately

Should you prefer to work in the round instead of back and forth, you may of course adjust the pattern. You’ll need to add steeks mid-front (usually 5 stitches), and follow the instructions. When you would normally turn and work from the wrong side, simply work across the steek and continue in the round. At the end you’ll cut the piece open, pick up stitches to work bands, and cover the cut edges.

See DROPS video: How to knit steeks and cut open

Should you prefer to work back and forth instead of in the round, you may of course adjust the pattern so you work the pieces separately and then assemble them at the end. Divide the stitches for the body in 2, add 1 edge stitch in each side (for sewing) and work the front and back pieces separately.

See DROPS lesson: Can I adapt a pattern for circular needles into straight needles?

Pattern repeats can vary slightly in the different sizes, in order to get the correct proportions. If you’re not working the exact same size as the garment in the photo, yours might deviate slightly. This has been carefully developed and adjusted so that the complete impression of the garment is the same in all sizes.

Make sure to follow instructions and diagrams for your size!

If you have found a pattern you like which is available in women’s size it’s not very difficult to convert it to men’s size. The biggest difference will be the length of sleeves and body. Start working on the women size that you think would fit across the chest. The additional length will be worked right before you cast off for the armhole/sleeve cap. If the pattern is worked top-down you can add the length right after the armhole or before the first decrease on sleeve.

Regarding additional yarn amount, this will depend on how much length you add, but it is better with a skein too many than too few.

All yarns will have excess fibres (from production) that might come off as lint or shedding. Brushed yarns (ie hairier yarns) have more of these loose, excess fibres, causing more shedding.

Shedding also depends on what is worn under or over the garment, and whether this pulls at the yarn fibres. It’s therefore not possible to guarantee that there will be no shedding

Below are some tips on how to get the best result when working with hairier yarns:

1. When the garment is finished (before you wash it) shake it vigorously so the looser hairs come off. NOTE: do NOT use a lint roller, brush or any method that pulls at the yarn.

2. Place the garment in a plastic bag and put it in your freezer - the temperature will cause the fibres to become less attached to each other, and excess fibres will come off easier.

3. Leave in the freezer for a few hours before taking it out and shaking it again.

4. Wash the garment according to the instructions on the yarn label.

Pilling is a natural process that happens to even the most exclusive of fibers. It's a natural sign of wear and tear that is hard to avoid, and that is most visible in high friction areas of your garment like a sweater's arms and cuffs.

You can make your garment look as new by removing the pilling, using a fabric comb or a pill/lint remover.

Still can't find the answer you need? Then scroll down and leave your question so one of our experts can try to help you. This will be done normally within 5 to 10 working days.
In the meantime, you can read the questions and answers that others have left to this pattern or join the DROPS Workshop on Facebook to get help from fellow knitters/crocheters!

Post a comment to pattern DROPS 115-29

We would love to hear what you have to say about this pattern!

If you want to leave a question, please make sure you select the correct category in the form below, to speed up the answering process. Required fields are marked *.

Comments / Questions (58)

country flag Else Lentz Beck wrote:

Jeg forstå ikke rigtig dette, jakkemønster som er lavet af Drops Puddel, og strikkes på pind nr. 15, men i skriver at det er udgået, så anbefaler i 4 andre garntyper som kan bruges, Puddel strikkes på pind nr 15, men de andre garntyper strikkes på pind 8 eller 9

04.01.2016 - 22:13

DROPS Design answered:

Hej Else. Samme historie her. Denne er strikket med 2 traade Puddel og pinde 15. Du kan erstatte i stedet med 4 traade Alpaca Bouclé, men husk strikkepröven!

05.01.2016 - 14:23

country flag Raija Aalto wrote:

Tässä mallissa ei selvinnyt minulle kumpi puoli kuulu päälle tämä missä on neulottu sileää ja kuuluuko tämä joka on neulottu aina oikeaa niin etu osaksi johon nappi kiinnitetään olen niin vähän neulonut asusteita t.raija

10.11.2015 - 09:46

country flag Annie Valkenberg wrote:

In de beschrijving staat, plaats twee markeerders in het werk 13st. Vanaf iedere kant middenvoor moet dit zijn middenachter? En waar dienen deze markeerders voor?

08.12.2014 - 17:22

DROPS Design answered:

Hoi Annie. Je mindert bij de markeerders - staat een beetje verderop in het patroon ;-)

09.12.2014 - 16:33

country flag Ludivine wrote:

Bonjour, Je souhaite tricoter ce gilet avec l'alternative proposée ; la laine "Eskimo uni". Puis je utiliser des aiguilles droites et quel numéro d'aiguille dois je prendre ? Il se tricote normalement avec 2 fils "Puddel", dois je faire pareil avec 2 fils Eskimo ? Merci de votre aide. Cordialement

28.04.2014 - 17:15

DROPS Design answered:

Bonjour Ludivine, DROPS Eskimo fait partie du même groupe et peut être utilisée en alternative - cliquez ici pour calculer la quantité - toutefois, ces 2 laines étant différentes, le résultat sera différent de celui sur la photo. N'hésitez pas à demander conseil à votre magasin DROPS. Bon tricot!

28.04.2014 - 17:51

country flag Gera wrote:

Ik vind dit vest erg leuk, alleen kan ik niet met rondbreinaalden overweg. Hebben jullie dit vest niet met gewone breinaalden?

15.01.2014 - 14:03

DROPS Design answered:

Hoi Gera. Dit vest wordt heen en weer gebreid op de rondbreinld. Je kan voor dit model ook gerust rechte naalden gebruiken.

15.01.2014 - 14:32

country flag Deb wrote:

Hello - I wonder whether I could make this with a different yarn that yields the same guage, perhaps Polaris (using only one strand of yarn)? or does Puddel stretch so much that this would not be advisable? Also - is it possible to find a translation of Comments? There are few in English - yet I think there must be very valuable information to be found. Thank you - Deb

02.12.2013 - 22:41

DROPS Design answered:

Dear Deb, Polaris may work in tension (work a swatch to check tension and if you like result) but look will be completely different because of different properties of each yarn. Do not hesitate to get help from your Drops Store. Happy knitting!

03.12.2013 - 09:23

country flag ANDRIEU wrote:

Bonsoir, La tzille S correspond-elle à une taille 38 ? Merci par avance Cordialement Mme ANDRIEU

06.09.2013 - 19:32

DROPS Design answered:

Bonjour Mme Andrieu, pour vérifier quelle taille vous devez choisir, pensez toujours à comparer les mesures d'un vêtement analogue que vous avez et dont vous aimez la forme à celles du schéma en bas de page. Ces mesures sont fiables et vous permettront de trouver la bonne taille pour chaque modèle. Bon tricot !

07.09.2013 - 09:36

country flag Linda Hames wrote:

First line of pattern -please explain (1 edge st at each side) what is an edge st?

06.03.2013 - 21:28

DROPS Design answered:

Dear Mrs Hamess, the edge sts are the sts used for the seam - look at the videos called "edge stitches" -cf index. Happy knitting!

07.03.2013 - 14:02

country flag Lisa wrote:

When you place markers 8 stitches in on each side, does this mean you continue garter stitch on the eight stitches and stockinet the on the middle? I'm a little confused why we divide for the 8 stitches. Help please.

01.03.2013 - 05:42

DROPS Design answered:

Dear Lisa, you place 2 markers at 8 sts each side but continue in st st on all sts. Markers are used later for the dec. Happy knitting!

01.03.2013 - 09:46

Dey wrote:

Me encanto,es liviano y comodo,pero nopor esomenosabrigador.

07.05.2012 - 15:27