
Popular categories
Looking for a yarn?


|
|||||||||||||
Verine |
|||||||||||||
 |
 |
||||||||||||
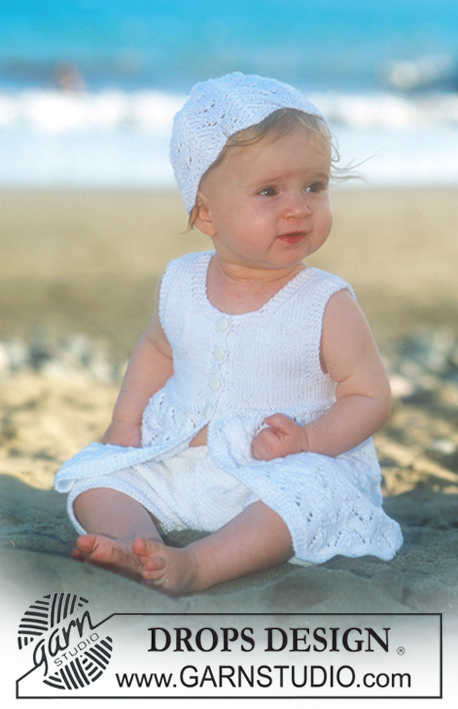
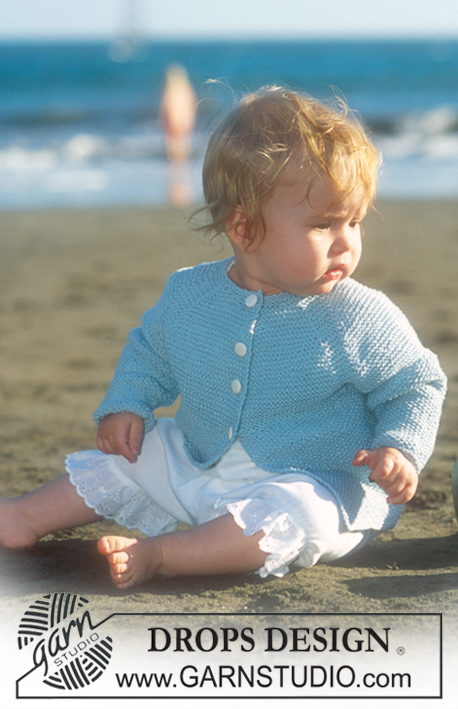
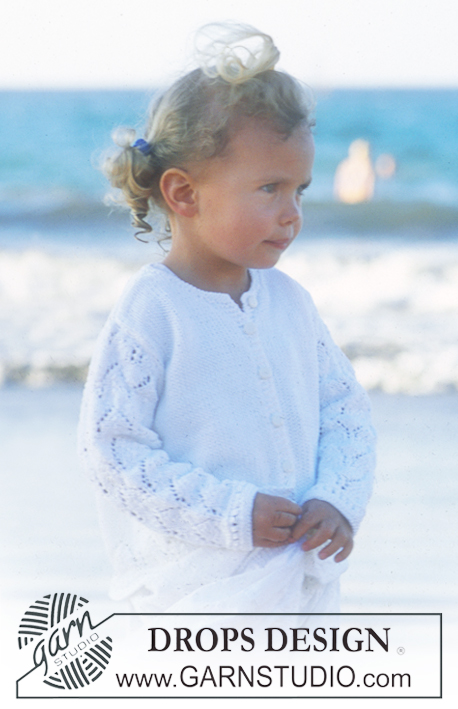
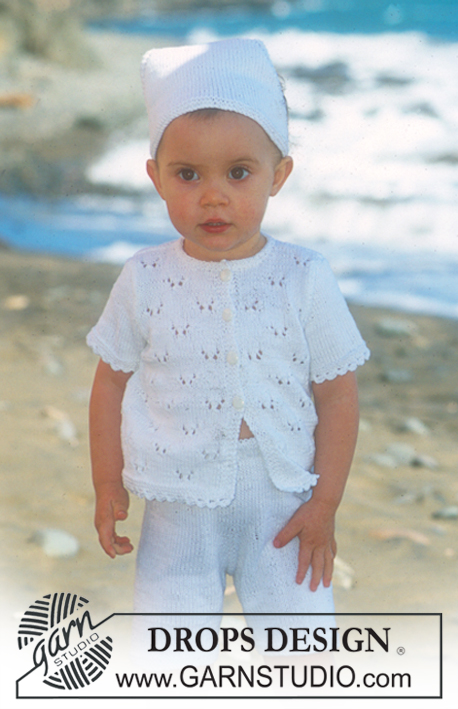
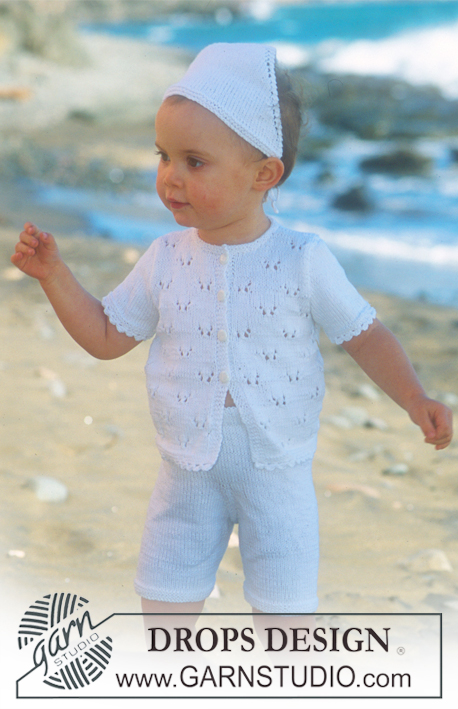
Jacket with short sleeves, shorts and scarf in Safran
DROPS Baby 10-6 |
|||||||||||||
|
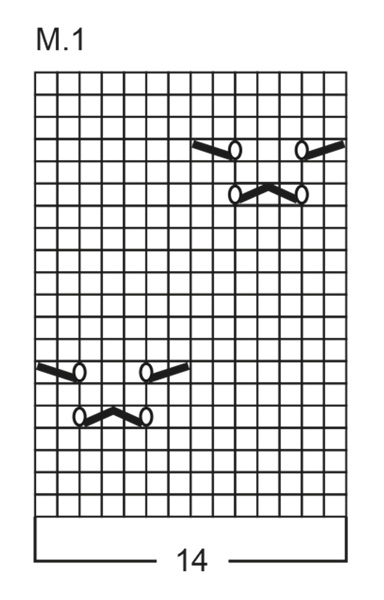
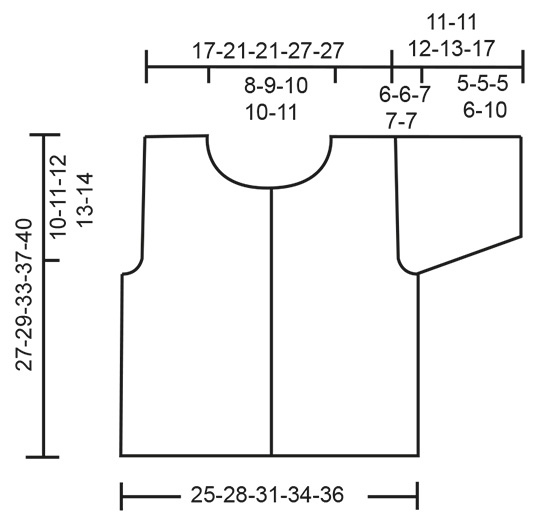
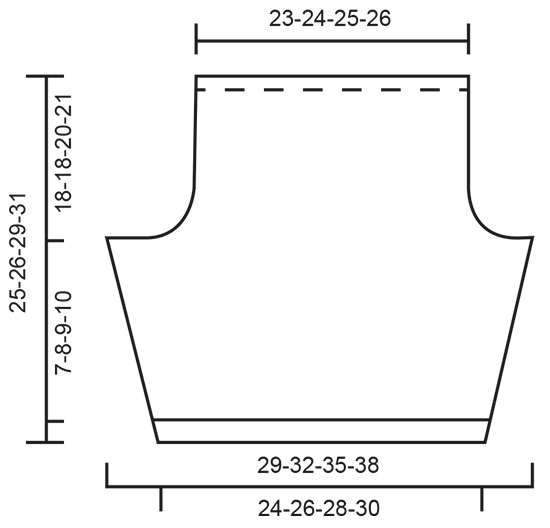
JACKET: Gauge: 24 sts x 32 rows on needles size 3 mm / US 2½ in stockinette st = 10 x 10 cm / 4" x 4". Garter sts (back and forth): Knit all rows Garter sts (on circular needle): K 1 round, P 1 round Pattern: See diagram M.1. The diagram shows the pattern from the right side. Buttonhole: Make buttonholes on right front band from RS as follows: cast/bind off 3rd st from edge and make a yo over cast/bind off st on the return row. Make buttonholes as follows: Size 1/3 months: 3, 8, 13, 18 and 22.5 cm / 1"-3"-5"-7"-9" Size 6/9 months: 4, 9, 14, 19 and 23.5 cm / 1½"-3½"-5½"-7½"-9½" Size 12/18 months: 4, 10, 16, 22 and 27.5 cm / 1½"-4"-6¼"-8¾"-10¾" Size 2 years: 3, 9, 15, 20, 25 and 30.5 cm / 1"-3½"-6"-8"-9¾"-12" Size 3/4 years: 4, 10, 16, 22, 28 and 33.5 cm / 1½"-4"-6¼"-8¾"-11"-13¼" Back and front piece: Knit back and forth on circular needle from mid front. Cast on 127-141-155-169-183 sts (this includes 4 edge sts each side for front edges, knitted in garter sts throughout) on needle size 3 mm / US 2½ and knit 4 rows garter sts. Continue following chart M.1. When piece measures 17-18-21-24-26 cm / 6¾"-7"-8¼"-9½"-10¼" – adjust to whole repeat of pattern - knit next row as follows: 31-34-38-41-45 sts (= front piece), bind off 6 sts for armhole, knit 53-61-67-75-81 sts (= back piece), bind off 6 sts for armhole, and knit remaining 31-34-38-41-45 sts (= front piece). Now complete each piece separately. Left front piece: = 31-34-38-41-45 sts. Bind off for armhole at beg of every row from side: 2 sts 1-1-2-1-2 times and 1 st 4-3-4-3-4 times = 25-29-30-36-37 sts. Continue in pattern, but do not knit the whole pattern towards neck and armhole if you cannot fit in a full repeat. When piece measures 23-24-28-31-34 cm / 9"-9½"-11"-12¼"-13⅜" put 7-7-8-8-9 sts toward front edge on a holder for neck. Continue and now bind off in beg of every row from front edge to shape the neckline: 2 sts 2-2-2-2-2 times and 1 st 3-3-4-4-5 times = 11-15-14-20-19 sts left on shoulder. Bind off remaining sts when piece measures approx 27-29-33-37-40 cm / 10⅝"-11⅜"-13"-14"½-15¾" = adjust to a full pattern repeat. Right front piece: Like left front piece, but mirrored. Remember buttonholes on front band. Back piece: = 53-61-67-75-81 sts. Bind off for armhole each side as described for front piece = 41-51-51-65-65 sts. When piece measures 26-28-32-36-39 cm / 10¼"-11"-12"½-14¼"-15¼" bind off the middle 17-19-21-23-25 sts for neck and work each shoulder separate. Continue and now dec 1 st towards neckline on next row = 11-15-14-20-19 sts left on shoulder. Continue and bind off when piece measures approx 27-29-33-37-40 cm / 10⅝"-11⅜"-13"-14"½-15¾" = adjust to front piece. Sleeve: Knitted round on double pointed needles. Cast on 46-48-52-54-56 sts on needle size 3 mm / US 2½. Knit 4 rounds in garter st and continue in stockinette st, and at the same time inc 2 sts mid under arm as follows: Size 1/3, 6/9 and 12/18 months: when sleeve measures 3 cm / 1⅛" = 48-50-54 sts. Size 2 and 3/4 years: when piece measures 2 cm / ¾", then 2-3 times on every 2 cm / ¾" = 58-62 sts. When piece measures 5-5-5-6-10 cm / 2"-2"-2"-2⅜"-4" bind off 6-6-6-6-6 sts mid under arm and finish sleeve back and forth on needle. Now bind off for sleeve cap in beg of each row each side: 2 sts 1-1-1-2-2 times, 1 st 6-6-7-5-5 times, 2 sts 1-1-1-2-2 times and 3 sts 1-1-1-1-1 time. Sleeve now measures approx 11-11-12-13-17 cm / 4⅜"-4⅜"-4¾"-5⅛"-6¾". Bind off remaining sts. Assembly: Sew shoulder seams. Set in sleeves. Pick up approx 55 to 65 sts round the neck (including sts on holder) on needle size 3 mm / US 2½. Knit 4 rows garter sts and then bind off. Crochet border: With hook size 3 mm / C crochet as follows: 1 sc, *ch 3, 1 dc in third ch from the hook, skip 2 sts and 1 sc in next st*, repeat from *-* round the neckline and along bottom edges on jacket and sleeves. Sew on buttons. ________________________________________________________________________ SCARF: Cast on 3 sts on needle size 3 mm / US 2½. Knit 2 rows garter sts and on second row inc 1 st inside 1 edge st each side = 5 sts. Continue in stockinette sts with 1 edge st each side in garter sts, at the same time on every other row inc 1 st inside the garter st each side – inc by making a yo (creates a row of holes each side). Continue the inc until there are 71-77-81-87-91 sts on needle. Knit 4 rows garter st over all sts and then bind off. ________________________________________________________________________ SHORTS: Gauge: 24 sts x 32 rows on needles size 3 mm / US 2½ in stockinette st = 10 x 10 cm / 4" x 4". Garter sts (back and forth): Knit all rows Each leg is knitted back and forth on needle. They are then put on the same circular needle and the shorts are completed knitting round. Right leg: Cast on 60-64-70-74 sts (includes 1 edge st each side) using needle size 2.5 mm / US 1 and knit 6 rows garter sts. Continue in stockinette sts on needle size 3 mm / US 2½ and when piece measures 2 cm / ¾" inc 1 st each side, repeat this on 2nd and 3rd row alternately a total of 6-7-8-9 times = 72-78-86-92 sts. When piece measures 7-8-9-10 cm / 2¾"-3⅛"-3½"-4" bind off 1 st in beg of following 2 rows (= 1 edge st each side to sew in later) and put the piece aside. Left leg: Cast on and knit as right leg. Shorts: Put both legs on the same circular needle size 3 mm / US 2½ = 140-152-168-180 sts. Place a marker mid front and mid back. Work stockinette stitch. After 2 rounds inc mid back at the same time as dec mid front. Inc back as follows: 1 st on each side of the 2 center sts on every other row a total of 6 times. Dec front as follows: 1 st on each side of the center 2 sts; 4-6-8-10 times on every row and then 10-10-10-10 times on every other row = 124-132-144-152 sts. Dec like this before 2 center sts: K2 tog. Dec like this after 2 center sts: slip 1 st, K1, psso. When piece measures 23-24-27-29 cm / 9"-9½"-10⅝"-11⅜" dec 14-16-24-28 m evenly distributed on round = 110-116-120-124 sts. When piece measures 25-26-29-31 cm / 9¾"-10¼"-11⅜"-12¼" change to circular needle 2,5 mm/US 1. P 1 round (= folding edge), continue in stockinette stitch for 1,5 cm / ½", bind off. Assembly: Sew seam on inside of legs within 1 edge st. Fold edge on top double towards WS and sew on. Pull a ribbon in suitable length through fold - measure on the child. |
|||||||||||||
Diagram explanations |
|||||||||||||
|
|||||||||||||
|
|||||||||||||
|
|||||||||||||
|
|||||||||||||
|
Have you made this or any other of our designs? Tag your pictures in social media with #dropsdesign so we can see them! Do you need help with this pattern?You'll find tutorial videos, a Comments/Questions area and more by visiting the pattern on garnstudio.com. © 1982-2024 DROPS Design A/S. We reserve all rights. This document, including all its sub-sections, has copyrights. Read more about what you can do with our patterns at the bottom of each pattern on our site. |
|||||||||||||


With over 40 years in knitting and crochet design, DROPS Design offers one of the most extensive collections of free patterns on the internet - translated to 17 languages. As of today we count 304 catalogs and 11422 patterns - 11417 of which are translated into English (US/in).
We work hard to bring you the best knitting and crochet have to offer, inspiration and advice as well as great quality yarns at incredible prices! Would you like to use our patterns for other than personal use? You can read what you are allowed to do in the Copyright text at the bottom of all our patterns. Happy crafting!
Comments / Questions (63)
Bonjour, J'aimerais faire des manches longues s/le modèle DROPS BABY 10/6 comme indiqué dans certains modèles. DROPS donnent les explications nécessaires pour rallonger les manches 3/4 prévues initialement : nbre de mailles à monter et augmentations au fur et à mesure pour obtenir le nbre de m à monter pour les manches 3/4 prévues initialement. Vous remerciant pour votre réponse. Cordialement
26.10.2021 - 11:46DROPS Design answered:
Bonjour Mme Ribault, nous ne sommes malheureusement pas en mesure de pouvoir ajuster chacun de nos modèles à chaque demande individuelle. Pour toute assistance complémentaire, vous pouvez vous adresser à votre magasin DROPS qui saura vous conseiller et vous renseigner. Bon tricot!
26.10.2021 - 16:55Jeg kan ikke få mønstre til at passe med 183 og 8 fra altså 175 masker. Dette passer ikke med 14 mønster. Ser d er tidligere er skrevet man skal lave 12,5 mønster, men hvordan for at det bliver ens i begge sider
12.05.2021 - 15:59DROPS Design answered:
Hej Lajla, jo, efter de 4 kantmasker, starter du nederst i højre hjørne af diagrammet. Strikker de 14 masker 12gange, så de første 7 masker af M.1 igen og sidst 4 kantmasker = 183 masker så får du jakken ens mod midt foran :)
14.05.2021 - 09:43Wenn bei Anleitung heisst, Körper, um welches Teil handelt es sich? Freundliche Grüsse und im Voraus herzlichen Dank für die Antwort.
21.04.2021 - 08:53DROPS Design answered:
Liebe Verena, es handelt sich um den Rumpfteil, dh die beide Vorderteile und das Rückenteil sind zuerst in einem Teil von der unteren Kante bis zum Armloch gestrickt, dann wird jedes Teil separat gestrickt. Viel Spaß beim stricken!
21.04.2021 - 13:17Pour la confection des manches pourquoi faut il "rabattre" et non augmenter? en effet si l'on suit les instructions on arrive à 27 mailles ce qui ne correspond pas au schéma où l'on voit bien qu'il faut augmenter et non diminuer merci
23.03.2021 - 17:17DROPS Design answered:
Bonjour Bistou, je comprends peut être mal votre question; mais les manches se tricotent ici de façon tout à fait classique: elles se tricotent de bas en haut; on augmente de chaque côté, puis on va rabattre pour la tête de manche d'abord les 6 m centrales puis rabattre au début de chaque rang de chaque côté pour former la tête de manche/l'arrondi de la manche, et ensuite rabattre les mailles restantes. Le haut de la manche va former un arrondi de 6 ou 7 cm selon la taille pour bien se loger dans l'emmanchure. Bon tricot!
24.03.2021 - 07:23Hello, I do not know how to crochet. Is there another way to do the edging on the jacket? Thanks!
17.12.2020 - 23:15DROPS Design answered:
Dear Mrs Waitt, what about picking up sts around sleeves /along bottom edge and and cast off with i-cord loops? Happy knitting!
18.12.2020 - 07:18Hej Jag stickar stl 1 år. Jag har lagt upp 155 maskor. 4 maskor i varje sida är framkantsmaskor, kvar har jag 147 maskor. Mönster M1 är varje rapport 14 maskor. Det går inte att få ut hela 14-maskors rapporter på 147 maskor. Vad har jag missat?
28.06.2020 - 21:10DROPS Design answered:
Hej Maria. Du stickar då M1 10 gånger (alla 14 maskor) och sedan den 11e gången stickar du de 7 första maskorna i M1. Mvh DROPS Design
29.06.2020 - 07:23Hej ! Jag tycker denna kofta ser slätstickad ut, med 4 maskor rätstickning i var sida ( framkant) samt rätstickad nederkant. Eftersom man stickar fram och tillbaks på rundsticka, vill jag sticka ett varv räta m och nästa varv aviga maskor. Men så uppfattar jag inte att det står beskrivet !
25.05.2020 - 00:31DROPS Design answered:
Hej Det är så som du beskriver det ska stickas. Du stickar 4 varv rätstickning först längst ner på koftan. Sedan stickas det enligt M.1 vilket är slätstickning med hålmönster (de 4 framkantmaskorna på varje sida rätstickas hela tiden). Mvh DROPS Design
25.05.2020 - 08:51Guten Abend Ich möchte gerne das Kurzarmjäckchen Drops VERINE aus Drops Baby/10 /6 stricken. Leider gibt es das nicht mehr in Gr.122/128. Wie kann ich das umrechnen? Vielen Dank für Ihre Hilfe.
22.05.2020 - 18:06DROPS Design answered:
Liebe Moni, leider können wir nicht jede Anleitung nach jedem Wunsch umrechnen, sicher können Ihnen die ähnlichen Modellen in diese Grösse inspirieren - Ihr DROPS Laden kann Ihnen auch gerne weiterhelfen, auch telefonisch oder per E-Mail. Viel Spaß beim stricken!
25.05.2020 - 07:47Jeg forstår ikke den tegning af et fladt ærme nederst i opskriften. Er det noget der hører til her?? Jeg har forståelsen af, at ærmet stikker man rundt. Er det ikke rigtigt? Og et spørgsmål til ærmet, der står at det skal være 13 cm i alt i str 2 år, og så bliver det stykke, hvor man strikker frem og tilbage, og lukker af, altså kun 7 cm. Men ærmelukningen på trøjen er 13 cm. Og der er og der er 20 m tilbage, når man skal lukke af. Er det meningen. På forhånd tak.
21.05.2020 - 20:14DROPS Design answered:
Hej Jette, det er øverste måleskitse som hører til den kortærmede jakke. Jo ærmet strikkes rundt, så deles det midt under og der strikkes ærmekuppel frem og tilbage på pinden. Ja det stemmer, når alle masker er lukket af passer ærmekuplen hele vejen rundt ind i ærmegabet . God fornøjelse!
22.05.2020 - 15:23Je tricote pour du 3 mois mais je rencontre un problème concernant le nombre de mailles : vous dites 127 mailles y compris 4 mailles de bordure. il reste donc hors bordures 119 mailles. Arrivé au commencement du M1, cela se joue pour 14 mailles. Or, 119:14 --> ce n\'est pas un compte juste, il reste 7 mailles dans le flou. \r\nMerci de votre réponse
25.04.2020 - 16:36DROPS Design answered:
Bonjour Evane, tricotez vos 127 m ainsi: 4 m point mousse, répétez 8 fois les 14 m de M.1, tricotez les 7 premières mailles de M.1 et terminez par 4 m point mousse. Bon tricot!
27.04.2020 - 08:22