
Popular categories
Looking for a yarn?


|
||||||||||||||||||||||
Roly Poly |
||||||||||||||||||||||
 |
 |
|||||||||||||||||||||
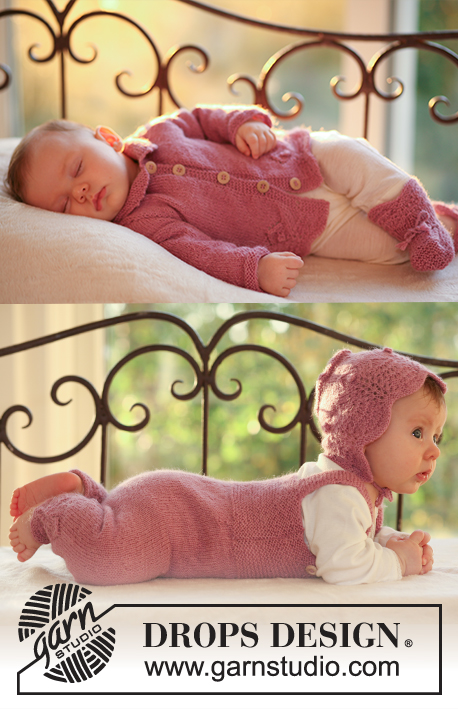
Set of baby jacket, jumpsuit, bonnet hat and socks in DROPS Alpaca
DROPS Baby 18-14 |
||||||||||||||||||||||
|
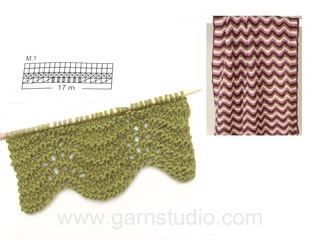
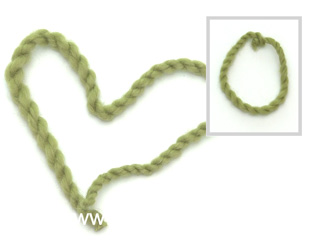
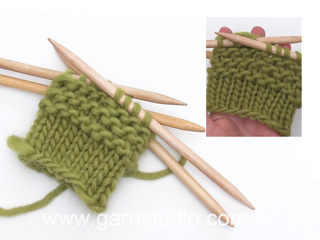
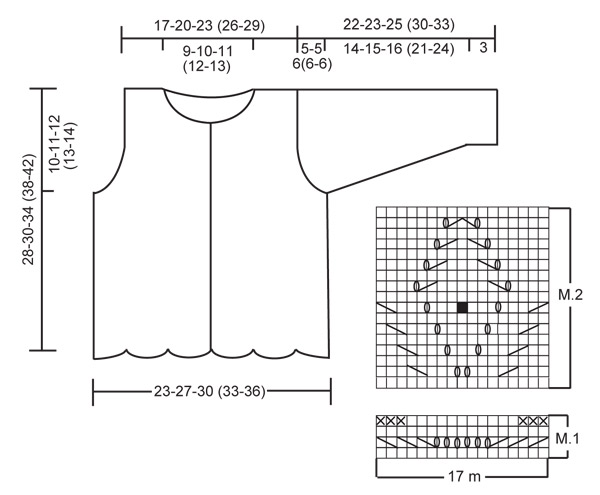
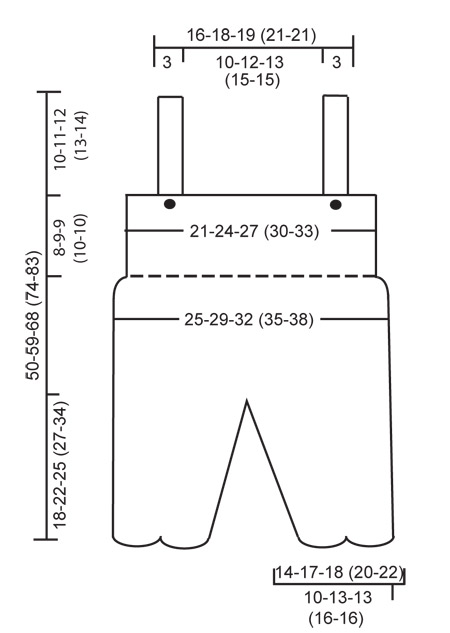
GARTER ST (in the round): K 1 round, P 1 round. GARTER ST (back and forth on needle): K all rows. PATTERN: See diagram M.1 and M.2 – the diagrams show the pattern from the RS. BUTTONHOLES: Make buttonholes on right front band. 1 buttonhole = cast off 3rd and 4th st from mid front and cast on 2 new sts on return row. Make buttonholes when piece measures: SIZE 1/3 months: 4, 9, 14 and 19 cm SIZE 6/9 months: 4, 10, 15 and 21 cm SIZE 12/18 months: 4, 9, 14, 19 and 24 cm SIZE 2 years: 4, 10, 16, 22 and 28 cm SIZE 3/4 years: 5, 12, 18, 25 and 31 cm NOTE: the last buttonhole is made on neckline. DECREASING TIP (applies to jumpsuit): Dec on each side of marker mid front and mid back. When 3 sts remain before marker K2 tog, K2 (marker sits between these 2 sts), slip 1 st as if to K, K1, psso. ------------------------------------------------------------------------------------------------------------------------ JACKET: BODY PIECE: Worked back and forth on circular needle from mid front. LOOSELY cast on 131-148-165 (182-199) sts (includes 5 front band sts each side towards mid front) on circular needle size 2.5 mm with Alpaca. K 3 rows (first row = RS). Work next row as follows from WS: 5 front band sts in garter st – SEE ABOVE - 1 stocking st, 7-8-9 (10-11) repeats of M.1 across the row, 1 stocking st, 5 front band sts in garter st. Work 3-3-4 (4-5) vertical repeats of M.1 like this, AT THE SAME TIME when piece measures 4 cm make buttonhole on right front band – SEE ABOVE. Now continue in M.2 with 1 stocking st and 5 garter sts each side. After M.2 piece measures approx 8-8-9 (9-10) cm. Now complete piece in stocking st with 5 garter sts each side. REMEMBER THE KNITTING TENSION! When piece measures 18-19-22 (25-28) cm work next row as follows from RS: 32-36-41 (45-49) sts = right front piece, cast off 6 sts for armhole, 55-64-71 (80-89) sts = back piece, cast off 6 sts for armhole, 32-36-41 (45-49) sts = left front piece. Now complete each piece separately. LEFT FRONT PIECE: = 32-36-41 (45-49) sts. Cast off to shape the armhole at the beg of every row from the side: 2 sts 1 time and 1 st 4-4-4 (4-5) times = 26-30-35 (39-42) sts. When piece measures 24-26-29 (33-37) cm slip 9-10-13 (14-14) sts towards mid front on a stitch holder for neck and cast off to shape the neckline at the beg of every row from mid front: 2 sts 2 times and 1 st 3 times = 10-13-15 (18-21) sts left on shoulder. Cast off when piece measures 28-30-34 (38-42) cm. RIGHT FRONT PIECE: Like left front piece, but mirrored – remember buttonholes! BACK PIECE: = 55-64-71 (80-89) sts. Cast off for armholes each side as described for front piece = 43-52-59 (68-75) sts. When piece measures 27-29-33 (37-41) cm cast off the middle 19-22-25 (28-29) sts for neck and complete each side separately. Cast off 2 sts on neckline on next row = 10-13-15 (18-21) sts left on shoulder. Cast off when piece measures 28-30-34 (38-42) cm. SLEEVE: Worked in the round on double pointed needles. Cast on 36-38-42 (44-46) sts on double pointed needles size 2.5 mm with Alpaca. Work 8 rows garter st – SEE ABOVE – and continue in stocking st. Insert a marker at beg of round = mid under arm. When piece measures 3 cm inc 1 st on each side of marker and repeat the inc on every 6-5-5 (6-6) round a total of 8-10-10 (12-13) times = 52-58-62 (68-72) sts. When piece measures 17-18-19 (24-27) cm cast off 6 sts mid under arm and complete piece back and forth on needle. Cast off to shape the sleeve cap each side at the beg of every row: 2 sts 2 times and 1 st 3-3-4 (4-4) times, then 2 sts each side until piece measures 21-22-24 (29-32) cm, now cast off 3 sts each side 1 time and cast off remaining sts. Piece measures approx 22-23-25 (30-33) cm. ASSEMBLY: Sew shoulder seams and set in sleeves. NECKLINE AND COLLAR: Pick up approx 65 to 85 sts round neckline on small circular needle size 2.5 mm (incl sts on stitch holders at front) and work garter st back and forth on needle from mid front. AT THE SAME TIME after 2 rows make 1 buttonhole in line with the others on front band. Work another 2 rows and now adjust no of sts evenly to 75-80-85 (90-95). Continue in garter st. When collar measures 4-4-5 (5-6) cm dec at the beg of every row each side: 1 st 3 times and 2 sts 1 times, cast off remaining sts. Sew on buttons. ----------------------------------------------------------- JUMPSUIT: Worked from bottom of legs towards the top, in the round on double pointed and circular needle. LEG: LOOSELY cast on 51-68-68 (85-85) sts with Alpaca on double pointed needles size 2.5 mm and work 4 rows garter st – SEE ABOVE. Work 3-3-4 (4-5) vertical repeats of M.1 and then continue in M.2. After M.2 piece measures approx 8-8-9 (9-10) cm. Insert a marker at beg of round (= inside of leg), and continue in stocking st. Now inc 1 st on each side of marker on every 2-4-4 (6-6) round a total of 12-9-13 (10-14) times = 75-86-94 (105-113) sts. AT THE SAME TIME when piece measures 16-20-23 (25-32) cm continue back and forth on needle from marker (to make it easier to slip both legs on the same circular needle afterwards) and cast on 1 new st each side for seam. When piece measures 18-22-25 (27-34) cm cast off 1 st each side and put piece aside. Knit the other leg. BODY PIECE: Slip legs on the same circular needle size 2.5 mm = 150-172-188 (210-226) sts. Insert 1 marker mid front and 1 marker mid back and continue in stocking st in the round. AT THE SAME TIME dec 1 st on each side of both markers – SEE DECREASING TIP - on every other round a total of 5-6-6 (7-7) times = 130-148-164 (182-198) sts. When piece measures 32-39-47 (51-59) cm work shortened rows mid back as follows (to make pants wider at the back) – beg by marker: work 10 sts, turn piece, work 20 sts (slip the first st as if to K to avoid a hole), turn piece. Continue like this working another 10 sts before each turn another 8-10-12 (14-16) times. Now work 1 round on all sts, AT THE SAME TIME dec 20-22-24 (26-26) sts evenly = 110-126-140 (156-172) sts. Now divide piece at the sides and complete front and back pieces separately. Slip the 55-63-70 (78-86) sts on back piece on a stitch holder. FRONT PIECE: = 55-63-70 (78-86) sts. Work garter st back and forth on needle. When piece in garter st measures 6-7-7-(8-8) cm make 2 buttonholes as follows: work 9-11-13 (15-18) sts, cast off 2 sts, work 33-37-40 (44-46) sts, cast off 2 sts, work 9-11-13 (15-18) sts. On return row cast on 2 new sts over cast off sts. Continue in garter st until piece in garter st measures 8-9-9 (10-10) cm (piece measures a total of 40-48-56 (61-69) cm) and cast off. BACK PIECE: = 55-63-70 (78-86) sts. Work 8-9-9 (10-10) cm garter st and then work next row as follows: cast off 6-8-10 (12-15) sts, work 8 sts, cast off 27-31-34 (38-40) sts, work 8 sts and cast off 6-8-10 (12-15) sts. Continue for braces on the 8 sts each side. Work garter st back and forth on needle until braces measures 22-24-26 (28-30) cm, cast off. ASSEMBLY: Sew legs tog at the top inside 1 edge st. Sew side seams, in outer loops of sts to avoid a chunky seam. Sew buttons on braces. ---------------------------------------------------------- BONNET: Worked back and forth on circular needle. LOOSELY cast on 89-93-106 (108-112) sts on circular needle size 2.5 mm with Alpaca. Work 4 rows garter st and work next row as follows from WS: 1 edge st in garter st, 1-3-1 (2-4) stocking sts, M.1 on the next 85-85-102 (102-102) sts, 1-3-1 (2-4) stocking sts and 1 edge st in garter st. Work 5-6-7 (8-9) vertical repeats of M.1 like this and then continue in M.2 with 1 edge st and 1-3-1 (2-4) stocking sts each side. After M.2 piece measures approx 10-11-12 (13-14) cm. Now continue in stocking st on all sts with 1 garter st each side, AT THE SAME TIME adjust no of sts to 88-94-102 (108-114) on first row. When piece measures 12-13-14 (15-16) cm cast off 5-5-6 (6-6) sts each side (i.e. cast off at the beg of the next 2 rows) = 78-84-90 (96-102) sts. Insert 6 markers in piece from RS as follows: First marker after 1 st and the next 5 markers with 13-14-15 (16-17) sts between each = 12-13-14 (15-16) sts left after the last marker. Now continue in garter st, AT THE SAME TIME K2 tog after each marker on every row from RS until there are 12 sts left on row. K2 tog across the row, cut thread, pull it through remaining sts and use thread-end to sew bonnet tog mid back – sew in outer loops of sts to avoid a chunky seam. (also sew tog the 5-5-6 (6-6) stocking sts cast off each side). CASING: Pick up approx 68 to 84 sts (divisible by 4) inside 1 edge st along bottom edge of bonnet on circular needle size 2.5 mm with Alpaca. K 1 row from WS, K 1 row from RS and continue as follows from WS: K2, * P2 tog, 1 YO, P2 *, repeat from *-* until 2 sts remain, K these. Now K 4 rows on all sts, cast off. TIE STRINGS: Cut 3 threads measuring approx 200 cm each, twist them hard, fold them double and let them twist again. Tie a knot each end and thread string through casing. ---------------------------------------------------------- SOCKS: Worked in the round on double pointed needles. LOOSELY cast on 51-51-51 (51-68) sts on double pointed needles size 2.5 mm with Alpaca. Work 4 rows garter st – SEE ABOVE – and then work 3-4-4 (5-5) vertical repeats of M.1. When piece measures approx 4-5-5 (6-6) cm work 1 round stocking st, AT THE SAME TIME adjust no of sts to 40-44-48 (52-56). Work 2 cm rib, K1/P1, and work next round as follows: * K2 tog, 1 YO *, repeat from *-* (= casing). On next round slip the first 15-17-18 (20-21) sts on a stitch holder, keep the next 10-10-12 (12-14) sts on needle and slip the last 15-17-18 (20-21) sts on a stitch holder. Work 3.5-4-5 (6-7) cm garter st back and forth on needle (= upper foot). Now pick up 9-11-13 (15-18) sts on each side of upper foot and slip sts from stitch holders back on needle = 58-66-74 (82-92) sts. Work garter st back and forth on needle from mid back, AT THE SAME TIME after 2-2.5-3 (3.5-4) cm dec as follows: K2 tog at the beg and at the end of row and K2 tog on each side of the 2 middle sts. Repeat the dec on every other row until piece in garter st measures 3-4-5 (5-6) cm. Cast off and sew sock tog under foot up to casing mid back – sew in outer loops of sts to avoid a chunky seam. TIE STRINGS: Cut 3 threads measuring approx 100 cm each, twist the hard, fold them double and let them twist again. Tie a knot each end and thread string through casing on sock. |
||||||||||||||||||||||
Diagram explanations |
||||||||||||||||||||||
|
||||||||||||||||||||||
|
||||||||||||||||||||||
|
||||||||||||||||||||||
|
Have you made this or any other of our designs? Tag your pictures in social media with #dropsdesign so we can see them! Do you need help with this pattern?You'll find tutorial videos, a Comments/Questions area and more by visiting the pattern on garnstudio.com. © 1982-2024 DROPS Design A/S. We reserve all rights. This document, including all its sub-sections, has copyrights. Read more about what you can do with our patterns at the bottom of each pattern on our site. |
||||||||||||||||||||||


With over 40 years in knitting and crochet design, DROPS Design offers one of the most extensive collections of free patterns on the internet - translated to 17 languages. As of today we count 304 catalogues and 11422 patterns - 11422 of which are translated into English (UK/cm).
We work hard to bring you the best knitting and crochet have to offer, inspiration and advice as well as great quality yarns at incredible prices! Would you like to use our patterns for other than personal use? You can read what you are allowed to do in the Copyright text at the bottom of all our patterns. Happy crafting!
Comments / Questions (57)
Bonjour, Faut-il suivre le diagramme M1 ou plutôt la vidéo du point de vague ? Si je suis M1, je n’ai pas le rang envers sur l’endroit tout du long mais seulement 6 mailles envers. Auriez-vous vous svp une photo que l’on puisse agrandir de point fantaisie M1 car on ne voit pas bien sûr la photo du modèle ? D’avance merci de votre retour. Bien cordialement.
07.06.2019 - 19:39DROPS Design answered:
Bonjour Véronique, suivez bien le diagramme, le point de vagues peut se tricoter de différentes façons, la vidéo est "standard", c'est-à-dire que dans ce modèle, le 1er rang de M.1 se tricote sur l'envers = tout à l'envers, puis au 2ème rang sur l'endroit, on tricote les jetés (= comme celui de la vidéo) soit *3 x 2 m ens à l'end, 5 x (1 jeté, 1 m end), 1 jeté, 3 x glisser 1 m à l'end, 1 m end, passez la m glissée par-dessus la m tricotée*), au 3ème rang, on tricote tout à l'envers, et au 4ème rang, on tricote *3 m end, 11 m env, 3 m end*. Bon tricot!
11.06.2019 - 09:47On the jumpsuit where it says at The same time continue back and forth and cast on one st each side door seam - are you casting on a new stitch every row from 6-1/4"-7"? Thanks for any help you can provide.
18.02.2019 - 03:03DROPS Design answered:
Dear Karyn, when leg measures 6¼”-8”-9” (9¾”-12½”) cast on 1 stitch on each side (= 2 more stitches for seam allowance), and continue back and forth until leg measures 7”-8¾”-9¾” (10 5/8”-13 3/8”) then bind off 1 st on each side = 75-86-94 (105-113) sts. Happy knittingn!
18.02.2019 - 10:48Liebes Drops-Team Ich habe gestern mit dieser wunderbaren Hose angefangen, bin leider bei M1 hängen geblieben. Da ich ja auf dem Nadelspiel stricke gibt es ja in dem Sinne keine "Rückreihen". Ich habe das so verstanden, diese "Rückreihe" einfach rechts zu stricken. Richtig? Vielen Dank und winterliche Grüsse aus der Schweiz :-)
09.01.2019 - 07:55DROPS Design answered:
Liebe Claudi, alle Reihen der Muster sind im Diagram gezeigt, dh M.1 wird nur über 4 Reihen/Runden gestrickt. Alle Reihen im M.1 (sowie im M.2) lesen Sie rechts nach links wenn Sie in der Runde stricken. Wenn Sie dann in Reihen stricken lesen Sie die Hinreihen rechts nach links und die Rückreihen links nach rechts.Viel Spaß beim stricken!
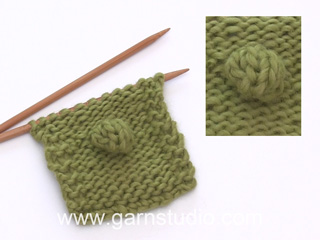
09.01.2019 - 08:51Hoi, Ik ben het mutsje aan het breien. Ik zit nu vast bij de nopjes. Ik heb van M2 al 11naalden gedaan (waaronder dus ook de naald met de nopjes) maar bij de twaalfde rij komt mijn telling niet meer uit. Ik heb ook te veel steken, geen 89 meer maar 104. Ik zit dus een beetje vast! Weten jullie wat ik fout doe? Alvast bedankt! Groetjes Hanne
23.09.2018 - 11:03DROPS Design answered:
Dag Leemenhanne, Nadat je de naald met de nopjes hebt gebreid staan er (tijdelijk) meer steken de naald omdat je 4 steken in 1 steek hebt gebreid met de nopjes. (Dan klopt het dus precies dat je 104 steken hebt) Op de teruggaande naald minder je deze steken weer door 1 steek recht af te halen, 3 steken samen te breien en de afgehaalde steek over te halen. (Zie ook beschrijving bij het betreffende symbool in het patroon)
23.09.2018 - 21:15Hallo, in der Anleitung für die Jacke heißt es M1 3 mal in der Höhe stricken. Wie strickt man denn dann die Masche vor den 5 Blendenmaschen? Auf der Rückreihe soll sie ja glatt gestrickt werden, also erscheint sie als linke M. auf der Vorderseite. Wie soll sie in den Hinreihen gestrickt werden? Ich kann mir nicht richtig vorstellen, wie es von vorne aussehen soll, Mustersatz, dann die extra linke oder rechte Masche, dann Blendenmaschen. Danke!
04.06.2017 - 00:02DROPS Design answered:
Liebe Tabea, wenn Sie M1 x 3 in der Höhe stricken, sollen Sie die Blendemaschen im Krausrippe stricken und 1 Masche glatt re (bei Hinreihe) nach den Blendemaschen am Anfang der Reihe und vor den Blendenmaschen am Ende der Reihe. M1 = 4 Reihe, die Hin- sowie die Rückhreihe sind im Diagram eingezeichnet. Viel Spaß beim stricken!
06.06.2017 - 08:45When almost finished the jumpsuit I noticed that the legs weren't matching. It was like one was on backwards. What I have done wrong?
04.08.2016 - 21:39DROPS Design answered:
Dear Mrs Reimer, both legs are the same and should be slipped on the same circular needle with cast off sts towards each other - see video below. You can also bring your work to your store or send them pictures from your work so that they can assist you more easily. Happy knitting!
05.08.2016 - 09:36Word in het vestje M.2 rondom gebreid of alleen in de voorpanden? Ook staat er dat er op 8 cm hoogte ieder deel apart gebreid moet worden. Dit begrijp ik niet, het is toch een geheel? Ik zou het fijn vinden dat U de oplossingen voor mij heeft. Hartelijke groet, Marianne.
10.11.2015 - 13:15DROPS Design answered:
Hoi Marianne. Ja, je begint met het breien van het lijf, dwz: voorpand, achterpand, voorpand. Je breit dus M.1 en M.2 over alle st van het lijf. Bij 8 cm deel je het werk (bij de armsgaten) en breit elke deel: voorpand, achterpand en voorpand apart verder (lees verder in het patroon voor de werkwijze van elk deel.
10.11.2015 - 15:47Har börjat sticka hängselbyxorna och är på ben, har stickat fram till det står SAMTIDIGT stickas benet vidare fram och tillbaka från markören? maskorna bakom markören mot kanten vad ska jag göra med dom? eller har jag missuppfattat
04.08.2015 - 10:00DROPS Design answered:
Hej Anneli, Du fortsätter att sticka över alla m, men när du kommer till markören vänder du arb och stickar tillbaka istället för at fortsätta runt. Lycka till
05.08.2015 - 08:42Jeg er usikker på indtagningen på sokkerne - har læst jeres svar til Helle d. 22.12.14. Skal det forstås, som at alle 66 masker sidder på 1 pind, og at man kun strikker 2 x 2 masker sm i starten og slutningen af hv.. 2. pind? Ellers en meget fin model
07.04.2015 - 17:31DROPS Design answered:
Ja alle masker sidder på samme p. Du strikker 2 r sm i starten og i slutningen af p men også på hver side af de 2 midterste m. God fornøjelse!
15.05.2015 - 10:15Warum werden die krausrippen nicht weiter in Runden gestrickt? Ich Nähe nicht so gerne zusammen, kann ich auch einfach in Runden weiterstricken?
03.04.2015 - 19:14DROPS Design answered:
Bitte beschreiben Sie genauer, welche Stelle Sie meinen.
03.04.2015 - 21:00