
Popular categories
Looking for a yarn?


|
|||||||
DROPS 32-20 |
|||||||
|
|
|||||||
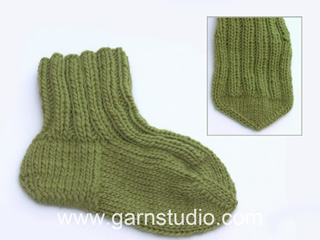
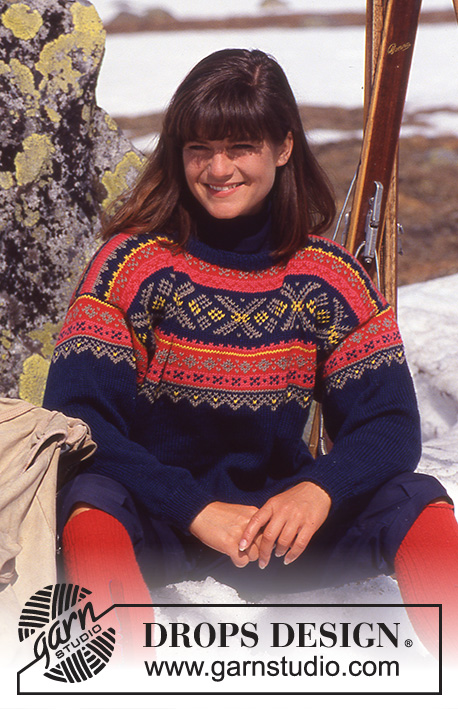
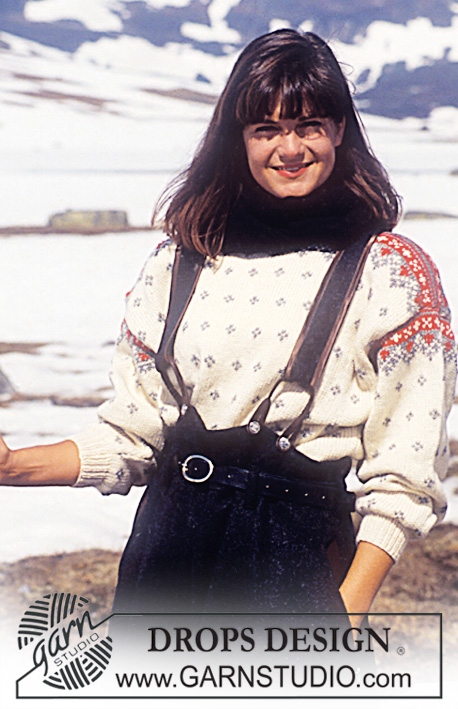
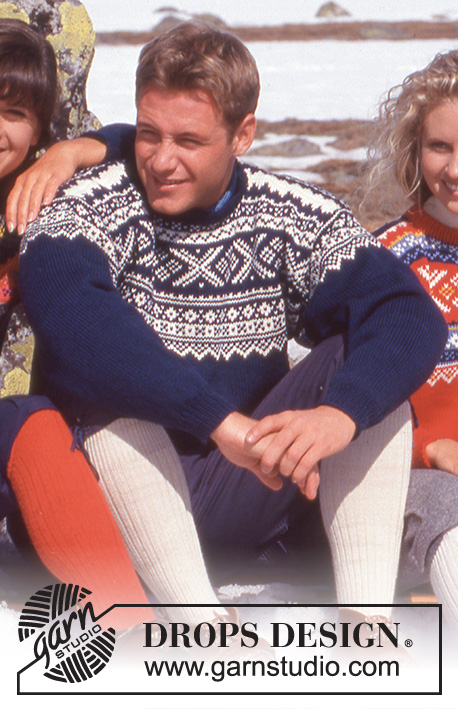
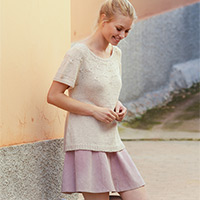
DROPS Sweater or jacket for men in Karisma Superwash with or without embroidered ribbon. Long or short design. Socks, Hat, Head band, Mittens.
DROPS 32-20 |
|||||||
|
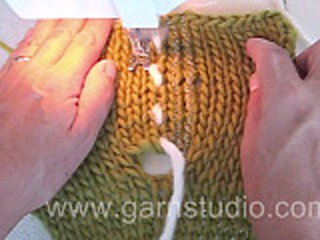
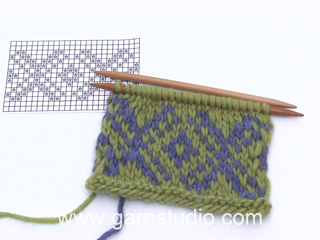
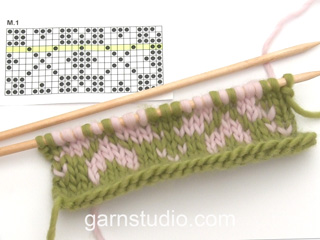
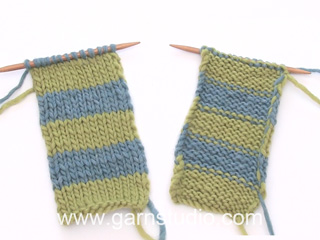
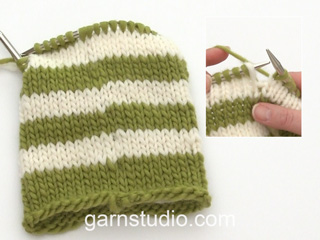
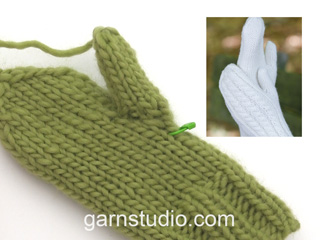
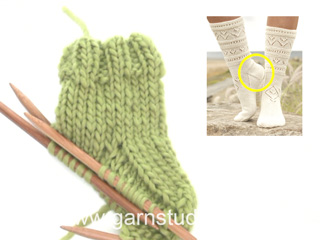
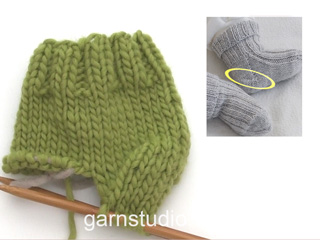
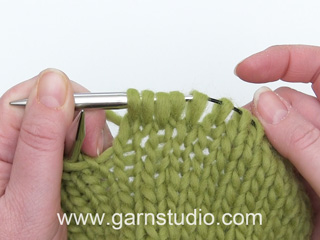
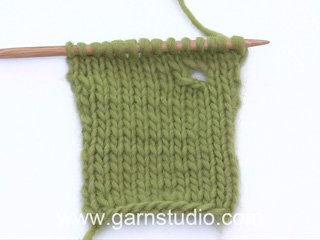
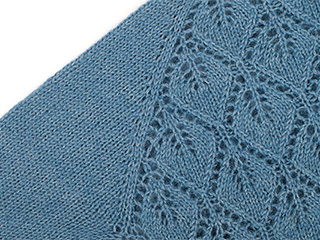
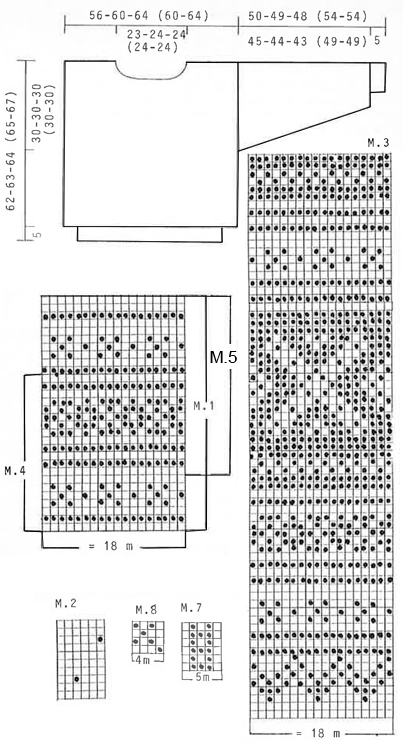
JACKET OR SWEATER: Knitting tension: 21 sts x 26 rows on needle size 4 mm and pattern = 10 x 10 cm 20 sts on needle size 2.5 mm and stocking sts = 10 cm in width. Long version: If you are knitting long version inc measurements on body from casting on edge with 10 cm at armhole, at M.3, at neck and casting off. Inc yarn amount by approx 50 g grey and 50 g off white. Pattern: Knit entire pattern in stocking sts. Diagrams are seen from RS. Rib: * K1, P1 * Edge: Knit 3.5 cm stocking sts, P1 round, 3.5 cm stocking sts. Jacket body: Knit jacket in the round on circular needles after ridges and cut up for armholes and mid front when knitting is completed. Figures in ( ) = Gent size. Cast on 194-202-210 (210-218) sts for Alt.1-grey or Alt.2 – off white on needle size 2.5 mm and knit 5 cm Rib back and forth on needle. Change to circular needle size 4 mm at the same time inc 5 sts mid front (these sts are for cutting afterwards and should not be knit into the pattern) knit 1 round stocking sts at the same time as inc 40-50-60 (42-52) sts evenly on 1st row = 234-252-270 (252-270) sts. Knit M.1, then continue with M.2. Remember knitting tension. At the same time when piece measures 32-33-34 (35-37) cm inc 5 sts on each side (these sts are for cutting later and are not knit into pattern). When piece measures 35-36-37 (38-40) cm knit M.3. When piece measures 56-57-58 (59-61) cm cast off 35-36-37 (36-37) sts (+5 sts) mid front for neck, complete piece knitting back and forth on row. Continuing cast off to shape neckline on every other row: 3 sts 1 time, 2 sts 1 time, 1 st 2 times. At the same time when piece measures 60-61-62 (63-65) cm cast off middle 45-46-47 (46-47) sts mid back for neck and on next row cast off 2 sts on each side to shape neckline. After M.3 complete with colour from last round. Cast off when piece measures 62-63-64 (65-67) cm Sweater body: Knit sweater on circular needles and cut up for armhole afterwards. Figures in ( ) = Gent size. Cast on 180-188-196 (196-204) sts on circular needle size 2.5 mm with Alt. 1 - grey or Alt.2 off white and knit 5 cm rib. Change to circular needle size 4 mm and knit 1 round stocking sts at the same time inc 54-64-74 (56-66) sts evenly on 1st row = 234-252-270 (252-270) sts. Knit M.1 continue with M.2. Remember knitting tension. At the same time when piece measures 32-33-34 (35-37) cm inc 5 sts on each side (these sts are for cutting later and are not knit into pattern). When piece measures 35-36-37 (38-40) cm knit M.3. At the same time When piece measures 44-45-45 (47-49) cm cast off middle 13-14-15 (14-15) sts for neck and complete each side separately. When piece measures 57-58-59 (60-62) cm cast off to shape neckline on every other row 11-12-12 (12- 12) sts 1 time, 3 sts 1 time, 2 sts 1 time, 1 sts 1 time. At the same time when piece measures 60-61-62 (63-65) cm cast off middle 45-46-47 (46-47) sts mid back for neck and on next row cast off 2 sts on each side. After M.3 complete with colour from last round. Cast off when piece measures 62-63-64 (65-67) cm Sweater and Jacket Sleeve: Cast on 48-48-50 (50-52) sts on double pointed needles size 2.5 mm with same colour as body and knit 5 cm Rib (if ribbons are to be sewn on later knit Edge in stead of Rib so ribbon is sewn on Edge). Change to double pointed needles size 4 mm and knit M.1. (place one pattern repeat mid sleeve) at the same time inc 12-14-12 (12-10) sts evenly on 1st row = 60-62-62 (62-62) sts. At the same time inc mid under arm on each side of middle sts 1 sts 32-32-32 (32-32) sts on Lady: every 3rd row. Gent: alternating every * 3rd and 4th row * = 124-126-126 (126-126). After M.1 continuing knit M.2. When piece measures 39-38-37 (43-43) cm – adjust to pattern, knit M.3 until piece measures 50-49-48 (54-54) cm, now knit 2 cm stocking sts with WS out for edge over cutting edge on body. Cast off. Sweater + Jacket Assembly: Sew in a marking thread down in middle of inc sts on each side (+ mid front on jacket). Sew two seams on sewing machine around marking threads, 1st seam = 1/2 sts from 1st st from thread, 2nd seam = 1/2 sts from 1st seam at armhole. Cut up for armhole (+ mid front at jacket). Sew shoulder seams. Jacket: Pick up approx 120 sts along left front band on needle size 2.5 mm and knit Edge (knit al edges in same colour as Rib), cast off, fold edge towards WS and sew. Repeat along right but after 1 cm cast off 6 buttonhole evenly on row - 1 buttonhole = cast off 2 sts, cast on 2 new sts on next row. Neckline Jacket: Pick up approx 114 sts around neckline on double pointed needles size 2.5 mm and knit Edge, cast off and fold edge towards WS and sew. Sew on Ribbons on front bands and along neck if desired. Sweater with split neck: Pick up approx 32 sts along left side of split on front piece on needle size 2.5 mm and knit Edge (knit all Edges in same colour as Rib), cast off. Repeat along right side. Fold edges towards WS and sew on. Pick up approx 114 sts around neckline on double pointed needles size 2.5 mm and knit Edge, cast off and fold edge towards WS and sew. Sew on Ribbon around neck and split and at bottom of sleeve if desired. Sew sleeves onto body from RS as follows: Sew alternating 1 sts in last garter st round of sleeve before folding edge and 1 sts on body after machine seam. Turn WS out on sweater and sew folding edge from sleeves over cutting edge onto body by hand. Sew 6 buttons onto Jacket or 3 claps on split neck. ________________________________________ HAT and SOCKS: Materials: DROPS Karisma Superwash from Garnstudio Alt.1/ Alt.2 350-350-350 (350-350) g colour no 53, grey/ 1, off white 50-50-50 (50-50) g colour no 1, off white/ 16, grey Hat: DROPS circular needles size 2.5 mm and 4 mm. Cast on 150 (158) sts on circular needle size 2.5 mm with grey (knit hat in colours of Alt.1) and knit 6 cm rib, change to circular needle size 4 mm and knit M.5 at the same time cast off to 102 (108) sts evenly on 1st round. After M.5 complete with grey at the same time insert a marking thread or stitch marker after every 6th sts. Now knit two sts after marking thread or stitch marker tog. Repeat this on every 6th row until 17 sts are left. Pull a double thread through these sts and sew. Socks: Size: Length: 58 (65) cm. - Foot: 23 (26) cm. Double pointed needles size 2.5 mm and 3 mm Knitting tension: 22 sts x 32 rows on needle size 3 mm and stocking sts = 10 x 10 cm Rib: * K1, P1 * Ankle: * slip next sts loosely off, K1 (WS = P1) psso * Heal decrease: 1st row: (RS) Knit until 6 (7) sts re-appear on needle. Turn piece. 2nd row: (WS) Knit until 6 (7) sts re-appear on needle. Turn piece. 3rd row: Knit until 8 sts return to row, knit ankle (see explanation!). Turn piece 4th row: Knit until 8 sts re-appear to row, knit ankle, turn piece. - Then continue knitting so 1 st less on each side before ankle. Continue until 12 (14) sts re-appear. Sock: Cast on 72 (80) sts on double pointed needles size 2.5 mm with grey (knit sock on colour of Alt.1) and knit 14 (16) cm rib. Change to double pointed needles size 3 mm and knit 2 rounds stocking sts at the same time inc 0 (4) sts evenly on 1st row = 72 (84) sts. Knit M.1. Then continuing knit M.2. When piece measures 30 (32) cm begin casting off for leg. Cast off each side of middle sts back: Knit 2 sts before middle sts tog, (see explanation of ankle) and K2 sts tog after middle sts – repeat on every 5th row (4th row) 12 (16) times in total = 48 (52) sts. When piece measures 50 (56) cm slip middle 24 (26) sts to front on a thread or stitch holder and complete with grey. Then knit 5 (6) cm stocking sts (heel) over the 24 (26) middle sts back, and then knit heel cast off (see explanation above). Then pick up 12 (13) sts on each side of heel and slip all sts on same needle = 60 (66) sts. Cast off continuing as follows: K2 first of uppermost 24 (26) sts tog and K2 last sts af uppermost 24 (26) sts tog on every other row 6 times in total = 48 (54) sts. Knit until foot measures approx 19 (21.5) cm. Insert a marking thread or stitch holder on each side of foot and cast off for toe on each side of marking thread as follows: K2 sts before marking thread or stitch marker tog and K2 sts after tog, repeat 3 times on every other row = 36 (42) sts. Then 7 (9) times on every row = 8 (6) sts. Pull sts tog and sow away thread well. ______________________________________________________________________ HEAD BAND AND MITTENS: Materials: DROPS Karisma Superwash from Garnstudio Alt.1/ Alt.2 150-150-150 (150-150) g colour no 53, grey/ 1, off white 50-50-50 (50-50) g colour no 1, off white/ 16, grey Head band: Cast on 120 (126) sts on double pointed needles size 2.5 mm with same colour as rib on sweater and knit 16 rounds stocking sts, P1 round, M.4, P1 round, 2 rounds stocking sts, cast off. Sew edges and cast off edge tog with mattress sts in outermost sts to avoid a thick seam. Mitten: Mittens: DROPS Double poined needles size 3 mm. Knitting tension: 22 sts x 32 rows on needle size 3 mm and stocking sts = 10 x 10 cm Rib: * K1, P1 * Figures in ( ) = Gent size. Cast on 48 (56) sts on double pointed needles size 3 mm with grey (knit mittens in Alt.1) and knit 2 cm stocking sts, P1 round, M.5. Then knit 3 cm Rib – cast off 4 (4) sts evenly on row = 44 (52) sts. Measures piece from here! Next row as follows: M.7, 17 (21) of M.8, M.7, 17 (21) sts of M.8. (insert a marking thread or stitch marker in transition from M.8 to M.7 for thumb). When piece measures 1 cm inc on each side of 1 sts with marking thread or stitch marker for thumb as follows: 1 sts 6 (6) times on every 3rd row = 56 (64) sts – knit inc sts into M.8 after each. When piece measures 6.5 (7) cm slip middle 13 (13) sts over thumb on a thread or stitch holder and on next row cast on 1 sts over these = 44 (52) sts. Continue until piece measures 17 (18) cm. Insert one marking thread or stitch marker in middle of each M.7. Now cast off on each side of marking thread on every row 1 sts (minus 4 sts per round)- repeat 10 (11) times. Pull thread through last sts and sew on. Thumb: Pick up 16 (20) sts around thumb and knit 6.5 cm M.8, then knit sts tog two by two, pull double thread through sts. |
|||||||
Diagram explanations |
|||||||
|
|||||||
|
|||||||
|
Have you made this or any other of our designs? Tag your pictures in social media with #dropsdesign so we can see them! Do you need help with this pattern?You'll find tutorial videos, a Comments/Questions area and more by visiting the pattern on garnstudio.com. © 1982-2024 DROPS Design A/S. We reserve all rights. This document, including all its sub-sections, has copyrights. Read more about what you can do with our patterns at the bottom of each pattern on our site. |
|||||||


With over 40 years in knitting and crochet design, DROPS Design offers one of the most extensive collections of free patterns on the internet - translated to 17 languages. As of today we count 304 catalogues and 11422 patterns - 11422 of which are translated into English (UK/cm).
We work hard to bring you the best knitting and crochet have to offer, inspiration and advice as well as great quality yarns at incredible prices! Would you like to use our patterns for other than personal use? You can read what you are allowed to do in the Copyright text at the bottom of all our patterns. Happy crafting!
Comments / Questions (23)
Die Bordüre um den Hals herum, wie wird die gestrickt? Ist das das Band, was man zusätzlich benötigt? Wo bekommt man es? Vielen Dank für eine Antwort
13.01.2018 - 16:49DROPS Design answered:
Liebe Barbara, das Zierband (= Bändel) um den Hals herum wird dann genäht, das können Sie finden entweder bei Ihrem DROPS Laden oder in einem Kurzwarenhandel. Viel Spaß beim fertigsstellen!
15.01.2018 - 09:01From the pattern diagrams, I believe the sweater image is Alt 2 (the hat is Alt 1). What I meant to ask was, shouldn't the background colour for the sweater (off white) require the larger amount of yarn (550g in ladies small)? The Alt 2 sweater requirements say you need 550g of grey and 200g of off white. Does this seem right to you?
29.01.2017 - 02:22DROPS Design answered:
Dear Evr, in alt 1 you need 550 g off white + 200 g grey, and in Alt 2 you need 550 g grey + 200 g off white. Happy knitting!
30.01.2017 - 11:45I would like to confirm that the image is an alt 2 sweater. The yarn required shows more gray than off white but the picture looks like the opposite and the jacket requirements are the opposite. Are the sweater numbers reversed?
21.01.2017 - 01:21DROPS Design answered:
Hi EVR. It's an old pattern, the colours may have been slightly altered. But the one on the pattern should be the one with an off white background, but I am not completely sure if it's a 16 or 53 on the pattern colour.
26.01.2017 - 12:11Laura wrote:
My comment below includes the word narks but should be Karisma :)
07.01.2017 - 17:07Laura wrote:
There is an error in the colour numbers. The photo shows blue-grey. The colour numbers are for the typical greys, not bluish at all. Narks a does not include any color close to the blue grey shown in the photo. It would be nice if the pattern included definitions of terms such as alt and others.
07.01.2017 - 17:04DROPS Design answered:
Dear Laura, remember that the colour may vary from screen to screen in the same way that shades may vary slighlty from dye lot to dyelot, please contact your DROPS Store if you need any help choosing a colour. Happy knitting!
09.01.2017 - 09:57Laura wrote:
What is the long and short version? The length of the seawater ? In that case where in the pattern are the instructions for the two? More importantly how do I know the final measures for one or the other?
07.01.2017 - 16:57DROPS Design answered:
Dear Laura, you will find all informations to the longer version in written pattern under "Long version". Happy knitting!
09.01.2017 - 09:58Laura wrote:
There is a mistake in the descr. This sweater is not Top-Down, it is bottom up. It is important to know because it is used as a filter.
07.01.2017 - 16:54Ik zoek in Nederland naar de band zoals op deze trui is gebruikt, maar kan het niet goed vinden. Weten jullie waar ik dit kan kopen?
07.05.2014 - 17:56DROPS Design answered:
Dit is een heel oud patroon en wij hebben al jaren geen band meer in ons assortiment helaas. Probeer het bij fourniturenwinkels, op marktplaats of op de markt.
08.05.2014 - 10:39Waar kan ik in Nederland drops band kopen?
13.03.2013 - 08:41DROPS Design answered:
Dit is een oud patroon en helaas hebben wij geen band meer in het assortiment. Wellicht kunt u mooi band vinden bij een fourniturenzaak of in een webwinkel.
15.03.2013 - 09:21Kommer denne opskrift på dansk?
21.04.2012 - 10:23DROPS Design answered:
Nu er den også lagt ud! God fornøjelse!
23.04.2012 - 09:55