
Popular categories
Looking for a yarn?


|
|||||||||||||||||||||||||||||||||||||
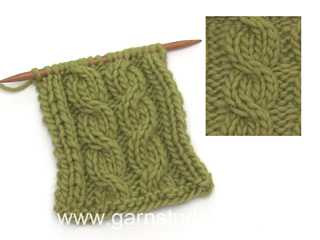
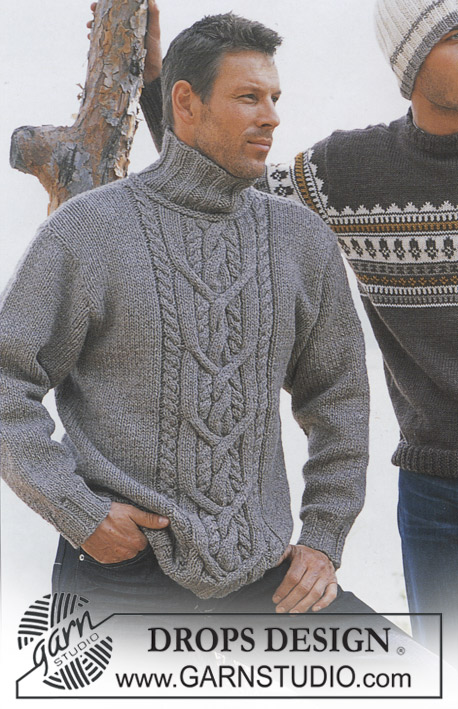
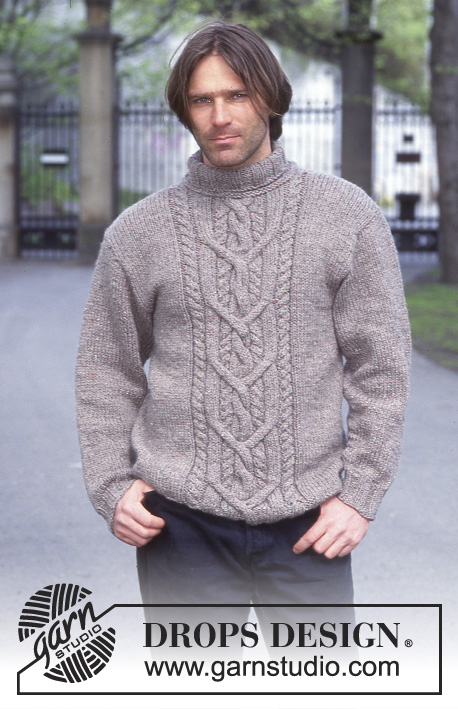
King's Cable |
|||||||||||||||||||||||||||||||||||||
 |
 |
||||||||||||||||||||||||||||||||||||
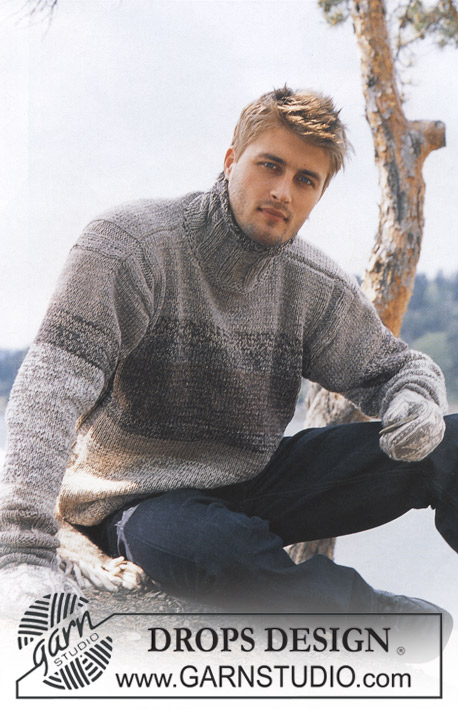
Men's knitted pullover with cables in DROPS Alaska and DROPS Alpaca
DROPS 85-6 |
|||||||||||||||||||||||||||||||||||||
|
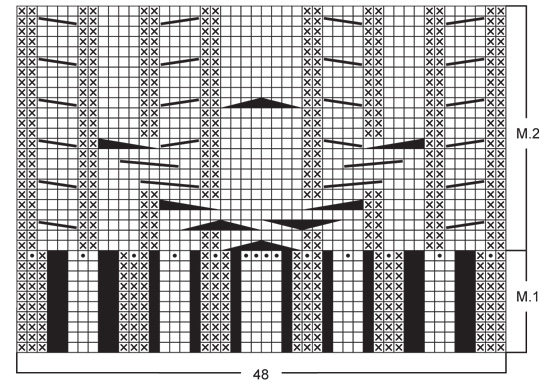
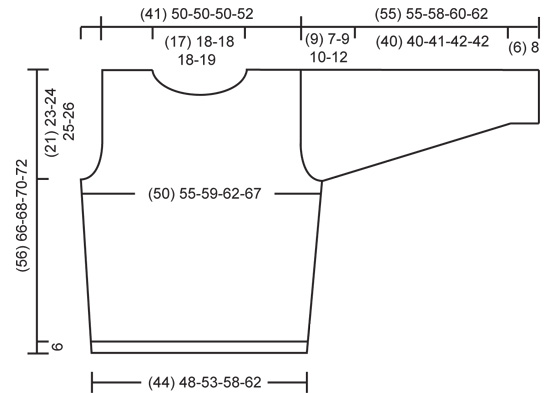
Gauge: 13 sts x 18 rows with 1 strand of each yarn on larger needles in stockinette = 10 x 10 cm. Rib: *K 3, P 3*, repeat from *-*. Pattern: The pattern is seen from the right side. Pattern 1 (M.1) is the first 10 rows of the chart. The black squares in Pattern 1 are NOT sts – skip over these squares. Pattern 2 (M.2) is the top 24 rows of the chart. Front: Cast on 60-66-72-78-84 sts on smaller needles with 1 strand each Alaska + Alpaca and knit rib as follows (row 1 = right side): Size 12/14 years: K 1 (edge st knit in garter st), *P 3, K 3*, repeat *-* a total of 2 times, Pattern 1 (= 34 sts), *K 3, P 3*, repeat *-* a total of 2 times, end with K 1 (edge st knit in garter st). Size S/M: K 1 (edge st knit in garter st), *K 3, P 3*, repeat *-* a total of 2 times, K 3, Pattern 1 (= 34 sts), *K 3, P 3*, repeat *-* a total of 2 times, end with K 3 and K 1 (edge st knit in garter st). Size L: K 1 (edge st knit in garter st), *P 3, K 3*, repeat *-* a total of 3 times, Pattern 1 (= 34 sts), *K 3, P 3*, repeat *-* a total of 3 times, end with K 1 (edge st knit in garter st). Size XL: K 1 (edge st knit in garter st), *K 3, P 3 , repeat *-* a total of 3 times, K 3, Pattern 1 (= 34 sts), *K 3, P 3*, repeat *-* a total of 3 times, end with K 3 and K 1 (edge st knit in garter st). Size XXL: K 1 (edge st knit in garter st), *P 3, K 3*, repeat *-* a total of 4 times, Pattern 1 (= 34 sts), *K 3, P 3*, repeat *-* a total of 4 times, end with K 1 (edge st knit in garter st). When Pattern 1 is complete, (the piece measures approx. 6 cm) change to larger needles – there are now 14 sts incl in Pattern = 74-80-86-92-98 sts. Continue as follows: K 1 (edge st knit in garter st), 12-15-18-21-24 sts stockinette st, Pattern 2 (= 48 sts) and 12-15-18-21-24 sts stockinette st, K 1 (edge st knit in garter st). When the piece measures 12 cm inc 1 st at each side every 5-6-7-12-12 cm a total of 4-4-4-3-3 times = 82-88-94-98-104 sts. When the piece measures 35-43-44-45-46 cm bind off for armhole at each side every other row: 3 sts 1 time, 2 sts 1-0-1-1-2 times and 1 st 2-1-2-4-4 times = (68) 80-80-80-82 sts. When the piece measures 50-59-61-63-65 cm dec 14 sts evenly distributed over the center 48 sts. On the next row bind off the center 14-16-16-16-18 sts for the neck. Then bind off at each neck edge every other row: 2 sts 1 time and 1 st 2 times = 16-21-21-21-21 sts remain on each shoulder. Bind off when the piece measures 56-66-68-70-72 cm. Back: Cast on 59-65-71-77-83 sts on smaller needles with 1 strand each Alaska + Alpaca and knit rib as follows: Sizes 12/14 years + L + XXL: K 1 (edge st knit in garter st), *K 3, P 3*, repeat *-*, end with K 3, K 1 (edge st knit in garter st). Sizes S/M + XL: K 1 (edge st knit in garter st), *P 3, K 3*, repeat *-*, end with P 3 and K 1 (edge st knit in garter st). When the piece measures 6 cm – the same length as Front – change to larger needles and stockinette st. When the piece measures 12 cm inc at each side as on front = 67-73-79-83-89 sts. Bind off for armhole as on front = 53-65-65-65-67 sts. When the piece measures 54-64-66-68-70 cm bind off the center 19-21-21-21-23 sts for the neck. On the next row dec 1 st at each neck edge = 16-21-21-21-21 sts remain on each shoulder. Bind off when the piece measures 56-66-68-70-72 cm. Sleeve: Cast on 32-32-38-38-38 sts on smaller needles with 1 strand each Alaska + Alpaca and knit rib, keeping 1 edge st at each side in garter st. When the piece measures 6-8-8-8-8 cm change to larger needles and stockinette st. When the piece measures 10-12-10-13-14 cm inc 1 st at each side every 3.5-3-3.5-3-2.5 cm a total of 10-12-11-12-14 times = 52-56-60-62-66 sts. When sleeve measures 46-48-49-50-50 cm bind off for sleeve cap at each side every other row: 4 sts 1 time, 3 sts 1 time, 2 sts 1-1-2-2-2 times and 1 st 3-1-1-2-2 times, then bind off 2 sts at each side until the piece measures 54-54-58-59-61 cm, then bind off 3 sts at each side 1 time. Bind off the remaining sts, the piece measures approx. 55-55-58-60-62 cm. Assembly: Sew shoulder seams. Collar with rolled edge: Pick up and knit approx. 60-78 sts (divisible by 6) around the neck on smaller double-pointed needles with 1 strand each Alaska + Alpaca; join and place a marker at the join. Knit rib for 12-12-14-14-14 cm and then bind off in rib. Pick up and knit approx. 56-72 new sts in the 1st row of the rib (at neckline) on smaller double-pointed needles with 1 strand each Alaska + Alpaca; join and knit 3 rows stockinette st (= rolled edge). Bind off – for best results, make a yo every 8 sts at the same time as you bind off. Sew in sleeves. Sew sleeve and side seams using edge sts as a seam allowance. |
|||||||||||||||||||||||||||||||||||||
Diagram explanations |
|||||||||||||||||||||||||||||||||||||
|
|||||||||||||||||||||||||||||||||||||
|
|||||||||||||||||||||||||||||||||||||
|
|||||||||||||||||||||||||||||||||||||
|
Have you made this or any other of our designs? Tag your pictures in social media with #dropsdesign so we can see them! Do you need help with this pattern?You'll find tutorial videos, a Comments/Questions area and more by visiting the pattern on garnstudio.com. © 1982-2024 DROPS Design A/S. We reserve all rights. This document, including all its sub-sections, has copyrights. Read more about what you can do with our patterns at the bottom of each pattern on our site. |
|||||||||||||||||||||||||||||||||||||


With over 40 years in knitting and crochet design, DROPS Design offers one of the most extensive collections of free patterns on the internet - translated to 17 languages. As of today we count 304 catalogues and 11422 patterns - 11422 of which are translated into English (UK/cm).
We work hard to bring you the best knitting and crochet have to offer, inspiration and advice as well as great quality yarns at incredible prices! Would you like to use our patterns for other than personal use? You can read what you are allowed to do in the Copyright text at the bottom of all our patterns. Happy crafting!
Comments / Questions (91)
O comprato la lana ma lo schema M2 non corrisponde per nulla al modello nella foto. Penso che le indicazioni dei punti si riferiscono al dritto del lavoro e il rovescio va lavorato come i punti si presentano. Altrimenti non è possibile che si lavorino dritto su dritto e rovescio su rovescio se non si fa un ferro sul rovescio seguendo i punti come si presentano. Ma in ogni caso non è assolutamente possible ottenere il motivo nella foto. Dove sta l'incrocio centrale ?
31.10.2015 - 20:33DROPS Design answered:
Buongiorno Chiara. Nei diagrammi trova tutti i ferri del motivo, visti sul diritto del lavoro. I ferri pari sono i ferri di ritorno e lavora le m come si presentano: la m lavorata a dir sul ferro di andata, viene lavorata a rov sul ferro di ritorno. Lavora una volta il diagramma M.1, poi prosegue ripetendo solo il diagramma M.2. Già alla seconda ripetizione di M.2 dovrebbe essere in grado di visualizzare meglio il risultato finale. Buon lavoro!
01.11.2015 - 08:52Der står den er strikke i lysebrun, men den bluse er grå kan i sige hvilken grå den er strikket i
23.10.2015 - 13:23DROPS Design answered:
Hej Susanne. Det er altsaa de farver den er strikket i, men det er nok lyset der aendrer i det. Men du kan lave en lysegraa version hvis du kigger paa farvekortene, f.eks. 04 Alaska med 517 Alpaca. Tag en snak med din garnbutik om den bedste kombi for dig. God fornöjelse.
23.10.2015 - 13:49Nelle descrizioni scrivete taglie 12/14 anni , Ma il maglione è per uomo. Mi confermate che le misure e la quantità di lana richiesta per eseguire il modello corrispondono a taglie per uomo? Grazie
02.10.2015 - 15:54DROPS Design answered:
Buongiorno Chiara. Il maglione viene proposto per la taglia ragazzo età 12/14 anni, e per le taglie uomo: S/M, L, XL, XXL. Quindi p.es per una taglia S/M (uomo), serviranno 750 g di Alaska e 350 g di Alpaca. Nel diagramma in fondo alle spiegazioni trova la corrispondenza delle misure espresse in cm. Il numero tra parentesi è riferito alla taglia ragazzi. Buon lavoro!
02.10.2015 - 18:07Hi,how to read King's cable drops 85-6 pullover pattern 2. M.2 chart on straight needle ???
29.08.2015 - 14:30DROPS Design answered:
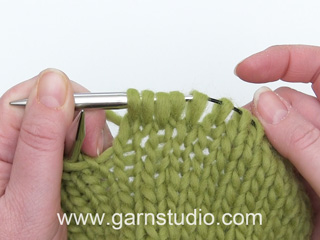
Dear Mrs Maple, in the diagram 1 square = 1 st x 1 row, start at the bottom on the right side and read every row from RS from the right towards the left and every row from WS from the left towards the right (cables should be done from RS). Happy knitting!
31.08.2015 - 10:22Hi,the king's cable pullover. The pattern 1,M.1. The last row,row 10 , tell me,knit 1 ,increase right, I want to know, which increase the pattern want me to use?? Increase KFB (knit front back) or increase M1,( make one )????
29.08.2015 - 04:12DROPS Design answered:
Dear Mrs Maple, that's right, you will work into front and back of each st with a dot in the diagram. Happy knitting!
31.08.2015 - 10:14Hi, The King's Cable Drops 85-6 pullover, I knit size XL. And I don't understand pattern 1,M.1. The last row, row 10. The chart tell me to knit 1,inc 1 st by att knit 2 sts in 1 st. Can u please translate for me..can u translate the inc 1 by att knit 2 STS in 1 st . please help,I am new knitter....
29.08.2015 - 04:01DROPS Design answered:
Dear Mrs Maple, on last row in M.1 you have to inc, ie: P1, P next st twice (in front and back loop of st) (= 1 st inc), P1, K1, K next st into front and back loop (= 1 st inc), K1, and so on, ie when there is a dot in the square, work this st into front and back loop (= 1 st inc in this st). Happy knitting!
31.08.2015 - 10:13Guten Tag, ich habe eine Frage zum Abketten des Halsausschnitts: laut Anleitung sollen 14 M gleichmäßig über die mittleren 48 M abgekettet werden. Ich vermute, dass 14 Mal 2M zusammen gestrickt werden, für eine Abnahme von 14 M. Doch wie kann ich dann das Muster entsprechend weiterführen? In der Folgereihe werden dann die 16 mittleren M abgekettet? Oder liege ich völlig falsch? Vielen Dank schon einmal!
08.06.2015 - 17:24DROPS Design answered:
Die 14 M werden an den gleichen Stellen wieder abgenommen, an denen sie zuvor zugenommen wurden, im Diagramm sind das ja die Kästchen mit den Punkten. Dann ketten Sie die mittleren 16 M für den Halsausschnitt ab.
05.07.2015 - 09:19Bräuchte den Pullover in Herrengrösse und nicht in Kindergrösse. Bitte um Maschenzahlen und Garnverbrauch. Danke
22.02.2015 - 17:31DROPS Design answered:
Die Herrengrößen finden Sie auch in der Anleitung, hinter der Angabe in Klammern, die für die Kindergröße steht, sind die Größen S/M-L-XL-XXL angegeben, mit den entsprechenden Mengenangaben unter Material. Die passende Größe entnehmen Sie am besten der Maßskizze am Ende der Anleitung über dem Diagramm, hier können Sie die einzelnen Maße sehen und sich damit für die richtige Größe entscheiden.
22.02.2015 - 21:46Buongiorno, cosa significa l'asterisco e come debbo intendere questa frase: *3 m dir, 3 m rov*, ripetere *-*. Ci sono aumenti da fare nella lavorazione delle coste?
14.02.2015 - 07:11DROPS Design answered:
Buongiorno Simonetta. Quando trova degli asterischi, vuol dire che deve ripetere le istruzioni riportate tra gli asterischi, un certo numero di volte. P.es: se trova: *3 m rov, 3 m dir*, ripetere *-* per un totale di 2 volte, dovrà lavorare in questo modo: 3 m rov, 3 m dir, 3 m rov, 3 m dir. Ci sono degli aumenti solo nell'ultima riga del motivo 1. Buon lavoro!
14.02.2015 - 09:37¿Que quiere decir puntos negros, saltarlos? que se pasan sin tejer?¿pero hay que pasar el punto de una aguja a otra? gracias
27.01.2015 - 01:51DROPS Design answered:
Hola Esperanza, los cuadros negros en realidad no son pts. Están ahí porque mas adelante en ese espacio va a haber pts al hacer aumentos. Pasamos de 34 pts en M.1 a 48 en M.2. Ignóralos.
27.01.2015 - 10:52