DROPS Alpaca
DROPS Alpaca
100% Alpaca
from 4.85 $ /50g
DROPS Cotton Viscose
54% Cotton, 46% Viscose
Discontinued
find alternatives
DROPS SS24

Stella Marina

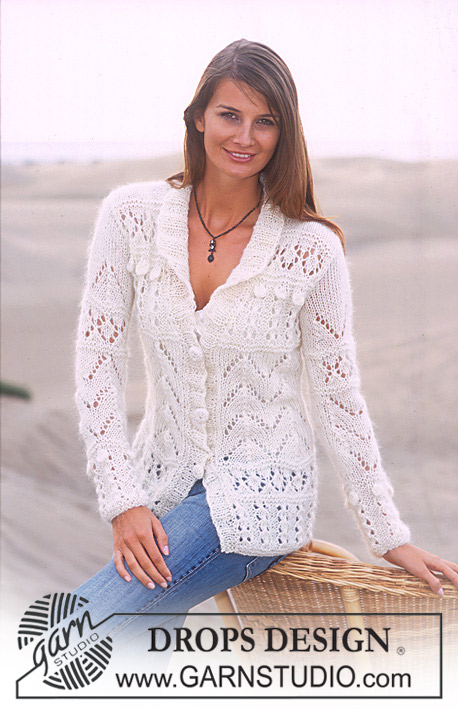
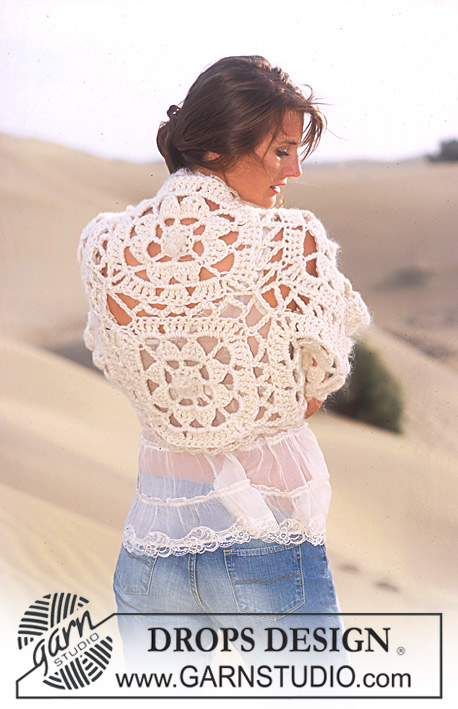
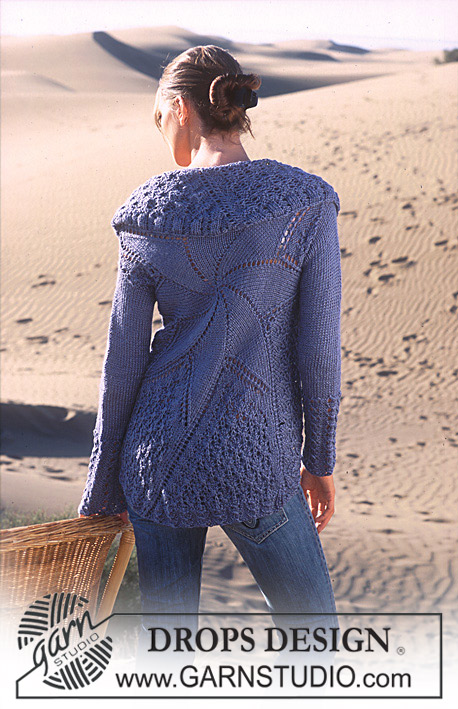
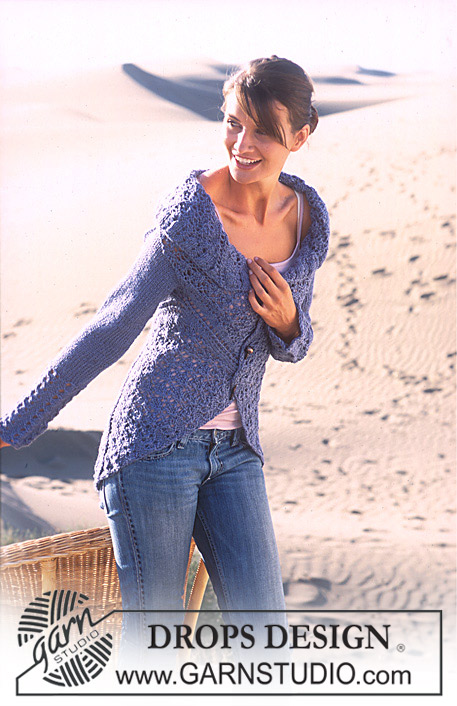
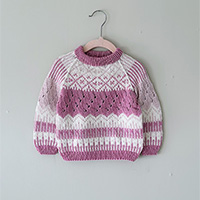
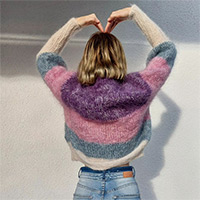
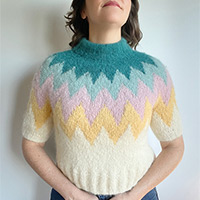
DROPS Cardigan in “art knitting” with Alpaca and Cotton Viscose, based on a circle.

DROPS 94-5
Size: S/M - M/L -XL

Materials: DROPS Cotton Viscose, from Garnstudio
400-450-500 g color no 22 jeans blue
and use: DROPS Alpaca from Garnstudio
250-300-300 g color no 6347, jeans blue

DROPS STRAIGHT NEEDLES and circular needles (40, 60, 80 cm / 16", 24", 32") size 6 mm / US 10 or the size needed to obtain the correct gauge.

DROPS crochet hook size 4 mm / G/6

-------------------------------------------------------

Alternative Yarn – See how to change yarns here
Yarn Groups A to F – Use the same pattern and change the yarn here
Yarn usage using an alternative yarn – Use our yarn converter here

-------------------------------------------------------

DROPS Alpaca
DROPS Alpaca
100% Alpaca
from 4.85 $ /50g
DROPS Cotton Viscose
54% Cotton, 46% Viscose
Discontinued
find alternatives

Pattern instructions

NOTE: This pattern is written in American English. All measurements in charts are in cm. For conversion from inches to cm - click here. There are different terms for crocheting in American and British English. If this pattern includes crochet, click for "crochet terms" here. For this pattern in British English, please click here.
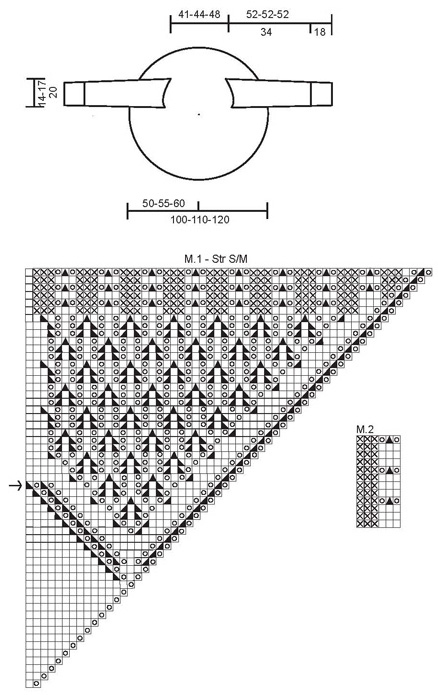
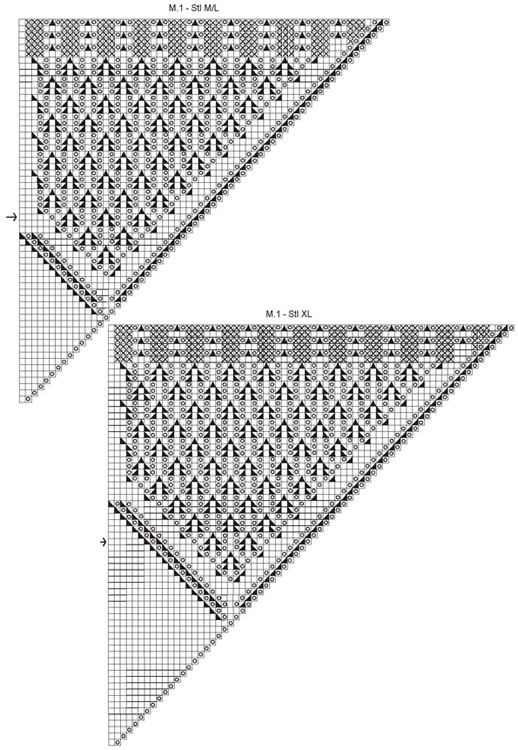
Knitting Gauge: Worrked with 1 thread of Cotton Viscose and 1 thread of Alpaca:
15 sts x 22 rounds on needles size 6 mm / US 10 in pattern (front and back piece) = 10 x 10 cm / 4" x 4"
15 sts x 19 rows of stockinette sts (sleeves) = 10 x 10 cm / 4" x 4"

Lace pattern: See diagrams M.1 – there is one diagram for each size. Diagram shows 1/8 of the piece and only every other round. Rounds 2, 4, 6 and all even rounds are worked in stockinette sts out to the rib (= the last 6 rounds in diagram), thereafter knit K over K and P over P so the rib will be a total of 11 rounds. M.2 = the rib for the sleeves.

Front and Back piece: The cardigan is knitted in a circle from the centre back. Cast on 8 sts with 1 thread of Cotton Viscose and 1 thread of Alpaca and distribute them evenly on 4 double pointed needles. Knit in pattern according to diagram M.1 – see explanation above. Inc. 8 sts on every other row according to diagram - change to longer circular needles as you go along.

Size S/M: Knit the round marked with an arrow for the armholes as follows: Make a yo, K2 tog. make a yo (as the first 3 windows in diagram shows). Knit 21 sts with another color (this thread is taken out later and the sleeves are knitted from here and downwards). Knit 63 sts according to diagram, knit the next 21 sts with another color (= 2nd armhole). Continue diagram as before.

Size M/L: Knit the round marked with an arrow for the armholes as follows: Make a yo, K2 tog. make a yo (as the first 3 windows in diagram shows). Knit 26 sts with another color (this thread is taken out later and the sleeves are knitted from here and downwards). Knit 67 sts according the diagram, knit the next 26 sts with another color (= 2nd armhole). Continue diagram as before.

Size XL: Knit the round marked with an arrow for the armholes as follows: Make a yo, K2 tog. make a yo (as the first 3 windows in diagram shows). Knit 30 sts with another color (this thread is taken out later and the sleeves are knitted from here and downwards). Knit 72 sts according the diagram, knit the next 30 sts with another color (= 2nd armhole). Continue diagram as before.

Last round in diagram is the binding off round. There is a total of 448-496-544 sts on the bind off round. The piece should measure approx 50-55-60 cm / 19¾"-21½"-23½" from the centre and out (= 100-110-120 cm / 39½"-43½"-47" in diameter).

Sleeves: Pick up sts for the sleeves from the thread which was knitted in another color. The sleeves are knitted from top down. Cut this thread in the middle and use 2 needles to put the sts on each side onto the needles (then pull the thread out) = 21-26-30 sts on each needle/side.
Put all the sts on a small circular needle = 42-52-60 sts. Pick up 4 additional sts for the top of the sleeve- top is where the sleeve is closest to the other sleeve – and 2 extra sts at the bottom (underneath) of the sleeve = 48-58-66 sts.
Start knitting from underneath the sleeve – insert a marking thread here.
P 1 round and continue in stockinette sts.
When the sleeve measures 4 cm / 1½" dec 1 st each side of the marking thread. Repeat to dec 2 sts on every 6-4-2.5 cm / 2⅜"-1½"-⅞" a total of 6-8-12 times = 36-42-42 sts. When the piece measures 34 cm / 13⅜" continue in M.2.
When the piece measures 52 cm / 21½" bind off loosely – remember to bind off at the 4th, 8th or 12th round as shown in diagram (= pattern round). Note: Try the cardigan on before binding off the sleeves to make sure the sleeves are the right length.

Diagram

All measurements in charts are in cm.

symbols = K
symbols = P
symbols = yo
symbols = K2 tog
symbols = slip 1 st as if to K, K1, psso
symbols = slip 1 st as if to K, K2 tog, psso
diagram
diagram
Do you have a question? See a list of frequently asked questions (FAQ)

Knitting tension is what determines the final measurements of your work, and is usually measured per 10 x 10 cm. It is provided like so: number of stitches in width x number of rows in height - eg: 19 stitches x 26 rows = 10 x 10 cm.

The knitting tension is very individual; some people knit/crochet loosely while others work tightly. You adjust the knitting tension with the needle size, which is why the suggested needle size only serve as a guide! You need to adjust this (up or down) to ensure that YOUR knitting tension matches the knitting tension provided in the pattern. If you work with a different knitting tension than provided you will have a different yarn consumption, and your work will have different measurements than what the pattern suggests.

The knitting tension also determines which yarns can replace each other. As long as you achieve the same knitting tension you can replace one yarn with another.

See DROPS lesson: How to measure your tension/gauge

See DROPS video: How to make a gauge tension swatch

The required amount of yarn is provided in grams, eg: 450 g. To calculate how many balls you’ll need you first need to know how many grams are in 1 ball (25g, 50g or 100g). This information is available if you click on the individual yarn quality on our pages. Divide the amount required with the amount of each ball. For example, if each ball is 50g (the most common amount), the calculation will be as follows: 450 / 50 = 9 balls.

The important thing when changing from one yarn to another is that the knitting/crochet tension remains the same. This is so that the measurements of the finished piece will be the same as on the sketch provided. It is easier to achieve the same knitting tension using yarns from the same yarn group. It is also possible to work with multiple strands of a thinner yarn to achieve the knitting tension of a thicker one. Please try our yarn converter. We recommend you to always work a test swatch.

Please NOTE: when changing yarn the garment might have a different look and feel to the garment in the photo, due to individual properties and qualities of each yarn.

See DROPS lesson: Can I use a different yarn than the one mentioned in the pattern?

All our yarns are categorised into yarn groups (from A to F) according to thickness and knitting tension – group A contains the thinnest yarns and group F the thickest. This makes it easier for you to find alternative yarns to our patterns, should you wish to switch yarn. All yarns within the same group have a similar knitting tension and can easily replace each other. However, different yarn qualities have different structures and properties which will give the finished work a unique look and feel.

Click here for an overview of the yarns in each yarn group

At the top of all our patterns you’ll find a link to our yarn converter, which is a helpful tool should you wish to use a different yarn than suggested. By filling in the yarn quality you wish to replace, the amount (in your size) and number of strands, the converter will present good alternative yarns with the same knitting tension. Additionally it will tell you how much you’ll require in the new qualities and whether you’ll need to work with multiple strands. Most skeins are 50g (some are 25g or 100g).

If the pattern is worked with multiple colours, every colour will have to be converted separately. Similarly, if the pattern is worked with several strands of different yarns (for example 1 strand Alpaca and 1 strand Kid-Silk) you will have to find alternatives for each, individually.

Click here to see our yarn converter

Since different yarns have different qualities and textures we have chosen to keep the original yarn in our patterns. However, you can easily find options among our available qualities by using our yarn converter, or simply pick a yarn from the same yarn group.

It is possible that some retailers still have discontinued yarns in stock, or that someone has a few skeins at home that they would like to find patterns for.

The yarn converter will provide both alternative yarn as well as required amount in the new quality.

If you think it's hard to decide what size to make, it can be a good idea to measure a garment you own already and like the size of. Then you can pick the size by comparing those measures with the ones available in the pattern's size chart.

You'll find the size chart at the bottom of the pattern.

See DROPS lesson: How to read size chart

The needle size provided in the pattern serves only as a guide, the important thing is to follow the knitting tension. And since knitting tension is very individual, you will have to adjust the needle size to ensure that YOUR tension is the same as in the pattern – maybe you’ll have to adjust 1, or even 2 needle sizes, up or down to achieve the correct tension. For this, we recommend that you work test swatches.

Should you work with a different knitting tension than the one provided, the measurements of the finished garment might deviate from the measurement sketch.

See DROPS lesson: How to measure your tension/gauge

See DROPS video: How to make a gauge tension swatch

Working a garment top-down provides more flexibility and room for personal adjustment. For example it is easier to try the garment on while working, as well as making adjustments to length of yoke and shoulder caps.

The instructions are carefully explaining every step, in the correct order. Diagrams are adjusted to the knitting direction and are worked as usual.

The diagram depicts all rows/rounds, and every stitch seen from the right side. It is read from bottom to top, from right to left. 1 square = 1 stitch.

When working back and forth, every other row is worked from the right side and every other row is worked from the wrong side. When working from the wrong side, the diagram will have to be worked reversed: from left to right, knit stitches are purled, purl stitches are knit etc.

When working in the round every round is worked from the right side and the diagram are worked from right to left on all rounds.

See DROPS lesson: How to read knitting diagrams

The diagram depicts all rows/rounds, and every stitch seen from the right side. It is worked from bottom to top, from right to left.

When working back and forth every other row is worked from the right side: from right to left and every other row is worked from the wrong side: from left to right.

When working in the round, every row in the diagram are worked from the right side, from right to left.

When working a circular diagram you start in the middle and work your way outwards, counter clockwise, row by row.

The rows usually start with a given number of chain stitches (equivalent to the height of the following stitch), this will either be depicted in the diagram or explained in the pattern.

See DROPS lesson: How to read crochet diagrams

Instructions for working several diagrams after each other on the same row/round, will often be written like so: “work A.1, A.2, A.3 a total of 0-0-2-3-4 times". This means you work A.1 once, then A.2 is worked once, and A.3 is repeated (in width) the number of times provided for your size – in this case like so: S = 0 times, M = 0 times, L=2 times, XL= 3 times and XXL = 4 times.

The diagrams are worked as usual: begin with the first row in A.1, then work the first row in A.2 etc.

See DROPS lesson: How to read knitting diagrams

See DROPS lesson: How to read crochet diagrams

The total width of the garment (from wrist-to-wrist) will be larger in the larger sizes, despite the actual sleeves being shorter. The larger sizes have longer sleeve caps and wider shoulders, so there will be a good fit in all sizes.

The measurement sketch/schematic drawing provides information regarding the full length of the garment. If it’s a jumper or a jacket the length is measured from the highest point on the shoulder (usually closest to the neckline), and straight down to the bottom of the garment. It is NOT measured from the tip of shoulder. Similarly, the length of yoke is measured from the highest point on the shoulder and down to where yoke is split into body and sleeves.

See DROPS lesson: How to read a schematic drawing

Diagrams are often repeated on the round or in height. 1 repeat is the diagram the way it appears in the pattern. If it says to work 5 repeats of A.1 in the round, then you work A.1 a total of 5 times after/next to each other in the round. If it says to work 2 repeats of A.1 vertically/in height you work the entire diagram once, then begin again at the start and work the entire diagram one more time.

Chain stitches are slightly narrower than other stitches and to avoid working the cast-on edge too tight, we simply chain more stitches to begin with. The stitch count will be adjusted on the following row to fit the pattern and measurement sketch.

The rib edge is more elastic and will contract slightly compared to, for example, stocking stitch. By increasing before the rib edge, you avoid a visible difference in width between the rib edge and the rest of the body.

It’s very easy to cast off too tightly, and by making yarn overs while casting off (and simultaneously casting these off) you avoid a too tight cast off edge.

See DROPS video: How to bind off with yarn overs (yo)

To achieve an even increase (or decrease) you can increase on, for example: every 3rd and 4th row alternately, like so: work 2 rows and increase on the 3rd row, work 3 rows and increase on the 4th. Repeat this until the increase is complete.

See DROPS lesson: Increase or decrease 1 st on every 3rd and 4th row alternately

Should you prefer to work in the round instead of back and forth, you may of course adjust the pattern. You’ll need to add steeks mid-front (usually 5 stitches), and follow the instructions. When you would normally turn and work from the wrong side, simply work across the steek and continue in the round. At the end you’ll cut the piece open, pick up stitches to work bands, and cover the cut edges.

See DROPS video: How to knit steeks and cut open

Should you prefer to work back and forth instead of in the round, you may of course adjust the pattern so you work the pieces separately and then assemble them at the end. Divide the stitches for the body in 2, add 1 edge stitch in each side (for sewing) and work the front and back pieces separately.

See DROPS lesson: Can I adapt a pattern for circular needles into straight needles?

Pattern repeats can vary slightly in the different sizes, in order to get the correct proportions. If you’re not working the exact same size as the garment in the photo, yours might deviate slightly. This has been carefully developed and adjusted so that the complete impression of the garment is the same in all sizes.

Make sure to follow instructions and diagrams for your size!

If you have found a pattern you like which is available in women’s size it’s not very difficult to convert it to men’s size. The biggest difference will be the length of sleeves and body. Start working on the women size that you think would fit across the chest. The additional length will be worked right before you cast off for the armhole/sleeve cap. If the pattern is worked top-down you can add the length right after the armhole or before the first decrease on sleeve.

Regarding additional yarn amount, this will depend on how much length you add, but it is better with a skein too many than too few.

All yarns will have excess fibres (from production) that might come off as lint or shedding. Brushed yarns (ie hairier yarns) have more of these loose, excess fibres, causing more shedding.

Shedding also depends on what is worn under or over the garment, and whether this pulls at the yarn fibres. It’s therefore not possible to guarantee that there will be no shedding

Below are some tips on how to get the best result when working with hairier yarns:

1. When the garment is finished (before you wash it) shake it vigorously so the looser hairs come off. NOTE: do NOT use a lint roller, brush or any method that pulls at the yarn.

2. Place the garment in a plastic bag and put it in your freezer - the temperature will cause the fibres to become less attached to each other, and excess fibres will come off easier.

3. Leave in the freezer for a few hours before taking it out and shaking it again.

4. Wash the garment according to the instructions on the yarn label.

Pilling is a natural process that happens to even the most exclusive of fibers. It's a natural sign of wear and tear that is hard to avoid, and that is most visible in high friction areas of your garment like a sweater's arms and cuffs.

You can make your garment look as new by removing the pilling, using a fabric comb or a pill/lint remover.

Still can't find the answer you need? Then scroll down and leave your question so one of our experts can try to help you. This will be done normally within 5 to 10 working days.
In the meantime, you can read the questions and answers that others have left to this pattern or join the DROPS Workshop on Facebook to get help from fellow knitters/crocheters!

You might also like...

Post a comment to pattern DROPS 94-5

We would love to hear what you have to say about this pattern!

If you want to leave a question, please make sure you select the correct category in the form below, to speed up the answering process. Required fields are marked *.

Comments / Questions (140)

country flag Henny wrote:

Bij dit mooie vest staat dat een combinatie van de volgende garens gebruikt is: - Cotton Viscose Denimblauw (nr. 22) - Alpaca Denimblauw (nr. 6347) Die laatste klopt echter niet. Nr. 6347 is namelijk grijspaars ipv denimblauw. Denimblauw is nr. 8120. Wat is nu de juiste kleur, nr. 6347 of nr. 8120 ?

10.01.2015 - 00:43

DROPS Design answered:

Hoi Henny. De naam van de kleur is aangepast sinds dit patroon is gepubliceerd - maar de kleur niet. Je moet de kleurnummer gebruiken zoals aangegeven: 22 Cotton Viscose en 6347 Alpaca. Ik zal het in dit patroon nu ook aanpassen.

13.01.2015 - 14:24

country flag Guylaine Lanthier wrote:

Bonjour ! Concernant l'étape des manches, on tricote 21 mailles d'une autre couleur et par la suite on tricote 67 mailles puis encore 21 mailles pour la 2e manches. Comment reprendre le fil de couleur initial pour tricoter les 67 mailles après avoir tricoter les 21 mailles doit-on le faufiler derrière les 21 mailles ou le couper ? Merci de votre aide ! Guylaine Lanthier

01.01.2015 - 22:58

DROPS Design answered:

Bonjour Mme Lanthier, il vaut mieux couper le fil pour tricoter les mailles des emmanchures avec une autre couleur (si on le faufile derrière les 21 m, l'emmanchure risque d'être trop serrée) et le reprendre pour tricoter les mailles suivantes, puis le couper de nouveau pour la 2e emmanchure et le reprendre après. Bon tricot!

02.01.2015 - 16:45

Majda Bodlaj wrote:

HELLO, I WOULD LIKE TO KNOW, WHY I NEED TWO DIFFERENT WOOLS? DO I NEED TO COMBINE BOTH TOGETHER ALL THE TIME? MAJDA

26.12.2014 - 08:57

DROPS Design answered:

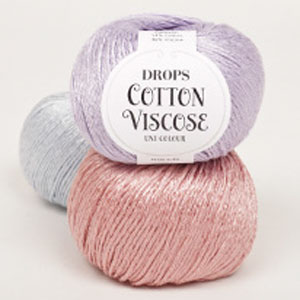
Dear Mrs Bodlaj, this jacket is worked with 1 strand each quality hold together as just 1 (= 2 threads at the same time): 1 strand Alpaca + 1 strand Cotton Viscose to get the best of the features from both yarns. Happy knitting!

30.12.2014 - 13:04

country flag Walter wrote:

Hallo liebes Drops Team, ich habe bis zum Pfeil bei gr XL gestrickt u komme nicht weiter. Ich weiß nicht wie ich weiter stricken muss.Können Sie mir weiter helfen? Danke im voraus

09.10.2014 - 17:08

DROPS Design answered:

Sie stricken die ersten 3 M wie im Diagramm (d.h. die Rd nach der markierten Rd), dann setzen Sie mit einem andersfarbigen Faden an und stricken die nächsten 30 M auch wie im Diag., schneiden den Faden ab und setzen mit der normalen Farbe wieder neu an, stricken die nächsten 72 M nach Diag., dann die nächsten 30 M wieder wie zuvor mit einer anderen Farbe, dann weiter mit dem normalen Faden. Nun stricken Sie nur noch mit dem normalen Faden weiter, auch über die andersfarbigen M.

11.10.2014 - 11:05

country flag Anne Marie wrote:

Merci de me renseigner plus clairement comment faire le rang où l'on met les mailles en suspend pour les manches doit on partager les mailles qui reste en deux de chaque coté des manches

20.09.2014 - 22:46

DROPS Design answered:

Bonjour Anne-Marie, pour les emmanchures, tricotez les mailles indiquées avec un fil d'une autre qualité/couleur puis tricotez à nouveau ces mailles en suivant le diagramme comme avant, et ce pour les 2 emmanchures. Quand le cercle est terminé, on retire délicatement le fil de chaque emmanchure et on relève les mailles de chaque côté (le rang tricoté avant et celui tricoté ensuite). Bon tricot!

22.09.2014 - 10:24

country flag Hege wrote:

Jeg ser det har kommet flere spørsmål om ermene, men jeg skjønner fortsatt ikke hvordan de skal strikkes. Skal jeg strikke de 26m x2 med bare en annen farge, eller skal jeg strikke dem med vanlig tråd og legge til en ekstra tråd? Når jeg skal fortsette på bolen, skal jeg legge opp 26m over maskinene med tråd i, i neste omg? Eller så blir det jo ikke nok masker til å fullføre mønsteret, hvis maskene til ermene skal settes bort?

07.09.2014 - 23:31

DROPS Design answered:

Hei Hege. Du strikker bare de 26 masker med en anden farve for at markere dit ermehul. Du strikker i efterfölgende pind videre med din bundfarge over maskerne som för. Naar du kommer til ermene kan du tage traaden ud og strikke op maskerne (2 gange 26 = 52 i alt)

08.09.2014 - 15:02

country flag Ann wrote:

Hur fungerar det med två garnkvaliteter? Ska jag sticka dubbelteknik enligt era videos eller blir alla maskor räta och varannan maska med vardera garnet?

02.09.2014 - 22:25

DROPS Design answered:

Du strikker ifølge opskriften med begge tråde samtidigt.

03.09.2014 - 11:17

country flag Rita wrote:

Ik zou eerst beginnen met iets eenvoudigers,is nogal ingewikkeld voor een beginneling

18.05.2014 - 11:43

country flag M.M. Siahaya wrote:

Ik kan breien re/av & nog watsimpele steekjes; kan ik dit vest maken of is 't te hoog gegrepen dan? Ik vind m wel erg mooi....

18.05.2014 - 09:42

DROPS Design answered:

Hoi. Ik zou hier dan even mee wachten. Het is kantbreien en ook is het model in een cirkel gebreid. Je kan eventueel eerst proberen wat eenvoudige kantpatronen om te oefenen en ook rondbreien oefenen. Maar dit is geen beginners patroon.

23.05.2014 - 16:58

Daria wrote:

Thank you. I'll use size 8 and try to adapt

16.10.2013 - 15:02