
Popular categories
Looking for a yarn?


|
|||||||||||||
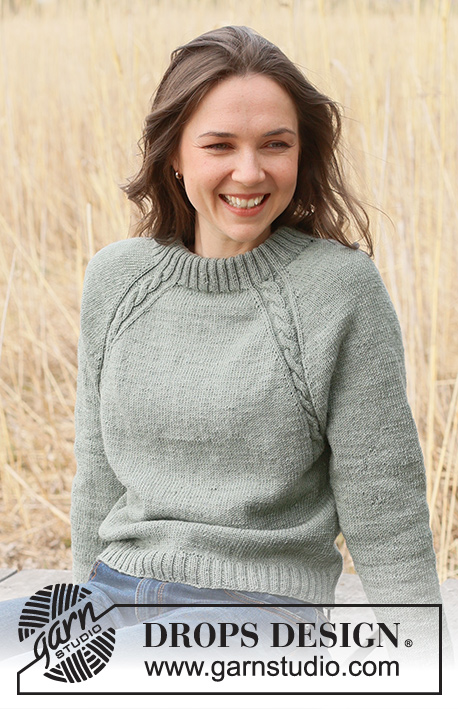
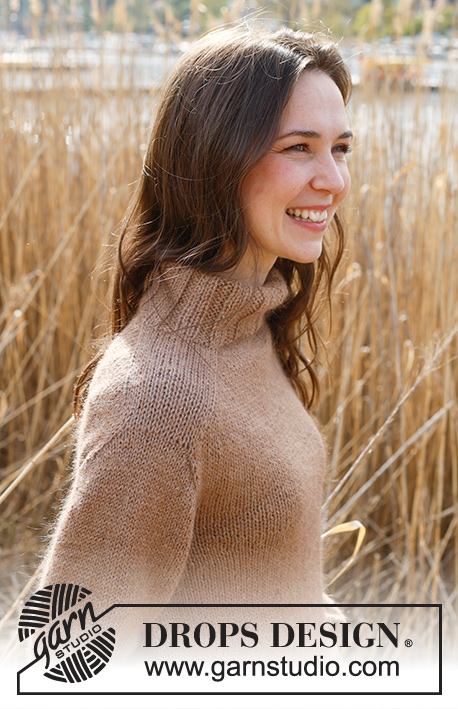
Sage Twist Cardigan |
|||||||||||||
 |
 |
||||||||||||
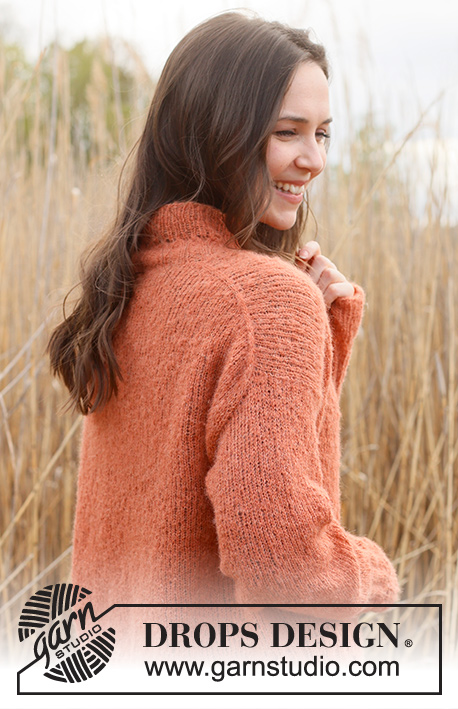
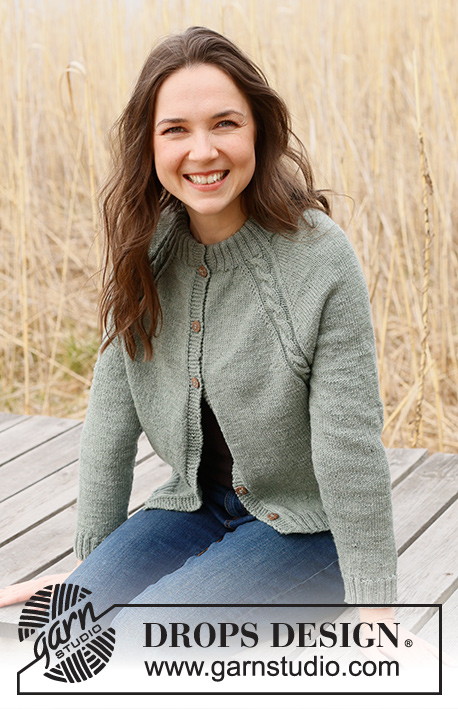
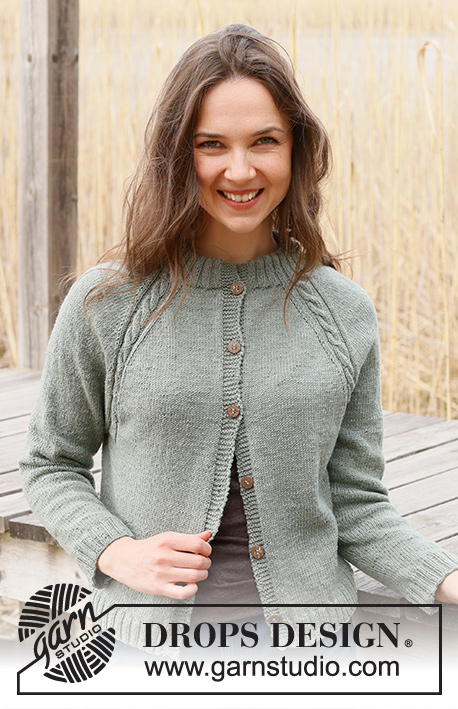
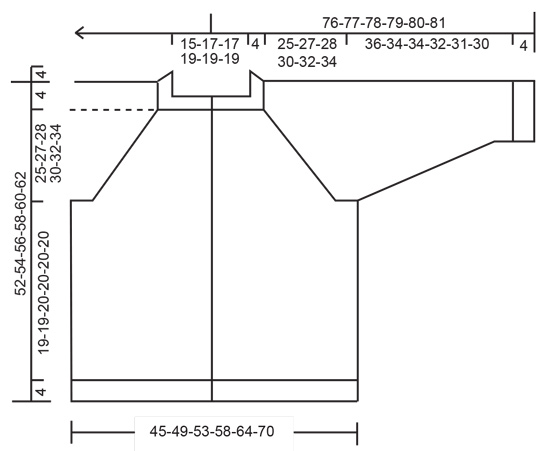
Knitted jacket in DROPS BabyMerino. The piece is worked top down with raglan, double neck and cables. Sizes S - XXXL.
DROPS 237-32 |
|||||||||||||
|
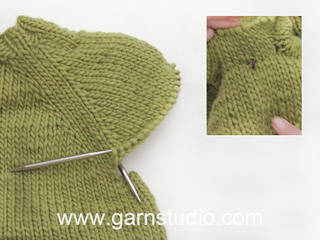
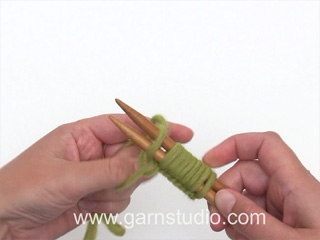
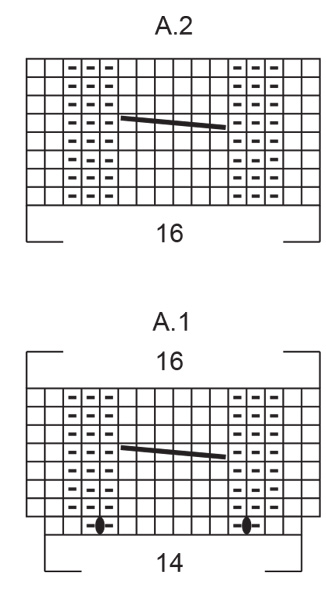
------------------------------------------------------- EXPLANATIONS FOR THE PATTERN: ------------------------------------------------------- PATTERN: See diagrams A.1 and A.2. The diagrams show all rows in the pattern from the right side. RAGLAN: Increase 1 stitch on each side of A.1/A.2, from the right side, by making 1 yarn over. Work the yarn over as follows from the wrong side: BEFORE A.1/A.2: Purl the yarn over in the back loop. The stitch twists to the right. AFTER A.1/A.2: Slip the yarn-over off the left needle, then replace it the other way round (insert the left needle into the back when replacing it). Purl the yarn over in the front loop. The stitch twists to the left. The new stitches are subsequently worked in stockinette stitch. BUTTONHOLES: Work buttonholes on the right band (when the garment is worn). Work from the right side when there are 4 stitches left on the row as follows: Make 1 yarn over, knit 2 together and knit 2. On the next row (wrong side), knit the yarn over to leave a hole. The first buttonhole is worked straight after the neck. Then work the other 5-5-5-6-6-6 buttonholes with approx. 8½-9-9½-8-8½-9 cm = 3¼"-3½"-3⅝"-3⅛"-3¼"-3½" between each one. DECREASE TIP (sleeves): Decrease 1 stitch on either side of the marker as follows: Work until there are 3 stitches left before the marker, knit 2 together, knit 2 (marker sits between these 2 stitches), slip 1 stitch as if to knit, knit 1 and pass the slipped stitch over the knitted stitch. ------------------------------------------------------- START THE PIECE HERE: ------------------------------------------------------- JACKET – SHORT OVERVIEW OF THE PIECE. The neck, yoke and body are worked back and forth with circular needle and top down. The sleeves are worked in the round with short circular needle/double pointed needles. DOUBLE NECK: Cast on 122-130-130-138-138-142 stitches with DROPS Baby Merino, using short circular needles sizes 3 MM = US 2.5 and 2.5 MM = US 1.5 held together. Remove the needle size 3 MM = US 2.5 keeping the stitches on the needle size 2.5 MM = US 1.5 (this gives you an elastic cast-on edge). Work rib as follows in the different sizes: SIZES S, XL and XXL: Purl 2, * knit 2, purl 2 *, work from *-* and finish with purl 2. SIZES M, L and XXXL: Knit 2, * purl 2, knit 2 *, work from *-* and finish with knit 2. Work this rib back and forth for 4½ cm = 1⅝". On the next 2 rows cast on 7 stitches at the end of each row = 136-144-144-152-152-156 stitches. Continue the rib, with 7 band stitches in garter stitch on each side, until the neck measures 9 cm = 3½" from the cast-on edge, adjust so that the next row is to be worked from right side. Fold the neck double to the inside and work 1 more row of rib, working every 2nd stitch together with its corresponding stitch on the cast-on edge. You now have a double neck. The yoke is measured from here. Purl 1 row from wrong side (with front band stitches as before). YOKE: Change to circular needle size 3 MM = US 2.5, work and increase as follows from the right side: 7 band stitches in garter stitch, work stockinette stitch and increase 2-1-2-1-2-3 stitches evenly over the next 12-14-14-16-16-18 stitches (14-15-16-17-18-21 stitches on the front piece), A.1, work stockinette stitch and increase 4 stitches evenly over the next 10 stitches (14 stitches on the sleeve), A.1, work stockinette stitch and increase 6-4-6-4-6-8 stitches evenly over the next 22-26-26-30-30-34 stitches (28-30-32-34-36-42 stitches on the back piece), A.1, work stockinette stitch and increase 4 stitches evenly over the next 10 stitches (14 stitches on the sleeve), A.1, work stockinette stitch and increase 2-1-2-1-2-3 stitches evenly over the next 12-14-14-16-16-18 stitches (14-15-16-17-18-21 stitches on the front piece) and 7 band stitches in garter stitch - NOTE! The first BUTTONHOLE is worked now – read description above = 162-166-170-174-178-190 stitches. Work the pattern back from the wrong side. Read the next section before continuing! Read RAGLAN in explanations above and start to increase on the next row from the right side. AT THE SAME TIME, when diagram A.1 is finished in height continue with A.2 over A.1. REMEMBER THE KNITTING GAUGE! Increase differently on the sleeves and body: SLEEVES: Increase every 2nd row 10-12-10-20-30-40 times, then every 4th row 10-12-15-12-9-4 times. FRONT/ BACK PIECE: Increase every 2nd row 24-27-31-40-49-54 times, then every 4th row 7-8-7-3-0-0 times. When all the increases are finished there are 366-402-422-474-530-582 stitches. Between each A.2 there are 54-62-64-78-92-102 stitches on each sleeve, 90-100-108-120-134-150 stitches on the back piece and 52-57-61-67-74-82 stitches on each front piece. Continue with stockinette stitch, bands in garter stitch and A.2 without increases and without cables (just knit and purl as shown in the diagram) until the yoke measures 25-27-28-30-32-34 cm = 9¾"-10⅝"-11"-11¾"-12½"-13⅜" from the neck. Divide for the body and sleeves from the right side as follows: Work 7 band stitches in garter stitch, knit 53-58-62-68-75-83 (to middle of A.2), place the next 70-78-80-94-108-118 stitches on a thread without working them, cast on 12-12-14-14-16-16 stitches under the sleeve, knit 106-116-124-136-150-166 (back piece), place the next 70-78-80-94-108-118 stitches on a thread without working them, cast on 12-12-14-14-16-16 stitches under the sleeve, knit 53-58-62-68-75-83 and 7 band stitches in garter stitch. The body and sleeves are finished separately and the piece is now measured from here. BODY: = 250-270-290-314-346-378 stitches. Continue with stockinette stitch and 7 band stitches in garter stitch on each side for a further 19-19-20-20-20-20 cm = 7½"-7½"-8"-8"-8"-8" or to desired length (there is approx. 4 cm = 1½" left). Knit 1 row from the right side and increase 14-18-22-26-26-30 stitches evenly spaced (do not increase the bands) = 264-288-312-340-372-408 stitches. Work back from the wrong side. Change to circular needle size 2.5 MM = US 1.5. Work rib from the right side in the different sizes as follows: SIZES S, XL and XXL: Work 7 band stitches in garter stitch, purl 2, * knit 2, purl 2 *, work from *-* and finish with 7 band stitches in garter stitch. SIZES M, L and XXXL: Work 7 band stitches in garter stitch, knit 2, * purl 2, knit 2 *, work from *-* and finish with 7 band stitches in garter stitch. ALL SIZES: Work this rib for 4 cm = 1½". Bind off with knit over knit and purl over purl. The jacket measures approx. 52-54-56-58-60-62 cm = 20½"-21¼"-22"-22¾"-23⅝"-24⅜" from the shoulder down. SLEEVES: Place the 70-78-80-94-108-118 stitches from the thread on the one side of the piece on short circular needle/double pointed needles size 3 MM = US 2.5 and knit up 1 stitch in each of the 12-12-14-14-16-16 stitches cast on under the sleeve = 82-90-94-108-124-134 stitches. Insert a marker in the middle of the new stitches under the sleeve. Read DECREASE TIP and work stockinette stitch in the round for 4-4-4-4-2-2 cm = 1½"-1½"-1½"-1½"-¾"-¾". Now decrease as follows in the different sizes: SIZES S, M, L, XL and XXL: Decrease every 2½-2-1½-1-1 cm = 1"-¾"-½"-⅜"-⅜" 12-15-16-21-28 times. SIZE XXXL: Decrease alternately every ½ cm = ⅛" and 1 cm = ⅜" 32 times. ALL SIZES: = 58-60-62-66-68-70 stitches. Work until the sleeve measures 36-34-34-32-31-30 cm = 14¼"-13⅜"-13⅜"-12½"-12¼"-11¾" or to desired length (approx. 4 cm = 1½" left). Change to double pointed needles size 2.5 MM = US 1.5. Knit 1 round and increase 10-8-10-6-8-10 stitches evenly spaced = 68-68-72-72-76-80 stitches. Work rib (knit 2, purl 2) for 4 cm = 1½". Bind off with knit over knit and purl over purl. Work the other sleeve in the same way. ASSEMBLY: Sew the buttons onto the left band. |
|||||||||||||
Diagram explanations |
|||||||||||||
|
|||||||||||||
|
|||||||||||||
|
|||||||||||||
|
Have you made this or any other of our designs? Tag your pictures in social media with #dropsdesign so we can see them! Do you need help with this pattern?You'll find tutorial videos, a Comments/Questions area and more by visiting the pattern on garnstudio.com. © 1982-2024 DROPS Design A/S. We reserve all rights. This document, including all its sub-sections, has copyrights. Read more about what you can do with our patterns at the bottom of each pattern on our site. |
|||||||||||||


With over 40 years in knitting and crochet design, DROPS Design offers one of the most extensive collections of free patterns on the internet - translated to 17 languages. As of today we count 304 catalogs and 11422 patterns - 11417 of which are translated into English (US/in).
We work hard to bring you the best knitting and crochet have to offer, inspiration and advice as well as great quality yarns at incredible prices! Would you like to use our patterns for other than personal use? You can read what you are allowed to do in the Copyright text at the bottom of all our patterns. Happy crafting!
Comments / Questions (18)
Jag får inte största storleken xxxl att stämma med maskantalet vid uppdelningen på ok. Räknat både framlänges och baklänges. För mig fattas det 4 m på sista framstycket, på första varvet, på oket.
29.03.2023 - 17:50DROPS Design answered:
Hej Ingela, Du har 582 masker (sætter 118x2 på en tråd): Strikker 7+ 83 + slår 16 nye op +166 + slår 16 nye op + 83+ 7 = 378 masker :)
13.04.2023 - 09:46Thank you for your reply. I am as wise as ever. What does, "work A.2 over A.1." mean? I know A1 and A2 are the diagrams, but I don't understand what "work A.2 over A.1." means. I also have no idea what the "increase rhythm" means. How do I know, from the pattern, exactly when to increase and by how much?
27.02.2023 - 17:22DROPS Design answered:
Dear Mrs McLeod, after the 8 rows in A.1 are done, work A.2 instead of A.1 and repeat A.2 in height. You should increase for the raglan on sleeve and on body but you will have to increase sometimes 8 sts (body + sleeves) or only 4 sts (for ex in size S you incrase for body 24 times on every other round but only 10 times on every other round on sleeve then you will increase on sleeve on every 4th round, this means you continue increasing on body until you have increased 24 times on every other round (48 rounds in total) while you increase every other time for sleeve after the first 10 times. The number of increases and stitches will depend with the size you are working. Happy knitting!
28.02.2023 - 10:25Are we supposed to follow the directions for the yoke, plus the raglan increases at the same time, to the point where we separate the sleeves? This pattern is very hard to make sense of, it reads as though written for the writer and not for the ignorant. I'd be thankful for some help in knowing how to proceed after the written instructions labelled 'yoke'. Thank you.
27.02.2023 - 06:21DROPS Design answered:
Dear Mrs McLeod, start working yoke as explained, then after you have worked the increase row from RS and the return row from WS start to increase for raglan, at the same time work A.2 over A.1. The increases for raglan will be worked at a different rythm on body/sleeves this means you might have to increase 8 sts (both body and sleeves) or only 4 sts (body only on every 2nd row while you have to increase on every 4th row on sleeves). Happy knitting!
27.02.2023 - 11:13Hallo, Super tevreden met breipatroon.Duidelijke uitleg! Heb het vest gewassen,handwas zoals in voorschrift.Was eerst mooi strak en elastisch,maar na het wassen iets uitgeleurd.Kan ik het terug strakker krijgen, Groetjes
20.01.2023 - 09:42DROPS Design answered:
Dag Marie Jeanne,
Het komt vrij precies met het wassen van Merinogarens en het lubbert inderdaad snel uit. Ga niet wringen en laat het kledingstuk niet in het water staan. Laat het plat drogen. Probeer een volgende keer tussen een paar handdoeken te laten drogen, waarbij je het kledingstuk in de juiste vorm/afmetingen neerlegt (dus zeker niet aan trekken!)
22.01.2023 - 17:41Bonjour, Je tricote la taille L et j'ai terminé l'empiècement. Je n'ai pas les 290 mailles dont vous parlez mais 262 mailles soit une différence de 28 mailles. J'ai refait le calcul : 7 + 62 + 124 + 62 + 7 et je trouve bien 262, pas 290. A priori, il y a aussi une différence pour toutes les tailles, 24 mailles pour la taille S par exemple. Pouvez-vous m'expliquer ? Merci, Pascale
13.12.2022 - 13:28DROPS Design answered:
Bonjour Mme Egron, il manque les 14 mailles à monter sous chacune des manches, vous devez avoir: 7+62 (devant gauche) + 14 m (sous manche gauche) + 124 m (dos) + 14 m (sous manche droite) + 62 m + 7 (devant droit), ainsi vous avez bien: 7+62+14+124+14+62+7= 290 mailles. En taille S, on va monter seulement 12 m sous chaque manche - soit 2 x 12 = 24 mailles. Bon tricot!
13.12.2022 - 13:46Hola, estoy haciendo este modelo en talla S y no entiendo cómo luego de los aumentos llega a 366 ni cómo se distribuye entre mangas, frentes y espalda. Gracias!
06.12.2022 - 03:44DROPS Design answered:
Hola Maria, 366 es el número de puntos que deberías tener después de terminar todos los aumentos. Al inicio del raglán, te indicaban los puntos para cada parte, separados por A.1 (sobre el que después trabajas A.2). Se aumentan 40 puntos para cada manga (aumentas 2 puntos cada 2ª hilera 10 veces y después 2 puntos cada 4ª hilera 10 veces). = 80 puntos aumentados. En cada parte del cuerpo (delantero y espalda) aumentas 2 pts cada 2ª hilera 24 veces, después 2 pts cada 4ª hilera 7 veces. = 124 puntos aumentados. Por lo tanto, a partir de los 162 puntos iniciales, aumentando 80 puntos en las mangas y 124 en el cuerpo tienes 366 puntos.
06.12.2022 - 18:48Mod Sage Twist : no ho capito come si lavora il gettato sul rovescio per avere inclinazione a dx o sx , mi potete mandare il video se c'è? Grazie saluti
01.11.2022 - 07:42DROPS Design answered:
Buonasera Rosa Maria, deve seguire le indicazioni riportate nel paragrafo RAGLAN: in un caso deve lavorare la maglia a rovescio nel filo dietro della maglia invece di quello davanti, nell'altro caso deve prima "ritorcere" la maglia sul ferro e poi lavorare il gettato a rovescio normalmente. ecco un video che può aiutarla: Buon lavoro!
01.11.2022 - 16:52Hallo, habe die Jacke bis zum Beginn des Abschnitt's Passe in Gr L gestrickt. Bei der beschriebenen Zunahme besteht eine Maschendifferenz. Es sollen 26 M zugenommen werden (170-144) beschrieben werden nur 18 M. Wenn man den Maschenbestand insgesamt addiert kommt man mit den beschriebenen Zunahmen nur auf 106 M statt genannten 170 M?? Lieben Gruß Monika
29.10.2022 - 06:15DROPS Design answered:
Liebe Monika, so wird es zugenommen: 2 Maschen beim linken Vorderteil + 4 Maschen bei jeder Ärmel + 6 Maschen beim Rückenteil + 2 Maschen beim rechten Vorderteil + 2 Maschen in jedem von den 4 gestrickten A.1 = 2+8+6+2+8=26 Maschen. Viel Spaß beim stricken!
31.10.2022 - 08:36