DROPS Baby Merino
DROPS Baby Merino
100% Wool
from 4.55 $ /50g
Get the yarn to make this pattern from 18.20$.

The yarn cost is calculated from the pattern’s smallest size and the yarn’s cheapest product type. Looking for an even better price? You might find it on the DROPS Deals!

DROPS Super Sale

Poetry Night

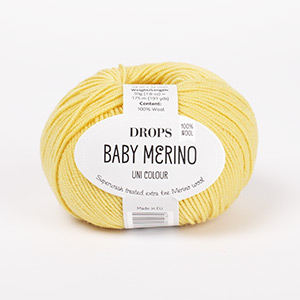
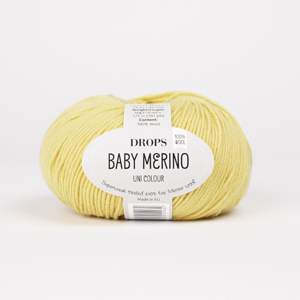
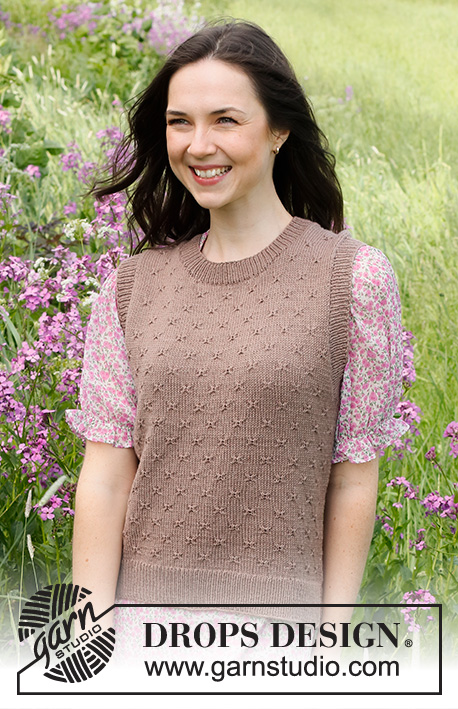
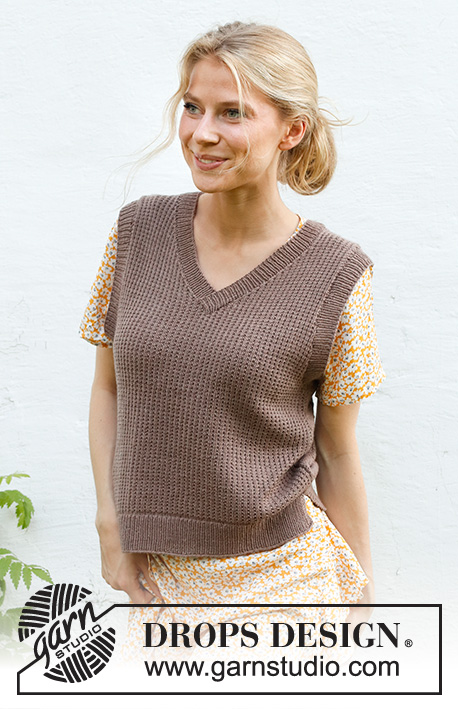
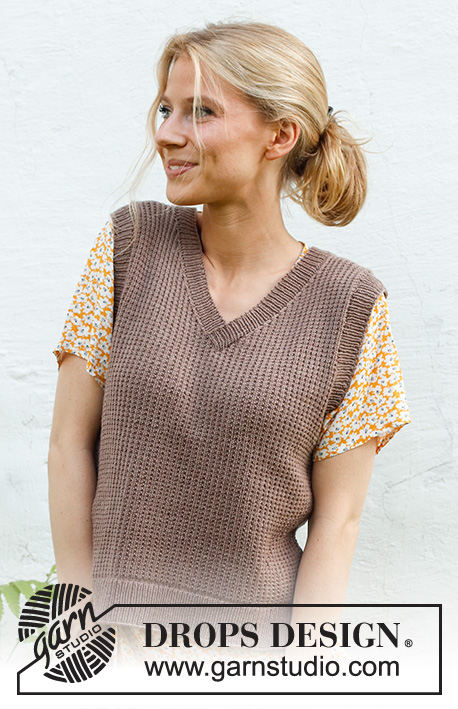
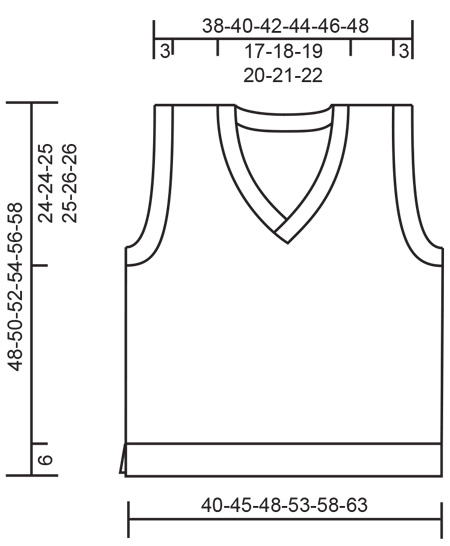
Knitted vest in DROPS BabyMerino. The piece is worked bottom up with relief-pattern, V-neck and split in the sides. Sizes XS - XXL.

DROPS 231-48
DROPS Design: Pattern no bm-094
Yarn group A
-------------------------------------------------------

SIZES:
XS - S - M - L - XL – XXL

Finished measurements:
Chest measurements: 80-90-96-106-116-126 cm = 31½"-35½"-37¾"-41¾"-45¾"-49½"
Full length: 48-50-52-54-56-58 cm = 19"-19¾"-20½"-21¼"-22"-22¾"
All measurements in charts are in cm.

MATERIALS:
DROPS BABY MERINO from Garnstudio (belongs to yarn group A)
200-250-250-300-300-350 g color 17, beige

NEEDLES:
DROPS SINGLE POINTED NEEDLES SIZE 3 MM = US 2.5.
DROPS CIRCULAR NEEDLE SIZE 2.5 MM = US 1.5: Length 40 cm = 16" and 80 cm = 32".
The technique MAGIC LOOP can be used – you then only need circular needle of 80 cm = 32" in each size.

KNITTING GAUGE:
24 stitches in width and 32 rows in height with stockinette stitch = 10 x 10 cm = 4" x 4".
NOTE: Needle size is only a guide. If you get too many stitches on 10 cm = 4", change to a larger needle size. If you get too few stitches on 10 cm = 4", change to a smaller needle size.

-------------------------------------------------------

Alternative Yarn – See how to change yarns here
Yarn Groups A to F – Use the same pattern and change the yarn here
Yarn usage using an alternative yarn – Use our yarn converter here

-------------------------------------------------------

DROPS Baby Merino
DROPS Baby Merino
100% Wool
from 4.55 $ /50g
Get the yarn to make this pattern from 18.20$.

The yarn cost is calculated from the pattern’s smallest size and the yarn’s cheapest product type. Looking for an even better price? You might find it on the DROPS Deals!

Pattern instructions

NOTE: This pattern is written in American English. All measurements in charts are in cm. For conversion from inches to cm - click here. There are different terms for crocheting in American and British English. If this pattern includes crochet, click for "crochet terms" here. For this pattern in British English, please click here.
-------------------------------------------------------

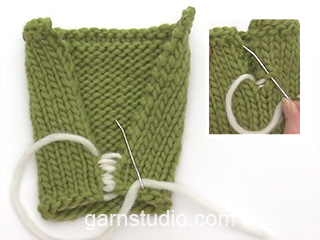
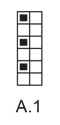
EXPLANATIONS FOR THE PATTERN:

-------------------------------------------------------

RIDGE/GARTER STITCH (worked back and forth):
Knit all rows.
1 ridge = knit 2 rows.

PATTERN:
See diagram A.1. The diagram shows all rows in the pattern from the right side.

DECREASE TIP (for V-neck):
All decreases are worked from the right side!
DECREASE 1 STITCH AT BEGINNING OF ROW (from right side):
1 edge stitch in garter stitch, slip 1 stitch as if to knit, knit 1 and pass the slipped stitch over the knitted stitch, work to end of row.
DECREASE 1 STITCH AT END OF ROW (from right side):
Work until there are 3 stitches left, knit 2 together, 1 edge stitch in garter stitch.

-------------------------------------------------------

START THE PIECE HERE:

-------------------------------------------------------

VEST – SHORT OVERVIEW OF THE PIECE:
The back and front pieces are worked separately, back and forth and bottom up. The piece is sewn together and the neck and sleeve-edges are worked to finish.

BACK PIECE:
Cast on 115-129-139-153-167-181 stitches with circular needle size 2.5 MM = US 1.5 and DROPS Baby Merino. Purl 1 row from the wrong side.
Work the next row from the right side as follows: 3 stitches in garter stitch, * knit 1, purl 1 *, work from *-* until there are 4 stitches left, knit 1 and 3 stitches in garter stitch. Continue this rib back and forth for 6 cm = 2⅜".
Knit 1 row from the right side where you decrease 20-22-24-26-28-30 stitches evenly spaced = 95-107-115-127-139-151 stitches.
Change to needle size 3 MM = US 2.5. Purl 1 row from the wrong side with 1 edge stitch in garter stitch on each side.
Work the next row from the right side as follows: 1 edge stitch in garter stitch, work A.1 until there are 2 stitches left, work the first stitch in A.1 so the pattern is symmetrical, and 1 edge stitch in garter stitch. Continue this pattern back and forth.
When the piece measures 24-26-27-29-31-32 cm = 9½"-10¼"-10⅝"-11⅜"-12¼"-12½", bind off for the armholes every 2nd row as follows: 3 stitches 1-1-1-2-2-3 times and 2 stitches 1-1-2-2-4-4 times on each side. Then bind off 1 stitch every 4th row 4-8-7-8-7-8 times on each side = 77-81-87-91-97-101 stitches.
Continue working until the piece measures 45-47-49-51-53-55 cm = 17¾"-18½"-19¼"-20"-21"-21⅝".
On the next row bind off the middle 37-39-41-43-47-49 stitches for the neck and finish each shoulder separately. Continue as before and bind off 2 stitches on the next row from the neck = 18-19-21-22-23-24 stitches on the shoulder.
Continue working until the piece measures 48-50-52-54-56-58 cm = 19"-19¾"-20½"-21¼"-22"-22¾". Bind off. Work the other shoulder in the same way.

FRONT PIECE:
Cast on and work in the same way as the back until the front piece measures 24-26-27-29-30-32 cm = 9½"-10¼"-10⅝"-11⅜"-11¾"-12½".
Insert 1 marker in the middle stitch on the row (a knitted stitch seen from the right side).
You will now bind off for the armholes and later decrease for the V-neck. Read ARMHOLES and V-NECK before continuing.

ARMHOLES:
Bind off for the armholes every 2nd row: 3 stitches 1-1-1-2-2-3 times and 2 stitches 1-1-2-2-4-4 times on each side. Then bind off 1 stitch every 4th row 4-8-7-8-7-8 times on each side.

V-NECK:
AT THE SAME TIME when the piece measures 30-32-33-35-36-38 cm = 11¾"-12½"-13"-13¾"-14¼"-15", bind off the middle stitch as follows, working from the right side: Work as far as the marker-stitch and place the worked stitches on an extra needle (Part-1), bind off the marker-stitch, work to end of row as before (Part-2).
Work the stitches in Part-2 as before and decrease for the neck at the beginning of each row from the right side 18-19-20-20-22-23 times – read DECREASE TIP. Then decrease every 2nd row from the right side 2-2-2-3-3-3 times.

After all the decreases for the armhole and neck there are 18-19-21-22-23-24 stitches on the shoulder. Continue working until the piece measures 48-50-52-54-56-58 cm = 19"-19¾"-20½"-21¼"-22"-22¾" from the cast-on edge. Bind off.

PART-1:
Place the stitches from Part-1 on needle size 3 MM = US 2.5. Continue the pattern back and forth, binding off and decreasing for the armhole and neck in the same way as in Part-2 but work the decreases for the neck at the end of each row from the right side.
After all the bind off for the armhole and decreases for neck there are 18-19-21-22-23-24 stitches on the shoulder. Continue working until the piece measures 48-50-52-54-56-58 cm = 19"-19¾"-20½"-21¼"-22"-22¾" from the cast-on edge. Bind off.

ASSEMBLY:
Sew the shoulder seams. Sew the side seams in the outermost loop of the outermost stitch. Start under the armhole and work down, leaving a split of 6 cm = 2⅜" at the bottom.

NECK:
The neck is worked back and forth with circular needle.
Start from the right side at the bottom of the V-neck, from the right side and knit up inside the 1 edge stitch approx. 138-140-148-150-158-162 stitches around the neck with circular needle size 2.5 MM = US 1.5 – start and finish mid-front.
Purl 1 row from the wrong side where you increase evenly to 159-161-171-173-181-185 stitches (number must be divisible by 2 + 1).
Work the next row from the right side: 1 edge stitch in garter stitch, * knit 1, purl 1 *, work from *-* until there are 2 stitches left, knit 1, 1 edge stitch in garter stitch. Continue this rib back and forth for 3 cm = 1⅛". Bind off a little loosely.
Lay one side of the neck on top of the other mid-front – see photo, and sew together.

SLEEVE-EDGES:
Start from the right side at the bottom of the armhole and knit up inside the 1 edge stitch approx. 124-124-130-130-136-136 stitches around the armhole, using short circular needle size 2.5 MM = US 1.5.
Knit 1 round where you increase evenly to 144-144-150-150-156-156 stitches (number must be divisible by 2).
Work rib in the round (knit 1, purl 1) for 3 cm = 1⅛". Bind off a little loosely.
Work the other sleeve-edge in the same way.

Diagram

All measurements in charts are in cm.

symbols = knit from right side, purl from wrong side
symbols = knit from wrong side
diagram
diagram
Do you have a question? See a list of frequently asked questions (FAQ)

Knitting tension is what determines the final measurements of your work, and is usually measured per 10 x 10 cm. It is provided like so: number of stitches in width x number of rows in height - eg: 19 stitches x 26 rows = 10 x 10 cm.

The knitting tension is very individual; some people knit/crochet loosely while others work tightly. You adjust the knitting tension with the needle size, which is why the suggested needle size only serve as a guide! You need to adjust this (up or down) to ensure that YOUR knitting tension matches the knitting tension provided in the pattern. If you work with a different knitting tension than provided you will have a different yarn consumption, and your work will have different measurements than what the pattern suggests.

The knitting tension also determines which yarns can replace each other. As long as you achieve the same knitting tension you can replace one yarn with another.

See DROPS lesson: How to measure your tension/gauge

See DROPS video: How to make a gauge tension swatch

The required amount of yarn is provided in grams, eg: 450 g. To calculate how many balls you’ll need you first need to know how many grams are in 1 ball (25g, 50g or 100g). This information is available if you click on the individual yarn quality on our pages. Divide the amount required with the amount of each ball. For example, if each ball is 50g (the most common amount), the calculation will be as follows: 450 / 50 = 9 balls.

The important thing when changing from one yarn to another is that the knitting/crochet tension remains the same. This is so that the measurements of the finished piece will be the same as on the sketch provided. It is easier to achieve the same knitting tension using yarns from the same yarn group. It is also possible to work with multiple strands of a thinner yarn to achieve the knitting tension of a thicker one. Please try our yarn converter. We recommend you to always work a test swatch.

Please NOTE: when changing yarn the garment might have a different look and feel to the garment in the photo, due to individual properties and qualities of each yarn.

See DROPS lesson: Can I use a different yarn than the one mentioned in the pattern?

All our yarns are categorised into yarn groups (from A to F) according to thickness and knitting tension – group A contains the thinnest yarns and group F the thickest. This makes it easier for you to find alternative yarns to our patterns, should you wish to switch yarn. All yarns within the same group have a similar knitting tension and can easily replace each other. However, different yarn qualities have different structures and properties which will give the finished work a unique look and feel.

Click here for an overview of the yarns in each yarn group

At the top of all our patterns you’ll find a link to our yarn converter, which is a helpful tool should you wish to use a different yarn than suggested. By filling in the yarn quality you wish to replace, the amount (in your size) and number of strands, the converter will present good alternative yarns with the same knitting tension. Additionally it will tell you how much you’ll require in the new qualities and whether you’ll need to work with multiple strands. Most skeins are 50g (some are 25g or 100g).

If the pattern is worked with multiple colours, every colour will have to be converted separately. Similarly, if the pattern is worked with several strands of different yarns (for example 1 strand Alpaca and 1 strand Kid-Silk) you will have to find alternatives for each, individually.

Click here to see our yarn converter

Since different yarns have different qualities and textures we have chosen to keep the original yarn in our patterns. However, you can easily find options among our available qualities by using our yarn converter, or simply pick a yarn from the same yarn group.

It is possible that some retailers still have discontinued yarns in stock, or that someone has a few skeins at home that they would like to find patterns for.

The yarn converter will provide both alternative yarn as well as required amount in the new quality.

If you think it's hard to decide what size to make, it can be a good idea to measure a garment you own already and like the size of. Then you can pick the size by comparing those measures with the ones available in the pattern's size chart.

You'll find the size chart at the bottom of the pattern.

See DROPS lesson: How to read size chart

The needle size provided in the pattern serves only as a guide, the important thing is to follow the knitting tension. And since knitting tension is very individual, you will have to adjust the needle size to ensure that YOUR tension is the same as in the pattern – maybe you’ll have to adjust 1, or even 2 needle sizes, up or down to achieve the correct tension. For this, we recommend that you work test swatches.

Should you work with a different knitting tension than the one provided, the measurements of the finished garment might deviate from the measurement sketch.

See DROPS lesson: How to measure your tension/gauge

See DROPS video: How to make a gauge tension swatch

Working a garment top-down provides more flexibility and room for personal adjustment. For example it is easier to try the garment on while working, as well as making adjustments to length of yoke and shoulder caps.

The instructions are carefully explaining every step, in the correct order. Diagrams are adjusted to the knitting direction and are worked as usual.

The diagram depicts all rows/rounds, and every stitch seen from the right side. It is read from bottom to top, from right to left. 1 square = 1 stitch.

When working back and forth, every other row is worked from the right side and every other row is worked from the wrong side. When working from the wrong side, the diagram will have to be worked reversed: from left to right, knit stitches are purled, purl stitches are knit etc.

When working in the round every round is worked from the right side and the diagram are worked from right to left on all rounds.

See DROPS lesson: How to read knitting diagrams

The diagram depicts all rows/rounds, and every stitch seen from the right side. It is worked from bottom to top, from right to left.

When working back and forth every other row is worked from the right side: from right to left and every other row is worked from the wrong side: from left to right.

When working in the round, every row in the diagram are worked from the right side, from right to left.

When working a circular diagram you start in the middle and work your way outwards, counter clockwise, row by row.

The rows usually start with a given number of chain stitches (equivalent to the height of the following stitch), this will either be depicted in the diagram or explained in the pattern.

See DROPS lesson: How to read crochet diagrams

Instructions for working several diagrams after each other on the same row/round, will often be written like so: “work A.1, A.2, A.3 a total of 0-0-2-3-4 times". This means you work A.1 once, then A.2 is worked once, and A.3 is repeated (in width) the number of times provided for your size – in this case like so: S = 0 times, M = 0 times, L=2 times, XL= 3 times and XXL = 4 times.

The diagrams are worked as usual: begin with the first row in A.1, then work the first row in A.2 etc.

See DROPS lesson: How to read knitting diagrams

See DROPS lesson: How to read crochet diagrams

The total width of the garment (from wrist-to-wrist) will be larger in the larger sizes, despite the actual sleeves being shorter. The larger sizes have longer sleeve caps and wider shoulders, so there will be a good fit in all sizes.

The measurement sketch/schematic drawing provides information regarding the full length of the garment. If it’s a jumper or a jacket the length is measured from the highest point on the shoulder (usually closest to the neckline), and straight down to the bottom of the garment. It is NOT measured from the tip of shoulder. Similarly, the length of yoke is measured from the highest point on the shoulder and down to where yoke is split into body and sleeves.

See DROPS lesson: How to read a schematic drawing

Diagrams are often repeated on the round or in height. 1 repeat is the diagram the way it appears in the pattern. If it says to work 5 repeats of A.1 in the round, then you work A.1 a total of 5 times after/next to each other in the round. If it says to work 2 repeats of A.1 vertically/in height you work the entire diagram once, then begin again at the start and work the entire diagram one more time.

Chain stitches are slightly narrower than other stitches and to avoid working the cast-on edge too tight, we simply chain more stitches to begin with. The stitch count will be adjusted on the following row to fit the pattern and measurement sketch.

The rib edge is more elastic and will contract slightly compared to, for example, stocking stitch. By increasing before the rib edge, you avoid a visible difference in width between the rib edge and the rest of the body.

It’s very easy to cast off too tightly, and by making yarn overs while casting off (and simultaneously casting these off) you avoid a too tight cast off edge.

See DROPS video: How to bind off with yarn overs (yo)

To achieve an even increase (or decrease) you can increase on, for example: every 3rd and 4th row alternately, like so: work 2 rows and increase on the 3rd row, work 3 rows and increase on the 4th. Repeat this until the increase is complete.

See DROPS lesson: Increase or decrease 1 st on every 3rd and 4th row alternately

Should you prefer to work in the round instead of back and forth, you may of course adjust the pattern. You’ll need to add steeks mid-front (usually 5 stitches), and follow the instructions. When you would normally turn and work from the wrong side, simply work across the steek and continue in the round. At the end you’ll cut the piece open, pick up stitches to work bands, and cover the cut edges.

See DROPS video: How to knit steeks and cut open

Should you prefer to work back and forth instead of in the round, you may of course adjust the pattern so you work the pieces separately and then assemble them at the end. Divide the stitches for the body in 2, add 1 edge stitch in each side (for sewing) and work the front and back pieces separately.

See DROPS lesson: Can I adapt a pattern for circular needles into straight needles?

Pattern repeats can vary slightly in the different sizes, in order to get the correct proportions. If you’re not working the exact same size as the garment in the photo, yours might deviate slightly. This has been carefully developed and adjusted so that the complete impression of the garment is the same in all sizes.

Make sure to follow instructions and diagrams for your size!

If you have found a pattern you like which is available in women’s size it’s not very difficult to convert it to men’s size. The biggest difference will be the length of sleeves and body. Start working on the women size that you think would fit across the chest. The additional length will be worked right before you cast off for the armhole/sleeve cap. If the pattern is worked top-down you can add the length right after the armhole or before the first decrease on sleeve.

Regarding additional yarn amount, this will depend on how much length you add, but it is better with a skein too many than too few.

All yarns will have excess fibres (from production) that might come off as lint or shedding. Brushed yarns (ie hairier yarns) have more of these loose, excess fibres, causing more shedding.

Shedding also depends on what is worn under or over the garment, and whether this pulls at the yarn fibres. It’s therefore not possible to guarantee that there will be no shedding

Below are some tips on how to get the best result when working with hairier yarns:

1. When the garment is finished (before you wash it) shake it vigorously so the looser hairs come off. NOTE: do NOT use a lint roller, brush or any method that pulls at the yarn.

2. Place the garment in a plastic bag and put it in your freezer - the temperature will cause the fibres to become less attached to each other, and excess fibres will come off easier.

3. Leave in the freezer for a few hours before taking it out and shaking it again.

4. Wash the garment according to the instructions on the yarn label.

Pilling is a natural process that happens to even the most exclusive of fibers. It's a natural sign of wear and tear that is hard to avoid, and that is most visible in high friction areas of your garment like a sweater's arms and cuffs.

You can make your garment look as new by removing the pilling, using a fabric comb or a pill/lint remover.

Still can't find the answer you need? Then scroll down and leave your question so one of our experts can try to help you. This will be done normally within 5 to 10 working days.
In the meantime, you can read the questions and answers that others have left to this pattern or join the DROPS Workshop on Facebook to get help from fellow knitters/crocheters!

You might also like...

Post a comment to pattern DROPS 231-48

We would love to hear what you have to say about this pattern!

If you want to leave a question, please make sure you select the correct category in the form below, to speed up the answering process. Required fields are marked *.

Comments / Questions (20)

country flag Lisa Lebrija wrote:

Hej Jeg forstår ikke jeres svar på mit spørgsmål. I svarer ikke på det jeg spørger om! For HVORDAN STRIKKES DEN SORTE FIRKANT PÅ RETSIDEN? Jeg kan godt se den bliver strikket ret på vrangsiden. Så vær sød at svar rigtigt på mit spørgsmål.

13.10.2022 - 12:36

DROPS Design answered:

Hej Lisa. Den sorte firkant strikkes alltid fra vrangen, og strikkes da ret. Mvh DROPS Design

13.10.2022 - 14:11

country flag Lisa Street Lebrija wrote:

Hej Jeg forstår ikke det mønster A1. Den første maske strikkes ret, hvordan strikkes den sorte firkant så på retsiden? Der står kun den strikkes ret på vrangsiden; men hvad med retsiden???

12.10.2022 - 21:45

DROPS Design answered:

Hei Lisa, Du starter A.1 fra retten og mønsteret fortsetter derfra, slik at rader 2, 4, 6 osv. er alltid fra vrangen. God fornøyelse!

13.10.2022 - 06:52

country flag Ella wrote:

Kun takakappaleessa vaihdetaan isommat puikot ja alkaa A1 kuvio. Niin onko tarkoitus, että työn nurjalla puolella neulotaan kaikki silmukat nurin ja A1 kuvio neulotaan työn oikealla puolella? Vai niin, että A1 kuviota toteutetaan työn molemmilla puolilla? Kokeilin jälkimmäistä ja jälki on aivan samaa kuin alun joustinneule. Mitä teen väärin? Kiitos jo etukäteen :)

11.09.2022 - 23:32

DROPS Design answered:

Hei, oikean puolen kerroksilla neulotaan oikeaa ja nurjan puolen kerroksilla neulotaan vuorotellen 1 silmukka oikein ja 1 silmukka nurin.

27.09.2022 - 18:54

country flag Mel wrote:

Hello! The black square in the diagram says "knit from wrong side". Does that mean that every row where we have a black square is a wrong side row? If not, what should we do from the right side? Thanks

29.05.2022 - 13:53

DROPS Design answered:

Dear Mel, yes - every row with the black square is a wrong side row. Happy knitting!

29.05.2022 - 15:19

country flag Neysa wrote:

When I achieved the knitting tension required by using stockinette stitch, is the needle going to be my main needle size (in this pattern, the 3mm one) or the ribbing needle (the 2.5 mm in this pattern). thanks!

18.04.2022 - 11:25

DROPS Design answered:

Dear Neysa, you measure the tension for the main needle size, with which you will work in stocking stitch, among other things. Happy knitting!

18.04.2022 - 19:48

country flag Ali Altink wrote:

Die zet ik op mijn te maken- lijst. Vind hem geweldig.

11.03.2022 - 21:23

country flag Chris wrote:

Pumpernickel

01.02.2022 - 17:47

country flag Sophy L wrote:

Graceful Gilet

18.01.2022 - 23:18

country flag Charlaine wrote:

"Comme un garçon"

14.01.2022 - 19:15

country flag Maarit wrote:

Den är stilren.

14.01.2022 - 13:57