
Popular categories
Looking for a yarn?


|
|||||||||||||||||||
Rocky Shores |
|||||||||||||||||||
 |
 |
||||||||||||||||||
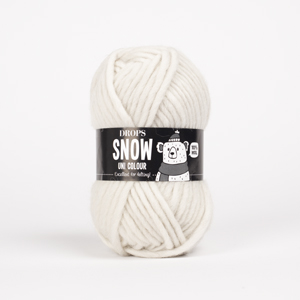
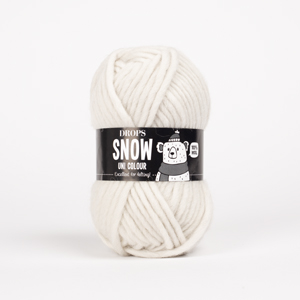
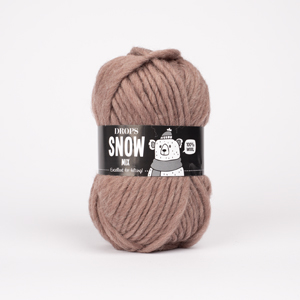
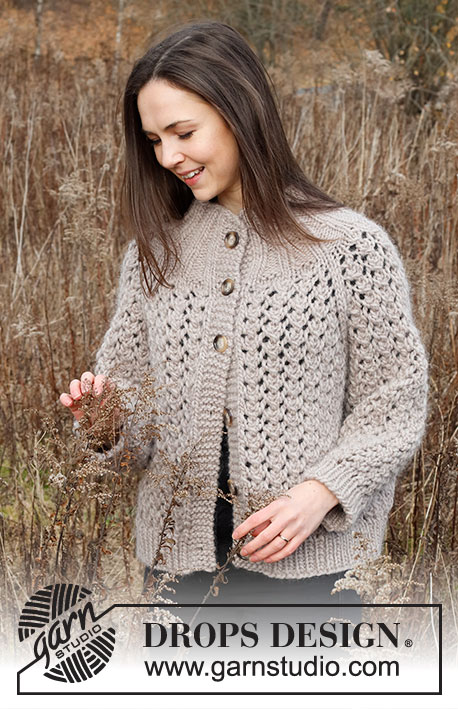
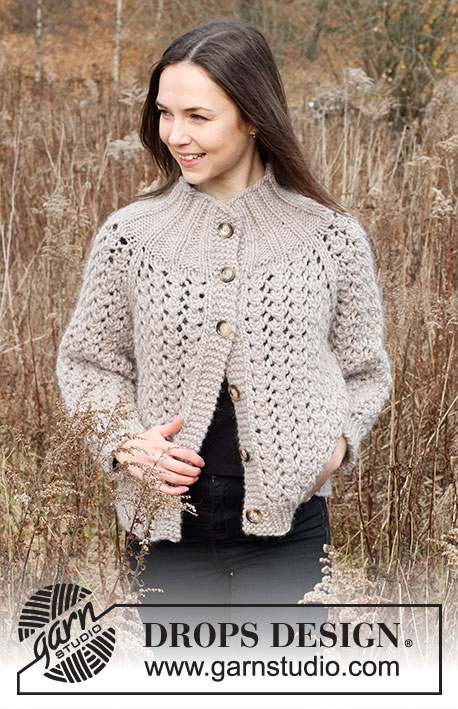
Knitted jacket in DROPS Snow or DROPS Wish. The piece is worked top down with raglan and lace pattern. Sizes S - XXXL.
DROPS 226-30 |
|||||||||||||||||||
|
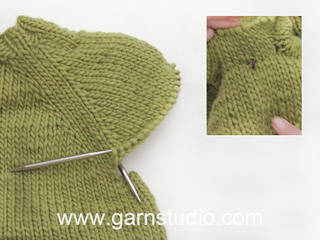
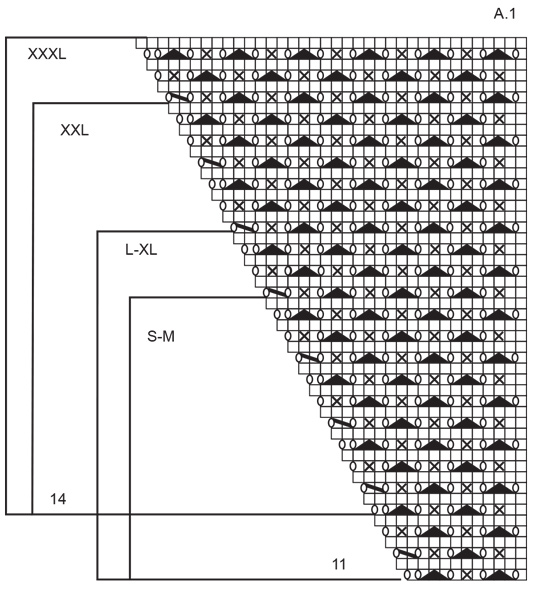
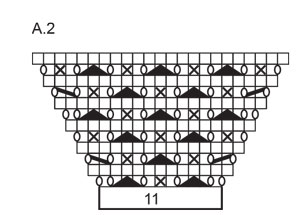
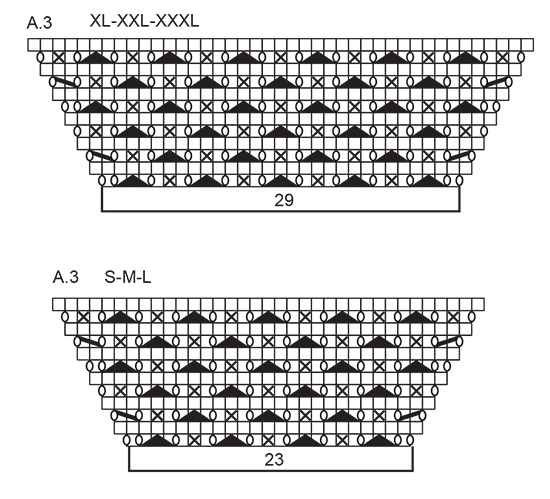
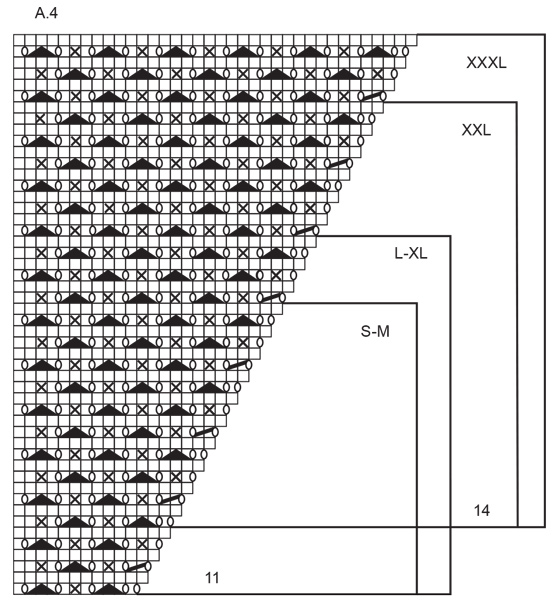
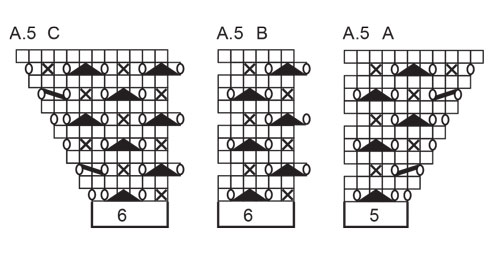
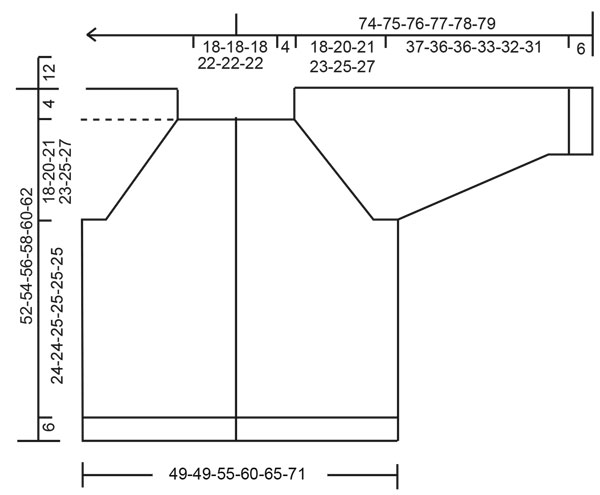
------------------------------------------------------- EXPLANATIONS FOR THE PATTERN: ------------------------------------------------------- RIDGE/GARTER STITCH (worked back and forth): Knit all rows. 1 ridge = knit 2 rows. PATTERN: See diagrams A.1 to A.5. Find your size in diagrams A.1 and A.4 and the right size in A.3. The diagrams show all rows in the pattern from the right side. BUTTONHOLES (top down): Work buttonholes on the right band (when the garment is worn). 1 buttonhole = work from the right side until there are 3 stitches left on the row, make 1 yarn over, knit 2 together and knit 1. On the next row (wrong side), knit the yarn over to leave a hole. The first buttonhole is worked when the rib on the neck measures approx. 4 cm = 1½". Then work the other 5-5-5-6-6-6 buttonholes with approx. 9 cm = 3½" between each one. INCREASE TIP (evenly spaced): To work out how to increase evenly, count the total number of stitches on the needle (e.g. 117 stitches) minus bands (e.g. 10 stitches) and divide the remaining stitches by the number of increases to be made (e.g. 8) = 13.3. In this example, increase by making 1 yarn over after approx. each 13th stitch. Do not increase on bands. On the next row work the yarn overs twisted to avoid holes. DECREASE TIP (for sleeves): Decrease 1 stitch on either side of the marker-stitch as follows: Work until there are 3 stitches left before the marker-stitch, knit 2 together, knit 3 (marker-stitch is the middle stitch), slip 1 stitch as if to knit, knit 1 and pass the slipped stitch over the knitted stitch (2 stitches decreased). BINDING-OFF TIP: To avoid the bind-off edge being tight you can bind off with a larger size needle. If the edge is still tight, make 1 yarn over after approx. each 8th stitch at the same time as binding off; the yarn overs are bind off as normal stitches. ------------------------------------------------------- START THE PIECE HERE: ------------------------------------------------------- JACKET – SHORT OVERVIEW OF THE PIECE. The neck and yoke and body are worked back and forth with circular needle, from mid front and top down. The sleeves are worked in the round with double pointed needles/short circular needle, top down. NECK: Cast on 68-68-68-76-76-76 stitches (including 5 band stitches on each side towards mid-front) with circular needle size 7 MM = US 10.75 and DROPS Snow or DROPS Wish. Purl 1 row from the wrong side. Then work as follows from the right side: 5 band stitches in GARTER STITCH – read description above, * knit 2, purl 2 *, work from *-* until there are 7 stitches left, knit 2 and finish with 5 band stitches in garter stitch. Continue this rib for 4 cm = 1½", then work the first BUTTONHOLE – read description above. Continue working until the rib measures 8 cm = 3⅛". On the next row from the right side increase 1 stitch in each purled section by making 1 yarn over at the end of each purled section; on the next row work the yarn overs twisted to avoid holes = 82-82-82-92-92-92 stitches. Continue the new rib (knit 2, purl 3) for 4 cm = 3⅛". The rib is now 12 cm = 4¾", finish after a row from the right side. Change to circular needle size 8 MM = US 11, purl 1 row from the wrong side where you increases 3-3-3-5-5-5 stitches evenly spaced – read INCREASE TIP = 85-85-85-97-97-97 stitches. Knit 1 row from the right side and purl 1 row from the wrong side (the bands are continued in garter stitch). Insert 1 marker at the beginning of the row. THE PIECE IS NOW MEASURED FROM HERE! YOKE: The first row is worked as follows from the right side: 5 band stitches in garter stitch, A.1 (= 11-11-11-14-14-14 stitches) (= 16-16-16-19-19-19 stitches on the front piece), work 2 stitches in stockinette stitch (= raglan-line), A.2 (= 11 stitches on the sleeve), work 2 stitches in stockinette stitch (= raglan-line), A.3 (= 23-23-23-29-29-29 stitches on the back piece), work 2 stitches in stockinette stitch (= raglan-line), A.2 (= sleeve), work 2 stitches in stockinette stitch (= raglan-line), A.4 (= 11-11-11-14-14-14 stitches) and 5 band stitches in garter stitch (= 16-16-16-19-19-19 stitches on the front piece). You have increased 8 stitches; these increases are drawn into A.1 - A.4. When A.2 and A.3 have been worked 1 time in height, continue as follows (continue with A.1 and A.4 as before): BACK PIECE: Work A.5A over the first 5-5-5-5-5-5 stitches, A.5B over the next 24-24-24-30-30-30 stitches (= 4-4-4-5-5-5 repeats of 6 stitches), finish with A.5C over the last 6-6-6-6-6-6 stitches. SLEEVES: Work A.5A over the first 5-5-5-5-5-5 stitches, A.5B over the next 12-12-12-12-12-12 stitches (= 2 repeats of 6 stitches), finish with A.5C over the last 6-6-6-6-6-6 stitches. Each time A.5 is worked 1 time in height, there is room for 2 more repeats of A.5B between A.5 A and A.5 C. When A.1 and A.4 have been worked 1 time in height there are 189-189-213-225-249-273 stitches on the needle and you have increased 13-13-16-16-19-22 times. REMEMBER THE KNITTING GAUGE! Continue working without further increases (working pattern as before) until the piece measures 18-20-21-23-25-27 cm = 7"-8"-8¼"-9"-9¾"-10⅝" from the marker on the neck. Now divide the piece for the body and sleeves and finish each piece separately. The next row is worked as follows from the right side: Work 29-29-32-35-38-41 stitches as before (= front piece), place the next 41-41-47-47-53-59 stitches on 1 thread for the sleeve, cast on 5 new stitches (= in side under sleeve), work 49-49-55-61-67-73 stitches as before (= back piece), place the next 41-41-47-47-53-59 stitches on 1 thread for the sleeve, cast on 5 new stitches (= in side under sleeve), work the remaining 29-29-32-35-38-41 stitches as before (= front piece). THE PIECE IS NOW MEASURED FROM HERE! BODY: = 117-117-129-141-153-165 stitches. Continue the pattern with 5 band stitches in garter stitch on each side (first row from the wrong side). When the piece measures 24-24-25-25-25-25 cm = 9½"-9½"-9¾"-9¾"-9¾"-9¾" knit 1 row from the right side where you increase 8 stitches evenly spaced – read INCREASE TIP = 125-125-137-149-161-173 stitches. Change to circular needle size 7 MM = US 10.75. The next row is worked as follows from the wrong side: 5 band stitches in garter stitch, * purl 1, knit 1 *, work from *-* until there are 6 stitches left, purl 1 and 5 band stitches in garter stitch. Continue this rib for 6 cm = 2⅜". Loosely bind off with garter stitch over garter stitch, knit over knit and purl over purl – read BINDING-OFF TIP. The jacket measures approx. 52-54-56-58-60-62 cm = 20½"-21¼"-22"-22¾"-23⅝"-24⅜" from the shoulder down. SLEEVES: Place the 41-41-47-47-53-59 stitches from the thread on the one side of the piece on double pointed needles/short circular needle size 8 MM = US 11 and knit up 1 stitch in each of the 5 stitches cast on under the sleeve = 46-46-52-52-58-64 stitches. Insert a marker in the middle of the 5 stitches under the sleeve and start the round here. Continue the pattern in the round, but without further increases – make sure the pattern matches the stitches on the yoke – NOTE! The stitches which do not fit into the pattern under the sleeve are worked in stockinette stitch. When the sleeve measures 4 cm = 1½", decrease 1 stitch on each side of the marker-stitch – read DECREASE TIP. Decrease like this every 5½-5½-4½-4-3-2½ cm = 2⅛"-2⅛"-1⅝"-1½"-1⅛"-1" a total of 6-6-7-7-8-10 times = 34-34-38-38-42-44 stitches. Continue working until the sleeve measures 37-36-36-33-32-31 cm = 14½"-14¼"-14¼"-13"-12½"-12¼" from the division (or to desired length; there is approx. 6 cm = 2⅜" left to finished length). Change to double pointed needles size 7 MM = US 10.75 and work rib (knit 1, purl 1) for 6 cm = 2⅜". Loosely bind off with knit over knit and purl over purl. The sleeve measures approx. 43-42-42-39-38-37 cm = 17"-16½"-16½"-15¼"-15"-14½" from the division. Work the other sleeve in the same way. ASSEMBLY: Sew the buttons onto the left band. |
|||||||||||||||||||
Diagram explanations |
|||||||||||||||||||
|
|||||||||||||||||||
|
|||||||||||||||||||
|
|||||||||||||||||||
|
|||||||||||||||||||
|
|||||||||||||||||||
|
|||||||||||||||||||
|
|||||||||||||||||||
|
Have you made this or any other of our designs? Tag your pictures in social media with #dropsdesign so we can see them! Do you need help with this pattern?You'll find tutorial videos, a Comments/Questions area and more by visiting the pattern on garnstudio.com. © 1982-2024 DROPS Design A/S. We reserve all rights. This document, including all its sub-sections, has copyrights. Read more about what you can do with our patterns at the bottom of each pattern on our site. |
|||||||||||||||||||


With over 40 years in knitting and crochet design, DROPS Design offers one of the most extensive collections of free patterns on the internet - translated to 17 languages. As of today we count 304 catalogs and 11422 patterns - 11417 of which are translated into English (US/in).
We work hard to bring you the best knitting and crochet have to offer, inspiration and advice as well as great quality yarns at incredible prices! Would you like to use our patterns for other than personal use? You can read what you are allowed to do in the Copyright text at the bottom of all our patterns. Happy crafting!
Comments / Questions (20)
Hej I følge opskriften startes bærestykket på retsiden med strikkediagram A1 som venstre forstykke og sluttes med A4 som højre forstykke. Men det betyder at jeg får det skrå udtagningsstykke ind mod forstykkernes 5 kantmasker, samt tre masker i raglanlinjen. Jeg strikker diagrammet fra højre mod venstre. Kan det være rigtigt? Bør det ikke være A4 der skal startes med for at give venstre forstykke, og A1 som højre forstykke? Tak for hjælpen.
13.02.2022 - 17:34DROPS Design answered:
Hej Ann-Mona, jeg tror du har ret. Vi har sendt spørgsmålet videre til design, så hold øje med en rettelse. Tak for info :)
15.02.2022 - 14:39What size is medium? for this sweater, like a 12-14 misses? I want to make this sweater for my daughter not sure if I should go large or medium.
05.02.2022 - 17:23DROPS Design answered:
Dear Julie, you can check the schematic below the pattern, where you will find the measurements of the sweater in cm, for the different sizes. This way, you can choose the best size for your daughter. Happy knitting!
05.02.2022 - 18:26After you work A1 and A4 one time in height (making the proper increases = 189 stitches), how do you continue the pattern without further increses? For the life of me, I can't seem to get the pattern without increasing the stitches.
04.01.2022 - 22:48DROPS Design answered:
Dear Flavia, repeat the pattern as before, and just work the new stitches that cannot be worked into the pattern in stokcing stitch. Happy knitting!
19.01.2022 - 10:42I cannot get the diagram started corretly. Help!, 🥰
08.12.2021 - 12:54DROPS Design answered:
Dear Mrs Havmand, could this lesson help you? It explains how to work diagram - from WS read diagrams from the left towards the right - see here here. Happy knitting!
08.12.2021 - 13:50Country flag Marie Garpefjäll 06.11.2021 - 00:04: Till Drops: A3 rad 9, fel i fönstret, saknas ett omslag i början. Det måste vara: ett omslag, två tillsammans, ett omslag. Mvh Marie
06.11.2021 - 20:25DROPS Design answered:
Hej Marie. Vi ska se över detta så fort som möjligt, tack för info! Mvh DROPS Design
09.11.2021 - 09:12A3 rad 9, fel i fönstret, saknas ett omslag i början. Det måste vara: ett omslag, två tillsammans, ett omslag. Mvh Marie
06.11.2021 - 00:04Je suis en train de tricoter ce joli modèle, et j'ai découvert quelques erreurs sur les explications que je signale pour éviter à d'autres quelques mésaventures ! Tout d'abord, les grilles A1 et A4 sont inversées. Sur le diagramme A1 et A4, la taille XL doit commencer à 14 mailles et terminer 6 rangs plus haut qu'indiqué. Sur les deux grilles A3 il manque des jetés entre deux mailles. En espérant avoir été utile !
31.10.2021 - 15:34So lovely, can'twait to kint it
10.10.2021 - 17:25French chic
07.08.2021 - 10:12Cardigan style "liseuse", trop beau, magnifique , j'ai hâte de trouver ce modèle en ligne afin de me le tricoter ! il couvre bien le col, la longueur est idéale, il a tout pour plaire !!
03.08.2021 - 22:53