
Popular categories
Looking for a yarn?


|
||||||||||||||||
Lady Grey |
||||||||||||||||
 |
 |
|||||||||||||||
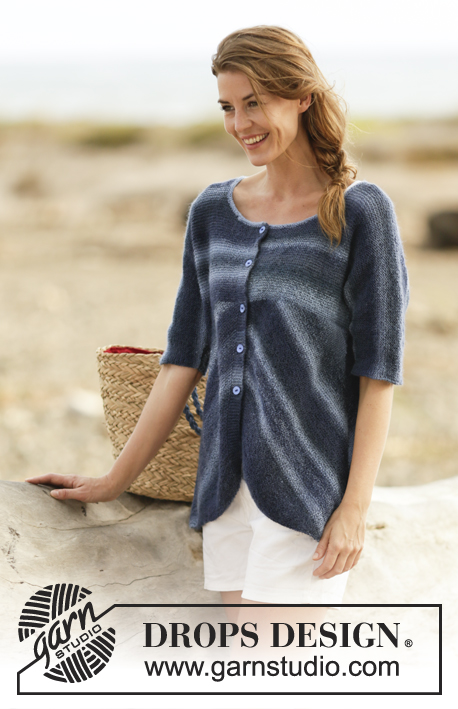
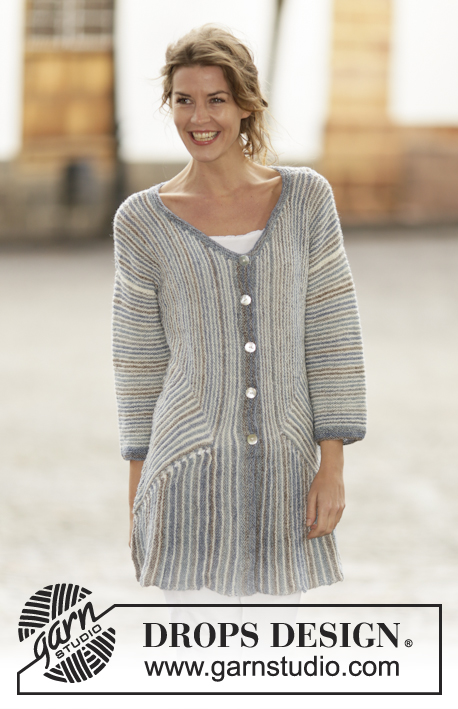
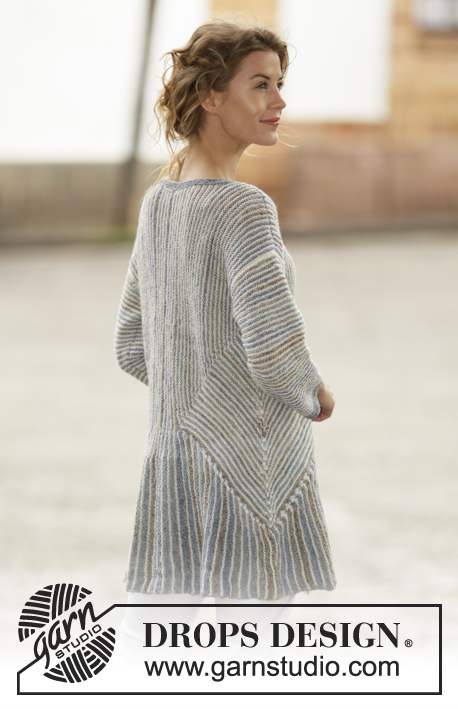
Knitted DROPS jacket in garter st with stripes and domino squares in ”Fabel”. Size: S - XXXL.
DROPS 161-25 |
||||||||||||||||
|
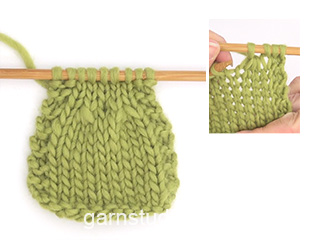
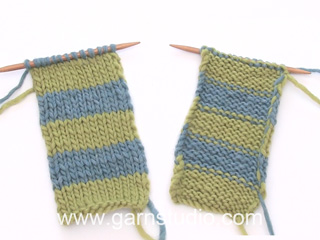
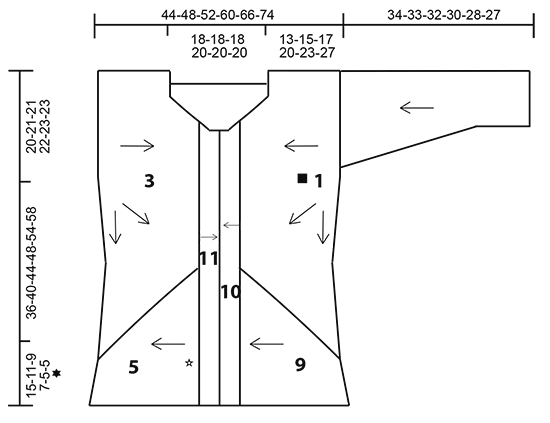
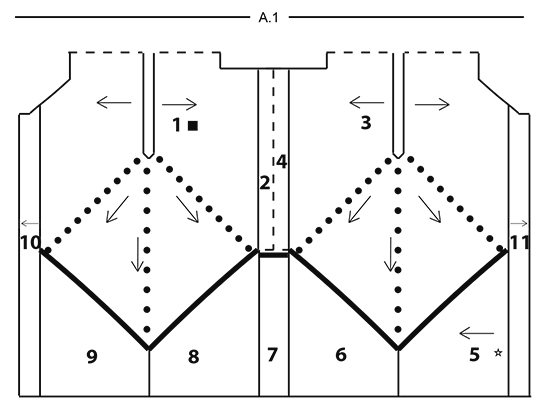
RIDGE/GARTER STITCH (worked back and forth): 1 ridge = knit 2 rows. STRIPES: Work stripes as follows (first row in each stripe = from right side): 1 RIDGE – see description above – with ocean view. 1 ridge with off white. DOMINO SQUARE: ROW 1 AND ALL OTHER ROWS FROM WRONG SIDE: Knit. ROW 2 (= right side): Knit to the stitch with the first marker, 1 yarn over, knit stitch with first marker, knit to stitch with 2nd marker, 1 yarn over, knit stitch with 2nd marker, 1 yarn over, knit to the stitch with the 3rd marker, knit stitch with 3rd marker, 1 yarn over, knit to end of row (= 4 stitches increased). The yarn overs are then knitted to allow holes. ROW 4: Knit and increase as in row 2. ROW 6: Knit to the stitch with the first marker, 1 yarn over, knit the stitch with the first marker, knit to 1 stitch before the stitch with the 2nd marker, 1 yarn over, knit 1, 1 yarn over, knit the stitch with the 2nd marker, 1 yarn over, knit 1, 1 yarn over, knit to the stitch with the 3rd marker, knit the stitch with the 3rd marker, 1 yarn over, knit to end of row (= 6 stitches increased). ROW 8: Knit and increase as for row 2. ROW 10: Knit and increase as for row 2. Repeat rows 1 to 10. BUTTONHOLE: 1 BUTTONHOLE = Knit 2 stitches together and make 1 yarn over. Make 4-4-4-5-5-5 buttonholes on the right band when the band (= part-11) measures 2-2-2-4-4-6 cm. The first hole is worked 7-7-7-8-8-8 cm from the neckline, the others with approx. 8-8-8-9-9-9 cm between them. The 5th-5th-5th-6th-6th-6th buttonhole is worked when working the neckline, make it above the others. ---------------------------------------------------------- JACKET: The jacket is worked as follows (see A.1): Left part (= part-1 and part-2) is worked as one, right part (= part-3 and part-4) is worked as one, then an edge is worked around the whole jacket (= part-5 to part-9). The bands are worked to finish (= part-10 and part-11). The broken lines in A.1 show the seams on the jacket. Then the sleeves are worked separately and sewn onto the jacket. PART-1 (left front piece and back piece): Cast on 87-91-91-95-99-99 stitches with circular needle size 4 mm and off white (= the armhole of the garment. The shoulder seam is sewn later). Work STRIPES – see description above. On row 1 (= right side) insert 3 markers in the piece as follows: Work 42-44-44-46-48-48 stitches, work the next stitch and insert the first marker in that stitch, work 1 stitch and insert the 2nd marker in that stitch (= the side of the jacket and the point of the domino), work 1 stitch and insert the 3rd marker in that stitch, work 42-44-44-46-48-48 stitches. The markers sit in the middle 3 stitches in the piece. The markers are to follow the piece as you work. Continue working DOMINO SQUARE – see description above (first row is worked with off white from wrong side). REMEMBER THE KNITTING TENSION! Work until the piece measures 13-15-17-20-23-27 cm measured at the shortest at the end/beginning of the row. The last row should be from wrong side. Cast off for the neck as follows: ROW 1 (= Right side): Cast off the first 12-12-14-14-16-16 stitches for the neck on the front piece and work domino to the end of the row as before. ROW 2 (= wrong side): Cast off the first 6 stitches for the neck on the back piece and work domino to the end of the row as before. ROW 3: Knit the first 2 stitches twisted together (= 1 stitch decreased for the neck on the front piece), work domino to the end of the row as before. ROW 4: Work domino. Repeat rows 3 and 4 until the piece measures 18-20-22-24-27-29 cm at the shortest – finish with 1 whole stripe with ocean view. Now divide the piece into 4 parts. Work with ocean view from the right side as follows: Knit to and including the stitch with the first marker, place these stitches on 1 thread (= stitches towards mid front – here the band will be worked = part-10), knit to and including the stitch with the 2nd marker, place these stitches on a 2nd thread (= diagonal line on the front piece from mid front to the side, these stitches will be worked together with an edge = part-9), knit to and including the stitch with the 3rd marker, place these stitches on a 3rd thread (= diagonal line on the back piece from the side up to mid back, these stitches will be worked together with an edge = part-8), change to off white and knit to end of the row (= stitches mid back, you will now continue working these stitches back and forth = part-2). There are now stitches on 3 different threads and the remaining stitches are on the needle. Now part-2 is worked back and forth over the stitches on the needle. PART-2 (left mid back): Continue to work stripes (row 1 = wrong side) until the piece measures 22-24-26-30-33-37 cm measured from the cast-on edge and horizontally towards mid back. Finish with 1 whole stripe with ocean view. Cast off loosely with ocean view (this is mid back and here part-2 will later be sewn together with part-4). Lay the piece to one side and work the right part of the jacket as follows: PART-3 (right front piece and back piece): Cast on and work as for part-1 until the piece measures 13-15-17-20-23-27 cm at the shortest. The last row is from the wrong side. Now cast off for the neck as follows: ROW 1 (= right side): Cast off the first 6 stitches for the neck on the back piece and work domino to end of the row as before. ROW 2 (= wrong side): cast off the first 12-12-14-14-16-16 stitches for the neck on the front piece and work domino to end of row as before. ROW 3: Work domino. ROW 4: Knit the first 2 stitches twisted together (= 1 stitch decreased for the neck on the front piece), work domino to end of row as before. Repeat rows 3 and 4 until the piece measures 18-20-22-24-27-29 cm at the shortest – make sure that length and stripes match part-1. Cut the strands. Now divide the piece into 4 parts. Work with off white from the right side as follows: Knit to and including the stitch with the first marker (= stitches mid back, you will continue to work back and forth over these stitches = part-4), change to ocean view, knit to and including the stitch with the 2nd marker, place these stitches on 1 thread (= diagonal line on the back piece from mid back to the side, these stitches will be worked together with an edge = part-6, the marker marks the side of the jacket), knit to and including the stitch with the 3rd marker, place these stitches on a 2nd thread (= diagonal line on the front piece from the side to mid front, these stitches will be worked together with an edge = part-5), knit to end of row and then place these stitches on a 3rd thread (= stitches towards mid front – here you will work a band = part-11). The stitches are now on 3 different threads and the remaining stitches are on the needle. PART-4 (right mid back): Continue working as for part-2. ASSEMBLY: Sew part-2 together with part-4 with ocean view – see the broken line in A.1, in the outermost loop of the outermost stitch. EDGE OF JACKET: The edge at the bottom is started mid front and is worked along the right front piece (part-5), right back piece (part-6) and continued along mid back (part-7), left back piece (part-8) and left front piece (part-9). Cast on 52-54-60-66-72-82 stitches with circular needle size 4 mm and off white. PART-5 (edge on right front piece): The edge is worked together with the stitches between the 3rd and 2nd marker on part-3 (i.e. from mid front and down to the tip of the domino). Work as follows: ROW 1 (= right side): Knit 1, 1 yarn over, knit 2 twisted together, knit 2 twisted together and knit to end of row (= 1 stitch decreased). ROW 2 (= wrong side): Knit until there is 1 stitch left on the needle, place the first/next 2 stitches from the thread back on the needle, knit 3 stitches together. The edge is now worked together with the first/next 2 stitches from part-3. Change to ocean view. ROW 3: Work as for row 1. Work short rows over the edge as follows: ROW 4 (= wrong side): Knit until there are 8 stitches left on the needle, turn the piece. ROW 5 (= right side): Knit. ROW 6 (= wrong side): Knit until there are 2 stitches left on the needle, turn the piece. ROW 7 (= right side): Knit. ROW 8: Work as for row 2. Change to off white. Repeat rows 1-8 until all the stitches from mid front and down to the tip have been worked to the edge. PART-6 (edge on right back piece): The edge is worked to the stitches between the 2nd and first markers on part-3 (i.e. from the tip of the domino and up to mid back). Work as follows with off white: ROW 1 (= right side): Knit 1, 1 yarn over, knit to end of row (= 1 stitch increased). ROW 2 (= wrong side): Knit until there is 1 stitch left on the needle, place the first/next 2 stitches from the thread back on the needle and knit 3 stitches together. The edge is now worked together with the first/next 2 stitches from the right back piece. Change to ocean view. ROW 3: Work as for row 1. Work short rows over the edge as follows: ROW 4 (= wrong side): Knit until there are 8 stitches left on the needle, turn the piece. ROW 5 (= right side): Knit. ROW 6 (= wrong side): Knit until there are 2 stitches left on the needle, turn the piece. ROW 7 (= right side): Knit. ROW 8: Work as for row 2. Change to off white. Repeat rows 1-8 until all the stitches from the tip to mid back have been worked together with the edge. PART-7 (edge mid back): Place 1 marker in the piece. THE PIECE IS NOW MEASURED FROM HERE! Now work short rows back and forth over the stitches from the edge as follows (i.e. they are not worked together with stitches from part-1 or part-3): Continue with stripes as before, adjust colour according to the stripes. Change to ocean view. ROW 1 (= right side): Knit. Knit short rows over the edge as follows: ROW 2 (= wrong side): Knit until there are 8 stitches left on the needle, turn the piece. ROW 3 (= right side): Knit. ROW 4 (= wrong side): Knit until there are 2 stitches left on the needle, turn the piece. ROW 5 (= right side): Knit. ROW 6: Knit. Change to off white. ROWS 7 AND 8: Knit. Repeat rows 1-8 until the piece measures 8-8-8-12-12-16 cm at the shortest, adjust the measurement with part-2 and part-4, they will be sewn together later. PART-8 (edge on left back piece): The edge is worked together with the stitches between the 3rd and 2nd marker on part-1 (i.e. from mid back and down to the tip of the domino). Work as for part-5 until all the stitches from mid back and down to the tip of the domino have been worked together with the edge. PART-9 (edge on the left front piece): The edge is worked together with the stitches between the 2nd and first marker on part-1 (i.e. from the tip of the domino and up to mid front). Work as for part-6 until all the stitches from the tip to mid front have been worked together with the edge. PART-10 (rest of left front piece and left band): Place the stitches from the first thread on part-1 (= left front piece mid front) back on the needle (i.e. there are now stitches from the edge and stitches from the thread on the needle). Insert 1 marker in the piece. THE PIECE IS NOW MEASURED FROM HERE! Work band as follows in the different sizes (the jacket in the picture shows size XL): SIZES S-M-L: Work garter stitch with ocean view until the piece measures 4 cm. Loosely cast off. SIZES XL-XXL-XXXL: Continue with stipes and decrease for the neck (as for part-1) at the beginning of every row from the right side, by knitting the 2 first stitches twisted together. Repeat the decreases until the piece measures 2-2-4 cm. Work garter stitch with ocean view for 4 cm (= band). Loosely cast off. PART-11 (the rest of the right front piece and right band): Insert 1 marker in the piece. THE PIECE IS NOW MEASURED FROM HERE! Work stripes as for part-3. Knit up 52-54-60-66-72-82 stitches along part-5 (= the edge on the right front piece) from the right side with ocean view, work the stitches from the thread mid front on part-3 (= right front piece mid front) back onto the needle. Knit 1 row from the wrong side – read BUTTONHOLE. Knit band as follows in the different sizes: SIZES S-M-L: Work as for part-10. SIZES XL-XXL-XXXL: Work as for part-10, but decrease for the neck at the start of each row from the wrong side. SLEEVE: The piece is worked back and forth in garter stitch and stripes. Cast on 54-54-56-56-58-58 stitches with circular needle size 4 mm and ocean view (including 1 edge stitch in each side of the piece). When the piece measures 6-5-6-8-6-6 cm increase 1 stitch with 1 yarn over inside the 1 edge stitch in each side of the piece. On the next row knit the yarn overs twisted. Increase in this way every 1½-1½-1½-1-1-1 cm a total of 16-18-17-19-20-20 times = 86-90-90-94-98-98 stitches. Work until the piece measures 34-33-32-30-28-27 cm (shorter measurements in larger sizes due to broader shoulder width), adjust so that the last stripe is with off white. Cast off. Work another sleeve. ASSEMBLY: See broken lines in A.1. Sew the shoulder seams. Sew the sleeve seams and sew the sleeves into the armholes. Sew part-7 together with part-2 and part-4 (= 8-8-8-12-12-16 cm horizontal seam). NECKLINE: Pick up 160-180 stitches with circular needle size 4 mm and ocean view. Work 3 ridges back and forth on the needle – remember BUTTONHOLE. Cast off. Sew the buttons onto the left band. |
||||||||||||||||
Diagram explanations |
||||||||||||||||
|
||||||||||||||||
|
||||||||||||||||
|
||||||||||||||||
|
Have you made this or any other of our designs? Tag your pictures in social media with #dropsdesign so we can see them! Do you need help with this pattern?You'll find tutorial videos, a Comments/Questions area and more by visiting the pattern on garnstudio.com. © 1982-2024 DROPS Design A/S. We reserve all rights. This document, including all its sub-sections, has copyrights. Read more about what you can do with our patterns at the bottom of each pattern on our site. |
||||||||||||||||


With over 40 years in knitting and crochet design, DROPS Design offers one of the most extensive collections of free patterns on the internet - translated to 17 languages. As of today we count 304 catalogues and 11422 patterns - 11422 of which are translated into English (UK/cm).
We work hard to bring you the best knitting and crochet have to offer, inspiration and advice as well as great quality yarns at incredible prices! Would you like to use our patterns for other than personal use? You can read what you are allowed to do in the Copyright text at the bottom of all our patterns. Happy crafting!
Comments / Questions (157)
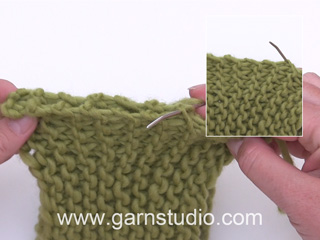
Tak for svar. Jeg har prøver igen , men det løser ikke mit problem. Jeg har taget det rigtige antal ud og det danner en fin hulrække og dominoer som følger den skrå linie i del 1. Jeg mangler et afsnit der fortæller hvordan jeg øger antallet før mærke 1 og efter mærke 3. Det skal sikre at linjen bliver skrå. På billedet kan man se at delen er uden hulmønster.
24.02.2016 - 12:21DROPS Design answered:
Hej Ann, Jo hvis du følger del 1 og tager ud ifølge DOMINORUDEN så kommer den til at se ud som på billedet. Det som er vigtigt er at du er sikker på at du har 21 m og 40 pinde i højden i retstrik på 10x10 cm. God fornøjelse!
24.02.2016 - 15:08Mit tidligere spørgsmål er formuleret forkert. Det jeg mangler er at øge maskeantallet mellem start og mærke 1 og fra mærke 3 til slut pind. Jeg har ikke haft problemer med dominoen.
06.02.2016 - 09:47DROPS Design answered:
Hej Ann, på hver 6.p (ifølge dominoen) laver man 6 udtagninger på pinden hvoraf de yderste kommer til at følge de stiblede linier både foran og bagpå. God fornøjelse!
22.02.2016 - 10:37Jeg er næsten færdig med at strikke Lady Grey(xxl). Og den passer overhovedet ikke og ligner ikke tegningen. Den hænger og drypper og er for kort. især bagpå. Der hvor den ikke passer med skitsen er del 1. Hvordan øges maskeantal fra ærmekant(opslåkant) til midt foran, så det følgerstregen ned mod 5 tallet på skitsen. Når maskeantal ikke øges mellem mærke 1 og mærke 2 bliver del 3 strikket til et rygmidt på 23 cm.
03.02.2016 - 11:09Også jeg har problemer med del 3 i opskriften, og får ikke svar i de øvrige kommentarer. Jeg mangler forklaring på hvorfor den stribede bort der er hele vejen ned på forstykket, ikke findes i hverken i mønsterbeskrivelsen eller målskitsen. Og jeg starter del 3 med natur, hvilket slet ikke passer med resten af mønsteret. Jeg undrer mig også lidt over at sammenstrikningen foregår fra vrangsiden. Har været i garnbutikken, hvor garnet er købt, men de kunne ikke hjælpe.
13.12.2015 - 21:21DROPS Design answered:
Hej Annette, Striberne får du automatisk hvis du følger opskriften. Antal striber kan variere alt efter størrelsen, så det er ikke sikkert at den bliver nøjagtig som på billedet. Sørg for at du slutter med "havudsigt" inden du starter med natur og del 3, så stemmer striberne. Jo du starter del 3 med højre forstykke, og du strikker sammen på vrangpinden, nøjagtig som der står i opskriften. God fornøjelse!
17.12.2015 - 09:38Jeg er kommet til sammenstrikning ved del 3. Når jeg slår 54 m op med natur og følger opskriften, bliver der 2 riller med natur og ikke kun 1 rille, som på billedet. Og hvad med stykket ud til forkanten strikket med havudsigt. Jeg kan tælle 7 striber ovenover dominoruden, men kan ikke finde dem i opskriften? Der er heller ikke overensstemmelse imellem måleskitsen og billedet mht. del 4 og 5. På måleskitsen går dominoruden ud til kanten og det gør den ikke på billedet. Hjælp!!!
26.10.2015 - 16:28DROPS Design answered:
Hej Merethe, Men hvis du sluttede med havudsigt, så bør der kun blive 1 rille med natur ved sammenstrikningen (har du ikke det, så kan du evt trevle sidste rille natur op inden du strikker stykkerne sammen). Der kan være lidt forskel med antal striber på billedet i forhold til hvilken størrelse du strikker i opskriften. Så bare følge opskriften, så får du den størrelse som passer dig. God fornøjelse!
30.10.2015 - 11:51Jeg er kommet til sammenstrikning ved del 3. Når jeg slår 54 m op med natur og følger opskriften, bliver der 2 riller med natur og ikke kun 1 rille, som på billedet. Og hvad med stykket ud til forkanten strikket med havudsigt. Jeg kan tælle 7 striber ovenover dominoruden, men kan ikke finde dem i opskriften? Der er heller ikke overensstemmelse imellem måleskitsen og billedet mht. del 4 og 5. På måleskitsen går dominoruden ud til kanten og det gør den ikke på billedet. Hjælp!!!
22.10.2015 - 22:00DROPS Design answered:
Hej Merete, du kan evt trevle sidste stykke op og afslutte det med havudsigt så du får 1 rille med natur når du strikker stykkerne sammen. Der er forskelligt antal striber ud til kanten alt efter hvilken størrelse man strikker. Så følg opskriften for din størrelse!
02.11.2015 - 11:20Bonsoir, malgré vos explications je n arrive toujours pas a faire la partie 3,je suis frustrée de ne pas pouvoir continuer mon ouvrage je reste bloquée à ce niveau pouvez vous m expliquer avec plus de précisions car je n y comprends vraiment rien,merci pour votre réponse.
21.10.2015 - 21:47DROPS Design answered:
Bonjour Martine, pour toute assistance complémentaire, vous pouvez contacter votre magasin DROPS ou bien rendez-vous sur le forum DROPS où vous pourrez obtenir de l'aide. Bon tricot!
22.10.2015 - 10:52Hej har forsøgt mig med denne trøje efter at købt fabel garn i en af jeres online butikker. Men den er slet ikke kommet til at ligne er ALT for kort foran og bag og drypper i spidserne. Jeg er en erfaren strikker og synes at jeg fulgt opskriften i str. Xxl. Har en strikke veninde der uafhængigt af mig har forsøgt sig med xl og fået samme dårlige resultat kan der være fejl i jeres opskrift ? Ved ikke helt om jeg mod på at forsøge den igen er ellers en flot trøje på jeres billede.
19.10.2015 - 15:57DROPS Design answered:
Hej Jeanette, vi ved at der er mange som har strikket den og fået et fint resultat, se gerne på Ravelry. Det er svært at gætte hvor det kan være gået galt. Har du målt strikkefastheden så du er helt sikker på at du har 21 m i bredden og 40 p retstrik i højden på 10x10 cm?
20.11.2015 - 14:56Bonjour, Je ne comprends pas comment faire la partie 3, a quel moment doit on monter les 52 Mailles? et la suite?, pour moi il manque des explications, merci de m'apporter plus de détails. En attendant je vous souhaite une bonne journee. Martine
09.10.2015 - 09:44DROPS Design answered:
Bonjour Martine, la partie 3 du schéma commence par le paragraphe "TRICOTER ENSEMBLE": on monte 52 m puis on tricote d'abord le bas du devant droit (en tricotant les m ens comme indiqué) puis on tricote le bas du demi-dos droit (en tricotant les m ens comme indiqué), et on termine par des rangs raccourcis (les 8 rangs répétés jusqu'à 8 cm côté plus court), on tricote ensuite le bas du demi-dos gauche et enfin le bas du devant gauche de la même façon. Bon tricot!
09.10.2015 - 10:41Hej, jag tycker den är fin, men för lång. Finns det någon alternativ beskrivning där den är kortare? Nina
15.09.2015 - 18:17DROPS Design answered:
Hej Nina, Nej tyvärr, då måste du hitta en annan modell, för att få eksakt beskrivning. Lycka till!
16.09.2015 - 15:08