
Popular categories
Looking for a yarn?


|
|||||||||||||||||||
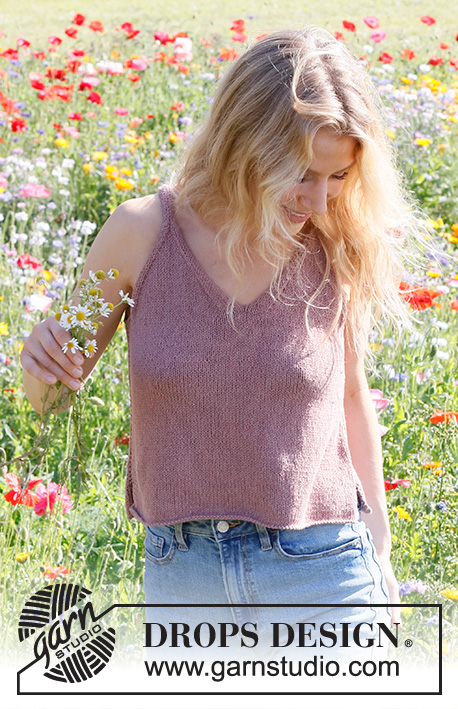
White Roses Top |
|||||||||||||||||||
 |
 |
||||||||||||||||||
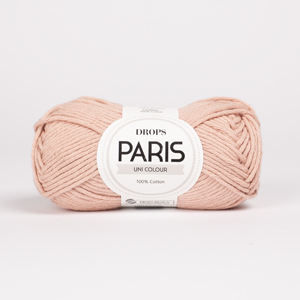
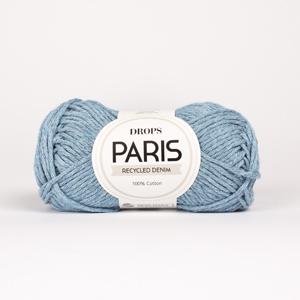
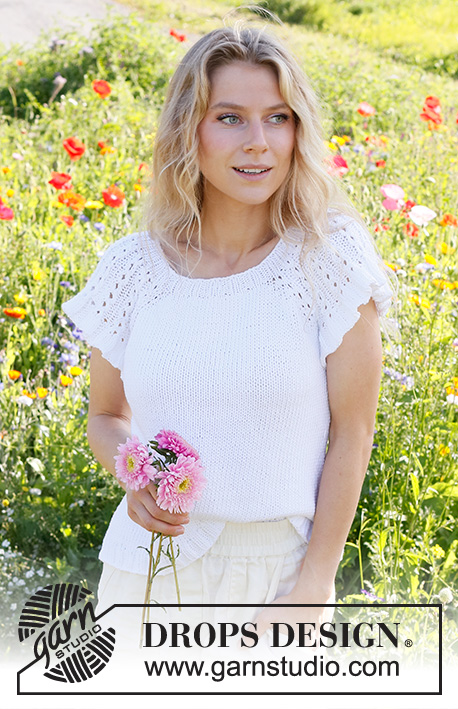
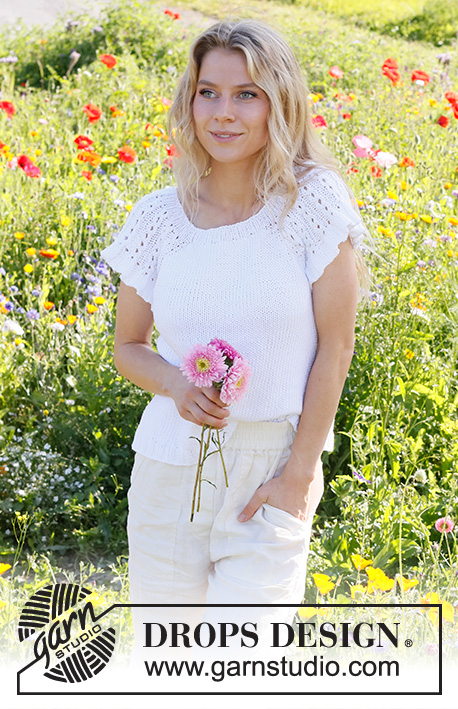
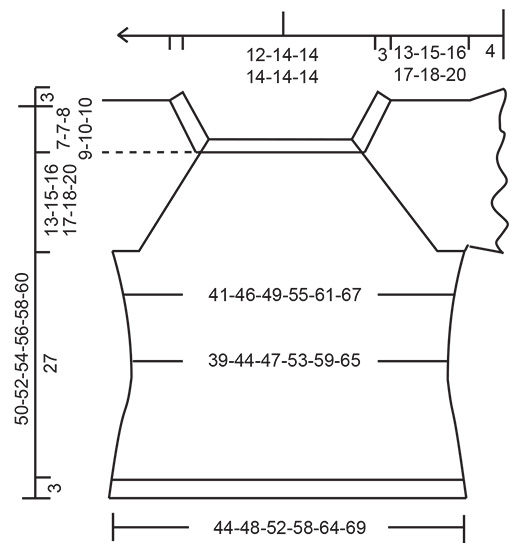
Knitted top in DROPS Paris. Piece is knitted top down with raglan, cables and flounce on sleeves. Size: S - XXXL
DROPS 231-25 |
|||||||||||||||||||
|
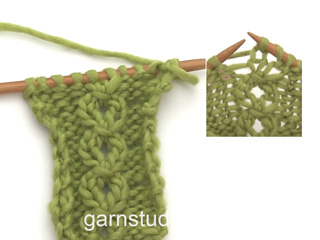
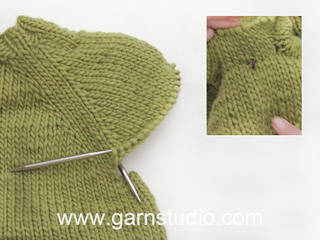
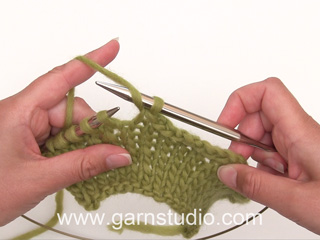
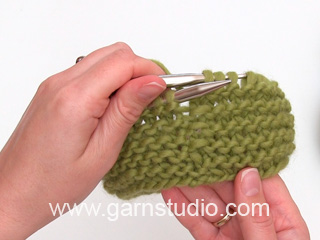
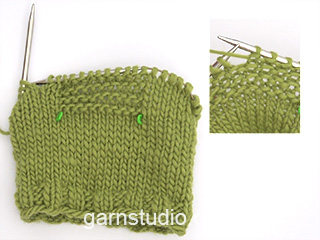
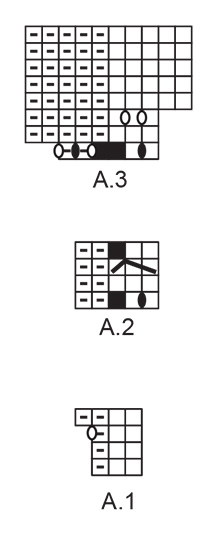
---------------------------------------------------------- EXPLANATION FOR THE PATTERN: ---------------------------------------------------------- GARTER STITCH (worked in the round): 1 ridge vertically = 2 rounds, i.e. knit 1 round and purl 1 round. GARTER STITCH (back and forth): Knit all rows. 1 ridge vertically = knit 2 rows. PATTERN: See diagrams A.1 to A.3. Diagrams show all rows in pattern seen from the right side. RAGLAN: All increases are done on front and back piece (do not increase on sleeves). First increase 2 stitches towards every raglan on front and back piece (= 8 stitches increased on round), then increase 1 stitch towards every raglan on front and back piece (= 4 stitches increased on round). Increase 2 stitches before 1st and 3rd marker thread as follows: Work until 2 stitches remain before marker thread: Make 1 yarn over, knit 1, make 1 yarn over, knit 1, marker thread is here. Increase 2 stitches after 2nd and 4th marker thread as follows: Knit 1, make 1 yarn over, knit 1, make 1 yarn over. Increase 1 stitch before 1st and 3rd marker thread as follows: Work until 1 stitch remains before marker thread, make 1 yarn over, knit 1, marker thread is here. Increase 1 stitch after 2nd and 4th marker thread as follows: Knit 1, make 1 yarn over. On next round knit yarn overs twisted to avoid holes. Then work the new stitches in stocking stitch. DECREASE TIP: Decrease 1 stitch on each side of marker thread as follows: Work until 3 stitches remain before marker thread, knit 2 together, knit 2 stitches (marker thread is between these 2 stitches), slip 1 stitch knitwise, knit 1, pass slipped stitch over stitch worked (= 2 stitches decreased). INCREASE TIP-1 (applies to sides of body): Work until 2 stitches remain before marker thread, make 1 yarn over, knit 4 (marker thread is in the middle of these stitches), make 1 yarn over (= 2 stitches increased). Repeat in the other side (= 4 stitches increased on round). On next round knit yarn overs twisted to avoid holes. Then work the new stitches in stocking stitch. INCREASE TIP-2 (evenly): To calculate how to increase evenly, count the number of stitches to be increased (e.g. 148 stitches) and divide number by stitches of increases to be done (e.g. 28) = 5.2. In this example increase by making 1 yarn over after approx. every 5th stitch. On next round work yarn overs twisted to avoid holes. CAST-OFF TIP: To avoid a tight cast-off edge when casting off, you may use a larger needle. If this still is too tight make 1 yarn over after approx. every 4th stitch while casting off (cast off yarn overs as stitches). ---------------------------------------------------------- START THE PIECE HERE: ---------------------------------------------------------- TOP - SHORT OVERVIEW OF THE PIECE: Work neck edge and yoke in the round on circular needle from approx. mid back, top down. Now divide yoke for body and sleeves. Work the body in the round on circular needle. Work sleeve edges back and forth on circular needle. NECK EDGE: Cast on 100-108-114-120-126-126 stitches on circular needle size 4 mm with DROPS Paris. Knit 1 round. Now work rib as follows: Work (knit 2/purl 2) over the first 8-12-12-12-12-12 stitches, insert 1st marker thread here, work A.1 over the next 30-30-33-36-39-39 stitches, work the first 2 stitches in A.1, insert 2nd marker thread here, work (purl 2/knit 2) over the next 16-20-20-20-20-20 stitches, purl 2, insert 3rd marker thread here, work A.1 over the next 30-30-33-36-39-39 stitches, work the first 2 stitches in A.1, insert 4th marker thread here, work (purl 2/knit 2) over the last 10-10-10-10-10-10 stitches on round. Continue like this and repeat the first 2 rounds in A.1 until piece measures 3 cm. Work next round as follows: Work in stocking stitch until 1st marker thread, work 3rd round in A.1 until 2nd marker (= 10-10-11-12-13-13 stitches increased), work in stocking stitch until 3rd marker thread, work 3rd round in A.1 until 4th marker thread (= 10-10-11-12-13-13 stitches increased), work in stocking stitch the rest of round = 120-128-136-144-152-152 stitches. Work 1 more round with last round in A.1 and stocking stitch over the remaining stitches. Insert a marker at beginning of round mid back. Now measure piece from here. YOKE: Switch to circular needle size 5 mm. Now work pattern, at the same time increase for raglan. Read all of the following section before continuing. PATTERN: Work in stocking stitch until 1st marker thread, work A.2 over the next 40-40-44-48-52-52 stitches (= 10-10-11-12-13-13 repetitions), work the first 2 stitches in A.2, 2nd marker thread is here, work in stocking stitch until 3rd marker thread, work A.2 over the next 40-40-44-48-52-52 stitches (= 10-10-11-12-13-13 repetitions), work the first 2 stitches in A.2, 4th marker thread is here, work in stocking stitch the rest of round. REMEMBER THE KNITTING TENSION! RAGLAN: At the same time on first round begin increases for RAGLAN – read explanation above. Increase 2 stitches every other round 10-10-11-14-16-19 times in total, then increase 1 stitch every other round 1-3-3-2-2-1 times in total = 21-23-25-30-34-39 stitches increased in each side of front and back piece. When all increases for raglan are done, there are 204-220-236-264-288-308 stitches on round. Work until piece measures 13-15-16-17-18-20 cm from marker – adjust to finish after 3rd round in A.2 – i.e. next round to be worked is 4th round in A.2. Now divide piece for body and sleeve edges as follows (the outermost part of cables in each side are now worked on body): Work as before over the first 31-37-39-44-48-53 stitches (= approx. half back piece), slip the next 38-38-42-46-50-50 stitches on a thread for sleeve edge, cast on 6-6-8-8-10-10 new stitches on needle (= in the side under sleeve), work as before over the next 64-72-76-86-94-104 stitches (= front piece), slip the next 38-38-42-46-50-50 stitches on a thread for sleeve edge, cast on 6-6-8-8-10-10 new stitches on needle (= in the side under sleeve), and work as before over the next 33-35-37-42-46-51 stitches. Now finish body and sleeves separately. NOW MEASURE PIECE FROM HERE! BODY: = 140-156-168-188-208-228 stitches. Insert 1 marker thread in each side, in the middle of the new stitches cast-on under sleeve (= 3-3-4-4-5-5 new stitches on each side of marker thread). Move the marker threads upwards when working; they should be used for increase and decrease in the sides later. Work in stocking stitch with 6-6-8-8-10-10 stitches in GARTER STITCH – read explanation above, over the new stitches cast on under sleeve in each side. When 2 ridges have been worked over the 6-6-8-8-10-10 stitches in each side, work in stocking stitch over all stitches. When piece measures 4 cm from division, decrease 1 stitch on each side of marker threads - read DECREASE TIP. Decrease like this approx. every 4 cm 2 times in total = 132-148-160-180-200-220 stitches. When piece measures 14 cm from division, increase 1 stitch on each side of marker threads - read INCREASE TIP-1. Increase like this approx. every 3 cm 4 times in total = 148-164-176-196-216-236 stitches. Work until piece measures approx. 27 cm from division. Approx. 3 cm rib remain until finished measurements. Try the top and work to desired length before rib. To stop the rib from contracting increase 28-32-36-40-44-48 stitches evenly - read INCREASE TIP-2 = 176-196-212-236-260-284 stitches. Switch to circular needle size 4 mm. Work rib (knit 2/purl 2) in the round for 3 cm. Cast off with knit over knit and purl over purl - read CAST-OFF TIP. Top measures approx. 50-52-54-56-58-60 cm from shoulder and down. SLEEVE EDGE: Slip the 38-38-42-46-50-50 stitches from thread in one side on circular needle size 5 mm. Begin from wrong side and work as follows: 2 stitches in GARTER STITCH - read explanation above, work last row in A.2 as before until 2 stitches remain, work 2 stitches in garter stitch. Then work as follows from right side: Work 2 stitches in garter stitch, A.3 until 4 stitches remain on needle, work the first 2 stitches in A.3, 2 stitches in garter stitch. When all increases in A.3 are done, there are 89-89-99-109-119-119 stitches on row. Continue back and forth until A.3 has been worked. Cast off with knit over knit and purl over purl - remember CAST-OFF TIP. Work the other sleeve edge the same way. |
|||||||||||||||||||
Diagram explanations |
|||||||||||||||||||
|
|||||||||||||||||||
|
|||||||||||||||||||
|
|||||||||||||||||||
|
Have you made this or any other of our designs? Tag your pictures in social media with #dropsdesign so we can see them! Do you need help with this pattern?You'll find tutorial videos, a Comments/Questions area and more by visiting the pattern on garnstudio.com. © 1982-2024 DROPS Design A/S. We reserve all rights. This document, including all its sub-sections, has copyrights. Read more about what you can do with our patterns at the bottom of each pattern on our site. |
|||||||||||||||||||


With over 40 years in knitting and crochet design, DROPS Design offers one of the most extensive collections of free patterns on the internet - translated to 17 languages. As of today we count 304 catalogues and 11422 patterns - 11422 of which are translated into English (UK/cm).
We work hard to bring you the best knitting and crochet have to offer, inspiration and advice as well as great quality yarns at incredible prices! Would you like to use our patterns for other than personal use? You can read what you are allowed to do in the Copyright text at the bottom of all our patterns. Happy crafting!
Comments / Questions (19)
Jeg striker str med 114 m. 12-33-20-33-10. Dette blir kun 108m.
02.06.2023 - 08:14É possibile avere le istruzioni senza usare i ferri circolari? Sarebbe un gran regalo per me. Grazie
14.03.2023 - 18:03DROPS Design answered:
Buonasera Lorenza, questo modello è stato progettato per essere lavorato in tondo: ci sono diversi tutorial gratuiti sul nostro sito per imparare a lavorare con in tondo. Buon lavoro!
14.03.2023 - 20:49Ik heb het antwoord op mijn vraag gevonden, de toelichting in de legenda van het diagram klopt niet, in de engelse versie staat dat bij de witte omslag GEEN gaatje moet ontstaan.
29.07.2022 - 17:19Ik begrijp het verschil tussen de zwarte omslag in het patroon en de witte omslag in het patroon niet, bij beide staat dat er een gaatje moet ontstaan….
29.07.2022 - 17:13DROPS Design answered:
Dag Eva,
Er stond een klein foutje in de beschrijving bij de witte omslag. Deze omslag brei je op de volgende naald gedraaid, zodat er geen gaatje ontstaat (er stond eerst:...zodat er een gaatje ontstaat). De zwarte omslag brei je dus normaal (niet gedraaid, zodat er wel een gaatje ontstaat.
06.08.2022 - 12:03I am having problems with A3, sleeve edging. seem to be unable to make the pattern work. Do I continue with 2 stitches at each end in garter stitch, on each row of A3. Not sure if I am dong the first increase row correctly. Is it just one increase, ( yarn over) between every stitch on first row of A3? Thank you for your help.
07.06.2022 - 11:05DROPS Design answered:
Dear Jane, correct, you work A.3 with 2 edge stitches in garter stitch, ie from RS: 2 sts in garter stitch, repeat A.3 until 4 sts remain, work the first 2 sts in A.3 and end with 2 sts in garter stitch. And correct again, on first row in A.3 you incrase with 1 yarn over after each stitch: K1, YO, K1, YO, P1, YO, P1, YO= there are now 8 sts, work the yarn overs as explained under diagram text. Happy knitting!
07.06.2022 - 16:38Hoi! Ik ben begonnen aan de mouwen, maar ik snap A.3 niet. In de eerste naald van A.3 zijn 4 meerderingen, maar in de tweede rij van het diagram staan slechts twee extra steken. Wat moet er met de twee andere gemeerderde steken worden gedaan? Alvast bedankt voor de hulp!
18.05.2022 - 20:33DROPS Design answered:
Dag Britte,
De eerst naald van A.3 heeft in totaal 4 steken, de zwarte hokjes zijn namelijk geen steken, die sla je dus over in het telpatroon en je gaat gelijk verder met de volgende steek. (Als je het telpatroon uit zo knippen, dan zou je deze zwarte blokjes eruit knippen). Er worden inderdaad ook 4 steken gemeerderd in de eerste naald, waardoor je op de tweede naald in totaal 8 steken hebt. Op de derde naald worden nog eens 2 steken gemeerderd, waarna je op de 4e naald 10 steken in totaal hebt.
19.05.2022 - 21:07A mintaleírás kezdő, rövid összefoglalója két különböző technikával is szerepeltetve van, lehet az egyik leírás nem ehhez a mintához való? A fenti vagy az alatta lévő a helyes, melyikkel kezdjem ? A szaporítás ill. fogyasztás fordítva van megadva, a számokból derül ki hogy nem szaporítani kell hanem fogyasztani. Köszönöm a segítséget.
22.04.2022 - 17:25När kommer mönstret på denna? Har väntat länge.
20.03.2022 - 17:59Liliane
15.01.2022 - 13:29