
Categorie popolari
State cercando un filato?


Lasciare un commento sul modello DROPS 156-17
Noi saremmo felici di ricevere i tuoi commenti e opinioni su questo modello!
Se vuoi fare una domanda, fai per favore attenzione a selezionare la categoria corretta nella casella qui sotto per velocizzare il processo di risposta. I campi richiesti sono indicati da *.
|
|||||||||||||||||||
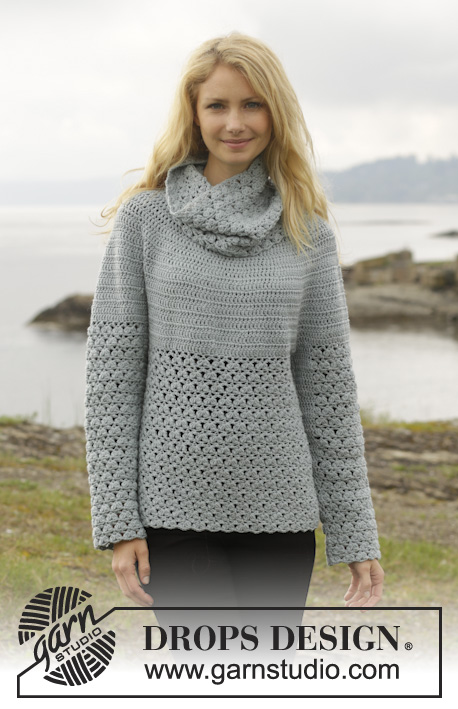
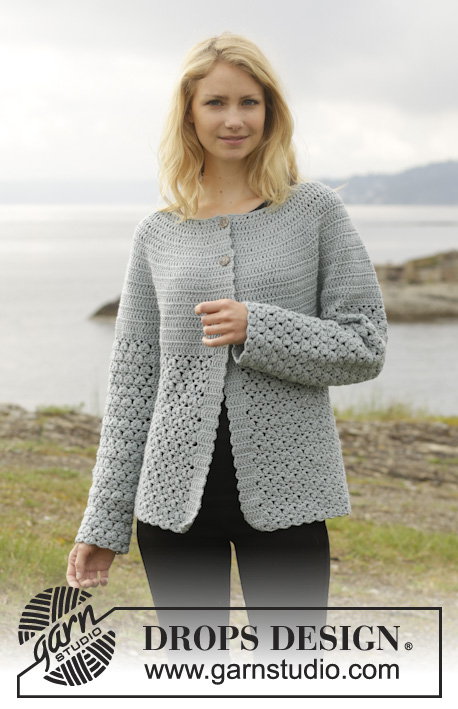
Yesterday Cardigan |
|||||||||||||||||||
 |
 |
||||||||||||||||||
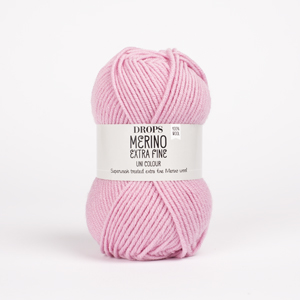
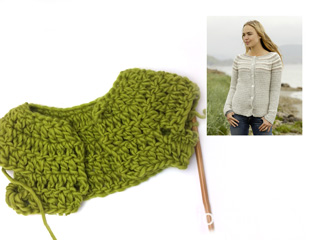
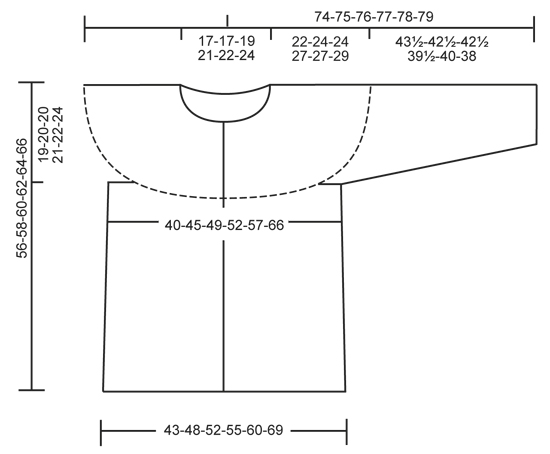
Giacca DROPS all’uncinetto, con sprone rotondo e motivo traforato, lavorata dall'alto verso il basso, in "Merino Extra Fine". Taglie: Dalla S alla XXXL.
DROPS 156-17 |
|||||||||||||||||||
|
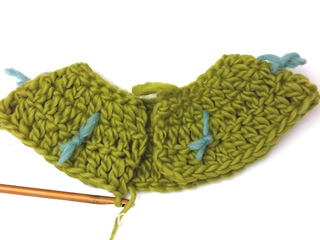
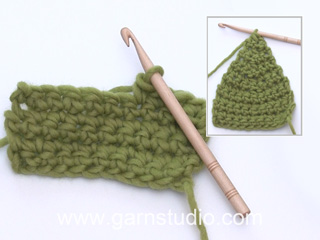
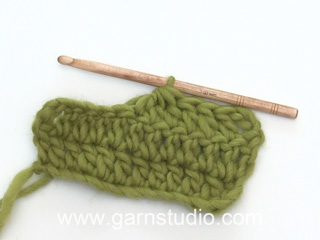
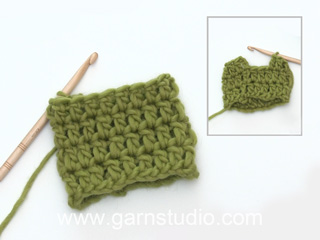
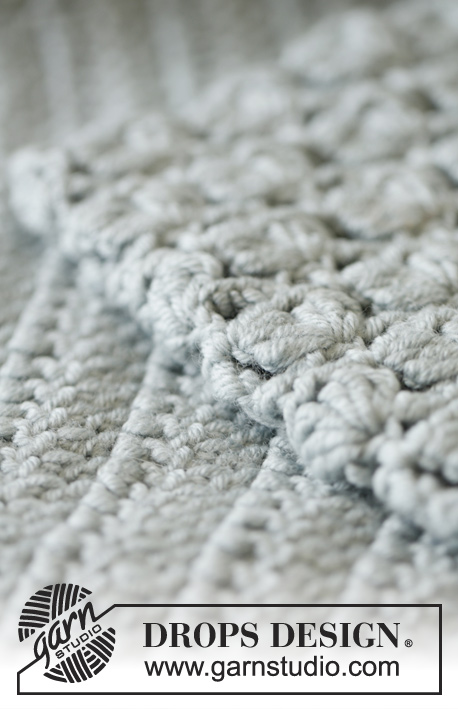
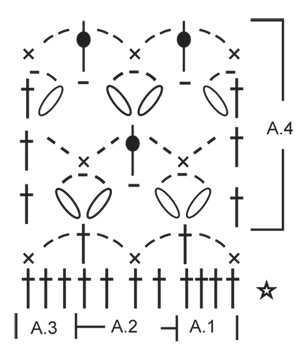
MOTIVO: Vedere i diagrammi da A.1 a A.4. I diagrammi mostrano tutte le righe del motivo, viste sul diritto del lavoro. INFORMAZIONI PER IL LAVORO: Sostituire la prima m.a all’inizio di ogni giro/riga con 3 cat. Sostituire la prima m.b all’inizio di ogni giro/riga con 1 cat Finire ogni giro di m.a con 1 m.bss nella 3a cat dall’inizio del giro. Finire ogni giro di m.b con 1 m.bss nella 1a cat del giro. SUGGERIMENTO PER GLI AUMENTI: Per aumentare 1 m, lavorare 2 m.a nella stessa m.a, prima da un lato di tutti i segni della riga, la volta successiva dall’altro lato di tutti i segni della riga. Proseguire ad aumentare in questo modo. SUGGERIMENTO PER LE DIMINUZIONI: Lavorare 1 m.a, ma aspettare a chiudere l’ultima gettata (= 2 m sull’uncinetto), lavorare la m.a successiva e all’ultima gettata, passare il filo attraverso tutte le m sull’uncinetto = è stata diminuita 1 m. ---------------------------------------------------------- DAVANTI E DIETRO: Si lavorano dall’alto verso il basso, avanti e indietro dal centro, davanti. Con l’uncinetto n° 4,5 ed il filato Merino Extra Fine, avviare 111-116-121-131-136-146 cat (comprese 3 cat per girare il lavoro). Lavorare la riga successiva come segue: 1 m.a nella 4a cat (= 2 m.a), 1 m.a in ognuna delle 2 cat successive, * saltare 1 cat, 1 m.a in ognuna delle 4 cat successive *, ripetere da *-* = 88-92-96-104-108-116 m.a - VEDERE LE INFORMAZIONI PER IL LAVORO. Inserire 19-20-21-23-24-26 segni nel lavoro, come segue: inserire il primo segno dopo l’ 8a m.a, poi inserire 18-19-20-22-23-25 segni a distanza di 4 m.a l’uno dall’altro; dopo l’ultimo segno ci sono 8 m.a. Lavorare avanti e indietro a m.a e, ALLO STESSO TEMPO, aumentare 1 m.a in corrispondenza di ogni segno, come segue: aumentare ogni 2 righe 5-6-6-5-5-6 volte, e ogni 4 righe 2-2-2-3-3-3 volte - VEDERE IL SUGGERIMENTO PER GLI AUMENTI = 221-252-264-288-300-350 m.a. Lavorare una riga ed aumentare 14-7-7-7-19-5 m.a in modo uniforme (non aumentare sulle prime e sulle ultime 6 m.a = bordi davanti) = 235-259-271-295-319-355 m.a. RICORDARSI LA TENSIONE DEL LAVORO! Alla riga successiva, lavorare come segue: 36-40-43-47-51-58 m.a (davanti), 8 cat (sotto manica), saltare 52-56-56-60-64-68 m.a della riga precedente (verranno utilizzate successivamente per la manica), 59-67-73-81-89-103 m.a (dietro), 8 cat (sotto manica), saltare 52-56-56-60-64-68 m.a della riga precedente (verranno utilizzate successivamente per la manica) e 36-40-43-47-51-58 m.a (davanti). Inserire un segno: da adesso in avanti, misurare il lavoro da questo punto ! Lavorare 1 m.a in ogni m.a / cat e, ALLO STESSO TEMPO, diminuire 8-8-8-12-12-12 m in modo uniforme – VEDERE IL SUGGERIMENTO PER LE DIMINUZIONI = 139-155-167-179-195-223 m.a. Proseguire a lavorare come segue: Lavorare 1 m.a in ognuna delle prime 6 m.a (= bordo davanti), diagramma A.1, ripetere il diagramma A.2 30-34-37-40-44-51 volte in larghezza, finire con il diagramma A.3 e 1 m.a in ognuna delle ultime 6 m.a. Proseguire con il motivo in questo modo. Dopo aver completato i diagrammi A.1-A.3 1 volta in verticale, ripetere il diagramma A.4 in verticale fino alla fine del lavoro. Quando il lavoro misura 14-14-14-15-15-15 cm dal segno, assicurarsi che la riga successiva sia l’ultima riga del diagramma A.4, aumentare 1 ripetizione del diagramma A.2 nell’arco di cat dell’ 8a-9a-9a-10a-11a-13a ripetizione come segue: Lavorare 2 cat, 1 m.b nell’arco di cat, 2 cat, 1 m.a nello stesso arco di cat, 2 cat, 1 m.b nello stesso arco di cat. Lavorare 14-16-19-20-22-25 ripetizioni del diagramma A.2; nella ripetizione successiva del diagramma A.2 aumentare in modo uguale. Proseguire come prima = ci sono 32-36-39-42-46-53 ripetizioni del diagramma A.2 in larghezza. Tagliare il filo quando il lavoro misura 34-34-36-35-37-37 cm dal segno, assicurarsi di finire con la penultima riga del diagramma A.4; il lavoro misura in tutto 56-58-60-62-64-66 cm. MANICHE: Si lavorano in tondo, dall’alto verso il basso. Inserire un segno; da adesso in avanti, misurare il lavoro da questo punto ! Iniziare lavorando dal centro, sotto la manica, come segue: Lavorare 1 m.b nella 5a delle 8 cat avviate per lo scalfo, 3 cat (= 1 m.a), lavorare 1 m.a in ognuna delle 3 cat successive, 1 m.a in ogni m.a della manica, proseguire con 1 m.a in ognuna delle rimanenti 4 cat sotto la manica = 60-64-64-68-72-76 m.a. Inserire 1 segno al centro, sotto la manica. Proseguire a lavorare come segue: 1 m.a in ognuna delle prime 11-11-11-13-13-15 m.a; ALLO STESSO TEMPO, diminuire 1 m.a (= 10-10-10-12-12-14 m.a), diagramma A.1, ripetere il diagramma A.2 8-9-9-9-10-10 volte in larghezza, diagramma A.3, lavorare 1 m.a in ognuna delle ultime 10-10-10-12-12-14 m.a. Proseguire con 1 m.a in ognuna delle 20-20-20-24-24-28 m.a al centro, sotto la manica e lavorare i diagrammi A.1-A.3 sulle m della parte superiore della manica. Dopo aver completato una ripetizione in verticale dei diagrammi A.1-A.3, ripetere il diagramma A.4 in verticale fino alla fine del lavoro. Proseguire con il motivo in questo modo e, ALLO STESSO TEMPO, quando il lavoro misura 4 cm, diminuire 1 m.a da ciascun lato del segno - vedere IL SUGGERIMENTO PER LE DIMINUZIONI. Ripetere queste diminuzioni ogni 3½-3½-3½-2½-2½-2 cm altre 9-9-9-11-11-13 volte. Lavorare ora solo i diagrammi A.1-A.3 sulle m della parte superiore della manica. Tagliare il filo quando la manica misura 43½-42½-42½-39½-40-38 cm; assicurarsi di finire alla penultima riga del diagramma A.4 – ATTENZIONE – misure più corte per le taglie più grandi perché lo sprone è più largo e le spalle sono più larghe. Lavorare l’altra manica in modo uguale. COLLO: Lavorare il COLLO nella fila di avvio delle cat. Con l’uncinetto n° 4,5 ed il filato Merino Extra Fine, lavorare come segue: 1 m.b nella prima m, * 2 cat, saltare 2 m, 1 m.b nella m successiva *, ripetere da *-* tutto intorno il collo. Tagliare il filo. CONFEZIONE: Attaccare i bottoni sul davanti sinistro: il bottone più in alto a ca.1 cm dal collo, il bottone più in basso in corrispondenza del passaggio tra la parte lavorata a m.a e quella lavorata seguendo il motivo. Abbottonare attraverso 2 m.a del davanti destro. |
|||||||||||||||||||
Spiegazioni del diagramma |
|||||||||||||||||||
|
|||||||||||||||||||
|
|||||||||||||||||||
|
|||||||||||||||||||
|
Avete realizzato questo o un altro dei nostri modelli? Taggate le vostre foto nei social media con #dropsdesign in modo che possiamo vederle! Avete bisogno di aiuto con questo modello?Troverete video tutorial, una sezione per i commenti/domande e molto altro guardando il modello su www.garnstudio.com © 1982-2024 DROPS Design A/S. Ci riserviamo tutti i diritti. Questo documento, compreso tutte le sue sotto-sezioni, è protetto dalle leggi sul copyright. Potete leggere quello che potete fare con i nostri modelli alla fine di ogni modello sul nostro sito. |
|||||||||||||||||||


Con oltre 40 anni di esperienza nel design di modelli di maglia e uncinetto, DROPS Design offre la più estesa collezione di modelli gratuiti su internet - tradotti in 17 lingue. Ad oggi vi possiamo fornire 304 cataloghi e 11422 modelli - 8666 dei quali sono tradotti in Italiano.
Ci stiamo impegnando molto per darvi il meglio che vi possiamo offrire in termini di maglia e uncinetto, ispirazioni e consigli così come filati di grande qualità ad un prezzo incredibile! Volete utilizzare i nostri modelli per qualcosa d'altro oltre al vostro uso personale? Potete leggere tutto ciò che è consentito nel testo sul Copyright in basso su tutte le pagine dei nostri modelli. Buon lavoro!
Commenti / Domande (35)
The Yesterday Cardigan pattern is written for sizes S-M-L-XL etc. However, I'e like to know what chest and arm measurements these sizes correspond with. The pattern gives stitch counts for each size but not actual measurements in cm of inches. Can you help me?
24.07.2023 - 18:22DROPS Design answered:
Hi Esther, You will find a measurements chart, with all the measurements for each size, at the bottom of the page. Happy knitting!
25.07.2023 - 06:44Hi I am having trouble with the following instructions: "When piece measures 14-14-14-15-15-15 cm from marker, adjust so that next row is last row in A.4, inc 1 repetition of A.2 in 8th-9th-9th-10th-11th-13th repetition in ch-space as follows: ....Work 14-16-19-20-22-25 repetitions of A.2" I thought I was supposed to be working A4 until the end? Am I supposed to work a row of A2 at this point? Many thanks
11.05.2023 - 11:24DROPS Design answered:
Dear Michelle, A.4 shows the pattern in height, while in width you read diagrams as follows: start with A.1, repeat A.2 and end with A.3 (seen from RS; from WS you will work: A.3, repeat A.2 and end with A.1). This lesson could help you understanding how to read crochet diagrams. Happy crocheting!
11.05.2023 - 16:35I am really enjoying this pattern! I need help with the increase within the A2 repetitions. The pattern reads, "inc 1 repetition of A.2 in 9th repetition in ch-space as follows: Work ch 2, 1 sc in ch-space, ch 2, 1dc in same ch-space,ch 2, 1 sc in same ch-space." I have just finished the dc of the 8th rep. Can you please tell me each step of the entire 9th repetition-plus inc, before I continue with the 1st ch 2 of 10th rep? and is this done in the single ch-sp of A2 (not the 3 ch-sp) Thnx!
08.04.2023 - 19:09DROPS Design answered:
Dear Dawn, work as follows in the 9th repeat: ch 2, in the chain-3 space of the previous row work (1 dc in ch-space, ch 2, 1 tr in same ch-space, ch 2, 1 dc in same ch-space), 1 tr in the next chain-1 space of the previous row. Happy crochetting!
08.04.2023 - 23:09Concerning instructions of the BODY : ...1 dc in each of the next ch 2, * skip ch 1, 1 dc in each of the next 4 ch *, repeat from *-* = 88-92-96-104-108-116 dc I am wondering about the "skip ch 1" . It is not clear to me if I should ch 1 and skip the chain st below or if I just skip the ch st below and dc in the next 4 ch sts. I find it confusing that it first uses "ch 2" and "ch 1" language and then switches to "4 ch". (switching the order of abbr.)
20.01.2023 - 15:13DROPS Design answered:
Dear Mrs Roehrs, on the very first row you should just skip 1 chain from the foundation chain and crochet 1 dc in each of the next 4 chains from the foundation chain; most of the time the chains are always tighten on the foundation chain as when crocheting the dc afterwards, reason why we crochet here more chains than you need stitches on first row. Happy crocheting!
20.01.2023 - 16:41Hello, I am going to attempt yesterday cardigan and have briefly looked at the diagram please would you tell me what (tr around st) means? and where can I find the meaning of the black dot? I have been doing crochet for a long time but have never followed a pattern. thank you, Christine
03.01.2023 - 17:40DROPS Design answered:
Hello Christine! A symbol with black dot is "tr in st" meaning you have to make treble crochet in stitch. Please look at step-by-step tutorials, videos and a very handy technical dictionary below the pattern. How to read crochet diagrams . Hope it helps!
03.01.2023 - 20:37Starting with the BODY of the piece (size M), I am asking for clarity on the following instructions: " ... AT THE SAME TIME inc 1 dc at all markers as follows: Inc every other row 5-6-6-5-5-6 times, and every 4th row 2-2-2-3-3-3 times." I do not understand what 6 and 2 "times" means. Is this the amount of rows or the amount of markers I inc at? Will I inc at each of the 19 markers- every other row? Then how does that work with the 4th row? Thank you.
01.01.2023 - 09:40DROPS Design answered:
Hi Dawn, You increase at all the markers every other row 6 times (you have worked 12 rows with 6 rows of increases), then every 4th row 2 times (you have worked 8 rows with 2 rows of increases). Hope this helps. Happy New Year!
02.01.2023 - 06:50Bonjour, je reviens vers vous concernant le modele Drops 156-17 et je ne comprends pas la partie concernant les augmentations. Quel motif faut il augmenter ? A quoi correspond A2 ? Merci beaucoup.
02.10.2022 - 21:55DROPS Design answered:
Bonjour Mme Les Grands Champs, vous devez augmenter pour l'empiècement 1 bride à chaque marqueur (la 1ère fois que vous augmentez, crochetez 2 brides avant les marqueurs, la fois suivante, crochetez 2 brides après les marqueurs) vous allez ainsi augmenter 19-20-21-23-24-26 brides à chaque rang d'augmentations, et augmenter ainsi tous les 2 rangs puis tous les 4 rangs. A.1 correspond au début du point fantaisie, vous répétez ensuite A.2 et vous terminez le point fantaisie par A.3. Bon crochet!
03.10.2022 - 10:03Kan dere legge ut en video av hvordan man hekler selve mønsteret fra diagrammer?
15.07.2022 - 21:48DROPS Design answered:
Hej, Her ser du :) Det er lidt andre symboler, men teknikken er den samme: Vifter ifølge diagram
02.08.2022 - 14:31Bonjour, je ne comprends pas le diagrammes, pourriez vous me donner plus d'explications ?
07.05.2022 - 16:39DROPS Design answered:
Bonjour Mme Cattaneo, chaque symbole représente 1 maille ou 1 groupe de mailles, vous lisez les diagrammes sur l'endroit ainsi: commencez par A.1, repétez A.2 et terminez par A.3; sur l'envers, commencez par A.3, répétez A.2 (en le lisant de gauche à droite) et terminez par A.1. Lorsque vous avez crocheté le diagramme en hauteur, répétez A.4 = les 4 derniers rangs. Bon crochet!
09.05.2022 - 08:30Je vous remercie pour tous ces beaux modèles avec les explications a la clé !
06.05.2022 - 20:15