DROPS Safran uni colour 100% Cotton |
3.00 BGN /50g |
Order |
Clicking the ORDER button will redirect you to HOBIYARN website
The yarn cost is calculated from the pattern’s smallest size and the yarn’s cheapest product type. Looking for an even better price? You might find it on the DROPS Deals!
-------------------------------------------------------
Alternative Yarn – See how to change yarns here
Yarn Groups A to F – Use the same pattern and change the yarn here
Yarn usage using an alternative yarn – Use our yarn converter here
-------------------------------------------------------
DROPS Safran uni colour 100% Cotton 3.00 BGN /50g Order |
Clicking the ORDER button will redirect you to HOBIYARN website
The yarn cost is calculated from the pattern’s smallest size and the yarn’s cheapest product type. Looking for an even better price? You might find it on the DROPS Deals!
This pattern has been corrected. Click here to see the correction/s.
= tr around ch-space (1st round= tr in tr) | |
= dc in tr | |
= ch | |
= 7 ch | |
= dc around ch-space | |
= sl st in ch | |
= 1st round beg here | |
= Work 1 tr but wait with last pull through, work 1 tr more in same tr. On last pull through, pull yarn through all YOs on hook | |
= double tr |
Each of our patterns has specific tutorial videos to help you.
These step-by-step tutorials might also help you:
Why is the knitting/crochet tension so important?
Knitting tension is what determines the final measurements of your work, and is usually measured per 10 x 10 cm. It is provided like so: number of stitches in width x number of rows in height - eg: 19 stitches x 26 rows = 10 x 10 cm.
The knitting tension is very individual; some people knit/crochet loosely while others work tightly. You adjust the knitting tension with the needle size, which is why the suggested needle size is only meant as a guide! You need to adjust this (up or down) to ensure that YOUR knitting tension matches the knitting tension provided in the pattern. If you work with a different knitting tension than provided you will have a different yarn consumption, and your work will have different measurements than what the pattern suggests.
The knitting tension also determines which yarns can replace each other. As long as you achieve the same knitting tension you can replace one yarn with another.
See DROPS lesson: How to measure your tension/gauge
See DROPS video: How to make a gauge tension swatch
How do I know how many balls of yarn I need?
The required amount of yarn is provided in grams, eg: 450 g. To calculate how many balls you’ll need you first need to know how many grams are in 1 ball (25g, 50g or 100g). This information is available if you click on the individual yarn quality on our pages. Divide the amount required with the amount of each ball. For example, if each ball is 50g (the most common amount), the calculation will be as follows: 450 / 50 = 9 balls.
Can I use a different yarn than what the pattern suggests?
The important thing when changing from one yarn to another is that the knitting/crochet tension remains the same. This is so that the measurements of the finished piece will be the same as on the sketch provided. It is easier to achieve the same knitting tension using yarns from the same yarn group. It is also possible to work with multiple strands of a thinner yarn to achieve the knitting tension of a thicker one. Please try our yarn converter. We recommend you to always work a test swatch.
Please NOTE: when changing yarn the garment might have a different look and feel to the garment in the photo, due to individual properties and qualities of each yarn.
See DROPS lesson: Can I use a different yarn than the one mentioned in the pattern?
What are the yarn groups?
All our yarns are categorised into yarn groups (from A to F) according to thickness and knitting tension – group A contains the thinnest yarns and group F the thickest. This makes it easier for you to find alternative yarns to our patterns, should you wish to switch yarn. All yarns within the same group have a similar knitting tension and can easily replace each other. However, different yarn qualities have different structures and properties which will give the finished work a unique look and feel.
How do I use the yarn calculator?
At the top of all our patterns you’ll find a link to our yarn calculator, which is a helpful tool should you wish to use a different yarn than suggested. By filling in the yarn quality you wish to replace, the amount (in your size) and number of strands, the calculator will present good alternative yarns with the same knitting tension. Additionally it will tell you how much you’ll require in the new qualities and whether you’ll need to work with multiple strands. Most skeins are 50g (some are 25g or 100g).
If the pattern is worked with multiple colours, every colour will have to be calculated separately. Similarly, if the pattern is worked with several strands of different yarns (for example 1 strand Alpaca and 1 strand Kid-Silk) you will have to find alternatives for each, individually.
Why do you show discontinued yarns in the patterns?
Since different yarns have different qualities and textures we have chosen to keep the original yarn in our patterns. However, you can easily find options among our available qualities by using our yarn calculator, or simply pick a yarn from the same yarn group.
It is possible that some retailers still have discontinued yarns in stock, or that someone has a few skeins at home that they would like to find patterns for.
The yarn calculator will provide both alternative yarn as well as required amount in the new quality.
What size should I knit?
If you think it's hard to decide what size to make, it can be a good idea to measure a garment you own already and like the size of. Then you can pick the size by comparing those measures with the ones available in the pattern's size chart.
You'll find the size chart at the bottom of the pattern.
See DROPS lesson: How to read size chart
Why do I get the wrong knitting tension with the suggested needle size?
The needle size provided in the pattern serves only as a guide, the important thing is to follow the knitting tension. And since knitting tension is very individual, you will have to adjust the needle size to ensure that YOUR tension is the same as in the pattern – maybe you’ll have to adjust 1, or even 2 needle sizes, up or down to achieve the correct tension. For this, we recommend that you work test swatches.
Should you work with a different knitting tension than the one provided, the measurements of the finished garment might deviate from the measurement sketch.
See DROPS lesson: How to measure your tension/gauge
See DROPS video: How to make a tension/gauge swatch
Why is the pattern worked top-down?
Working a garment top-down provides more flexibility and room for personal adjustment. For example it is easier to try the garment on while working, as well as making adjustments to length of yoke and shoulder caps.
The instructions are carefully explaining every step, in the correct order. Diagrams are adjusted to the knitting direction and are worked as usual.
How do I work according to a knitting diagram?
The diagram depicts all rows/rounds, and every stitch seen from the right side. It is read from bottom to top, from right to left. 1 square = 1 stitch.
When working back and forth, every other row is worked from the right side and every other row is worked from the wrong side. When working from the wrong side, the diagram will have to be worked reversed: from left to right, knit stitches are purled, purl stitches are knit etc.
When working in the round every round is worked from the right side and the diagram are worked from right to left on all rounds.
See DROPS lesson: How to read knitting diagrams
How do I work according to a crochet diagram?
The diagram depicts all rows/rounds, and every stitch seen from the right side. It is worked from bottom to top, from right to left.
When working back and forth every other row is worked from the right side: from right to left and every other row is worked from the wrong side: from left to right.
When working in the round, every row in the diagram are worked from the right side, from right to left.
When working a circular diagram you start in the middle and work your way outwards, counter clockwise, row by row.
The rows usually start with a given number of chain stitches (equivalent to the height of the following stitch), this will either be depicted in the diagram or explained in the pattern.
See DROPS lesson: How to read crochet diagrams
How do I work several diagrams simultaneously on the same row/round?
Instructions for working several diagrams after each other on the same row/round, will often be written like so: “work A.1, A.2, A.3 a total of 0-0-2-3-4 times". This means you work A.1 once, then A.2 is worked once, and A.3 is repeated (in width) the number of times provided for your size – in this case like so: S = 0 times, M = 0 times, L=2 times, XL= 3 times and XXL = 4 times.
The diagrams are worked as usual: begin with the first row in A.1, then work the first row in A.2 etc.
See DROPS lesson: How to read knitting diagrams
See DROPS lesson: How to read crochet diagrams
Why are the sleeves shorter in larger sizes?
The total width of the garment (from wrist-to-wrist) will be larger in the larger sizes, despite the actual sleeves being shorter. The larger sizes have longer sleeve caps and wider shoulders, so there will be a good fit in all sizes.
Where on the garment is the length measured?
The measurement sketch/schematic drawing provides information regarding the full length of the garment. If it’s a jumper or a jacket the length is measured from the highest point on the shoulder closest to the neckline, and straight down to the bottom of the garment. It is NOT measured from the tip of shoulder. Similarly, the length of yoke is measured from the highest point on the shoulder and down to where yoke is split into body and sleeves.
On a jacket measures are never taken along bands, unless specifically stated. Always measure inside band stitches when measuring the length.
See DROPS lesson: How to read a schematic drawing
What is a repeat?
Diagrams are often repeated on the round or in height. 1 repeat is the diagram the way it appears in the pattern. If it says to work 5 repeats of A.1 in the round, then you work A.1 a total of 5 times after/next to each other in the round. If it says to work 2 repeats of A.1 vertically/in height you work the entire diagram once, then begin again at the start and work the entire diagram one more time.
Why does the piece start with more chain stitches than it’s worked with?
Chain stitches are slightly narrower than other stitches and to avoid working the cast-on edge too tight, we simply chain more stitches to begin with. The stitch count will be adjusted on the following row to fit the pattern and measurement sketch.
Why increase before the rib edge when the piece is worked top-down?
The rib edge is more elastic and will contract slightly compared to, for example, stocking stitch. By increasing before the rib edge, you avoid a visible difference in width between the rib edge and the rest of the body.
Why increase in the cast-off edge?
It’s very easy to cast off too tightly, and by making yarn overs while casting off (and simultaneously casting these off) you avoid a too tight cast off edge.
See DROPS video: How to bind off with yarn overs (yo)
How do I increase/decrease on every 3rd and 4th row/round alternately?
To achieve an even increase (or decrease) you can increase on, for example: every 3rd and 4th row alternately, like so: work 2 rows and increase on the 3rd row, work 3 rows and increase on the 4th. Repeat this until the increase is complete.
See DROPS lesson: Increase or decrease 1 st on every 3rd and 4th row alternately
How can I work a jacket in the round instead of back and forth?
Should you prefer to work in the round instead of back and forth, you may of course adjust the pattern. You’ll need to add steeks mid-front (usually 5 stitches), and follow the instructions. When you would normally turn and work from the wrong side, simply work across the steek and continue in the round. At the end you’ll cut the piece open, pick up stitches to work bands, and cover the cut edges.
See DROPS video: How to knit steeks and cut open
Can I work a jumper back and forth instead of in the round?
Should you prefer to work back and forth instead of in the round, you may of course adjust the pattern so you work the pieces separately and then assemble them at the end. Divide the stitches for the body in 2, add 1 edge stitch in each side (for sewing) and work the front and back pieces separately.
See DROPS lesson: Can I adapt a pattern for circular needles into straight needles?
Why is the pattern slightly different than what I see in the photo?
Pattern repeats can vary slightly in the different sizes, in order to get the correct proportions. If you’re not working the exact same size as the garment in the photo, yours might deviate slightly. This has been carefully developed and adjusted so that the complete impression of the garment is the same in all sizes.
Make sure to follow instructions and diagrams for your size!
How do I make a women’s size garment into a men’s size one?
If you have found a pattern you like which is available in women’s size it’s not very difficult to convert it to men’s size. The biggest difference will be the length of sleeves and body. Start working on the women size that you think would fit across the chest. The additional length will be worked right before you cast off for the armhole/sleeve cap. If the pattern is worked top-down you can add the length right after the armhole or before the first decrease on sleeve.
Regarding additional yarn amount, this will depend on how much length you add, but it is better with a skein too many than too few.
How do I prevent a hairy garment from shedding?
All yarns will have excess fibres (from production) that might come off as lint or shedding. Brushed yarns (ie hairier yarns) have more of these loose, excess fibres, causing more shedding.
Shedding also depends on what is worn under or over the garment, and whether this pulls at the yarn fibres. It’s therefore not possible to guarantee that there will be no shedding
Below are some tips on how to get the best result when working with hairier yarns:
1. When the garment is finished (before you wash it) shake it vigorously so the looser hairs come off. NOTE: do NOT use a lint roller, brush or any method that pulls at the yarn.
2. Place the garment in a plastic bag and put it in your freezer - the temperature will cause the fibres to become less attached to each other, and excess fibres will come off easier.
3. Leave in the freezer for a few hours before taking it out and shaking it again.
4. Wash the garment according to the instructions on the yarn label.
Why does my garment pill?
Pilling is a natural process that happens to even the most exclusive of fibers. It's a natural sign of wear and tear that is hard to avoid, and that is most visible in high friction areas of your garment like a sweater's arms and cuffs.
You can make your garment look as new by removing the pilling, using a fabric comb or a pill/lint remover.
Elly May |
||||||||||||||||||||||||||||
|
|
|||||||||||||||||||||||||||
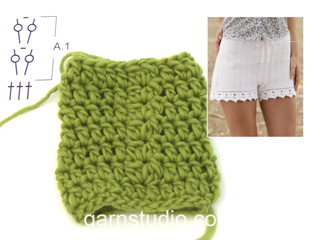
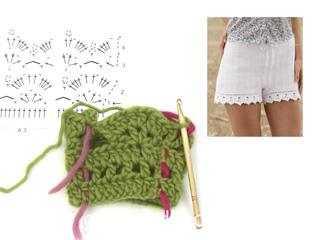
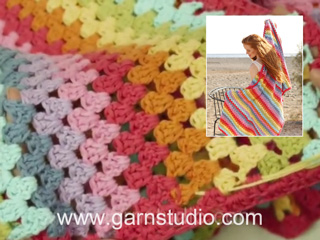
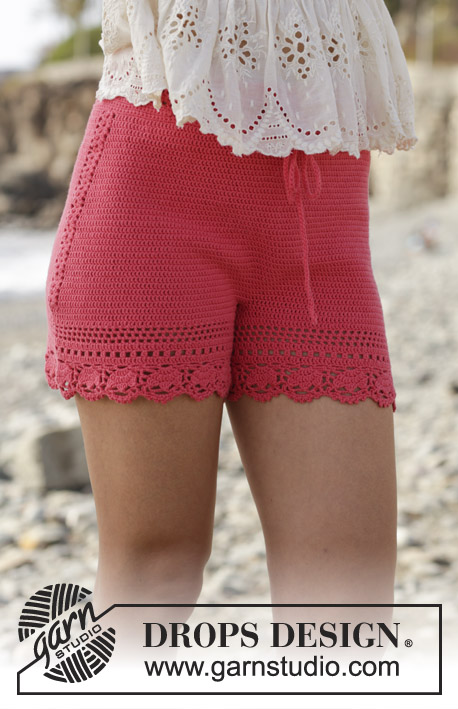
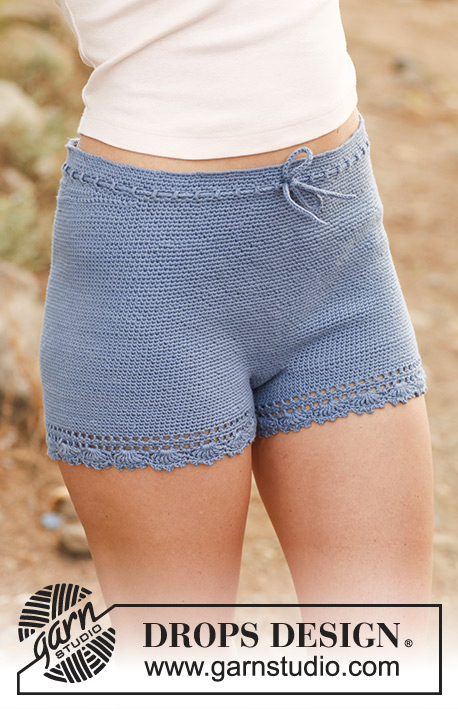
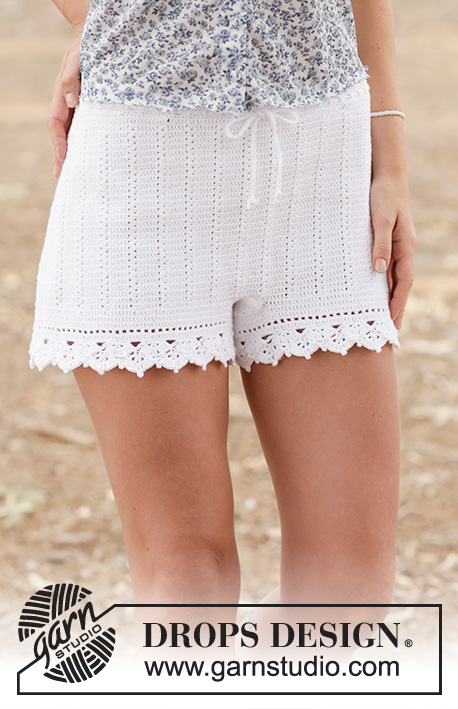
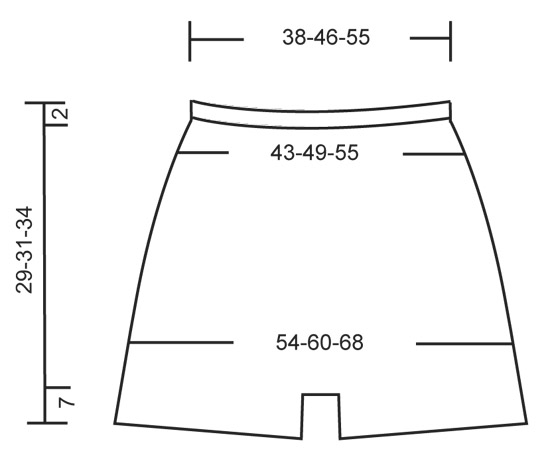
Crochet DROPS shorts with trebles and lace pattern in ”Safran”. Size: S - XXL.
DROPS 162-19 |
||||||||||||||||||||||||||||
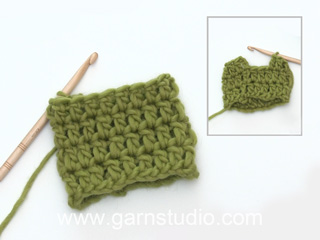
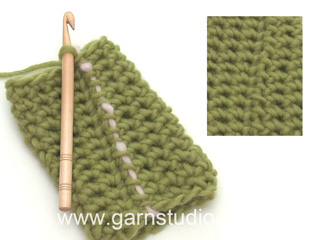
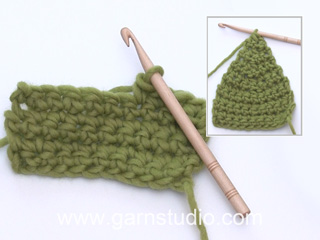
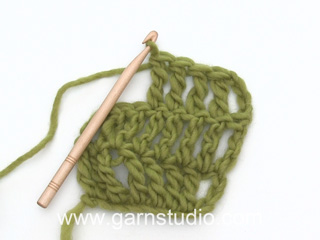
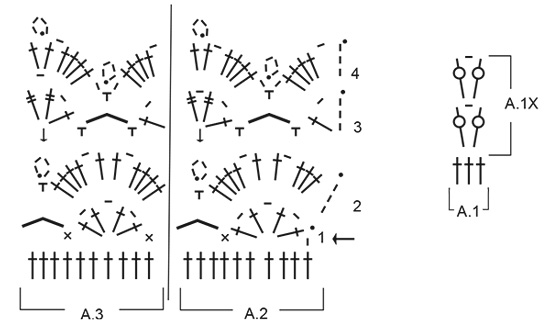
CROCHET INFO: Replace first dc at beg of every dc round with 1 ch. Finish round with 1 sl st in 1st ch at beg of round. Replace first tr at beg of every tr round with 3 ch. Finish round with 1 sl st in 3rd ch at beg of round. PATTERN: See diagrams A.1 to A.3. INCREASE TIP 1: Inc 2 tr mid back as follows: Work until 2 tr remain before marker mid back, work 2 tr in first tr, 1 tr in each of the next 2 tr (marker is between these) and 2 tr in next tr (= 2 tr inc). Inc 4 tr mid back as follows: Work until 4 tr remain before marker mid back, work 2 tr in first tr, 1 tr in next tr, 2 tr in next tr, 1 tr each of the next 2 tr (marker is between these) and 2 tr in next tr, 1 tr in next tr, 2 tr in next tr (= 4 tr inc). INCREASE TIP 2: Work until 1 tr remains before marker in the side, work 2 tr in first tr, 1 tr in next tr (marker is in this tr) and 2 tr in next tr (= 2 tr inc). Repeat the same inc in the other side = 4 sts inc on round. ---------------------------------------------------------- SHORTS: The piece is worked top down. Work 224-274-326 ch on hook size 2,5 mm with Safran and form a ring with 1 sl st in first ch. Insert 1 marker at beg of round = mid back. Work first round as follows: 1 ch, * skip 1 ch, 1 dc in each of the next 7 ch *, repeat from *-* until 0-2-6 ch remain, work 1 dc in each of these ch = 196-240-286 dc. READ CROCHET TIP! Continue working 1 dc in every dc until piece measures 2 cm. REMEMBER THE CROCHET TENSION! Now work an eyelet row as follows: 4 ch, skip 1 dc, * 1 tr in next dc, 1 ch, skip 1 dc *, repeat from *-* the entire round, finish with 1 sl st in 3rd ch from beg of round. On next round work 1 dc in every tr and every ch. Then work the shorts higher in the back as follows: Work 11-12-13 dc past the marker mid back, turn and work 1 sl st in first st, then 1 dc in each of the next 21-23-25 dc, turn and work 1 sl st in first st, then 1 dc in each of the next 32-35-38 sts (sl sts are also worked). Continue like this by working 11-12-13 sts more on every turn until a total of 154-192-208 sts have been worked. Turn again and work until marker mid back. Continue to work 1 round with dc while AT THE SAME TIME inc 28-16-2 dc evenly = 224-256-288 dc. Then work pattern (and insert markers) as follows from mid back: 3 tr, A.1 (= 3 tr), * 5 tr, A.1*, repeat from *-* until 2 tr remain, 2 tr, AT THE SAME TIME insert a marker in each side as follows: Insert a marker in the 3rd tr after 7th-8th-9th repetition A.1, and insert a marker in 3rd tr after 21th-24th-27th repetition with A.1 (i.e. 1 marker in each side). When A.1 has been worked 1 time vertically, continue pattern A.1X - AT THE SAME TIME inc mid back and in the sides as follows: SIDES: Inc on each side of tr with marker, in each side as follows - READ INCREASE TIP 2. Repeat inc every 4th round 7-7-8 times in total = 28-28-32 tr inc. MID BACK: AT THE SAME TIME when piece measures 15-17-19 cm (measured mid front), inc mid back as follows – Read INCREASE TIP-1. Repeat inc with 2 tr mid back every round 10 times in total, and repeat inc with 4 tr every round 2-2-3 times = 28-28-32 tr inc. There are now 280-312-352 tr on round. Now piece measures approx. 22-24-27 cm mid front and 27-29-32 cm mid back. Now divide for legs as follows: Work 1 sl st in each of the first 5-6-6 tr on round, turn and work 1 tr in each of the first 10-12-12 tr (i.e. 5-6-6 sts on each side of marker mid back). These 10-12-12 tr = gusset. Work tr back and forth over these tr. When piece measures 4-5-6 cm, dec 1 tr in each side, repeat dec when piece measures 8-9-10 cm = 6-8-8 tr. Continue with 1 tr in every tr until gusset measures 11-12-13 cm, cut the yarn. Fasten gusset edge to edge to the middle 6-8-8 sts towards mid front. Then work the legs. LEG: Work 1 tr in each of the 132-146-166 tr around one leg (i.e. work 1 tr in every tr in A.1X and 1 tr in ch-space = 3 tr), in addition work 28-31-34 tr along the gusset = 160-177-200 tr. Work 2 rounds with tr AT THE SAME TIME on last round inc 0-3-0 tr evenly by working 2 tr in 1 tr = 160-180-200 tr. Continue to work as follows: ROUND 1: 3 ch (= 1 tr), * 1 ch, skip 1 tr, 1 tr in next tr * , repeat from *-* until 1 tr remains, 1 ch, skip 1 tr, 1 sl st in 3rd ch at beg of round. ROUND 2: 3 ch (= 1 tr), * 1 tr in ch-space, 1 tr in next tr *, repeat from *-* the entire round until 1 ch-space remains, 1 tr in ch-space, finish with 1 sl st in 3rd ch on round. ROUND 3: Now work pattern as follows: Work pattern according to diagram A.2 over the first 10 tr, continue with A.3 the entire round. Finish every round with 1 sl st at beg of round. REMEMBER CROCHET INFO! Continue like this until pattern A.2-A.3 have been worked vertically. Fasten off. Work the other leg the same way. TIES: Work 130-140-150 cm with LOOSE ch, turn and work 1 sl st in every ch. Thread the tie in the row with eyelet holes at the top of shorts – start mid front |
||||||||||||||||||||||||||||
Diagram explanations |
||||||||||||||||||||||||||||
|
||||||||||||||||||||||||||||
Have you made this or any other of our designs? Tag your pictures in social media with #dropsdesign so we can see them! Do you need help with this pattern?You'll find tutorial videos, a Comments/Questions area and more by visiting the pattern on garnstudio.com. © 1982-2024 DROPS Design A/S. We reserve all rights. This document, including all its sub-sections, has copyrights. Read more about what you can do with our patterns at the bottom of each pattern on our site. |
With over 40 years in knitting and crochet design, DROPS Design offers one of the most extensive collections of free patterns on the internet - translated to 17 languages. As of today we count 304 catalogues and 11422 patterns - 11422 of which are translated into English (UK/cm).
We work hard to bring you the best knitting and crochet have to offer, inspiration and advice as well as great quality yarns at incredible prices! Would you like to use our patterns for other than personal use? You can read what you are allowed to do in the Copyright text at the bottom of all our patterns. Happy crafting!
Comments / Questions (162)
Henriette wrote:
Hej Kunne i uddybe mønstret i shortsene, det giver ikke rigtig mening m 5 stm og så mønstret a1 som er 3 stm så er det jo egentlig 8 stm ? Og så a1x er det hele vejen rundt ? Mvh henriette
20.09.2021 - 18:14DROPS Design answered:
Hej Henriette. Mönstret i shortsen stickas sähär: 3 st, A.1 (= 3 st), * 5 st, A.1*, gentag *-* til der er 2 fm tilbage, 2 st. Når A.1 er hæklet 1 gang i højden fortsættes med mønster A.1X. I denna video kan du se hur du ska göra. Mvh DROPS Design
23.09.2021 - 10:07Bambi wrote:
Hola, en la frase 'Repetir los aum cada 4ª vta un total de 7-7-8 vcs = 28-28-32 p.a. aum.', la expresión '4ª vta', qué significa exactamente? cada cuatro vueltas?
26.07.2021 - 01:34DROPS Design answered:
Hola Bambi, mira la leccion DROPS AQUI. Buen trabajo!
27.07.2021 - 15:57Kari Skuseth wrote:
Heklefasthet oppgis med nål 2,5 mens oppskrift er nål nr 3. jeg heklet prøvelapp nål 2,5 og 26 st brede og 16 rader ble 12x12 cm. Gjentok prøvelapp med nål nr 2. da fikk jeg mål 11x11 cm selvom jeg heklet svært stramt. Er det noe feil med angitt heklefasthet her? Det kan umulig stemme.
11.06.2021 - 15:13DROPS Design answered:
Hei Kari. Ser at det er en rettelse på shortsen fra 03.06.2015 der heklenålen er rettet til str. 2,5 i selve oppskriften, samme str. som det står under heklefastheten. Vi skal få oppdatert dette asap. Den oppgitte heklefastheten skal stemme (men man på hekle stramt). mvh DROPS design
14.06.2021 - 12:57Maren wrote:
Zu Beginn der Anleitung. In der ersten Runde muss ich ja 1 lm dann7 fm... Muss ich in der darauffolgenden Runde (fm) auch eine fm in die fm häkeln?
21.04.2021 - 14:03DROPS Design answered:
Liebe Maren, diese Luftmasche ist die von der Luftmaschenkette und wird übersprungen und nicht dazugehäkelt: * 1 Lm überspringen, je 1 feste M (fM) in die nächsten 7 Lm * - siehe auch mal hier. Am Ende der 1. Runde sollen Sie 196-240-286 fM haben. Viel Spaß beim häkeln!
21.04.2021 - 15:30Hanna wrote:
Ciekawi mnie dlaczego w polskim nazewnictwie dropsowym ang. single crochet tłumaczone jest na oczko ścisłe. Wydaje mi się to mylące, choć najwyraźniej niektórzy takiego pojęcia używają. Aż do teraz spotykałam się w j.polskim z półsłupkiem jako odpowiednikiem sc - zarówno w starszych książkach, dzisiejszych gazetkach i w polskim internecie. Gdybym nie sprawdziła wzorów po ang. i norwesku, to źle zabrałabym się do wzoru. Czy psł nie byłby mniej mylącym rozwiązaniem?
13.04.2021 - 20:21DROPS Design answered:
Witaj Haniu, zgadza się, są 2 różne nazewnictwa. Musieliśmy wybrać jedną opcję. Mam nadzieję, że nie zniechęci cię to do wykonywania naszych wzorów :) Serdecznie pozdrawiamy!
14.04.2021 - 12:49Beatrice wrote:
Bonjour, taille M. Du milieu dos je fais 33 brides ensuite 108 ce qui fais un total de 141 brides. J'en déduis que d'un côté milieu dos j'ai 33 brides et de l'autre côté j'ai 83 brides que le dos est plus grand que le devant et correspond à 116 brides. Merci de me confirmer que le dos est plus large que le devant. Merci d'avance. Cordialement.
12.04.2021 - 10:01DROPS Design answered:
Bonjour Beatrice, le dos est aussi large que le devant: à partir du début du tour: 6 motifs de A.1 + 1x A.1 avec les marqueurs (= 7ème) + 13 x A.1 (= devant) + 1 x A.1 avec les marqueurs (= 21ème A.1) + 7 x A.1 jusqu'à la fin du tour (avec 5 brides entre chaque A.1 sauf début/fin du tour où vous en avez 3/2). Bon crochet!
12.04.2021 - 11:35Beatrice Betra wrote:
Bonjour, si je comprends bien, je fais 36 brides je mets i marqueur 1er côté je fais 107 brides marqueur 2ème côté je termine le rang a1 par 81 brides pour aller au milieu dos taille M. Ai-je bien compris, car j'essais de comprendre depuis un petit bout de temps. Je vous remercie d'avance pour votre réponse que j'attends. Bonne journée et à bientôt.
10.04.2021 - 10:13DROPS Design answered:
Bonjour Mme Betra, en S/M, crochetez ainsi: à partir du milieu dos: 3 B, A.1 (= 3 B), répétez ensuite*5 B, A.1* 5 fois au total, crochetez encore 5 B, mettez un marqueur, crochetez A.1 (= le 7ème depuis le début du tour), mettez un marqueur (= côté). x , répétez de *à* et mettez un marqueur de la même façon de chaque côté du 21ème A.1 du tour. Terminez le tour en continuant de *à* et par 2 brides après le dernier A.1 du tour ((Les côtés sont au niveau de 7ème et du 21ème A.1 du tour). Bon crochet!
12.04.2021 - 07:55Jocelyne COLAS wrote:
Bonjour, sous le paragraphe short : continuer au pont fantaisie en plaçant des marqueurs sur la 3eme mailles du diagramme après le 7eme 8eme 9eme motifs etc pourriez plutôt nous indiquer à combien de maille du milieu dos placer les marqueurs. Car je ne comprends pas le positionnement des marqueurs sur ce rang. D'avance merci pour votre repose, bien cordialement Mme Colas jocelyne
28.03.2021 - 14:57DROPS Design answered:
Bonjour Mme Colas, en S/M, le 1er marqueur sera dans la 3e bride après le 7ème motif– en L après le 8ème motif et en XL/XXL, après le 9ème motif; autrement dit: 3 B, A.1 (= 3 B), *5 B, A.1*, répétez de *-* 6-7-8 fois; reprenez de *à* en mettant un marqueur dans la 3e des 5 brides suivantes. Bon crochet!
06.04.2021 - 08:20Agnieszka wrote:
Chyba mnie ten wzór pokona! Prułam już z 10 razy, ale uparłam się: zaczynając motyw A.1X mam dodać 7-krotnie po 4 oczka przy bocznych markerach, w co 4. okrążeniu, czyli już przy pierwszym dodaniu, na bokach, odstęp między motywami będzie wynosił nie 5 - jak normalnie, tylko 7 słupków, tak? A za 4 rzędy, gdy znów będę dodawać to wyjdzie już 9 słupków? Dobrze to rozumiem? Czy mam przesuwać motyw, żeby się za każdym razem zgadzało te 5 słupków pomiędzy motywami?
13.03.2021 - 13:11DROPS Design answered:
Witaj Agnieszko, powinno być cały czas 5 słupków między motywami A.1X. Jak dodasz oczka na bokach po raz 4-ty to między motywami będzie 13 sł, a to oznacza, że masz miejsce na 1 nowy schemat A.1X. Powodzenia!
14.03.2021 - 20:17Marina wrote:
Hola de nuevo! Estoy al punto en el que el tejido mide 15 cm y debo hacer los aum en la espalda. Para poder hacer 1 p.a. y luego los otros 2 p.a en el siguiente p.a. debo comenzar una vuelta nueva. Es decir, hago 2pa, 1 pa, uno con pe a la 3 cad de la vta anterior y continuo con el otro pa y los sig 2pa. ¿Eso está bien? Porque cuando termine con los 4 pa, voy nec terminar en una vuelta nueva.
29.09.2020 - 16:52DROPS Design answered:
Hola Marina, tienes que combinar el TIp-1 para los aumentos y la Informacion para la realización del trabajo. Trabajar hasta que queden 2 puntos antes del MP, 2 p.a. en el siguiente p.a, 1 p.a en el siguiente p.a, MP, 1 p.e en el 3º p,de cad del inicio de la vuelta, 3 p.de cad y 2 p.a en el sig. p.a. Al aumentar 4 p.a se trabajaría de la misma manera.
20.11.2020 - 23:27