DROPS Cotton Merino
DROPS Cotton Merino
50% Wool, 50% Cotton
from 7.00 BGN /50g
Get the yarn to make this pattern from 42.00BGN.

The yarn cost is calculated from the pattern’s smallest size and the yarn’s cheapest product type. Looking for an even better price? You might find it on the DROPS Deals!

DROPS Super Sale

Verano

Crochet DROPS jacket with lace pattern and double treble crochet in ”Cotton Merino”. Size: S - XXXL.

DROPS 153-14
DROPS design: Pattern no cm-004
Yarn group B
-----------------------------------------------------------
Size: S/M - L/XL - XXL - XXXL
Materials:
DROPS COTTON MERINO from Garnstudio
300-300-350-350 g colour no 01, white

DROPS CROCHET HOOK SIZE 5 mm – or size needed to get 13 dtr = width 10 cm, or to get 3 repetitions of A.2 = width 10 cm.
DROPS MOTHER-OF-PEARL BUTTON NO 540: 5 pieces for all sizes

-------------------------------------------------------

Alternative Yarn – See how to change yarns here
Yarn Groups A to F – Use the same pattern and change the yarn here
Yarn usage using an alternative yarn – Use our yarn converter here

-------------------------------------------------------

DROPS Cotton Merino
DROPS Cotton Merino
50% Wool, 50% Cotton
from 7.00 BGN /50g
Get the yarn to make this pattern from 42.00BGN.

The yarn cost is calculated from the pattern’s smallest size and the yarn’s cheapest product type. Looking for an even better price? You might find it on the DROPS Deals!

Pattern instructions

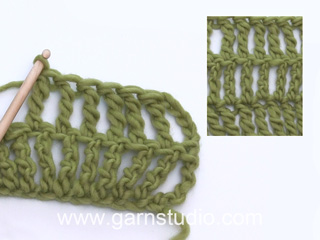
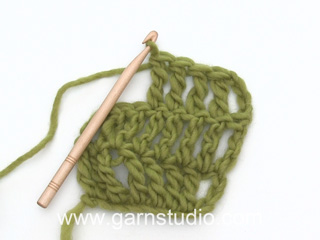
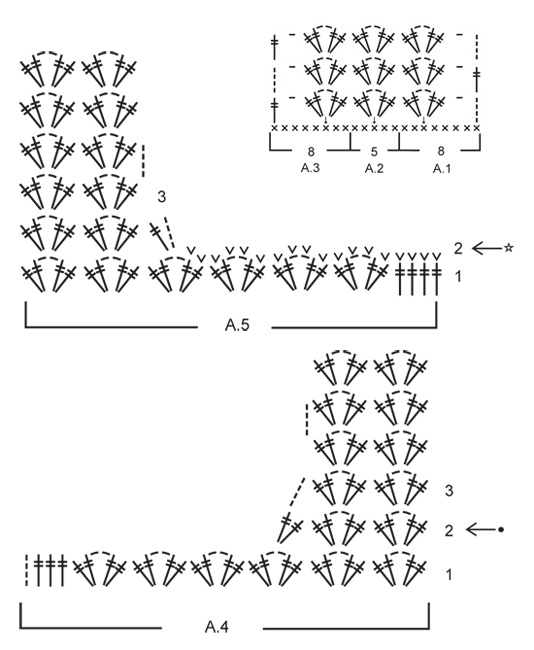
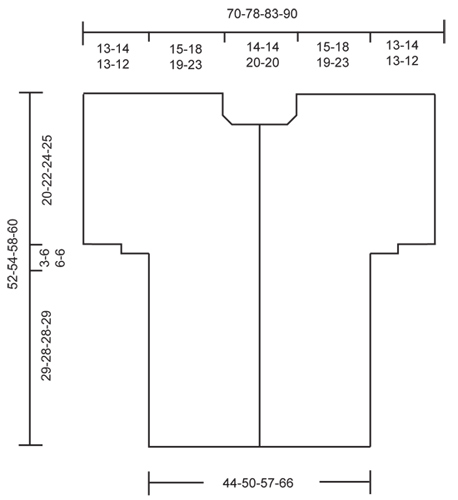
CROCHET INFO:
Replace first dtr at beg of every dtr row with 4 ch.

PATTERN:
See diagrams A.1 - A.5.

CROCHET TIP:
ROW 1 in diagram A.4 and A.5 are not worked on back piece but on front piece.

BUTTONHOLES:
Do not dec for buttonholes but sew the buttons on to left band and button between two dtr/triple tr in right band.
Sew on buttons measured from cast-on edge as follows:
SIZE S/M: 12, 20, 28, 36 and 44 cm
SIZE L/XL: 14, 22, 30, 38 and 46 cm
SIZE XXL: 10, 20, 30, 40 and 50 cm
SIZE XXXL: 12, 22, 32, 42 and 52 cm
----------------------------------------------------------

BACK PIECE:
Worked back and forth. Work 83-95-108-120 ch on hook size 5 mm with Cotton Merino. Work first row as follows (= WS): 1 dc in 2nd ch from hook = 1 dc, 1 dc in each of the next 1-3-1-3 ch, * skip 1 ch, 1 dc in each of the next 4 ch *, repeat from *-* 16-18-21-23 times = 66-76-86-96 dc.
Continue to work as follows:
ROW 1 (= RS): Work A.1 1 time, then work A.2 until 8 dc remain (= 10-12-14-16 times in width) and finish with A.3 1 time. REMEMBER THE CROCHET TENSION!
ROW 2 (= WS): Turn piece and work A.3 1 time, A.2 (= 10-12-14-16 times in width), A.1 1 time.
ROW 3 (= RS): Turn piece and work A.1 1 time, A.2 (= 10-12-14-16 times in width), A.3 1 time.
Repeat 2nd and 3rd row until piece measures approx. 29-28-28-29 cm - adjust to finish with 3rd row (= RS). Fasten off.

Continue to work as follows: * Work 10-5-5-5 loose ch, beg from WS and continue A.3, A.2 and A.1 over back piece as before and finish with 10-5-5-5 loose ch, turn piece. Continue to work as follows:
ROW 1 (= RS): Work 5 ch, in 10th ch from hook work 2 dtr + 2 ch + 2 dtr (= 1 repetition of A.1), work A.2 2-1-1-1 time (work last repetition of A.2 around the 2 ch in A.1 from previous row). Then continue with A.2 10-12-14-16 times in total over the entire back piece as before and finish row as follows: Work A.2 around the 2 ch in A.3 from previous row, then continue with A.2 1-0-0-0 times, and then A.3 the last 1 dtr will be in 1st ch on previous row. Cut the yarn and turn piece *, in size L/XL – XXL – XXXL repeat *-* 1 more time, AT THE SAME TIME work 2 extra repetitions of A.2 over back piece. I.e. work 1 extra repetition of A.2 over the inc repetition from previous row in each side of piece = 16-18-20 repetitions in total of A.2 in size L/XL – XXL – XXXL. Do not repeat *-* in size S/M but continue as explained below:
Work 13-13-13-13 loose ch, beg from WS and continue with A.2 in ch-space from A.3 on previous row, A.2 over sleeves and back piece as before, and A.2 in ch-space in A.1 on previous row and finish with 13-13-13-13 loose ch. Continue to work as follows:
ROW 1 (= RS): Work A.1 and A.2 1 time over the new sts. Continue with A.2 over sleeves and back piece as before and finish with 1 repetition of A.2 and A.3. Continue this pattern until piece measures approx. 49-51-55-57 cm - adjust to finish after a row from WS.
Then finish each shoulder separately as follows:

RIGHT SHOULDER:
Work A.1 1 time and A.2 5-6-6-7 times in total, then work 2nd row of diagram A.4 – READ CROCHET TIP! Turn and work 3rd row of A.4, and continue row with A.2 and A.1 as before. Continue like this until piece measures 52-54-58-60 cm in total. Fasten off.

LEFT SHOULDER:
Work left shoulder the same way but reversed, and work A.3 instead of A.1 and 2nd row of A.5 instead of A.4.
Beg with 2nd row of A.5 in the middle of row, so that there are 4-4-6-6 repetitions of A.2 in width for neck.

RIGHT FRONT PIECE:
Worked back and forth. Work 45-52-58-64 ch on hook size 5 mm with Cotton Merino. Work first row as follows (= WS): 1 dc in 2nd ch from hook, 1 dc in each of the next 4-1-2-3 ch, * skip 1 ch, 1 dc in each of the next 4 ch *, repeat from *-* 7-9-10-11 times in total and finish with 1 dc in each of the next 4 ch = 37-42-47-52 dc.
ROW 1 (= RS): 4 ch (= 1 dtr), 1 dtr in each of the next 3 dc (= 4 dtr for band) NOTE: Work band with every other row dtr and triple tr. Then work A.2 5-6-7-8 times in total, finish with A.3 1 time.
Repeat this pattern, with 4 dtr/triple tr for band towards mid front until piece measures approx. 29-28-28-29 cm – adjust according to back piece and finish with a row from RS. Fasten off.
Then work 10-5-5-5 loose ch for sleeve and continue as on back piece. When piece measures 42-44-46-48 cm, work as follows on 1st row from WS: Pattern as before until 3 repetitions of A.2 and 4 dtr remain. Work pattern according to diagram A.5 over these sts. Turn and work A.5, continue row with pattern as before. Continue like this back and forth until piece measures 52-54-58-60 cm in total. Fasten off.

LEFT FRONT PIECE:
Work as right but reversed. Work according to diagram A.1 instead of A.3, and when neck dec beg, work according to A.4 instead of A.5.

ASSEMBLY:
Place front piece on top of back piece and work the shoulders as follows: * 1 dc through both layers, 3 ch, skip 2 dtr *, repeat from *-*. Work the sides tog as follows: 1 dc, * 3 ch, 1 dc in ch-space on next row *, repeat from *-*. Work tog under sleeves as follows: * 1 dc in ch in next dtr-group, 3 ch *, repeat from *-* and finish with 1 dc.
Sew buttons on left band and button through two dtr/triple tr in right band.

NECK EDGE:
Work a neck edge as follows, beg from WS:
ROW 1: Fasten yarn with 1 dc at the edge, * 3 ch, skip approx. 2 cm, 1 dc *, repeat from *-* around the entire neck edge. Turn piece.
ROW 2: 4 ch, 3 dtr in first ch-space, * 3 dtr in next ch-space *, repeat from *-* along the entire row, and finish with 1 dtr in first ch on previous row. Turn piece.
ROW 3: * 3 ch, skip 3 dtr, 1 dc between the next two dtr-groups *, repeat from *-* along the entire row. Turn piece.
ROW 4: 2 ch, 1 dc in first ch-space, * 2 ch, 1 dc in next ch-space *, repeat from *-* along the entire row. Fasten off.

This pattern has been corrected.

Updated online: 28.08.2014
New Chart: A.4 and A.5

Diagram

symbols = 1 ch
symbols = 1 dc
symbols = 1 dtr
symbols = sl st
symbols = beg on this row when dec for neck on right side at the back = RS
symbols = beg on this row when dec for neck on left side at the back NOTE! Beg row with sl sts until ch-space.
diagram
diagram
Do you have a question? See a list of frequently asked questions (FAQ)

Knitting tension is what determines the final measurements of your work, and is usually measured per 10 x 10 cm. It is provided like so: number of stitches in width x number of rows in height - eg: 19 stitches x 26 rows = 10 x 10 cm.

The knitting tension is very individual; some people knit/crochet loosely while others work tightly. You adjust the knitting tension with the needle size, which is why the suggested needle size is only meant as a guide! You need to adjust this (up or down) to ensure that YOUR knitting tension matches the knitting tension provided in the pattern. If you work with a different knitting tension than provided you will have a different yarn consumption, and your work will have different measurements than what the pattern suggests.

The knitting tension also determines which yarns can replace each other. As long as you achieve the same knitting tension you can replace one yarn with another.

See DROPS lesson: How to measure your tension/gauge

See DROPS video: How to make a gauge tension swatch

The required amount of yarn is provided in grams, eg: 450 g. To calculate how many balls you’ll need you first need to know how many grams are in 1 ball (25g, 50g or 100g). This information is available if you click on the individual yarn quality on our pages. Divide the amount required with the amount of each ball. For example, if each ball is 50g (the most common amount), the calculation will be as follows: 450 / 50 = 9 balls.

The important thing when changing from one yarn to another is that the knitting/crochet tension remains the same. This is so that the measurements of the finished piece will be the same as on the sketch provided. It is easier to achieve the same knitting tension using yarns from the same yarn group. It is also possible to work with multiple strands of a thinner yarn to achieve the knitting tension of a thicker one. Please try our yarn converter. We recommend you to always work a test swatch.

Please NOTE: when changing yarn the garment might have a different look and feel to the garment in the photo, due to individual properties and qualities of each yarn.

See DROPS lesson: Can I use a different yarn than the one mentioned in the pattern?

All our yarns are categorised into yarn groups (from A to F) according to thickness and knitting tension – group A contains the thinnest yarns and group F the thickest. This makes it easier for you to find alternative yarns to our patterns, should you wish to switch yarn. All yarns within the same group have a similar knitting tension and can easily replace each other. However, different yarn qualities have different structures and properties which will give the finished work a unique look and feel.

Click here for an overview of the yarns in each yarn group

At the top of all our patterns you’ll find a link to our yarn calculator, which is a helpful tool should you wish to use a different yarn than suggested. By filling in the yarn quality you wish to replace, the amount (in your size) and number of strands, the calculator will present good alternative yarns with the same knitting tension. Additionally it will tell you how much you’ll require in the new qualities and whether you’ll need to work with multiple strands. Most skeins are 50g (some are 25g or 100g).

If the pattern is worked with multiple colours, every colour will have to be calculated separately. Similarly, if the pattern is worked with several strands of different yarns (for example 1 strand Alpaca and 1 strand Kid-Silk) you will have to find alternatives for each, individually.

Click here to see our yarn calculator

Since different yarns have different qualities and textures we have chosen to keep the original yarn in our patterns. However, you can easily find options among our available qualities by using our yarn calculator, or simply pick a yarn from the same yarn group.

It is possible that some retailers still have discontinued yarns in stock, or that someone has a few skeins at home that they would like to find patterns for.

The yarn calculator will provide both alternative yarn as well as required amount in the new quality.

If you think it's hard to decide what size to make, it can be a good idea to measure a garment you own already and like the size of. Then you can pick the size by comparing those measures with the ones available in the pattern's size chart.

You'll find the size chart at the bottom of the pattern.

See DROPS lesson: How to read size chart

The needle size provided in the pattern serves only as a guide, the important thing is to follow the knitting tension. And since knitting tension is very individual, you will have to adjust the needle size to ensure that YOUR tension is the same as in the pattern – maybe you’ll have to adjust 1, or even 2 needle sizes, up or down to achieve the correct tension. For this, we recommend that you work test swatches.

Should you work with a different knitting tension than the one provided, the measurements of the finished garment might deviate from the measurement sketch.

See DROPS lesson: How to measure your tension/gauge

See DROPS video: How to make a tension/gauge swatch

Working a garment top-down provides more flexibility and room for personal adjustment. For example it is easier to try the garment on while working, as well as making adjustments to length of yoke and shoulder caps.

The instructions are carefully explaining every step, in the correct order. Diagrams are adjusted to the knitting direction and are worked as usual.

The diagram depicts all rows/rounds, and every stitch seen from the right side. It is read from bottom to top, from right to left. 1 square = 1 stitch.

When working back and forth, every other row is worked from the right side and every other row is worked from the wrong side. When working from the wrong side, the diagram will have to be worked reversed: from left to right, knit stitches are purled, purl stitches are knit etc.

When working in the round every round is worked from the right side and the diagram are worked from right to left on all rounds.

See DROPS lesson: How to read knitting diagrams

The diagram depicts all rows/rounds, and every stitch seen from the right side. It is worked from bottom to top, from right to left.

When working back and forth every other row is worked from the right side: from right to left and every other row is worked from the wrong side: from left to right.

When working in the round, every row in the diagram are worked from the right side, from right to left.

When working a circular diagram you start in the middle and work your way outwards, counter clockwise, row by row.

The rows usually start with a given number of chain stitches (equivalent to the height of the following stitch), this will either be depicted in the diagram or explained in the pattern.

See DROPS lesson: How to read crochet diagrams

Instructions for working several diagrams after each other on the same row/round, will often be written like so: “work A.1, A.2, A.3 a total of 0-0-2-3-4 times". This means you work A.1 once, then A.2 is worked once, and A.3 is repeated (in width) the number of times provided for your size – in this case like so: S = 0 times, M = 0 times, L=2 times, XL= 3 times and XXL = 4 times.

The diagrams are worked as usual: begin with the first row in A.1, then work the first row in A.2 etc.

See DROPS lesson: How to read knitting diagrams

See DROPS lesson: How to read crochet diagrams

The total width of the garment (from wrist-to-wrist) will be larger in the larger sizes, despite the actual sleeves being shorter. The larger sizes have longer sleeve caps and wider shoulders, so there will be a good fit in all sizes.

The measurement sketch/schematic drawing provides information regarding the full length of the garment. If it’s a jumper or a jacket the length is measured from the highest point on the shoulder closest to the neckline, and straight down to the bottom of the garment. It is NOT measured from the tip of shoulder. Similarly, the length of yoke is measured from the highest point on the shoulder and down to where yoke is split into body and sleeves.

On a jacket measures are never taken along bands, unless specifically stated. Always measure inside band stitches when measuring the length.

See DROPS lesson: How to read a schematic drawing

Diagrams are often repeated on the round or in height. 1 repeat is the diagram the way it appears in the pattern. If it says to work 5 repeats of A.1 in the round, then you work A.1 a total of 5 times after/next to each other in the round. If it says to work 2 repeats of A.1 vertically/in height you work the entire diagram once, then begin again at the start and work the entire diagram one more time.

Chain stitches are slightly narrower than other stitches and to avoid working the cast-on edge too tight, we simply chain more stitches to begin with. The stitch count will be adjusted on the following row to fit the pattern and measurement sketch.

The rib edge is more elastic and will contract slightly compared to, for example, stocking stitch. By increasing before the rib edge, you avoid a visible difference in width between the rib edge and the rest of the body.

It’s very easy to cast off too tightly, and by making yarn overs while casting off (and simultaneously casting these off) you avoid a too tight cast off edge.

See DROPS video: How to bind off with yarn overs (yo)

To achieve an even increase (or decrease) you can increase on, for example: every 3rd and 4th row alternately, like so: work 2 rows and increase on the 3rd row, work 3 rows and increase on the 4th. Repeat this until the increase is complete.

See DROPS lesson: Increase or decrease 1 st on every 3rd and 4th row alternately

Should you prefer to work in the round instead of back and forth, you may of course adjust the pattern. You’ll need to add steeks mid-front (usually 5 stitches), and follow the instructions. When you would normally turn and work from the wrong side, simply work across the steek and continue in the round. At the end you’ll cut the piece open, pick up stitches to work bands, and cover the cut edges.

See DROPS video: How to knit steeks and cut open

Should you prefer to work back and forth instead of in the round, you may of course adjust the pattern so you work the pieces separately and then assemble them at the end. Divide the stitches for the body in 2, add 1 edge stitch in each side (for sewing) and work the front and back pieces separately.

See DROPS lesson: Can I adapt a pattern for circular needles into straight needles?

Pattern repeats can vary slightly in the different sizes, in order to get the correct proportions. If you’re not working the exact same size as the garment in the photo, yours might deviate slightly. This has been carefully developed and adjusted so that the complete impression of the garment is the same in all sizes.

Make sure to follow instructions and diagrams for your size!

If you have found a pattern you like which is available in women’s size it’s not very difficult to convert it to men’s size. The biggest difference will be the length of sleeves and body. Start working on the women size that you think would fit across the chest. The additional length will be worked right before you cast off for the armhole/sleeve cap. If the pattern is worked top-down you can add the length right after the armhole or before the first decrease on sleeve.

Regarding additional yarn amount, this will depend on how much length you add, but it is better with a skein too many than too few.

All yarns will have excess fibres (from production) that might come off as lint or shedding. Brushed yarns (ie hairier yarns) have more of these loose, excess fibres, causing more shedding.

Shedding also depends on what is worn under or over the garment, and whether this pulls at the yarn fibres. It’s therefore not possible to guarantee that there will be no shedding

Below are some tips on how to get the best result when working with hairier yarns:

1. When the garment is finished (before you wash it) shake it vigorously so the looser hairs come off. NOTE: do NOT use a lint roller, brush or any method that pulls at the yarn.

2. Place the garment in a plastic bag and put it in your freezer - the temperature will cause the fibres to become less attached to each other, and excess fibres will come off easier.

3. Leave in the freezer for a few hours before taking it out and shaking it again.

4. Wash the garment according to the instructions on the yarn label.

Pilling is a natural process that happens to even the most exclusive of fibers. It's a natural sign of wear and tear that is hard to avoid, and that is most visible in high friction areas of your garment like a sweater's arms and cuffs.

You can make your garment look as new by removing the pilling, using a fabric comb or a pill/lint remover.

Still can't find the answer you need? Then scroll down and leave your question so one of our experts can try to help you. This will be done normally within 5 to 10 working days.
In the meantime, you can read the questions and answers that others have left to this pattern or join the DROPS Workshop on Facebook to get help from fellow knitters/crocheters!

You might also like...

Post a comment to pattern DROPS 153-14

We would love to hear what you have to say about this pattern!

If you want to leave a question, please make sure you select the correct category in the form below, to speed up the answering process. Required fields are marked *.

Comments / Questions (108)

country flag Renee wrote:

Begrijp ik het goed dat er dus geen beginstokjes / losse keten aan het begin en eind van de toer wordt gehaakt? De vijf losse waar je mee begint, hangen dan zo raar langs het achterpand. Groetjes, Renée

20.05.2015 - 21:23

DROPS Design answered:

Hoi Renée. Je begint elke toer met 5 lossen (ter vervanging van 1 dstk + 1 l), en je eindigt elke toer met 1 dstk in de 4e l van de vorige toer. Zie ook het telpatroon

21.05.2015 - 15:46

country flag Renee wrote:

Als je na het afhechten van het rugpand de 5 losse hebt gehaakt (maat M), moet je dan de losse aanhechten in de 2e losse van de vorige toer en dan 5 losse haken om een nieuw dubbel stokje voor de volgende toer te haken. Of haak je 5 losse en nog eens 5 losse van A3 verkeerde kant. Groetjes, Renee

16.05.2015 - 14:58

DROPS Design answered:

Hoi Renee. Je begint met de 5 lossen en volgt dan patroon A.3 - dus na de 5 l heb je 2 dstk + 2 l + 2 dstk om de l-boog van de vorige toer (je haakt door zoals eerst). enzovoort

20.05.2015 - 12:58

country flag Katrin wrote:

Hallo, ich bleibe in der Anleitung leider beim Rückenteil hängen. Nach den ca. 28 cm (Größe L/XL) habe ich den Faden abgeschnitten und beginne mit 5 neuen LM. Wie geht es aber dann weiter? Verbinde ich erst die neuen LM mittels Kettmasche o.ä. mit dem Rückenteil und fahre dann mit 4+1 LM von Muster A.3 fort? Das ist mir leider nicht klar. Vielen Dank für Ihre Hilfe!

06.05.2015 - 21:42

DROPS Design answered:

Sie brauchen die 5 Lm nicht zu verbinden, sondern häkeln statt der 4 Ersatz-Lm direkt ein D-Stb (ab der Rück-R) in das Rückenteil.

05.07.2015 - 09:26

country flag Ane Dolberg Andersen wrote:

Jeg forstår simpelthen ikke dette: "VENSTRE SKULDER: Hækl den venstre skulder på samme måde men modsat, og der hækles A.3 i stedet for A.1 og 2.række af A.5 i stedet for A.4. Start med 2.række af A.5 midt på rækken, så der bliver 4-4-6-6 rapporter af A.2 i bredden til hals." skal skuldrene ikke se egens ud? Hvad menes der med at jeg skal starte med 2.række af A.5 "midt" på rækken? Skal jeg lave kædemasker, og hvor? Vh. Ane

27.04.2015 - 19:32

DROPS Design answered:

Hej Ane, Jo men for at få den venstre skulder spejsvendt, så det bliver ens mod midt foran, så skal du følge de andre diagrammer ifølge opskriften. God fornøjelse!

13.05.2015 - 12:25

country flag Barbara wrote:

Hallo, Ben er nog niet uit! Ben nog niet aan de schouders beland. In de uitleg staat : Hecht af. Ga verder en haak als volgt: * haak 10-5-5-5 losse l, begin aan de verkeerde kant en ga verder A.3, A.2 en A.1 over het achterpand als hiervoor en eindig met 10-5-5-5 losse l, keer het werk. Ga verder en haak als volgt; En hier geraak ik niet uit. Dus draad afhechten, dan 5 losse haken, maar hoe maak je dit terug vast aan het werk? Sorry voor de vele vragen.

14.04.2015 - 21:12

DROPS Design answered:

Hoi Barbara. Oké, nu zie ik ook wat je bedoeld. Eerlijk gezegd, dan denk ik niet dat je hier moet afhechten (ik ga dat even verder sturen om hier opheldering over te krijgen). Ik zou gewoon keren na de 3e toer en haken zoals beschreven. De 5 l lijkt voor mij de lus om in te meerderen en verder gewoon het patroon netjes boven elkaar te haken.

15.04.2015 - 15:40

country flag Barbara wrote:

Hecht af. Hallo, Ik ben met dit vestje begonnen en bij het achterpand beland daar waar je moet afhechten. Dan moet ik dus 5 losse maken, mar begrijp niet goed hoe ik dan verder moet?? Word achterpand in 2 delen gemaakt? Of direct eraan verder doen? Zoja, kan je me meer uitleg geven want geraak er niet uit? Alvast bedankt!

13.04.2015 - 23:04

DROPS Design answered:

Hoi Barbara. Je haakt het achterpand in één deel tot aan het opdelen voor de hals (de halslijn zie je ook op de maattekening onderaan). Je haakt dan een aantal toeren apart over de linker schouder/mouw en de rechterschouder/mouw. Je haakt dus niet meer over de middelste 4-4-6-6 herhalingen van A.2 in het midden (=hals). Je haakt volgens de beschrijving onder eerst RECHTERSCHOUDER. Als je klaar bent, breek je de draad en haakt volgens de beschrijving voor de LINKERSCHOUDER aan de andere kant van het achterpand.

14.04.2015 - 16:55

Mayaveena wrote:

HI,Thanks for this beautiful pattern.I finished mine with cotton merino .It came out well..but sleeves r short.Anyway i love this..Thanks once again for this clear pattern n chart.keep going.

19.03.2015 - 12:38

country flag Linda wrote:

Yeah! I finished this little sweater in lilac cotton merino. Lovely yarn to work with and washed up nice. The sleeves came out much shorter than picture. I added the same stitching as around the neck on the bottom of sleeves to extend them. Came out nice and will be a sweet little summer jacket. Thank you for the pattern.

18.03.2015 - 22:28

country flag Sabrina W. wrote:

Liebes Team, Ich stecke gerade an der linken Schulter und begreife die Vorgehensweise einfach nicht, wo beginne ich mit der ersten reihe der linken Schulter und wie geht es danach weiter?

14.12.2014 - 15:14

DROPS Design answered:

Die 1. R der linken Schulter besteht ja aus folgenden Bestandteilen: A.5 (die 2. R von A.5), A.2 und A.3. Sie beginnen mit einer Hin-R mitten in der R ab der Stelle, an der Sie mit A.4 bei der rechten Schulter geendet haben, und häkeln bis zum Lm-Bogen, in den Sie A.5 häkeln müssen, Kett-M. Dann häkeln Sie A.5 (d.h. die 2. R, siehe Startpfeil), A.2 und A.3. Damit sind Sie wieder am Ärmelrand angelangt. In der Mitte befinden sich nun 4 bzw. 6 Rapporte (je nach Größe) von A.2, die nicht behäkelt wurden und den Halsausschnitt bilden.

06.03.2015 - 11:56

Piret wrote:

Just finished this pattern. Easy and beautiful. My sleeves are not so long as they are on that picture but i love it.

04.11.2014 - 20:31