
Popular categories
Looking for a yarn?


|
|
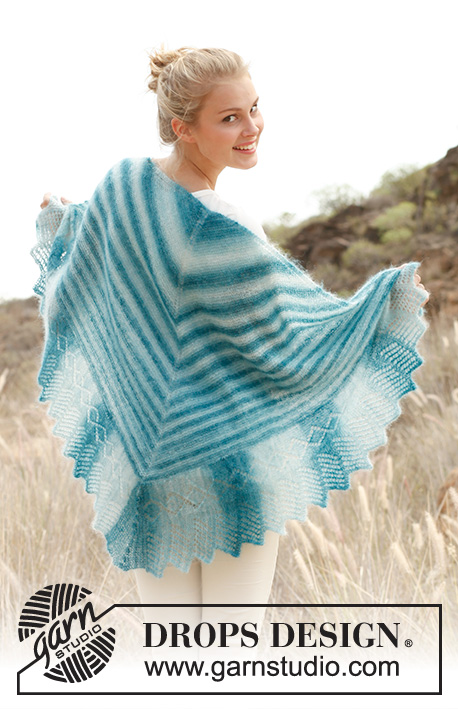
Edelweiss |
|
 |
 |
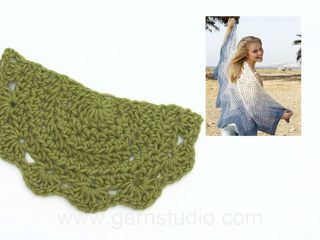
Crochet DROPS shawl with zig-zag pattern in 2 threads ”BabyAlpaca Silk”.
DROPS 145-6 |
|
|
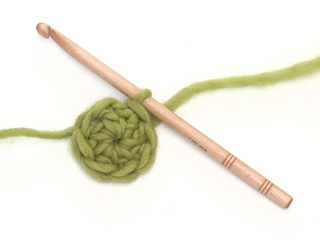
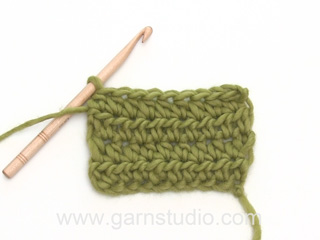
MAGIC CIRCLE: When piece is worked in the round, start with this technique to avoid holes in the middle (instead of ch-ring): Hold the yarn end and wind the yarn one time around the index finger to make a loop. Hold the loop with left thumb and middle finger, place the thread over left index finger. Insert hook through the loop, make a YO and pull thread through loop, work 3 ch, then work 11 tr around the loop. Pull yarn end to tighten the loop. Fasten the yarn end on the back side. CROCHET TIP: Replace 1 htr at beg of round with 2 ch. STRIPES: Work stripes as follows: 0-27 cm: 2 threads off white 27-37 cm: 1 thread off white and 1 thread ice blue 37-47 cm: 2 threads ice blue 47-57 cm: 1 thread ice blue and 1 thread grey blue 57-67 cm: 2 threads grey blue ---------------------------------------------------------- SHAWL: Shawl is worked in stripes - see explanation above. Work a magic circle with 12 tr on hook size 5 mm – see explanation above. Turn. ROW 1: READ CROCHET TIP! 2 htr in first tr, * 1 htr in each of the next 2 tr, 2 htr in next tr *, repeat from *-* until 2 tr remain and finish with 1 htr in each of the last 2 tr = 16 htr. Turn. ROW 2: 2 htr in first htr, * 1 htr in each of the next 3 htr, 2 htr in next htr *, repeat from *-* until 3 htr remain and finish with 1 htr in each of the last 3 htr = 20 htr. Turn. ROW 3: 2 htr in first htr, * 1 htr in each of the next 4 htr, 2 htr in next htr *, repeat from *-* until 4 htr remain and finish with 1 htr in each of the last 4 htr = 24 htr. Turn. ROW 4: 2 htr in first htr, * 1 htr in each of the next 5 htr, 2 htr in next htr *, repeat from *-* until 5 htr remain and finish with 1 htr in each of the last 5 htr = 28 htr. Turn. ROW 5: 2 htr in first htr, * 1 htr in each of the next 6 htr, 2 htr in next htr *, repeat from *-* until 6 htr remain and finish with 1 htr in each of the last 6 htr = 32 htr. Turn. ROW 6: 4 ch, work 3 tr in next htr, * skip 3 htr, work 3 tr + 1 ch + 3 tr in next htr *, repeat from *-* 6 times in total, skip 3 htr, work 3 tr + 1 ch in next htr, skip 1 htr, work 1 tr in last htr. Turn. ROW 7: 4 ch, work 3 tr in first ch, * skip 6 tr, work 3 tr + 3 ch + 3 tr in next ch-loop *, repeat from *-* 6 times in total, skip 6 tr, work 3 tr + 1 ch in next ch, 1 tr in last tr. Turn. ROW 8: 4 ch, work 3 tr + 1 ch + 3 tr in first ch, * skip 6 tr, work 3 tr + 1 ch + 3 tr + 3 ch + 3 tr + 1 ch + 3 tr in next ch-loop *, repeat from *-* 6 times in total, skip 6 tr, work 3 tr + 1 ch + 3 tr + 1 ch in last ch and 1 tr in last tr. Turn. ROW 9: 4 ch, work 3 tr + 1 ch in first ch, skip 3 tr, work 3 tr + 1 ch in next ch, * skip 6 tr, work 3 tr + 1 ch in next ch, skip 3 tr, work 3 tr + 3 ch + 3 tr + 1 ch in next ch-loop, skip 3 tr, work 3 tr + 1 ch in next ch *, repeat from *-* 6 times in total, skip 6 tr, work 3 tr + 1 ch in next ch, skip 3 tr, work 3 tr + 1 ch in next ch and 1 tr in last tr. Turn. ROW 10-11: Work as 9th row. ROW 12: 4 ch, work 3 tr + 1 ch + 3 tr + 1 ch in first ch, skip 3 tr, work 3 tr in next ch,* skip 6 tr, work 3 tr + 1 ch in next ch, skip 3 tr, work 3 tr + 1 ch + 3 tr + 3 ch + 3 tr + 1 ch + 3 tr + 1 ch in next ch-loop, skip 3 tr, work 3 tr in next ch *, repeat from *-* 6 times in total, skip 6 tr, work 3 tr + 1 ch in next ch, skip 3 tr, work 3 tr + 1 ch + 3 tr +1 ch in last ch and 1 tr in last tr. Turn. ROW 13: 4 ch, work 3 tr + 1 ch in first ch, skip 3 tr, work 3 tr + 1 ch in next ch, skip 3 tr, work 3 tr + 1 ch in next ch,* skip 6 tr, work 3 tr + 1 ch in next ch, skip 3 tr, work 3 tr, + 1 ch in next ch, skip 3 tr, work 3 tr + 3 ch + 3 tr + 1 ch in next ch-loop, skip 3 tr, work 3 tr + 1 ch in next ch, skip 3 tr, work 3 tr in next ch *, repeat from *-* 6 times in total, skip 6 tr, work 3 tr + 1 ch in next ch, skip 3 tr, work 3 tr + 1 ch in next ch, skip 3 tr, work 3 tr + 1 ch in next ch and 1 tr in last tr. Turn. ROW 14-15: Work as 13th row. When 3 rows have been worked as row 13, inc the same way as on row 12 (in ch-loop work 3 tr + 1 ch + 3 tr + 3 ch +3 tr + 1 ch +3 tr + 1 ch, and work 3 tr + 1 ch + 3 tr + 1 ch in first and last ch). Work next row as 13th row but work 3 tr + 1 ch more between every top/bottom in pattern. Work 3 rows in total like this, then inc again. Continue like this upwards, on every 4th row inc in every top and in each side. Continue until shawl measures 67 cm measured along the middle of shawl. Cut and fasten the threads. |
|
|
Have you made this or any other of our designs? Tag your pictures in social media with #dropsdesign so we can see them! Do you need help with this pattern?You'll find tutorial videos, a Comments/Questions area and more by visiting the pattern on garnstudio.com. © 1982-2024 DROPS Design A/S. We reserve all rights. This document, including all its sub-sections, has copyrights. Read more about what you can do with our patterns at the bottom of each pattern on our site. |
|


With over 40 years in knitting and crochet design, DROPS Design offers one of the most extensive collections of free patterns on the internet - translated to 17 languages. As of today we count 304 catalogues and 11422 patterns - 11422 of which are translated into English (UK/cm).
We work hard to bring you the best knitting and crochet have to offer, inspiration and advice as well as great quality yarns at incredible prices! Would you like to use our patterns for other than personal use? You can read what you are allowed to do in the Copyright text at the bottom of all our patterns. Happy crafting!
Comments / Questions (189)
I forklaring til magisk cirkel står der 11 st masker, i selve opskriften står der 12? Hvilken skal jeg rette mig efter?
05.04.2017 - 16:06DROPS Design answered:
Hei Sussi. I forklaringen til magisk sirkel står det: ... hækl 3 lm, derefter hækles der 11 st rundt om løkken. De 3 lm du først hekler regnes som 1 stav (+ 11 st rundt løkken = 12 staver om ringen). God fornøyelse med det flotte sjalet.
06.04.2017 - 07:25Har tidligere spurgt om jeg kunne bruge 100% bomuld og fik to valg. Jeg har valgt drops #6. Skal jeg stadig følge opskriften med to tråde eller kan jeg hækle med én tråd? Er garnmængden den samme?
28.03.2017 - 20:59DROPS Design answered:
Hej Sussi, Du skal stadigvæk hækle med 2 tråde, men der er ikke så mange meter på DLY #6 så da skal du bruge 1 ekstra nøgle i natur og 2 ekstra i hver af isblå og gråblå og sjalet vil så naturligvis blive tungere. God fornøjelse!
29.03.2017 - 08:39Super einfach zu strickendes Tuch mit schönem Farbeffekt. Habe es für eine Freundin aus Drops You 5 Wolle gestrickt, da sie nur Baumwolle verträgt. Auch damit klappt´s prima, ist nur ein bisschen schwer ;-)
17.03.2017 - 18:22When do you change colors?
15.03.2017 - 00:14DROPS Design answered:
Dear Mrs McClure, you will find the color changes under STRIPES in the written pattern. Happy crocheting!
15.03.2017 - 09:10Er det muligt at hækle sjalet i 100 % bomuld? Hvis ja, hvilken type?
12.03.2017 - 15:12DROPS Design answered:
Hej Sussi. Ja, du kan erstatte med f.eks. DROPS Safran eller DROPS Loves You #6 eller #7, du kan se garnalternativerne her.
13.03.2017 - 11:49Please explain the phrase of adding stitches between top/bottom of pattern? thank you
06.03.2017 - 04:46DROPS Design answered:
Dear Mrs Bond, you will continue as in row 13 but there will be 3 tr+ 1 ch more between each tip pointing outwards/innwards. Happy crocheting!
06.03.2017 - 10:14Après avoir crocheté le rang 15, impossible de comprendre l'explication pour continuer le travail. Pouvez-Vous m'expliquer svp
02.11.2016 - 20:14DROPS Design answered:
Bonjour Florence, après le rang 15, répétez le rang 12 pour les augmentations (vous aurez plus de groupes de B entre les pointes (= les augmentations) puis crochetez 3 rangs sans augmenter, et augmentez encore 1 fois. Répétez ces 4 rangs (= 3 rangs sans augmenter, 1 rang avec augmentation) jusqu'à ce que le châle mesure 67 cm. Bon crochet!
03.11.2016 - 09:06Bonjour à vous Je suis en rade lors de l l'explication:ajouter 3 brides et une maille en l air au milieu de 2 pointe .... Pouvez vous m aider svp ...j ai l habitude de lire des diagrammes mais pas les explications.... Merci à vous .. Chantal.
30.10.2016 - 12:42DROPS Design answered:
Bonjour Mme Moussier, quand vous continuez à crocheter le rang 13, vous aurez 3B, 1 ml en plus entre chaque pointe à cause des augmentations précédentes. Continuez comme avant, mais comme vous avez plus de mailles, le motif entre les pointes est plus large. Bon crochet!
31.10.2016 - 11:01I think we Canadians use the term strand differently. The yarn is made up of 3 strands twisted together then wound into a ball. Do you refer to the yarn as a strand? You can see why I thought I might have to undo the yarn and separate the strands...
10.10.2016 - 12:07DROPS Design answered:
Dear Helen, you will work here with 2 yarns same colour or with 1 yarn each colour, ie start with 2 balls off-white then work with 1 ball off white + 1 ball ice blue. Do not separate single strands making the thread of yarn in the ball. Happy crocheting!
10.10.2016 - 13:09I bought the yarn on line so must ask ? here. Please confirm that combine strands means using two balls of yarn, i.e. one blue, 1 white NOT taking the yarn apart and Thank you.
10.10.2016 - 10:03DROPS Design answered:
Dear Helen, this shawl is worked entirely with 2 strands of yarn (see "STRIPES"), ie either 2 strands same colour or 2 strands 2 different colours. Happy crocheting!
10.10.2016 - 10:14