
Popular categories
Looking for a yarn?


|
|
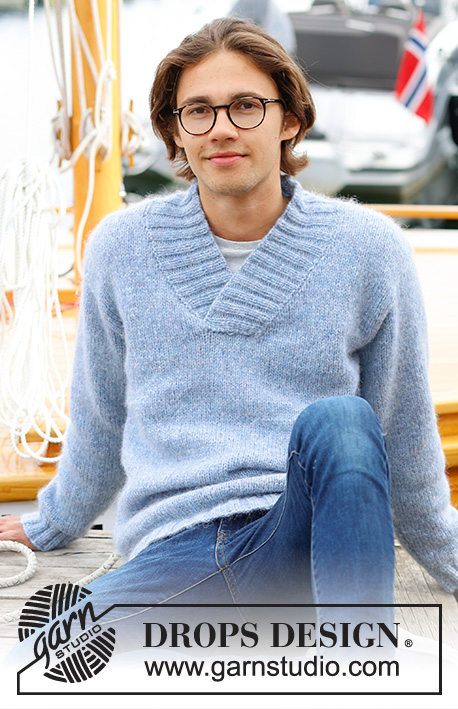
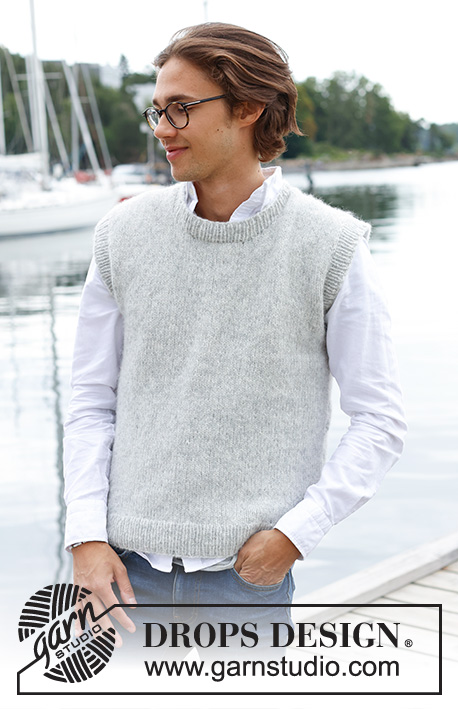
Lighthouse Vest |
|
 |
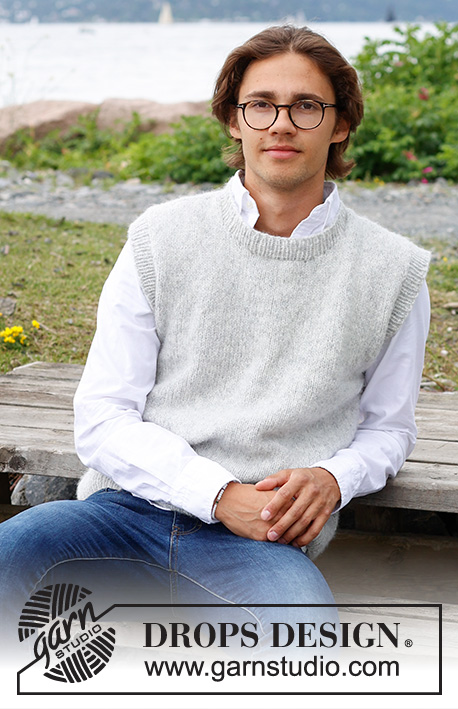 |
Knitted vest for men in DROPS Air. The piece is worked bottom up in stocking stitch. Sizes S - XXXL.
DROPS 233-7 |
|
|
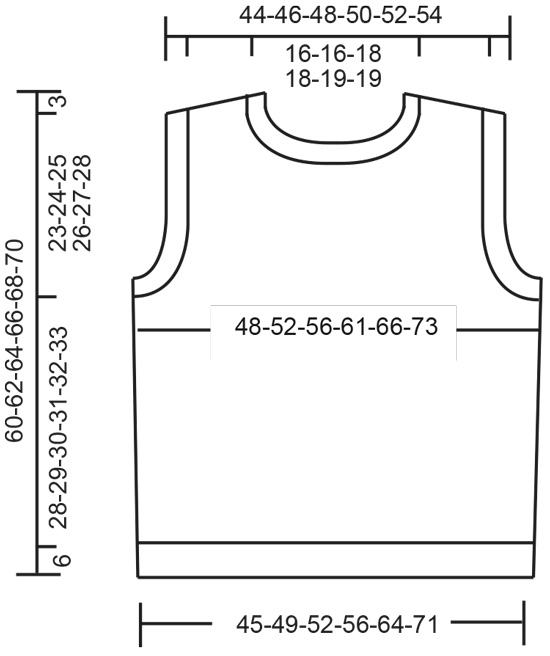
------------------------------------------------------- EXPLANATIONS FOR THE PATTERN: ------------------------------------------------------- INCREASE TIP (for sides of body): Work until there are 2 stitches left before the marker, make 1 yarn over, knit 4 (marker sits in the middle of these 4 stitches), 1 yarn over. On the next round knit the yarn overs twisted to avoid holes. Then work the new stitches in stocking stitch. ------------------------------------------------------- START THE PIECE HERE: ------------------------------------------------------- VEST – SHORT OVERVIEW OF THE PIECE: The piece is worked in the round on circular needle, bottom up, as far as the armholes. It is divided for the front and back pieces which are finished separately, back and forth. The neck and sleeve-edges are worked in the round on circular needle to finish. BODY: Cast on 170-188-196-214-242-268 stitches with circular needle size 4 mm and DROPS Air. Work rib in the round (knit 1, purl 1) for 6 cm. Knit 1 round and decrease 18-20-20-22-26-28 stitches evenly spaced = 152-168-176-192-216-240 stitches. Insert 1 marker at the beginning of the round and 1 marker after 76-84-88-96-108-120 stitches; allow the markers to follow your work onwards – the are used when increasing in the sides. Change to circular needle size 5 mm. Work in the round, in stocking stitch. When the piece measures 10 cm, increase 2 stitches in each side – read INCREASE TIP. Increase like this every 10-14-7-7-14-14 cm a total of 3-2-4-4-2-2 times = 164-176-192-208-224-248 stitches. Work until the piece measures 34-35-36-37-38-39 cm. On the next round cast off for the armholes as follows: Start 3-4-5-6-7-8 stitches before the first marker, cast off 6-8-10-12-14-16 stitches, work to 3-4-5-6-7-8 stitches before the second marker, cast off 6-8-10-12-14-16 stitches. Finish the front and back piece separately. Place the first 76-80-86-92-98-108 stitches on a thread for the front piece. BACK PIECE: = 76-80-86-92-98-108 stitches. Work stocking stitch back and forth and cast off for the armholes at the beginning of each row as follows: 2 stitches 1-1-2-2-3-4 times, 1 stitch 4-4-3-5-4-5 times on each side = 64-68-72-74-78-82 stitches. Then cast off for the diagonal shoulders and neck as described below. DIAGONAL SHOULDER and NECK: Read the next section before continuing! When the piece measures 57-59-61-63-65-67 cm, place stitches on a thread on each side for the shoulders (to avoid having to cut the strand, work the stitches before placing them on the thread): Place stitches from the side as follows: 5-6-6-6-7-8 stitches 2 times then place the last 8-8-9-10-9-9 stitches on the thread. Place all the stitches back on circular needle size 5 mm. Work 1 row of stocking stitch over all stitches (to avoid a hole in the transitions between stitches placed on the thread, pick up the strand between the 2 stitches and work it twisted together with the next stitch on the left needle). Cast off. AT THE SAME TIME, when the piece measures 58-60-62-64-66-68 cm, cast off the middle 26-26-28-28-30-30 stitches for the neck and finish each shoulder separately. Cast off 1 stitch on the next row from the neck. When all stitches are cast off, the piece measures approx. 60-62-64-66-68-70 cm from the highest point on the shoulder. Repeat on the other shoulder. FRONT PIECE: = 76-80-86-92-98-108 stitches. Work stocking stitch back and forth and cast off for the armholes at the beginning of each row as follows: 2 stitches 1-1-2-2-3-4 times, 1 stitch 4-4-3-5-4-5 times on each side = 64-68-72-74-78-82 stitches. When the piece measures 52-54-55-57-58-60 cm, place the middle 14-14-16-16-18-18 stitches on a thread for the neck and finish each shoulder separately. Cast off at the beginning of each row from the neck as follows: 3 stitches 1 time, 2 stitches 1 time and 1 stitch 2 times = 18-20-21-22-23-25 stitches on the shoulder. At the same time work the diagonal shoulders. DIAGONAL SHOULDER: When the piece measures 57-59-61-63-65-67 cm, place stitches on a thread on each side for the shoulders in the same way as on the back piece; i.e. place 5-6-6-6-7-8 stitches on the thread 2 times then place the last 8-8-9-10-9-9 stitches on the thread. When all the stitches are on the thread place them back on the needle and work 1 row of stocking stitch over all stitches, as on the back piece. Cast off. When all stitches are cast off, the piece measures approx. 60-62-64-66-68-70 cm from the highest point on the shoulder. Repeat on the other shoulder. ASSEMBLY: Sew the shoulder seams. NECK: Start on one shoulder, using short circular needle size 4 mm, and knit up 68 to 82 stitches around the neck (including the stitches from the thread, the stitch-number divisible by 2). Work rib in the round (knit 1, purl 1) for 3 cm. Cast off with knit over knit and purl over purl. SLEEVE-EDGES: Start at the bottom of the armhole, using short circular needle size 4 mm, and knit up approx. 78-82-86-88-92-96 stitches around the armhole (stitch-number divisible by 2). Work rib in the round (knit 1, purl 1) for 3 cm. Cast off with knit over knit and purl over purl. Work the other sleeve-edge in the same way |
|
|
|
|
Have you made this or any other of our designs? Tag your pictures in social media with #dropsdesign so we can see them! Do you need help with this pattern?You'll find tutorial videos, a Comments/Questions area and more by visiting the pattern on garnstudio.com. © 1982-2024 DROPS Design A/S. We reserve all rights. This document, including all its sub-sections, has copyrights. Read more about what you can do with our patterns at the bottom of each pattern on our site. |
|


With over 40 years in knitting and crochet design, DROPS Design offers one of the most extensive collections of free patterns on the internet - translated to 17 languages. As of today we count 304 catalogues and 11422 patterns - 11422 of which are translated into English (UK/cm).
We work hard to bring you the best knitting and crochet have to offer, inspiration and advice as well as great quality yarns at incredible prices! Would you like to use our patterns for other than personal use? You can read what you are allowed to do in the Copyright text at the bottom of all our patterns. Happy crafting!
Comments / Questions (29)
Skulle vilja sticka herr västen Lighthouse Vest. Det står i mönstret att det ska vara garn drops air men vill sticka i Drops cotton merino. Går det? Fattar inte hur jag byter ut garn?
26.11.2022 - 17:04DROPS Design answered:
Hei Mona. DROPS Air og DROPS Cotton Merino tilhører 2 forskjellige garngrupper og kan ikke byttes med hverandre. Men ta en titt på garn i garngruppe C, de kvaliteten kan byttes med DROPS Air. Eller du kan bytte DROPS Air med garn fra garngruppe A, men da må det brukes 2 tråder. Bruk vår garnkalkulator for å finne ut hvor mye garn du trenger ved garnbytte. Husk også å sjekke at du får den oppgitte strikkefastheten ved garnbytte. mvh DROPS Design
28.11.2022 - 14:28Hej. Jeg er ved bagstykket og forstår ikke hvad det er, jeg skal gøre, når jeg kommer til SKRÅ SKULDER? Kan nogen forklare mig det? :-)
04.11.2022 - 18:25DROPS Design answered:
Hei Marianne. Husk at når du strikker skråskulder felles det samtidig også av til hals. Så om du f.eks strikker str S og arbeidet måler 57 cm strikker du 5 masker, sett disse på 1 tråd, strikk ut pinnen, snu, strikk 5 masker og sett disse på 1 tråd, strikk ut pinnen, Gjenta dette 1 gang til, men SAMTIDIG som arbeidet måler 58 cm felles de midterste 26 maskene av til hals. Du har da 10 masker på 1 tråd i hver side og har felt 28 masker til hals = 16 masker igjen. Så settes de 8 siste maskene på hver side inn på tråden. Vi skal samle SKRÅ SKULDER og HALS til ett avsnitt, slik at det blir lettere å forstå. mvh DROPS Design
07.11.2022 - 09:07Hej - hvad gør den grå skulder? Jeg vil gerne strikke den uden den går udover skulderen, kan den modificeres til det?
14.10.2022 - 21:57DROPS Design answered:
Hei Ida. Se vårt forrige svar til deg. mvh DROPS Design
24.10.2022 - 11:12Hej - hvad gør den grå skulder? Jeg vil gerne strikke den hvor den ikke går ud over skulderen, hvordan kan jeg modificere opskriften sådan?
13.10.2022 - 22:19DROPS Design answered:
Hei Ida. Du får ikke en "søm" øverst på skulderen, men "sømmen" går litt skrå fra halsen mot skulderen mer på baksiden. Du kan prøve å tilpasse oppskriften slik at du har færre masker på skulderen når den er ferdig strikket, slik at vrangbord kanten ikke går så mye over skuldrene. mvh DROPS Design
24.10.2022 - 09:14Hi there, I am very confused by the diagonal shoulder and neck part for the L size. Please could you clarify the instructions? Do I knit the next row and put the first and last 6 stitches on a spare thread? Or knit 6 stitches, put them on a thread, knit the rest putting the last 9 on a thread? Do I start to cast off when I put the stitches on a thread or on the following rows? Thank you!
06.10.2022 - 02:10DROPS Design answered:
Hi Hannah, You work the stitches each time before placing them on a thread. The stitches are placed on threads at the beginning of each row, so the one shoulder on rows 1, 3, 5 etc, the other shoulder on rows 2, 4, 6 etc. The rows in between are worked in stocking stitch (knitted from the right side, purled from the wrong side). The cast-off stitches are worked before you start the diagonal shoulders, so before you place stitches on threads. Happy knitting!
06.10.2022 - 06:54Hi! Could you tell me what size the model is wearing? Knitting as a surprise so can’t take any measurements. Thank you, Marieke
06.10.2022 - 00:44DROPS Design answered:
Hi Marieke, There is a measurements chart at the bottom of the page. If you can't take physical measurements, measure another jumper/vest the person wears and work the pattern from those measurements. Happy knitting!
06.10.2022 - 06:57Hi there, I am very confused about the diagonal shoulder shaping and neck. For the L size, do I knit 6, put those on a thread, knit the rest of the row, putting the final 6 stitches on a thread? Where do the 9 stitches come from? And when do I cast off the centre for the neck? Thanks!
06.10.2022 - 00:35DROPS Design answered:
Dear Hannah, starting from Armhole, work the first 6 sts and slip them on a thread, work to the end of the row, turn work the first 6 sts and slip them on a thread, work to the end of the row; repeat these 2 rows one more time -remember to cast off the sts for neck at the same time - then work the last 9 sts and slip them on a thread. The stitches slipped on a thread should always been towards armhole. Happy knitting!
06.10.2022 - 08:58Jeg forstår ikke helt når man skal bytte pinnestørrelse. Er det riktig at man skal strikke med pinne 4 helt til man setter masker tilbake på pinne ved skrå skulder? Eller skal kun vrangbordene være i pinne 4 og resten i pinne 5?
13.09.2022 - 18:49DROPS Design answered:
Hei Sandra, Du bytter til pinne str. 5 etter vrangborden. God fornøyelse!
14.09.2022 - 07:07Hi, Just want to confirm. After the rib on the first 6cm of the piece do we swap to 5mm needles? (Just later in the pattern it says "back on to 5mm" but I don't see where the needles were changed. Thank you 😊
08.09.2022 - 03:34DROPS Design answered:
Hi Nicole, Yes, you change to needle size 5 mm after the ribbing is finished. Happy knitting!
08.09.2022 - 06:50