
Popular categories
Looking for a yarn?


|
|||||||||||||||||||||||||||||||
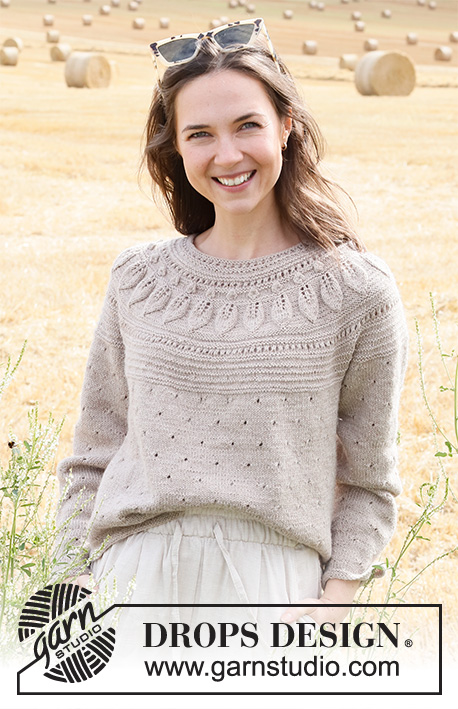
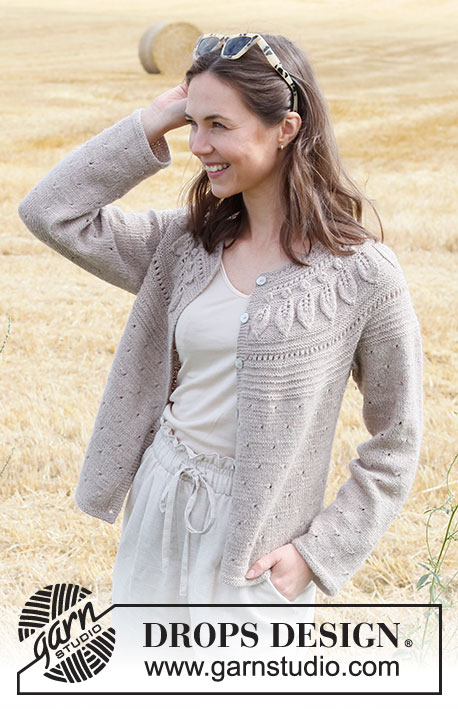
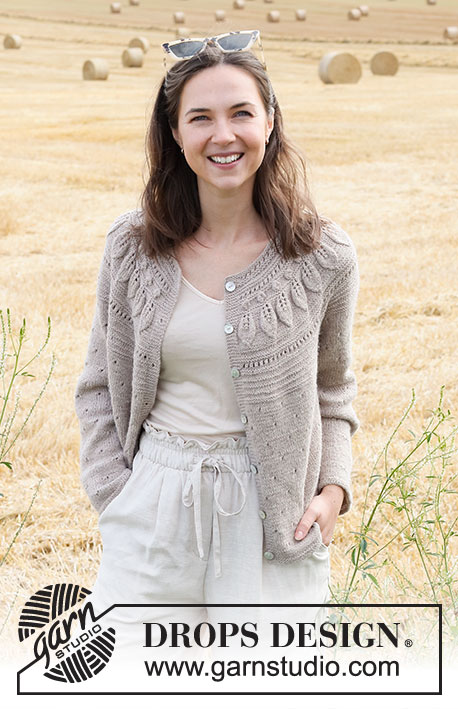
Sparrow Song Jacket |
|||||||||||||||||||||||||||||||
 |
 |
||||||||||||||||||||||||||||||
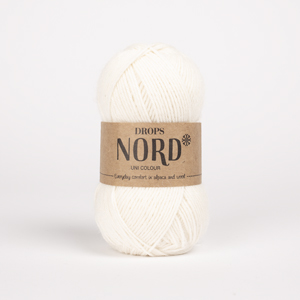
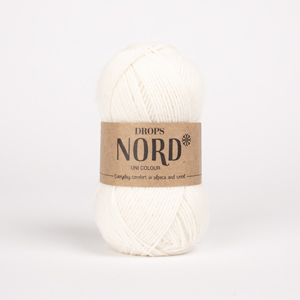
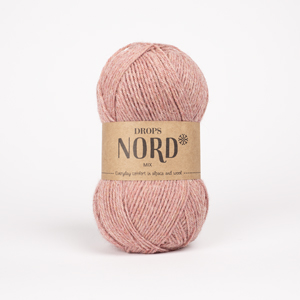
Knitted jacket in DROPS Nord. The piece is worked top down with round yoke, leaf pattern and lace pattern. Sizes S - XXXL.
DROPS 223-12 |
|||||||||||||||||||||||||||||||
|
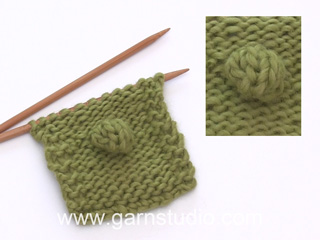
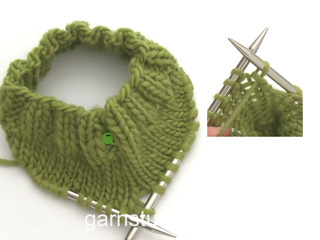
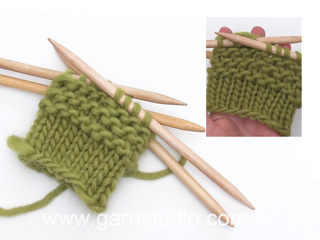
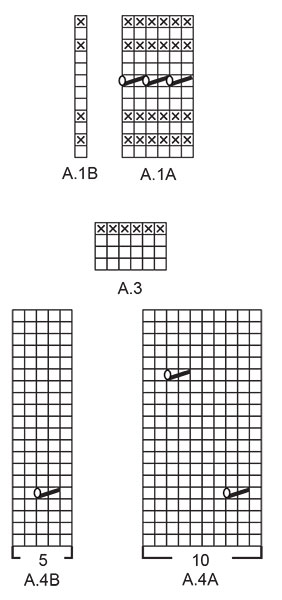
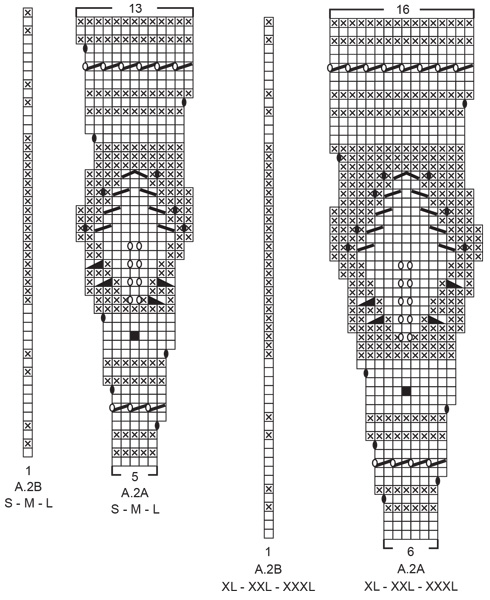
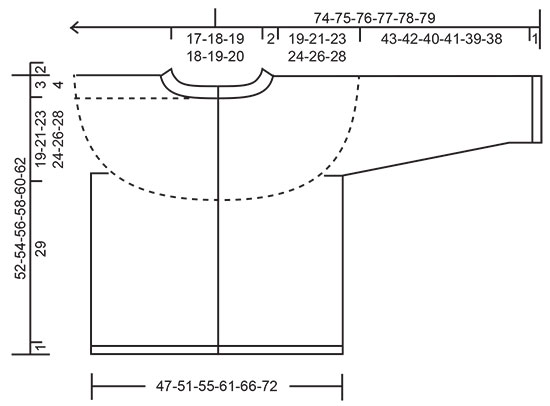
------------------------------------------------------- EXPLANATIONS FOR THE PATTERN: ------------------------------------------------------- RIDGE/GARTER STITCH (worked in the round): 1 ridge in height = 2 rounds; Knit 1 round and purl 1 round. RIDGE/GARTER STITCH (worked back and forth): Knit all rows. 1 ridge in height = Knit 2 rows. PATTERN: See diagrams A.1 to A.4. Choose diagram for your size (applies to A.2). The diagrams show all rows in the pattern from the right side. INCREASE TIP (evenly spaced): To work out how to increase evenly, count the total number of stitches on the needle (e.g. 121 stitches), minus the bands (e.g. 10 stitches) and divide the remaining stitches by the number of increases to be made (e.g. 25) = 4.4. In this example, increase by making 1 yarn over after alternately each 4th and 5th stitch. Do not increase on bands. On the next row work the yarn overs twisted to avoid holes. ELEVATION (back of neck): To make the back of the neck slightly higher when working the yoke, work an elevation as described here. Skip this section if you do not want an elevation. Insert 1 marker in the middle of the row. Start from the right side and knit 16-17-18-20-21-22 stitches past the marker, turn, tighten the strand and purl 32-34-36-40-42-44 stitches back. Turn, tighten the strand and knit 48-51-54-60-63-66 stitches, turn, tighten the strand and purl 64-68-72-80-84-88 stitches back. Turn, tighten the strand and knit 80-85-90-100-105-110 stitches, turn, tighten the strand and purl 96-102-108-120-126-132 stitches. Turn, tighten the strand and knit to the end of the row, turn and purl back (the bands are worked in garter stitch). Then work YOKE as described in the text. DECREASE TIP (for sleeves): Decrease 1 stitch on either side of the marker thread as follows: Work until there are 3 stitches left before the marker thread, knit 2 together, knit 2 (marker thread sits between these 2 stitches), slip 1 stitch as if to knit, knit 1 and pass the slipped stitch over the knitted stitch (2 stitches decreased). BUTTONHOLES: Work buttonholes on the right band (when the garment is worn). Work from the right side when there are 3 stitches left on the row as follows: Make 1 yarn over, knit 2 together and knit 1. On the next row (wrong side), knit the yarn over to leave a hole. The first buttonhole is worked when the neck measures approximately 1½ cm. The other 6-6-6-7-7-7 buttonholes are worked with approx. 8-8-8½-7½-8-8 cm between each one. CASTING-OFF TIP: To avoid the cast-off edge being tight you can cast off with a larger size needle. If the edge is still tight, make 1 yarn over after approx. each 4th stitch at the same time as casting off; the yarn overs are cast off as normal stitches. ------------------------------------------------------- START THE PIECE HERE: ------------------------------------------------------- JACKET – SHORT OVERVIEW OF THE PIECE: The neck and yoke are worked back and forth with circular needle from mid front and top down. The yoke is divided for body and sleeves and the body continued back and forth. The sleeves are worked in the round with short circular needle/double pointed needles, top down. NECK: Cast on 121-125-129-135-139-145 stitches (including 5 band stitches on each side towards mid-front) with circular needle size 2.5 mm and Nord. Purl 1 row (= wrong side). The next row is worked as follows from the right side: 5 band stitches in GARTER STITCH – read description above, work A.1A until there are 6 stitches left, work A.1B (= 1 stitch) and 5 band stitches in garter stitch. Continue this pattern until A.1 has been completed – remember BUTTONHOLES on the right band – read description above. Knit 1 row from the right side, where you increase 25-31-42-44-46-46 stitches evenly spaced – read INCREASE TIP = 146-156-171-179-185-191 stitches. Purl 1 row from the wrong side (yarn overs purled twisted and band stitches worked in garter stitch). Change to circular needle size 3 mm. Insert 1 marker after the band at the beginning of the row – the yoke is measured from this marker! Now you can work an ELEVATION at the back of the neck – read description above. If you do not want an elevation, go straight to YOKE. YOKE: The next row is worked as follows from the right side: 5 band stitches in garter stitch, work A.2A until there are 6 stitches left (= 27-29-32-28-29-30 repeats of 5-5-5-6-6-6 stitches), work A.2B (= 1 stitch) and 5 band stitches in garter stitch. Continue this pattern and increase as shown in the diagram. REMEMBER THE KNITTING TENSION! When A.2 has been completed in height, there are 362-388-427-459-475-491 stitches on the needle and the piece measures approx. 15-15-15-17-17-17 cm from the marker on the neck. Continue with A.3 and 5 band stitches in garter stitch on each side. AT THE SAME TIME, on the first row from the right side in A.3, increase 9-11-4-22-26-40 stitches evenly spaced = 371-399-431-481-501-531 stitches. Work A.3 until the yoke measures approx. 19-21-23-24-26-28 cm from the marker on the neck, finishing after a complete repeat in height. Knit 1 row from the right side. Then knit 1 row from the wrong side, AT THE SAME TIME as the yoke is divided for body and sleeves as follows: Knit 58-63-67-75-79-85 stitches (= right front piece), place the next 74-78-86-96-98-100 stitches on a thread for the sleeve, cast on 6-6-8-8-10-12 stitches (= in side under sleeve), knit 107-117-125-139-147-161 stitches (= back piece), place the next 74-78-86-96-98-100 stitches on a thread for the sleeve, cast on 6-6-8-8-10-12 stitches (= in side under sleeve), knit the last 58-63-67-75-79-85 stitches (= left front piece). Body and sleeves are finished separately. THE PIECE IS NOW MEASURED FROM HERE! BODY: = 235-255-275-305-325-355 stitches. The next row is worked as follows from the right side: 5 band stitches in garter stitch, work A.4A until there are 10 stitches left (= 22-24-26-29-31-34 repeats of 10 stitches), work A.4B (= 5 stitches) and 5 band stitches in garter stitch. Continue this pattern until the piece measures 29 cm from the division. There is approx. 1 cm left to finished length; try the jacket on and work to desired length. Change to circular needle size 2.5 mm and work 2 ridges back and forth over all stitches. Cast off with knit from the right side – read CASTING-OFF TIP! The jacket measures approx. 52-54-56-58-60-62 cm from the shoulder down. SLEEVES: Place the 74-78-86-96-98-100 stitches from the thread on the one side of the piece on double pointed needles/short circular needle size 3 mm and knit up 1 stitch in each of the stitches cast on under the sleeve = 80-84-94-104-108-112 stitches. Insert a marker thread in the middle of the 6-6-8-8-10-12 stitches under the sleeve. Allow the thread to follow your work onwards; it will be used when decreasing under the sleeve. Start at the marker thread and work in the round as follows: 0-2-2-2-4-1 stitches in stocking stitch, work A.4A over the next 80-80-90-100-100-110 stitches (= 8-8-9-10-10-11 repeats of 10 stitches) and 0-2-2-2-4-1 stitches in stocking stitch. Continue this pattern until the sleeve measures 3-3-3-2-2-2 cm from the division. Now decrease 2 stitches under the sleeve - read DECREASE TIP. Decrease like this every 2½-2-1½-1½-1-1 cm a total of 15-16-19-23-24-25 times = 50-52-56-58-60-62 stitches. Continue working until the sleeve measures 43-42-40-41-39-38 cm from the division (shorter measurements in larger sizes due to wider neck and longer yoke). There is approx. 1 cm left to finished length; try the jacket on and work to desired length. Change to double pointed needles size 2.5 mm. Work 2 RIDGES– read description above. Cast off with knit – remember CASTING-OFF TIP! The sleeve measures approx. 44-43-41-42-42-39 cm from the division. Work the other sleeve in the same way. ASSEMBLY: Sew the buttons onto the left band. |
|||||||||||||||||||||||||||||||
Diagram explanations |
|||||||||||||||||||||||||||||||
|
|||||||||||||||||||||||||||||||
|
|||||||||||||||||||||||||||||||
|
|||||||||||||||||||||||||||||||
|
|||||||||||||||||||||||||||||||
|
Have you made this or any other of our designs? Tag your pictures in social media with #dropsdesign so we can see them! Do you need help with this pattern?You'll find tutorial videos, a Comments/Questions area and more by visiting the pattern on garnstudio.com. © 1982-2024 DROPS Design A/S. We reserve all rights. This document, including all its sub-sections, has copyrights. Read more about what you can do with our patterns at the bottom of each pattern on our site. |
|||||||||||||||||||||||||||||||


With over 40 years in knitting and crochet design, DROPS Design offers one of the most extensive collections of free patterns on the internet - translated to 17 languages. As of today we count 304 catalogues and 11422 patterns - 11422 of which are translated into English (UK/cm).
We work hard to bring you the best knitting and crochet have to offer, inspiration and advice as well as great quality yarns at incredible prices! Would you like to use our patterns for other than personal use? You can read what you are allowed to do in the Copyright text at the bottom of all our patterns. Happy crafting!
Comments / Questions (23)
Die Anleitung und das Muster sind sehr schön, super beschrieben und sehr klare Diagramme. Ich kann gar nicht aufhören zu stricken. Die Drops Nord ist auch ein Traum! Vielen Dank für diese tolle Anleitung!
28.03.2024 - 11:24Hallo, ich habe diese Jacke genau nach Anleitung gestrickt, am Ende 2 Krausrippen und beim abketten festgestellt, dass sie sich ganz furchtbar einrollt. Wie wurde es am Modell vom Foto gelöst oder gibt es noch einen speziellen Tipp?
06.01.2023 - 18:49DROPS Design answered:
Liebe Frau Fischer, Sie können die Jacke mit Stecknadeln auf einer geeigneten Unterlage spannen, anfeuchten (z.B. mit einer Sprühflasche für Blumen) und trocknen lassen, danach entfernen Sie die Stecknadeln, dann sollte sich der Rand nicht mehr rollen.
09.01.2023 - 08:40Entschuldigen Sie, die Erleuchtung kam dann noch bezüglich der Zunahmen. Ich habe jedoch eine Musterprobe gestrickt und die Blätter kamen kraus rechts raus, am Bild sind sie aber glatt rechts. Für meine Begriffe stimmt hier die Grafik nicht und die Rückreihen müssten hier doch 'umgedreht werden', oder nicht?
27.11.2022 - 08:10DROPS Design answered:
Liebe Frau Biersack, die Blätter sollen glatt rechts gestrickt (= rechte Maschen bei den Hinreihen und linke Maschen bei den Rückreihen = leeres Kästchen); und um herum die Bläter stricken Sie glatt links (= linke Maschen bei den Hinreihen, rechte Maschen bei den Rückreihen) - Siehe Diagramerklärungen. Viel Spaß beim stricken!
28.11.2022 - 10:45Hallo, in der Anleitung steht bei der Passe man solle wie im Diagramm gezeigt zunehmen. Jedoch verstehe ich nicht, wo da nun die Zunahmen sein sollen. Vielleicht können Sie mir helfen?
25.11.2022 - 18:39DROPS Design answered:
Liebe Frau Biersack, als Antwort für Ihren Kommentar sind alle Reihen im Diagram gezeichnet, die Hin- sowie die Rückreihen; Hinreihen lesen Sie rechts nach links, Rückreihen lesen Sie links nach rechts. Hier lesen Sie mehr. Viel Spaß beim stricken!
28.11.2022 - 08:37Liebes Team, muss ich die Masche von A.2B auch in der Rückreihe als erste Masche vor A.2A stricken? Liebe Grüße, Kathrin Melziarek
17.03.2022 - 13:06DROPS Design answered:
Liebe Frau Melziarek, wenn Sie die Rückreihen mit A.2 stricken, stricken Sie so: 5 Blenden-Maschen, A.2B, jetzt wierdeholen Sie die 6 M in A.2 (links nach rechts lesen) und dann 5 Blenden-Maschen. Viel Spaß beim stricken!
17.03.2022 - 17:15Stehen die Diagramme A2B auf dem Kopf oder muss man sie von unten nach oben stricken? Falls sie von unten nach oben gestrickt werden, fängt man wirklich so an? Dann hätte man zweimal eine Lochreihe vor den Noppen und Blättern, aber auf dem foto sieht das ganz anders aus. Oder lässt man die unteren 14 Reihen weg, aber dann fehlen ja zunahmen?
01.11.2021 - 20:43DROPS Design answered:
Liebe Johanna, alle Diagramme werden von unten nach oben gestrickt, es sind ja 2 Lochreihen, 1 beim A.1 und 1 beim A.2, genauso wie gezeichnet. Viel Spaß beim stricken!
03.11.2021 - 07:53Hallo, Ich habe die Wolle bei LindeHobby gekauft und komme nun mit dem Diagramm nicht klar. Bin erst bei der 5 Reihe und hänge vollkommen in der Luft. Wenn ich das so stricke wie beschrieben, habe ich nur rechte, bzw. linke Maschen auf der Nadel, außer der Blende. Bei A.1A ist die erste Hinreihe rechte Maschen, Rückreihe linke Maschen. Auf dem Foto sieht das aber aus wie kraus rechts. Was mach ich falsch? Liebe Grüße Annerose
10.10.2021 - 10:44Annerose Scheurer answered:
Meine Frage hat sich erledigt. Nach zwei Tassen Kaffee kam die Erleuchtung 💡. Sorry 🙈
10.10.2021 - 13:00I think there is an error under the buttonholes explanation.. It reads: “The first buttonhole is in the lace pattern on the neck, so this buttonhole is not worked”. However, the buttonhole is in the band that is in garter stitch and therefore no lace hole.
28.09.2021 - 22:15How is the stitch increase during knitting for sweaters from top to down?
15.09.2021 - 19:21DROPS Design answered:
Dear Moutaz, each pattern has a different rate of increases built in, for this particular piece into the pattern on the yoke. You will have to read the pattern, and see the diagrams. Happy Knitting!
16.09.2021 - 00:09كيف يتم تزويد القطب اثناء عمل التريكو للكنزات من الاعلى الى الاسفل؟؟؟
14.09.2021 - 10:43DROPS Design answered:
Dear Mrs Moutaz, we can unfortunately only answer in English or in one of the languages the pattern is available, is it possible for you to ask your question in one of these languages? Thanks for your comprehension!
14.09.2021 - 16:09