
Popular categories
Looking for a yarn?


|
||||||||||||||||||||||
Bluebird |
||||||||||||||||||||||
 |
 |
|||||||||||||||||||||
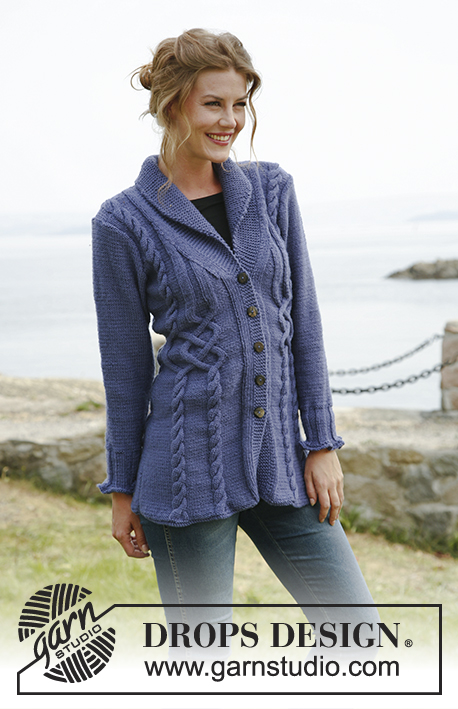
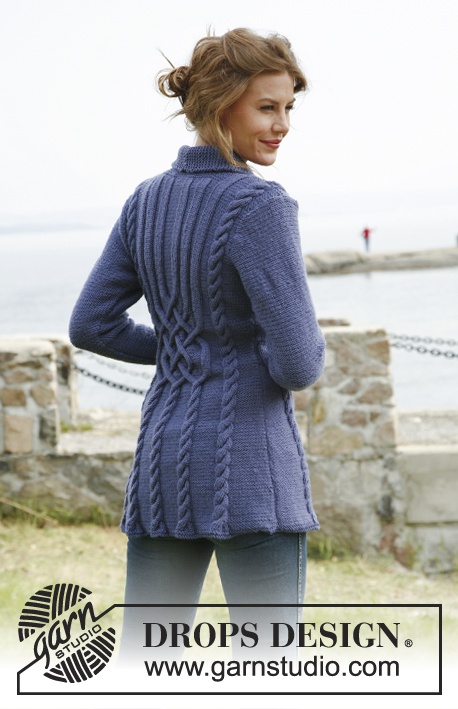
Knitted DROPS jacket with cables in ”Karisma”. Size: S to XXXL.
DROPS 134-1 |
||||||||||||||||||||||
|
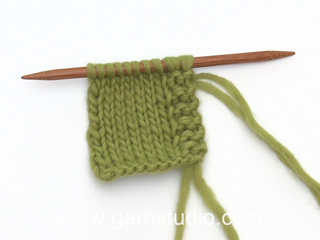
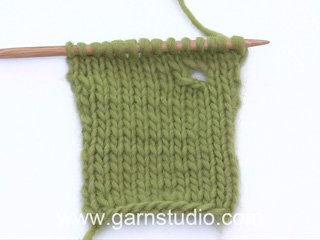
PATTERN: See diagram M.1 to M.4 – diagrams show pattern from RS (1st row = RS). GARTER ST (back and forth on needle): K all rows. KNITTING TIP (applies to band): Work the 5 band sts in garter st with double yarn the entire piece, i.e. have a little ball on the side that is only used on band. When inc for collar, work the inc sts with double yarn. This is done to make the band and the collar nice and firm. BUTTON HOLES: Cast off for button holes on right front band from RS. 1 BUTTON HOLE = cast off 3rd and 4th band st from mid front, on next row cast on 2 new sts over these sts. Cast off for button holes when piece measures: SIZE S: 18, 25, 32, 39 and 46 cm SIZE M: 19, 26, 33, 40 and 47 cm SIZE L: 20, 27, 34, 41 and 48 cm SIZE XL: 21, 28, 35, 42 and 49 cm SIZE XXL: 22, 29, 36, 43 and 50 cm SIZE XXXL: 23, 30, 37, 44 and 51 cm INCREASE TIP (applies to collar): Inc inside outermost band st by making 1 YO, on next row K YO twisted (i.e. work in back loop of st instead of front) to avoid holes. DECREASE TIP (applies to neck): Dec from RS inside the sts inc for collar + the 5 band sts + the first 3 sts in stocking st. Dec as follows AFTER these sts: Slip 1 st as if to K, K 1, psso. Dec as follows BEFORE these sts: K 2 tog. -------------------------------------------------------- -------------------------------------------------------- BACK PIECE: Worked back and forth on needle. Cast on 126-136-146-156-174-184 sts on straight needles size 3.5 mm with Karisma. K 2 rows (1st row = RS), switch to needle size 4 mm. READ ALL OF THE FOLLOWING SECTION BEFORE CONTINUING: PATTERN: Continue as follows (from RS): 1 edge st in GARTER ST – see explanation above, 12-17-22-27-16-21 sts in reverse stocking st, diagram M.2 (= 20 sts) 1-1-1-1-2-2 times, diagram M.1A (= 60 sts), diagram M.2 (= 20 sts) 1-1-1-1-2-2 times, 12-17-22-27-16-21 sts in reverse stocking st and 1 edge st in garter st. When piece measures 29-30-31-32-33-34 cm, work diagram M.1B over diagram M.1A, work the other sts as before (dec 12 sts in diagram M.1B as shown in diagram). After diagram M.1B, continue to work diagram M.1C over diagram M.1B. SIDE DEC AND SIDE INC: When piece measures 12 cm, dec 1 st in each side. Repeat dec every 2½ cm a total of 10 times. When piece measures 40 cm, inc 1 st in each side. Repeat inc every 3 cm a total of 4 times (work inc sts in reverse stocking st). After all dec and inc there are 102-112-122-132-150-160 sts on the needle. ARMHOLES: When piece measures 55-56-57-58-59-60 cm, cast off and dec for armholes at the beg of every row in each side as follows: 5 sts 1 time in all sizes, 3 sts 0-1-1-2-3-4 times, 2 sts 1-2-4-4-5-5 times and 1 st 3-2-2-3-5-5 times = 82-84-86-88-92-96 sts. Continue the pattern as before with 1 edge st in garter st in each side. When piece measures 70-72-74-76-78-80 cm, K 4 rows over the middle 40 sts (work the other sts as before). Then cast off the middle 30 sts for neck. Finish each shoulder (= 26-27-28-29-30-31 sts) separately. Continue the pattern with 5 sts in garter st towards the neck. When piece measures 74-76-78-80-82-84 cm, work the 8 sts over the cable in diagram M.2 tog 2 by 2 = 22-23-24-25-26-27 sts remain on needle. On next row cast off all sts K over K and P over P. RIGHT FRONT PIECE: Worked back and forth on needle. Cast on 68-73-78-83-92-97 sts (incl 5 band sts towards mid front and 1 edge st in the side) on needles size 3.5 mm with Karisma. READ KNITTING TIP! K 2 rows (1st row = RS), switch to needle size 4 mm. READ ALL OF THE FOLLOWING SECTION BEFORE CONTINUING! PATTERN: Continue as follows (= from RS): SIZE S, M, L and XL: 5 band sts in garter st, 4 sts in stocking st, 6 sts in reverse stocking st, diagram M.3A (= 40 sts), 12-17-22-27 sts in reverse stocking st and 1 edge st in garter st. Size XXL and XXXL: 5 band sts in garter st, 4 sts in stocking st, 6 sts in reverse stocking st, diagram M.3A (= 40 sts), M.2 (= 20 sts), 16-21 sts in reverse stocking st and 1 edge st in garter st. When piece measures 29-30-31-32-33-34 cm, work diagram M.3B over diagram M.3A, work the other sts as before (dec 6 sts in diagram M.3B as shown in diagram). After diagram M.3B, continue to work diagram M.3C over these sts. SIDE DEC AND SIDE INC: When piece measures 12 cm, dec 1 st in the side. Repeat dec every 2½ cm a total of 10 times. When piece measures 40 cm, inc 1 st in the side. Repeat inc every 3 cm a total of 4 times (work inc sts in reverse stocking st). BUTTON HOLES: At the same time when piece measures 18-19-20-21-22-23 cm, cast off for button holes - see explanation above. COLLAR: At the same time when piece measures 47-48-49-50-51-52 cm, from RS inc 2 sts for collar as follows: Make 1 YO after first st and 1 YO after second st, on next row K both YOs twisted to avoid holes. Continue to inc 1 st for collar on every other row a total of 12 times and then every 4th row a total of 6 times – SEE INCREASE TIP! After all inc, there are 20 inc collar sts and 25 sts in garter st in total (all these sts are worked with double yarn). NECKLINE: At the same time when piece measures 49-50-51-52-53-54 cm, dec 1 st towards the neck - SEE DECREASE TIP! Repeat dec every other row a total of 12 times and then on every 4th row a total of 8 times. ARMHOLE: At the same time when piece measures 55-56-57-58-59-60 cm, cast off and dec for armhole in the side as on back piece. After all inc and dec, there are 46-47-48-49-51-53 sts on needle. Work until piece measures 74-76-78-80-82-84 cm, adjust so that next row is worked from RS. Continue to work the 8 sts over the cable tog 2 by 2 = 42-43-44-45-47-49 sts on needle. On next row (= WS), cast off the first 22-23-24-25-27-29 sts for shoulder, K the rest of row. Continue like this over the remaining 20 collar sts: * K 2 rows over all sts, K 2 rows over only the outermost 14 sts (towards mid front) *, repeat from *-* until collar measures approx. 7-8 cm at the inside (it will then measure approx. 14-16 cm at the edge). Cast off. LEFT FRONT PIECE: Cast on and work as right front piece but reversed. I.e. after 2 rows K, work pattern as follows (from RS): SIZE S, M, L and XL: 1 edge st in garter st, P 12-17-22-27 sts, diagram M.4A (= 40 sts), P 6 sts, K 4 sts and 5 band sts in garter st. Size XXL and XXXL: 1 edge st in garter st, P 16-21 sts, diagram M.2 (= 20 sts), diagram M.4A, P 6 sts, K 4 sts and 5 band sts in garter st. Then work diagram M.4B and diagram M.4C instead of diagram M.3B and diagram M.3C. Sts over cable on shoulder are cast off from WS and shoulder sts from RS; this is done opposite from right front piece to avoid cutting the thread when working the collar. SLEEVE: Worked back and forth on needle. Cast on 100-100-100-116-116-132 sts (incl 1 edge st in each side) on needle size 3.5 mm with Karisma. K 1 row (1st row = RS) and P 1 row, then K all sts tog 2 by 2 = 50-50-50-58-58-66 sts. K 1 row from WS. Then work rib = K 4/P 4 with 1 edge st in garter st in each side. When piece measures 10 cm, switch to needle size 4 mm and continue in reverse stocking st. AT THE SAME TIME when piece measures 13-13-13-13-11-11 cm, inc 1 st each side, repeat inc every 3-2½-2-2-2-2 cm a total of 12-14-16-15-17-16 times = 74-78-82-88-92-98 sts. When piece measures 49-48-47-46-45-44 cm (shorter measurements in the larger sizes because of longer sleeve cap and broader shoulder width) cast off and dec for sleeve cap at beg of every row in each side: 4 sts 1 time, 2 sts 3 times, 1 st 5-6-7-9-10-12 times and then 2 sts in each side until piece measures 57 cm. Continue to cast off 3 sts 1 time in each side, then cast off the remaining sts. Sleeve measures approx. 58 cm. ASSEMBLY: Sew the shoulder seams. Sew collar tog mid back, edge to edge to avoid a chunky seam. Sew collar to the back of neckline. Sew in sleeves and sew under arm and side seams in one inside 1 edge st. Sew on buttons. |
||||||||||||||||||||||
Diagram explanations |
||||||||||||||||||||||
|
||||||||||||||||||||||
|
||||||||||||||||||||||
|
||||||||||||||||||||||
|
||||||||||||||||||||||
|
Have you made this or any other of our designs? Tag your pictures in social media with #dropsdesign so we can see them! Do you need help with this pattern?You'll find tutorial videos, a Comments/Questions area and more by visiting the pattern on garnstudio.com. © 1982-2024 DROPS Design A/S. We reserve all rights. This document, including all its sub-sections, has copyrights. Read more about what you can do with our patterns at the bottom of each pattern on our site. |
||||||||||||||||||||||


With over 40 years in knitting and crochet design, DROPS Design offers one of the most extensive collections of free patterns on the internet - translated to 17 languages. As of today we count 304 catalogues and 11422 patterns - 11422 of which are translated into English (UK/cm).
We work hard to bring you the best knitting and crochet have to offer, inspiration and advice as well as great quality yarns at incredible prices! Would you like to use our patterns for other than personal use? You can read what you are allowed to do in the Copyright text at the bottom of all our patterns. Happy crafting!
Comments / Questions (639)
Als je de meerderingen voor de kraag hebt gedaan heb je 20 steken plus de 5 st. Waarom staat er dan dat je over de overgebleven 20 st ribbelsteek blijft breien nadat je voor de schouder hebt afgekant? Waar zijn de andere 5 steken dan? Dankjewel
02.09.2020 - 16:42DROPS Design answered:
Dag Petrie,
Er zijn 20 steken gemeerderd voor de kraag en daardoor zijn er inderdaad in totaal 25 steken in ribbelsteek. Nadat je steken hebt afgekant voor de schouder heb je 20 steken over. De andere ribbelsteken zijn afgekant.
03.09.2020 - 13:24Size M Front pieces Start 73 stitches PLUS increases (Side 5, Collar20) = 98 MINUS decreases (patternM3B 6, armhole 14, side 11, neckline 21) = 46 not 47 where am I going wrong ? Please help - I have to undo back to the last buttonhole if my calculation is wrong ...
29.08.2020 - 18:54DROPS Design answered:
Dear Linda, you start with 73 sts, decrease 6 sts in M.3B, decrease 10 sts on the side and increase 4 sts on the side, increaes for collar 12 sts and decrease 12 sts for neck then cast off and decrease for armhole (5 +3+2+2+1+1 = 14 sts) = 73-6-10+4-12+12-14= 47 sts. Happy knitting!
31.08.2020 - 09:28Hello - I have a problem here with the math for the BACK I am making size M (136 stitches) 136 minus 22 = 114 plus 10 = 124 NOT 112 as the pattern says ?? SIDE DEC AND SIDE INC: When piece measures 12 cm, dec 1 st in each side. Repeat dec every 2½ cm a total of 10 times. When piece measures 40 cm, inc 1 st in each side. Repeat inc every 3 cm a total of 4 times (work inc sts in reverse stocking st). After all dec and inc there are 102-112-122-132-150-160 sts on the needle.
24.08.2020 - 09:52DROPS Design answered:
Dear Linda, when working M.1B you will decrease 12 sts = ther ewill be now 112 sts after all decreases/increases are done. Happy knitting!
24.08.2020 - 11:33Hallo, ben dit vest aan het breien met drops karisma op nld no 4. Nu heb ik patr. M1a 1 keer gebreid tot m1b maar heb bij lange na geen 32 cm maar 15 cm. Wat doe ik verkeerd? Gr. Sonja ter Haar
27.06.2020 - 09:28DROPS Design answered:
Dag Sonja,
Het is de bedoeling dat je M.1a in de hoogte herhaalt totdat je op 32 cm bent.
30.06.2020 - 15:45Vindt het lastig dat er vragen in een andere taal wordt beantwoordt. Kan dat niet gewoon in de taal waarmee de vraag is gesteld? Vindt ook de patronen warrig geschreven en niet logisch, ik zit nu bij de kraag en waarbij staat "brei 2 naalden recht over alle steken, brei 2 naalden recht over alleen de buitenste 14 steken (middenvoor), *herhaal van *-*. tot de kraag 14-16 cm aan buitenkant. Kant alle steken af. Hier begrijp ik echt niets van?!
06.06.2020 - 19:14Vindt het lastig dat er vragen in een andere taal wordt beantwoordt. Kan dat niet gewoon in de taal waarmee de vraag is gesteld? Vindt ook de patronen warrig geschreven en niet logisch, ik zit nu bij de kraag en waarbij staat "brei 2 naalden recht over alle steken, brei 2 naalden recht over alleen de buitenste 14 steken (middenvoor), *herhaal van *-*. tot de kraag 14-16 cm aan buitenkant. Kant alle steken af. Hier begrijp ik echt niets van?!
06.06.2020 - 19:12Ik kom bij minderingen/meerderen op een andere steken verhouding als in beschrijving ik heb 128 steken opgezet, bij 12 cm 10 X geminderd beide zijde = 108 st over op naald, bij 40 cm meerderen 4x 1 st aan beide zijde = 116 st op de naald, bij beschrijving is het "alle minderingen en meerderingen gedaan zijn staan er 102 st op de naald".
30.04.2020 - 15:47Ser spændende ud. Den vil jeg prøve at lave.
30.04.2020 - 08:47Ik snap de meerderingen voor de kraag niet. Waar maak ik die, na de 5 steken van de bies, of aan de buitenkant. Maar daar kan ik toch geen omslag maken?
13.01.2020 - 21:55DROPS Design answered:
Dag Tineke,
Je meerdert inderdaad aan de buitenkant naast de laatste steek van de bies (en als je 2 meerderingen maakt ook naast de een na laaste steek).
17.01.2020 - 18:21Thank you for your response. One more question I have as I have started the pattern. When working the diagram I have completed the first 2 knit rows and changed to the larger needles and completed the first row of the diagram. For the second row I am wondering if you can clarify that I work it left to right and if I change the pearl rows to knit or do as pattern says. I know the pearl side is used on the body but for the cabling section is it knit side out or pearl side out for these stitches
30.12.2019 - 17:00DROPS Design answered:
Dear Mrs Holder, you will read more about diagrams here, when working back and forth - see here. Happy knitting!
02.01.2020 - 13:49