
Popular categories
Looking for a yarn?


|
|||||||||||||||||||||||||||||||||||||
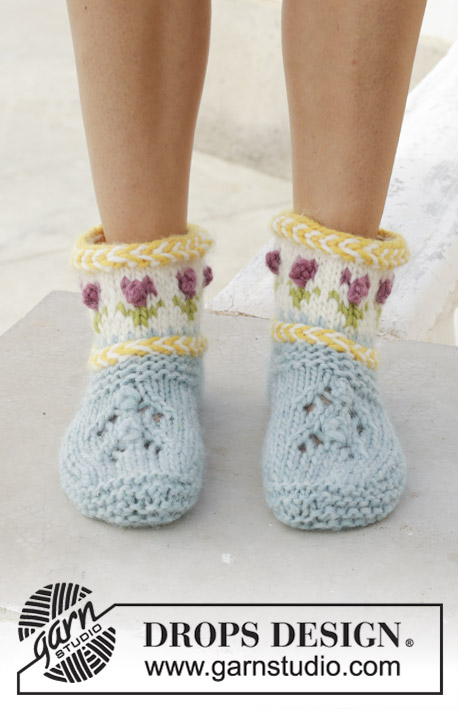
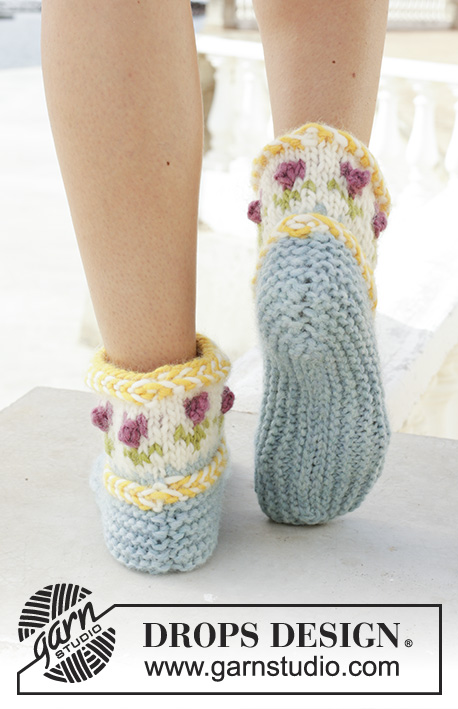
Spring Buds |
|||||||||||||||||||||||||||||||||||||
 |
 |
||||||||||||||||||||||||||||||||||||
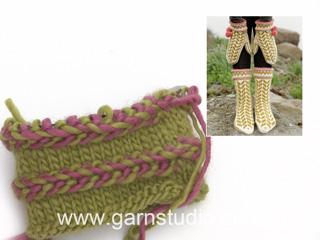
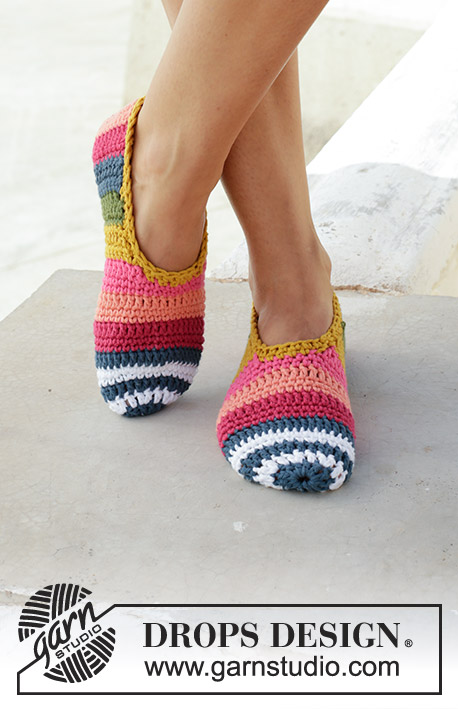
Knitted slippers with Latvian cable and multi-coloured Norwegian pattern. Sizes 35 - 43. The piece is worked in DROPS Snow.
DROPS 189-34 |
|||||||||||||||||||||||||||||||||||||
|
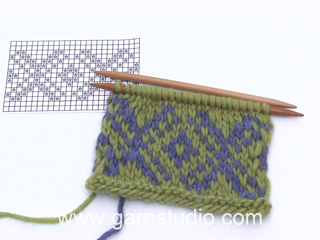
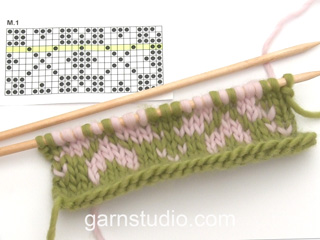
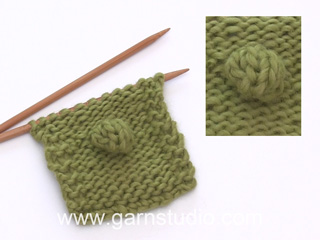
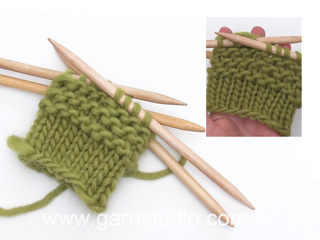
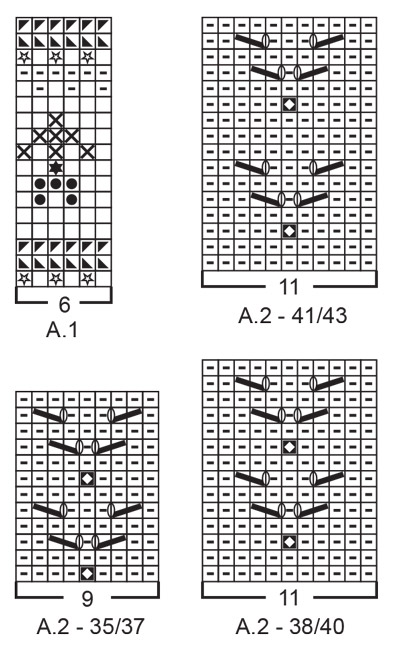
INFORMATION FOR THE PATTERN: RIDGE/GARTER STITCH (worked in the round): 1 ridge = 2 rounds. Knit 1 round and purl 1 round. PATTERN: See diagrams A.1 and A.2. Choose diagram for your size (applies to A.2). LATVIAN CABLE: The cable is made up of 3 rounds – all the rounds are shown in diagram A.1 and are worked as follows: ROUND 1: * Knit 1 with off white, knit 1 with yellow *, work from *-* to end of round. ROUND 2: Place both strands in front of piece (towards you). Then move the off white strand to the back, purl 1 and move the strand to the front again. Pull the yellow strand underneath the off white strand and then move the yellow strand to the back, purl 1 and move the strand to the front again. Continue like this, purling alternately the off white and the yellow strand, but always placing the strand underneath the strand from the last stitch worked. ROUND 3: Work as round 2, but now always place the strand OVER the strand from the last stitch worked. DECREASE TIP: Start 2 stitches before the marker thread, knit 2 together, marker thread, slip 1 stitch as if to knit, knit 1, pass the slipped stitch over the knitted stitch (= 2 stitches decreased). ---------------------------------------------------------- SLIPPER: The piece is worked in the round with double pointed needles, top down. First work the leg, then the foot. LEG: Cast on 42 stitches in all sizes with double pointed needles size 6 mm and yellow. Beginning of round = mid back. Work A.1 in the round (= 7 repeats of 6 stitches). REMEMBER THE KNITTING TENSION! When A.1 has been completed, the piece measures approx. 10 cm. Change to aquamarine and work 3-4-5 RIDGES in the round – see description above – AT THE SAME TIME decrease 6-4-2 stitches evenly on first round = 36-38-40 stitches. Cut the strand. Now work the foot as described below. FOOT: Place the first 13-13-14 stitches and the last 14-14-15 stitches on the round on 1 thread = 9-11-11 stitches left on needle (mid top of foot). Work A.2 back and forth over these 9-11-11 stitches and, at the same time, cast on 1 new stitch in each side on the first row = 11-13-13 stitches on needle (the new stitches are edge stitches and are knitted both from the right and wrong sides). When A.2 has been completed the middle piece measures approx. 7-8-9 cm. Work stocking stitch with 1 edge stitch knitted in each side until the middle piece measures 7-8½-10 cm. On the next row, cast off the 1 edge stitch in each side = 9-11-11 stitches on the needle. Cut the strand. The next round is worked as follows from mid back: Knit the first 13-13-14 stitches from the strand, knit up 12-14-16 stitches along the side of the middle piece (knit up inside the 1 edge stitch), knit the 9-11-11 stitches from the middle piece, knit up 12-14-16 stitches along the other side of the middle piece and knit the remaining 14-14-15 stitches from the thread = 60-66-72 stitches on the needles. THE PIECE IS NOW MEASURED FROM HERE! Insert 1 marker thread at the beginning of the round (= mid back) and 1 marker thread mid front of slipper. Continue in the round with garter stitch. When the piece measures 2 cm (adjust to that the next round is knitted) decrease 1 stitch on each side of both marker threads – read DECREASE TIP (= 4 stitches decreased). Decrease like this every 2nd round (i.e. every knitted round) until the piece measures 5-5-6 cm – then cast off with knit. Sew the seam under the foot in the outermost loop of the outermost stitch so the seam is flat. Work the other slipper in the same way. |
|||||||||||||||||||||||||||||||||||||
Diagram explanations |
|||||||||||||||||||||||||||||||||||||
|
|||||||||||||||||||||||||||||||||||||
|
|||||||||||||||||||||||||||||||||||||
|
Have you made this or any other of our designs? Tag your pictures in social media with #dropsdesign so we can see them! Do you need help with this pattern?You'll find tutorial videos, a Comments/Questions area and more by visiting the pattern on garnstudio.com. © 1982-2024 DROPS Design A/S. We reserve all rights. This document, including all its sub-sections, has copyrights. Read more about what you can do with our patterns at the bottom of each pattern on our site. |
|||||||||||||||||||||||||||||||||||||


With over 40 years in knitting and crochet design, DROPS Design offers one of the most extensive collections of free patterns on the internet - translated to 17 languages. As of today we count 304 catalogues and 11422 patterns - 11422 of which are translated into English (UK/cm).
We work hard to bring you the best knitting and crochet have to offer, inspiration and advice as well as great quality yarns at incredible prices! Would you like to use our patterns for other than personal use? You can read what you are allowed to do in the Copyright text at the bottom of all our patterns. Happy crafting!
Comments / Questions (6)
If I use drop snow, what is gauge? How many ounces are needed for this pattern?
06.02.2022 - 18:34DROPS Design answered:
Dear Mrs Rothstein, this pattern requires 100 g main colour + 50 g each of the 4 contrast colours DROPS Snow = 2 balls in the main colour + 1 ball in each of the 4 contrast colour. Happy knitting!
07.02.2022 - 11:12Thanks for it. site
22.05.2018 - 14:02These slipper would make the perfect spring birthday gifts !
06.01.2018 - 16:50These slippers are the very essence of spring!
27.12.2017 - 21:05Beau modèle pour les saisons estivales.
12.12.2017 - 18:14Modèle très féminin et qui monte vite . Merci .
11.12.2017 - 16:07