
Popular categories
Looking for a yarn?


|
||||||||||||||||||||||||||||||||||||||||
Ros |
||||||||||||||||||||||||||||||||||||||||
 |
 |
|||||||||||||||||||||||||||||||||||||||
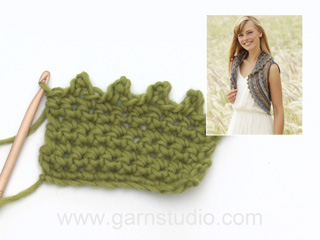
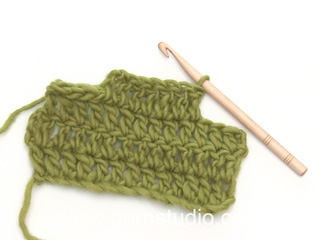
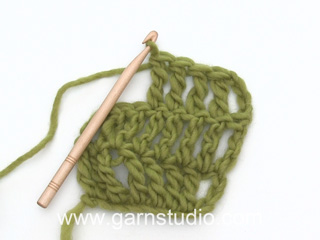
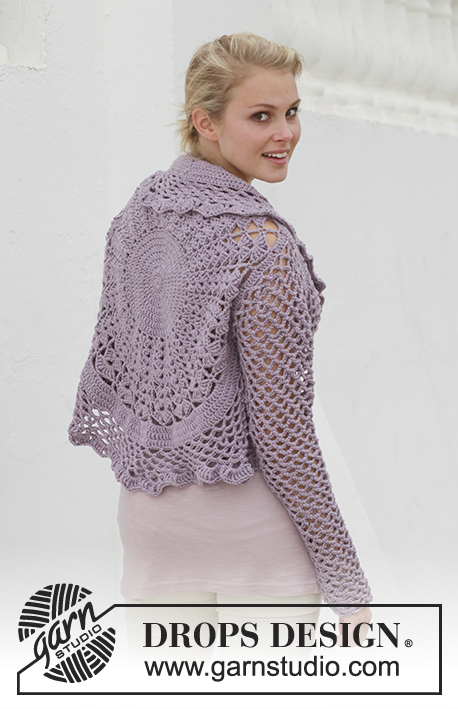
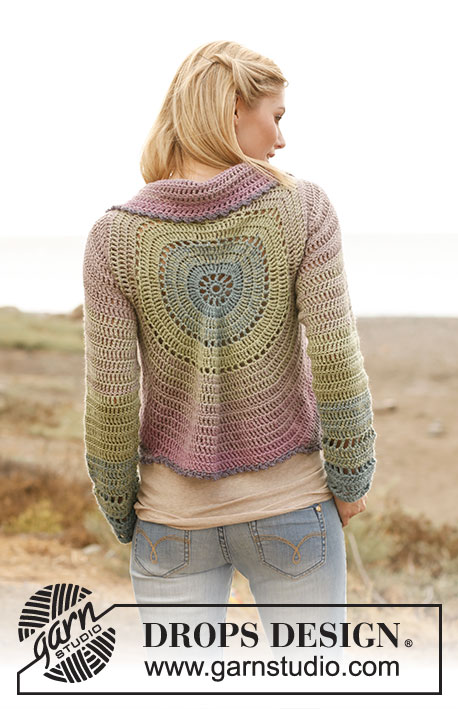
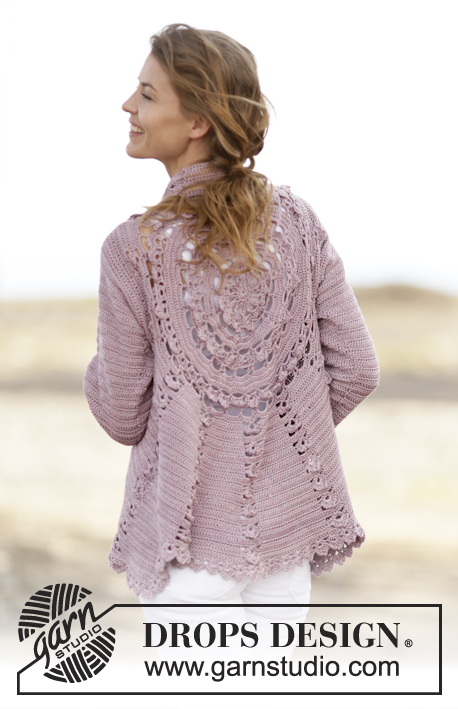
Crochet DROPS jacket worked in a circle with lace pattern in ”Cotton Viscose”. Size: S - XXXL.
DROPS 162-11 |
||||||||||||||||||||||||||||||||||||||||
|
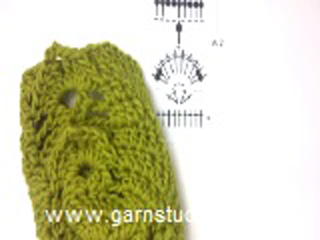
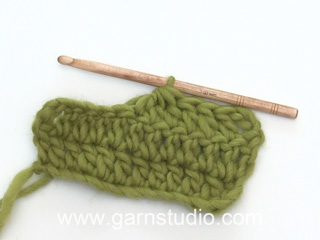
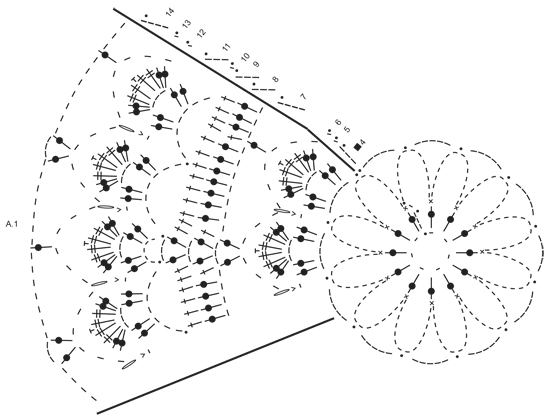
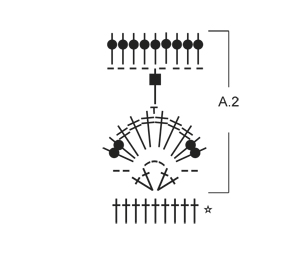
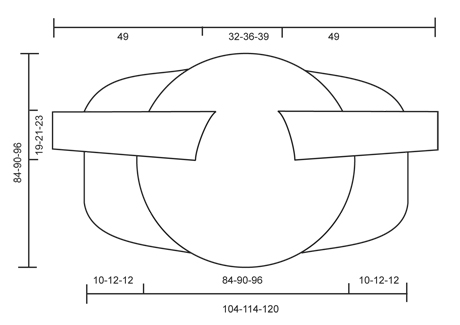
PICOT: Work 2 ch, 1 dc in the 2nd ch from hook. CROCHET INFO: Beg every tr round/row with 3 ch that replace first tr and finish every round/row with 1 sl st in 3rd ch from beg of round/row. PATTERN: See diagrams A.1-A.2. After 3rd round, repeat A.1 6 times in total on round. CROCHET 3 TR TOG: Work 3 tr into 1 tr at beg of row as follows: Work 3 ch (= replace 1 tr), work 1 tr, but wait with last pull through (= 2 strands on hook), then work next tr but on last pull through, pull yarn through all sts on hook. DECREASE TIP (applies to sleeves): Dec at beg of row by working 1 sl st over the tr to be dec. Dec at end of row by working until 1 tr to be dec remains, turn piece. ---------------------------------------------------------- CIRCLE: Work 7 ch on hook size 3.5 mm with Cotton Viscose and form a ring with 1 sl st in first ch. Then work A.1 as follows: ROUND 1: Work 3 ch, 12 tr in ch-ring, finish with 1 sl st in 3rd ch from beg of round. ROUND 2: Work 1 ch, * 1 dc in first tr, 14 ch *, repeat from *-* 12 times in total, finish with 1 sl st in first dc. Fasten off. ROUND 3: Work 1 sl st in first ch-space, 5 ch, * 1 sl st in next ch-space, 5 ch *, repeat from *-* 11 times in total, finish with 1 sl st in first ch-space. A.1 is repeated 6 times in total on round. ROUND 4: Work 3 ch, in first ch-space work: * 2 tr, 3 ch, 2 tr in same ch-space, 1 ch *, repeat from *-* 12 times in total, finish with 1 sl st in 3rd ch from beg of round. ROUND 5: Work 1 ch, in first ch-space work 2 tr, 2 dtr, 1 PICOT – see explanation above, 2 dtr, 2 tr, 1 dc in next ch, * in next ch-space work 2 tr, 2 dtr, 1 picot, 2 dtr, 2 tr, 1 dc in next ch *, repeat from *-* 11 times in total, finish with 1 sl st in first ch = 12 leaves. ROUND 6: Work 1 ch, * 6 ch, 1 dc in dc and ch (from 5th and 4th round) *, repeat from *-* 12 times in total, finish with 1 sl st in first ch. ROUND 7: Work 4 ch, * 3 ch, 1 tr in next ch-space, 7 ch, 1 tr in next ch-space, 3 ch, 1 tr in same ch-space, 4 ch *, repeat from *-* 6 times in total, finish with 1 sl st in 4th ch. ROUND 8: Work 3 ch, 3 tr in next ch-space, * 1 tr in next tr, 7 tr in next ch-space, 1 tr in next tr, 1 tr in next ch-space, 3 ch, 1 tr in same ch-space, 1 tr in next tr, 7 tr in next ch-space *, repeat from *-* 5 times in total, 1 tr in next tr, 7 tr in next ch-space, 1 tr in next tr, 1 tr in next ch-space, 3 ch, 1 tr in same ch-space, 1 tr in next tr, 4 tr in first ch-space, finish with 1 sl st in 3rd ch = 114 tr. REMEMBER THE CROCHET TENSION! ROUND 9: Work 3 ch, * 1 tr in every tr until ch-space, in ch-space as follows: 1 tr, 3 ch, 1 tr *, repeat from *-* the entire round, finish with 1 sl st in 3rd ch = 126 tr. ROUND 10: Work 1 ch, * 7 ch, skip 6 tr, 1 sl st in next tr, 7 ch, skip 6 tr, 1 sl st in next tr, 5 ch, 1 sl st in next tr, 7 ch, skip 6 tr, 1 sl st in next tr *, repeat from *-* 5 times in total, 7 ch, skip 6 tr, 1 sl st in next tr, 7 ch, skip 6 tr, 1 sl st in next tr, 5 ch, 1 sl st in next tr, 7 ch, skip 6 tr, 1 sl st in first ch. ROUND 11: Work 3 ch, in every ch-space work 2 tr, 3 ch, 2 tr, 1 ch, finish with 1 sl st in 3rd ch. ROUND 12: Work 1 ch, * in next ch-space work 2 tr, 2 dtr, 1 picot, 2 dtr, 2 tr, 1 dc in next ch *, repeat from *-* 24 times in total, finish with 1 sl st in first ch = 24 leaves. ROUND 13: Work 1 ch, * 6 ch, 1 dc in dc and ch (from 12th and 11th round) *, repeat from *-* 24 times in total, finish with 1 sl st in first ch. ROUND 14: Work 4 ch, * 3 ch, 1 tr in next ch-space, 7 ch, 1 tr in next ch-space, 3 ch, 1 tr in same ch-space, 4 ch *, repeat from *-* 12 times in total, finish with 1 sl st in 4th ch. ROUND 15: Work 3 ch - READ CROCHET INFO, work 4 tr in first ch-space (i.e. ch-space with 3 ch), now work tr in all ch-space with 7 ch from previous round, do not work in ch-space with 3 ch from previous round. Work * 8 tr in each of the next 7 ch-spaces, 9 tr in next ch-space *, repeat from *-* 2 times in total, 8 tr in each of the next 7 ch-spaces, 5 tr in last ch-space (i.e. ch-space with 4 ch) = 195 tr. ROUND 16: Work * 1 tr in each of the first 14 tr, 2 tr in next tr *, repeat from *-* 13 times in total = 208 tr. ROUND 17: Work * 2 tr in first tr, 1 tr in each of the next 15 tr *, repeat from *-* 13 times in total AT THE SAME TIME inc 1 tr extra on round = 222 tr. ROUND 18: Work 1 ch, * 6 ch, skip 5 tr, 1 sl st in next tr *, repeat from *-* 37 times in total, finish with 1 sl st in first ch. ROUND 19:Work as round 11 in A.1: Work 3 ch, in every ch-space work 2 tr, 3 ch, 2 tr, 1 ch, finish with 1 sl st in 3rd ch. ROUND 20: Work as round 12 in A.1: Work 1 ch, * in next ch-space work 2 tr, 2 dtr, 1 picot, 2 dtr, 2 tr, 1 ch *, repeat from *-* 37 times in total, finish with 1 sl st in first ch = 37 leaves. ROUND 21: Work as round 13 in A.1: Work 1 ch, * 6 ch, 1 dc in dc and ch (from 20th and 19th round) *, repeat from *-* 37 times in total, finish with 1 sl st in first ch. ROUND 22: Work as round 14 in A.1: Work 4 ch, * 3 ch, 1 tr in next ch-space, 7 ch, 1 tr in next ch-space, 3 ch, 1 tr in same ch-space, 4 ch *, repeat from *-* 18 times in total, work 3 ch, 1 tr in last ch-space, 4 ch, finish with 1 sl st in 4th ch. ROUND 23: Work 4 tr in first ch-space (i.e. ch-space with 3 ch), now work tr in all ch-space with 7 ch from previous round, do not work in ch-space with 3 ch from previous round. Work * 7 tr in next ch-space, 8 tr in next ch-space, 7 tr in next ch-space *, repeat from *-* 11 times in total, 8 tr in next ch-space, 8 tr in next ch-space, 7 tr in next ch-space, 4 tr in last ch-space (i.e. ch-space with 4 ch) = 273 tr. Then work piece back and forth. Work every row tog at the end of row with 1 sl st in 3rd ch from beg of row. Turn piece. ROW 24 (= WS): Work * 2 tr in next tr, 1 tr in each of the next 11 tr (= tr-group), A.2 *, repeat from *-* 13 times in total = 169 tr and 13 A.2. Turn piece. A.2 is repeated vertically until finished measurements. ROW 25 (= RS): Work A.2, 2 tr in first tr, 1 tr in each of the next tr in tr-group, * A.2, 2 tr in first tr in tr-group, 1 tr in each of the next tr *, repeat from *-* until 1 tr-group remains, 2 tr in first tr, 1 tr in each of the next tr = 182 tr. Turn piece. ROW 26: Work as row 24 = 195 tr (15 tr between every A.2). ROW 27: Work as row 25 = 208 tr (16 tr between every A.2). Repeat row 24-27 0-1-1 more time = 208-260-260 tr (= 16-20-20 tr between every A.2). Piece measures approx. 20-23-23 cm from centre and outwards. Now work arm holes as follows: ROW 28 (= from WS): Work 2 tr in first tr, 1 tr in each of the next 15-19-19 tr, A.2 as before, 2 tr in next tr, 1 tr in each of the next 15-19-19 tr, A.2, 54-62-62 loose ch (= right armhole), skip: 16-20-20 tr + A.2 + 16-20-20 tr + A.2, work * 2 tr in next tr, 1 tr in each of the next 15-19-19 tr, A.2 *, repeat from *-* 5 times in total, 2 tr in first tr, 1 tr in each of the next 15-19-19 tr, 54-62-62 loose ch (= left armhole), skip: A.2 + 16-20-20 tr + A.2 + 16-20-20 tr, work A.2, 2 tr in next tr, 1 tr in each of the next 15-19-19 tr, A.2 = 153-189-189 tr, 9 A.2 and 108-124-124 ch. ROW 29 (from RS): Work A.2, 2 tr in next tr, 1 tr in each of the next 16-20-20 tr, A.2, in ch-row (= left armhole) work as follows: 1 tr in each of the 54-62-62 ch, * 2 tr in next tr, 1 tr in each of the next 16-20-20 tr, A.2 *, repeat from *-* 5 times in total, 2 tr in next tr, 1 tr in each of the next 16-20-20 tr, in next ch-row (= right armhole) work as follows: 1 tr in each of the 54-62-62 ch, then work A.2, 2 tr in next tr, 1 tr in each of the next 16-20-20 tr, A.2, 2 tr in next tr, 1 tr in each of the next 16-20-20 tr = 270-322-322 tr and 9 A.2. ROW 30 (= from WS): Work 1 tr in each of the next 18-22-22 tr, A.2 as before, 1 tr in each of the next 18-22-22 tr, A.2, 1 tr in each of the next 18-22-22 tr, A.2 (adjust row according to the other repetitions), 1 tr in each of the next 18-22-22 tr, A.2, * 1 tr in each of the next 18-22-22 tr, A.2 *, repeat from *-* 5 times in total, 1 tr in each of the next 18-22-22 tr, A.2, 1 tr in each of the next 18-22-22 tr, A.2, 1 tr in each of the next 18-22-22 tr, A.2, 1 1 tr in each of the next 18-22-22 tr, A.2 = 234-286-286 tr and 13 A.2. Work pattern as before but now inc only on every row from RS until 52-52-60 rows have been worked in total = 377-429-481 tr (29-33-37 tr in every tr-group). Insert 4 markers in the piece as follows from WS: Work 29-33-37 tr, A.2, 14-16-18 tr, insert 1st marker, work 15-17-19 tr, * A.2, 29-33-37 tr *, repeat from *-* 4 times in total, insert 2nd marker here (1st-2nd marker = right front piece). Work A.2, 29-33-37 tr, A.2, 29-33-37 tr and A.2, insert 3rd marker here. * Work 29-33-37 tr, A.2 *, repeat from *-* 4 times in total, 15-17-19 tr, insert 4th marker. (3rd-4th marker = left front piece), 14-16-18 tr, A.2. Tr between 1st and 4th marker are up towards neck. Fasten off. RIGHT FRONT PIECE: Now work right front piece between 1st and 2nd marker, beg from 2nd marker (i.e. from RS) = 131-149-167 tr and 4 A.2. Continue inc in tr-groups as before BUT do not inc in tr-groups in each side of front piece - AT THE SAME TIME dec 2 tr at beg of every row by CROCHET 3 TR TOG - see explanation above. Work until 10-12-12 cm over front piece have been worked, adjust to finish with 1 whole repetition of A.2. Fasten off. LEFT FRONT PIECE: Work left front piece between 3rd and 4th marker the same way as right front piece, beg from 4th marker (i.e. from RS). EDGE: Work an edge around the entire jacket as follows: Work the first 2 rounds of A.2, when working first round of A.2 over tr-rows, skip 2 tr-rows on each side of tr-group. Beg every round with 3 ch and finish with 1 sl st in 3rd ch. SLEEVES: Work back and forth from armhole and down, work every row tog with 1 sl st at the end of row. Insert 1 marker in piece, NOW MEASURE PIECE FROM HERE. Beg by working 86-94-102 tr evenly around the opening for sleeve, beg of row should be under sleeve. Then work 3 rows with 1 tr in every tr. Continue with 1 tr in every tr - AT THE SAME TIME dec differently in the different sizes as follows: READ DECREASE TIP! SIZE S/M: Dec 1 st in each side of piece alternately every 3rd and 2nd row 16 times in total = 54 tr. SIZE L/XL: Dec 1 st in each side of piece every other row 20 times in total = 54 tr. SIZE XXL/XXXL: Dec 1 st in each side of piece every other row 24 times = 54 tr. ALL SIZES: Work 1 tr in every tr until sleeve measures approx. 47 cm, adjust so that next row is from WS. Then work the first 2 rounds of A.2 (= 6 repetitions in width). Fasten off. Work the other sleeve the same way. |
||||||||||||||||||||||||||||||||||||||||
Diagram explanations |
||||||||||||||||||||||||||||||||||||||||
|
||||||||||||||||||||||||||||||||||||||||
|
||||||||||||||||||||||||||||||||||||||||
|
||||||||||||||||||||||||||||||||||||||||
|
||||||||||||||||||||||||||||||||||||||||
|
Have you made this or any other of our designs? Tag your pictures in social media with #dropsdesign so we can see them! Do you need help with this pattern?You'll find tutorial videos, a Comments/Questions area and more by visiting the pattern on garnstudio.com. © 1982-2024 DROPS Design A/S. We reserve all rights. This document, including all its sub-sections, has copyrights. Read more about what you can do with our patterns at the bottom of each pattern on our site. |
||||||||||||||||||||||||||||||||||||||||


With over 40 years in knitting and crochet design, DROPS Design offers one of the most extensive collections of free patterns on the internet - translated to 17 languages. As of today we count 304 catalogues and 11422 patterns - 11422 of which are translated into English (UK/cm).
We work hard to bring you the best knitting and crochet have to offer, inspiration and advice as well as great quality yarns at incredible prices! Would you like to use our patterns for other than personal use? You can read what you are allowed to do in the Copyright text at the bottom of all our patterns. Happy crafting!
Comments / Questions (265)
Hola os comento que esta mui bien esplicado os felicito asi se trabaja muibien el modelo es mui bonito gracias perdonar mis faltas ortograficas soy mui mallor y no estudiado mucho
18.01.2019 - 14:50Stephanie wrote:
Please can you explain in more detail how to do the Edge around the whole garment? I don't understand "when working first round of A.2 over dc-rows, skip 2 dc-rows on each side of dc-group"
31.10.2018 - 11:41DROPS Design answered:
Dear Stephanie, for the edge you will work A.2 all around the circle (skipping 4 sts before working 2 dc,3ch,2 dc in next st). When working along the front pieces (= in the rows) skip 2 dc-rows instead of 4 sts. Happy crocheting!
31.10.2018 - 12:08Jessica wrote:
Boa tarde. Fazendo as frentes, deve-se fazer 3 pontos juntos para a diminuição, certo? Diz para fazer no início de cada carreira. Mas essa diminuição é no início do direito e do verso ou só do direito? E os aumentos no grupos de ponto alto são somente no primeiro ponto alto no direito? Ou aumento no verso também? E uma última dúvida: o casaco das fotos daqui do site não foi feito conforme a receita aqui disponibilizada, certo? Pois o meu casaco está ficando diferente do das fotos.
29.05.2018 - 20:04DROPS Design answered:
Bom dia, Sim, deve fazer tanto as diminuições como os aumentos no direito da peça. Quanto ao casaco da foto, foi feito exactamente como a receita indica. É que para o casaco ficar igual, deve usar o fio DROPS indicado e conferir sempre sua amostra que deve ser igual à amostra indicada na receita. É fundamental fazer uma amostra e conferir se está igual à indicada e, acima de tudo, usar o fio DROPS do modelo. Bom croché!
30.05.2018 - 12:37Jessica wrote:
Bom dia. Acabei a carreira 27 e fiquei sem saber o que fazer. Diz para repetir mais 0-1-1 vezes as carreiras 24 a 27, mas não sei o que isso significa. Poderiam me explicar?
18.05.2018 - 14:06DROPS Design answered:
Boa tarde, Conforme o tamanho que está a fazer. Se estiver a fazer o tamanho S/M, não repete. Se estiver a fazer o tamanho L/XL ou XXL/XXXL, repete mais 1 vez as carreiras 24 a 27. Bom croché!
24.05.2018 - 15:44Bonjour. Je suis coincé au rang 27. Pouvez vous m'aider ? . merci.
29.04.2018 - 11:33DROPS Design answered:
Bonjour Corinne, au rang 27, vous crochetez comme au rang 25 en continuant les augmentations comme avant, autrement dit, vous aurez 1 bride de plus entre chaque A.2 soit 16 brides entre chaque A.2. Bon crochet!
30.04.2018 - 10:47Jessica Muller wrote:
No Brasil, qual linha devo usar para substituir a indicada na receita?
25.04.2018 - 17:31DROPS Design answered:
Pode ver no separador fios alternativos, quais os outros fios aconselhados para este modelo.
28.05.2018 - 13:01Merci pour votre réponse 😍 Comment fait on la diminution en début de rang pour les manches et je ne comprends pas comment faire la diminution en fin de rang et finir par une maille coulée
06.04.2018 - 16:14DROPS Design answered:
Bonjour Virginie, cette vidéo montre comment diminuer en début et en fin de rang, comme expliqué sous DIMINUTIONS (manches) dans le modèle. Bon crochet!
09.04.2018 - 09:13Bonjour Pour commencer les manches on part sur l endroit où l envers du travail? Excusez moi si ma question vous paraît idiote mais je suis débutante 😉
06.04.2018 - 14:57DROPS Design answered:
Bonjour Virginie, on crochète le 1er rang des manches sur l'endroit en commençant en bas de l'emmanchure et tout autour de l'emmanchure (= les mailles sautées du cercle + les mailles en l'air montées pour l'emmanchure): 86-94-102 B à répartir tout autour de l'emmanchure. Bon crochet!
06.04.2018 - 15:20Bonjour Pour les diminutions des manches, faut il diminuer sur un même rang 1B en début et fin de rang ,et ce, 1 rang sur 2 pour la taille L ou faut il seulement diminuer 1 seule B en début de chaque rang pendant 40 rangs ? (20 rangs endroits et 20 rangs envers) merci pour votre éclairage!!!!
05.04.2018 - 21:56DROPS Design answered:
Bonjour Mme Petit, on diminue 20 fois 2 brides (1 au début + 1 à la fin du rang) tous les 2 rangs (= tous les rangs sur l'endroit) soit 40 rangs au total, il doit alors vous rester 54 brides (= 94-40 diminutions). Bon crochet!
06.04.2018 - 08:43Excusez moi mais je voudrais savoir comment on place les 2b 3db 1 picot 3db 2 d sur les bords des devants la ou on fait les diminutions puisque je commence la bordure avec le 2eme rang de a2 ayant fini le gilet sur le 2eme rang de a2 Le comprend bien que ma bordure ne comprendra qu 1 seule rang du motif merci
30.03.2018 - 13:59DROPS Design answered:
Bonjour Virginie, vous pouvez les crocheter entre 2 brides des groupes de brides, à intervalles réguliers. Bon crochet!
03.04.2018 - 07:54