
Popular categories
Looking for a yarn?


|
|||||||||||||
Tweed Casual |
|||||||||||||
 |
 |
||||||||||||
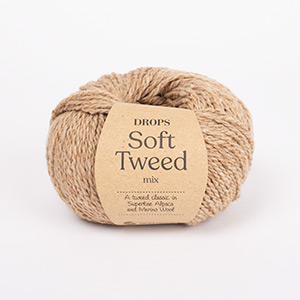
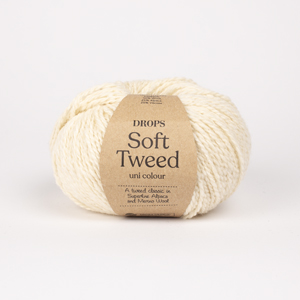
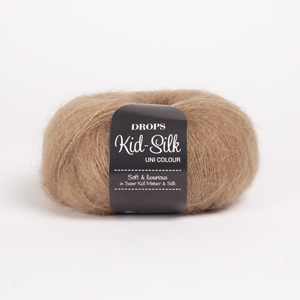
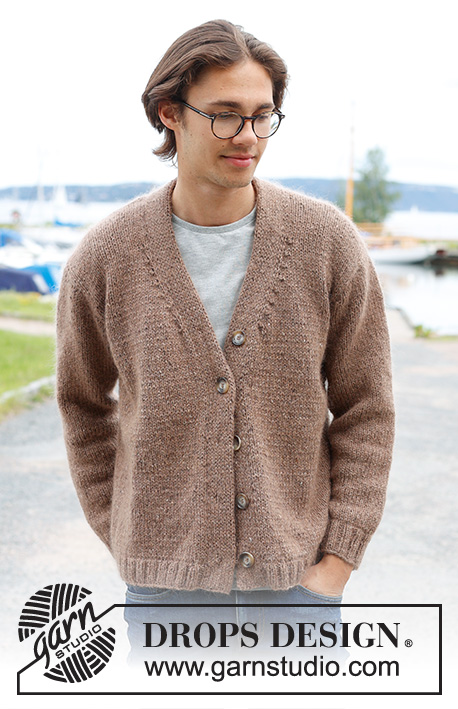
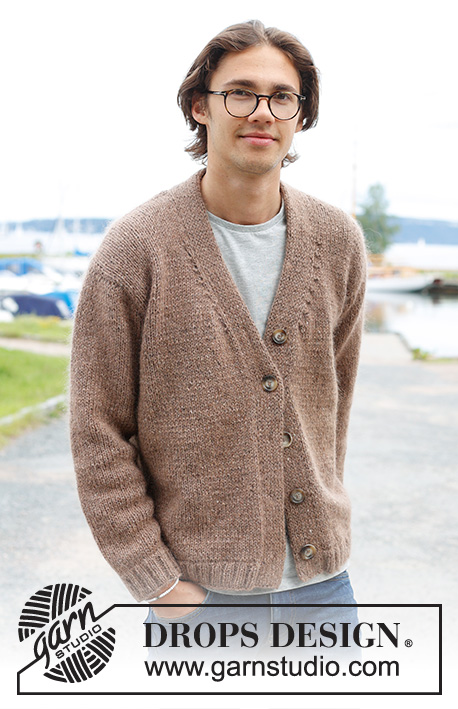
Knitted jacket for men in DROPS Soft Tweed and DROPS Kid-Silk. The piece is worked bottom up with V-neck and double bands. Sizes S - XXXL.
DROPS 233-9 |
|||||||||||||
|
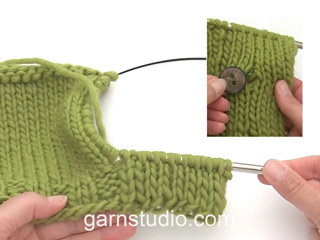
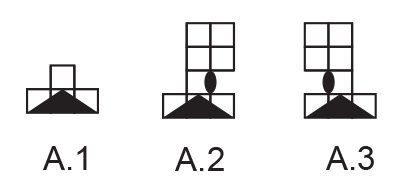
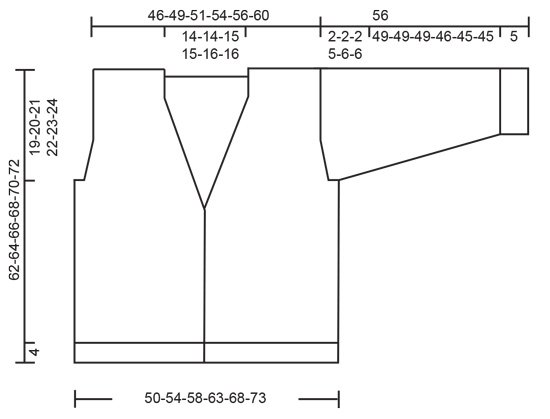
------------------------------------------------------- EXPLANATIONS FOR THE PATTERN: ------------------------------------------------------- PATTERN : See diagrams A.1 to A.3. The diagrams show all rows in the pattern from the right side. RIDGE/GARTER STITCH (worked back and forth): Knit all rows. 1 ridge = knit 2 rows. DECREASE TIP (V-neck and armholes): All decreases are worked from the right side! DECREASE 2 STITCHES AT THE BEGINNING OF THE ROW: Work 1 edge stitch in garter stitch, knit 1, work A.1 over the next 3 stitches. DECREASE 2 STITCHES AT THE END OF THE ROW: Work until there are 5 stitches left, work A.1 over the next 3 stitches, knit 1 and 1 edge stitch in garter stitch. DECREASE 1 STITCH AT THE BEGINNING OF THE ROW: Work 1 edge stitch in garter stitch, knit 1, work A.2 over the next 3 stitches. DECREASE 1 STITCH AT THE END OF THE ROW: Work until there are 5 stitches left, work A.3 over the next 3 stitches, knit 1 and 1 edge stitch in garter stitch. INCREASE TIP (sleeves): Knit 1 after the marker, make 1 yarn over, knit until there is 1 stitch left before the marker, 1 yarn over. On the next round knit the yarn overs twisted. BUTTONHOLES: Work buttonholes starting from the right side as follows: Work the first 8 stitches as before, turn and work back, turn and work these stitches 1 more time (right side). Cut the strand. Work 4 rows as before over the other 8 band stitches (first row from the right side) and work together the last stitch from the right side with the first stitch along the edge of the jacket. On the next row from the wrong side work all the band stitches as before. Work buttonholes when the band measures: S: 6, 13, 21, 29 and 37 cm. M: 6, 13, 21, 29 and 37 cm. L: 6, 13, 21, 29 and 37 cm. XL: 6, 14, 22, 30 and 38 cm. XXL: 6, 15, 23, 31 and 39 cm. XXXL: 6, 15, 24, 32 and 40 cm. ------------------------------------------------------- START THE PIECE HERE: ------------------------------------------------------- JACKET – SHORT OVERVIEW OF THE PIECE: The piece is worked bottom up, back and forth on circular needle as far as the armholes, then divided and the front and back pieces finished separately back and forth on circular needle. The sleeves are worked in the round on double pointed needles/short circular needle from bottom up as far as the sleeve cap, which is finished back and forth. Stitches are knitted up along the front pieces and the bands worked to finish. BODY: Cast on 192-208-224-240-264-280 stitches with circular needle size 4 mm and 1 strand DROPS Soft Tweed and 1 strand DROPS Kid-Silk. Purl 1 row from the wrong side. On the next row (right side) work rib as follows: 1 edge stitch in GARTER STITCH – read description above, * purl 2, knit 2 *, work from *-* until there are 3 stitches left, purl 2 and 1 edge stitch in garter stitch. When the rib measures 4 cm, knit 1 row from the right side and decrease 30-34-38-38-46-46 stitches evenly spaced = 162-174-186-202-218-234 stitches. Change to circular needle size 5 mm. Insert a marker 41-44-47-51-55-59 stitches in from each side (= 80-86-92-100-108-116 stitches on the back piece between the markers). Allow the markers to follow your work onwards; they are used when casting off for the armholes. Continue with stocking stitch and 1 edge stitch in garter stitch on each side. REMEMBER THE KNITTING TENSION! OVERVIEW OF THE NEXT SECTION: When the piece measures 38-38-38-39-40-41 cm, start to decrease for the V-neck. AT THE SAME TIME as you work these decreases, you cast off/decrease for the armholes and finish each shoulder separately. Read V-NECK and ARMHOLES before continuing. V-NECK: When the piece measures 38-38-38-39-40-41 cm, on the next row from the right side, decrease for the V-neck on each side– read DECREASE TIP. Decrease 2 stitches on each side every 4th row 4 times in all sizes. Then decrease 1 stitch on each side every 4th row 3-3-4-4-5-5 times. ARMHOLES: AT THE SAME TIME, when the piece measures 43-44-45-46-47-48 cm and the next row is from the right side, cast off for the armholes: Work as before until there are 2-3-4-4-4-5 stitches left before the first marker, cast off 4-6-8-8-8-10 stitches, work until there are 2-3-4-4-4-5 stitches left before the second marker, cast off 4-6-8-8-8-10 stitches and work to the end of the row. The front and back pieces are finished separately. LEFT FRONT PIECE (when the garment is worn): Start from the wrong side, work stocking stitch with 1 edge stitch in garter stitch on each side and continue to decrease for the V-neck. In addition, decrease for the armhole as follows: ARMHOLE: At the beginning of the next row from the right side decrease 1-1-1-2-2-2 stitches, then decrease 1 stitch on every 4th row 0-0-0-1-3-3 times – remember DECREASE TIP. After all the decreases for the V-neck and armhole there are 27-29-30-32-33-36 stitches on the shoulder. Continue with stocking stitch and 1 edge stitch in garter stitch on each side. Cast off when the piece measures 62-64-66-68-70-72 cm. RIGHT FRONT PIECE: Start from the wrong side, work stocking stitch with 1 edge stitch in garter stitch on each side and continue to decrease for the V-neck. In addition, decrease for the armhole as follows: ARMHOLE: At the end of the next row from the right side decrease 1-1-1-2-2-2 stitches, then decrease 1 stitch on every 4th row 0-0-0-1-3-3 times. After all the decreases for the V-neck and armhole there are 27-29-30-32-33-36 stitches on the shoulder. Continue with stocking stitch and 1 edge stitch in garter stitch on each side. Cast off when the piece measures 62-64-66-68-70-72 cm. BACK PIECE: = 76-80-84-92-100-106 stitches. Start from the wrong side and work stocking stitch with 1 edge stitch in garter stitch on each side. In addition decrease for the armholes as follows: On the next row from the right side decrease 1-1-1-2-2-2 stitches on each side, then decrease 1 stitch on each side every 4th row 0-0-0-1-3-3 times = 74-78-82-86-90-96 stitches. When the piece measures 59-61-63-65-67-69 cm cast off the middle 18-18-20-20-22-22 stitches for the neck (28-30-31-33-34-37 stitches on each shoulder). Finish each shoulder separately. On the next row cast off 1 stitch from the neck = 27-29-30-32-33-36 stitches. Cast off when the piece measures 62-64-66-68-70-72 cm. Work the other shoulder in the same way. SLEEVES: Cast on 44-44-48-48-52-52 stitches with double pointed needles size 4 mm and 1 strand of each quality. Knit 1 round, then work rib (knit 2, purl 2) for 5 cm. Knit 1 round and decrease 6-4-6-4-6-6 stitches evenly spaced = 38-40-42-44-46-46 stitches. Insert a marker at the beginning of the round (mid-under sleeve). Allow the marker to follow your work onwards; it is used when increasing under the sleeve. Change to double pointed needles size 5 mm and work stocking stitch in the round. When the sleeve measures 12-12-10-12-10-12 cm, increase 1 stitch on each side of the marker – read INCREASE TIP. Increase like this every 4-3½-3½-3-32½. cm a total of 11-12-13-13-14-15 times = 60-64-68-70-74-76 stitches. When the sleeve measures 54-54-54-51-50-50 cm, work the next round as follows: Start 2-3-4-4-4-5 stitches before the marker, cast off 4-6-8-8-8-10 stitches, work to the end of the round = 56-58-60-62-66-66 stitches. Start from the wrong side and work the sleeve cap in stocking stitch back and forth as follows: Cast off 9-9-10-5-4-4 stitches at the beginning of each row 2-2-2-5-6-6 times = 20-22-20-12-18-18 stitches. Cast off. The sleeve measures approx. 56 cm. Work the other sleeve in the same way. ASSEMBLY: Sew the shoulder seams inside the cast-off edge. Sew in the sleeves inside the 1 edge stitch along the armholes. RIGHT BAND: The band is worked bottom up. Using a strand end of 1½ to 2 metres, knit up stitches along the front piece (this allows you to continue working without cutting the strand) as follows: Start at the bottom and pick up 1 stitch in each row, inside the 1 edge stitch, using circular needle size 4.5 mm and 1 strand of each quality. Continue working from the end with the ball = bottom of the front piece. Cast on 16 stitches as an extension of the picked up stitch at the bottom of the front piece (cast on from the wrong side). Work the band over these 16 stitches at the same time as it is worked together with the knitted-up stitches along the front piece: ROW 1 (right side): Slip the first stitch onto the right needle as if to purl with the strand in front, * knit 1, slip 1 stitch onto the right needle as if to purl with the strand in front *, work from *-* until there is 1 band stitch left, slip 1 stitch onto the right needle as if to knit with the strand behind, knit 1 and pass the slipped stitch over the knitted stitch, turn. ROW 2 (wrong side): * Slip the first/next stitch onto the right needle as if to purl with the strand in front, knit 1 *, work from *-* over all 16 band stitches, turn. Repeat rows 1 and 2. Work the BUTTONHOLES – read description above. When all the stitches from the front piece are knitted together with the band, work the back of the neck. BACK OF NECK: Work the 16 band stitches as follows: ROW 1: * Slip the first/next stitch onto the right needle as if to purl with the strand in front, knit 1 *, work from *-* over all 16 band stitches. Repeat this row for 8-8-9-9-10-10 cm. On the last row from the right side knit all stitches together 2 and 2, then cast off. LEFT BAND: Start at the top of the front piece and knit up 1 stitch in each row, inside the 1 edge stitch, using circular needle size 4.5 mm and 1 strand of each quality. Cast on 16 stitches as an extension of the picked up stitch at the bottom of the front piece. Work the band over these 16 stitches at the same time as the band is worked together with the knitted-up stitches along the front piece: ROW 1(wrong side): Knit 1, *slip the first stitch onto the right needle as if to purl with the strand in front, knit 1 *, work from *-* until there is 1 band stitch left, slip the next 2 stitches onto the right needle as if to purl them together with the strand in front, turn. ROW 2 (right side): Knit 2 together, * slip 1 stitch onto the right needle as if to purl with the strand in front, knit 1 *, work from *-* until there is 1 stitch left, slip 1 stitch onto the right needle as if to purl with the strand in front, turn. Repeat rows 1 and 2. When all the stitches from the front piece are knitted together with the band, work the back of the neck. BACK OF NECK: Work the 16 band stitches as follows: ROW 1: * Knit 1, slip the next stitch onto the right needle as if to purl with the strand in front *, work from *-* over all 16 band stitches. Repeat this row for 8-8-9-9-10-10 cm. On the last row from the right side work all stitches together as follows: Slip 1 stitch onto the right needle as if to knit, knit 1 and pass the slipped stitch over. Cast off. ASSEMBLY: Sew the bands together mid-back and sew them to the neckline. Sew the buttons onto the left band. |
|||||||||||||
Diagram explanations |
|||||||||||||
|
|||||||||||||
|
|||||||||||||
|
|||||||||||||
|
|||||||||||||
|
Have you made this or any other of our designs? Tag your pictures in social media with #dropsdesign so we can see them! Do you need help with this pattern?You'll find tutorial videos, a Comments/Questions area and more by visiting the pattern on garnstudio.com. © 1982-2024 DROPS Design A/S. We reserve all rights. This document, including all its sub-sections, has copyrights. Read more about what you can do with our patterns at the bottom of each pattern on our site. |
|||||||||||||


With over 40 years in knitting and crochet design, DROPS Design offers one of the most extensive collections of free patterns on the internet - translated to 17 languages. As of today we count 304 catalogues and 11422 patterns - 11422 of which are translated into English (UK/cm).
We work hard to bring you the best knitting and crochet have to offer, inspiration and advice as well as great quality yarns at incredible prices! Would you like to use our patterns for other than personal use? You can read what you are allowed to do in the Copyright text at the bottom of all our patterns. Happy crafting!
Comments / Questions (16)
Kas on võimalik seda kampsunit kududa ainult Soft Tweedist? Kuidas siis võiks seda kududa.
25.02.2023 - 07:20DROPS Design answered:
Tere Karine! DROPS Soft Tweed üksi on palju peenem ja koetihedus tuleb hoopis teine. Näidiseks võib hoopis ette võtta mõne sarnase mustri lõngagrupp B lõngadele (nt. DROPS Karismale loodud juendid) kust saab vajalikud silmuste arvud ja siis lisada siit juhendist soovitud detailid. Vaata ka õpetust Kuidas asendada lõngu . Head kudumist!
27.02.2023 - 21:38Hallo, wordt de voorbies in tricosteek gebreid? En ik snap niet goed hoe naald 1 en 2 gebreid worden. Gewoon heen en weer, maar wat gebeurt er met die laatste steek?
30.11.2022 - 21:15DROPS Design answered:
Dag Eveline,
Nee, de voorbies wordt niet in tricotsteek gebreid. Onder de betreffende paragrafen staat uitgelegd hoe je de biezen breit (1 recht, 1 averecht afhalen met de draad aan de voorkant). De eerste naald brei je alle steken averecht. Op de tweede naald brei je zoals staat beschreven en vanaf de tweede naald brei je de eerste en de laatste steek steeds in ribbelsteek. Je breit inderdaad heen en weer, van midden voor tot midden voor.
04.12.2022 - 16:41Bonjour, Je ne comprends pas bien comment faire les diminutions pour l'encolure. -Faut-il faire 3 mailles ensemble sur l'endroit ou sur l'envers? Car il est indiqué que "Toutes les diminutions se font sur l’endroit!" mais dans le diagramme c'est noté "3 mailles ensemble à l’envers". - A quel moment faut-il diminuer de 3 fois 1 maille tout les 4 rangs au lieu de 4 fois 2 mailles? Merci d'avance
21.11.2022 - 22:36DROPS Design answered:
Bonjour Nathalie, les diminutions se font en tricotant 3 mailles ensemble à l'envers sur l'endroit, on forme ainsi une petite démarcation (cf photos); quand le devant mesure 38-38 cm, vous diminuez 2 m et répétez ces diminutions encore 3 fois tous les 4 rangs (4 fois au total) puis vous diminuez 1 m seulement 3 tous les 4 rangs (cf DIMINUTIONS). Bon tricot!
22.11.2022 - 10:08Hei, Katkaistaanko lanka jokaisessa napinlävessä?
21.10.2022 - 16:27DROPS Design answered:
Kyllä, lanka katkaistaan jokaisen napinläven jälkeen.
24.10.2022 - 18:50Ifht dobbeltforkant. Skal jeg slå masker op hele vejen rundt på arbejdet og derefter kun strikke 16 masker sammen af gangen rundt? Eller slår jeg kun masker op et stykke (forkant højre, bagkant, forkant venstre, bagkant af gangen? I så fald, hvor mange mansker ca?
25.09.2022 - 08:04DROPS Design answered:
Hei Martha. Du strikker dobbelt stolpe over Højre Forkant + Halskant bagpå i et stykke og Venstre Forkant + Halskant Bagpå i et stykke (begge nedenifra og opp). Så når begge stolpene er strikket sys de sammen midt bak. Strikk opp 1 maske i hver strikkede pinne langs hele forstykket. Over bakstykket strikkes kun dobbelt stolpe (halskantene bak sys fast til bakstykket til slutt). mvh DROPS Design
26.09.2022 - 11:31What needle should I use to measure knit tension?
18.09.2022 - 10:17DROPS Design answered:
Dear Babs, check your tension with needle size nr 5 mm. Happy knitting!
19.09.2022 - 10:11