DROPS Safran uni colour 100% Cotton |
1.55 € /50g |
Order |
Clicking the ORDER button will redirect you to Camellia website
The yarn cost is calculated from the pattern’s smallest size and the yarn’s cheapest product type. Looking for an even better price? You might find it on the DROPS Deals!
-------------------------------------------------------
Alternative Yarn – See how to change yarns here
Yarn Groups A to F – Use the same pattern and change the yarn here
Yarn usage using an alternative yarn – Use our yarn converter here
-------------------------------------------------------
DROPS Safran uni colour 100% Cotton 1.55 € /50g Order |
Clicking the ORDER button will redirect you to Camellia website
The yarn cost is calculated from the pattern’s smallest size and the yarn’s cheapest product type. Looking for an even better price? You might find it on the DROPS Deals!
This pattern has been corrected. Click here to see the correction/s.
= knit from right side, purl from wrong side | |
= purl from right side, knit from wrong side | |
= between 2 stitches make 1 yarn over | |
= knit 3, pass the first stitch worked over the other 2 stitches | |
= no stitch here; go straight to next symbol in the diagram |
Each of our patterns has specific tutorial videos to help you.
These step-by-step tutorials might also help you:
Why is the knitting/crochet tension so important?
Knitting tension is what determines the final measurements of your work, and is usually measured per 10 x 10 cm. It is provided like so: number of stitches in width x number of rows in height - eg: 19 stitches x 26 rows = 10 x 10 cm.
The knitting tension is very individual; some people knit/crochet loosely while others work tightly. You adjust the knitting tension with the needle size, which is why the suggested needle size is only meant as a guide! You need to adjust this (up or down) to ensure that YOUR knitting tension matches the knitting tension provided in the pattern. If you work with a different knitting tension than provided you will have a different yarn consumption, and your work will have different measurements than what the pattern suggests.
The knitting tension also determines which yarns can replace each other. As long as you achieve the same knitting tension you can replace one yarn with another.
See DROPS lesson: How to measure your tension/gauge
See DROPS video: How to make a gauge tension swatch
How do I know how many balls of yarn I need?
The required amount of yarn is provided in grams, eg: 450 g. To calculate how many balls you’ll need you first need to know how many grams are in 1 ball (25g, 50g or 100g). This information is available if you click on the individual yarn quality on our pages. Divide the amount required with the amount of each ball. For example, if each ball is 50g (the most common amount), the calculation will be as follows: 450 / 50 = 9 balls.
Can I use a different yarn than what the pattern suggests?
The important thing when changing from one yarn to another is that the knitting/crochet tension remains the same. This is so that the measurements of the finished piece will be the same as on the sketch provided. It is easier to achieve the same knitting tension using yarns from the same yarn group. It is also possible to work with multiple strands of a thinner yarn to achieve the knitting tension of a thicker one. Please try our yarn converter. We recommend you to always work a test swatch.
Please NOTE: when changing yarn the garment might have a different look and feel to the garment in the photo, due to individual properties and qualities of each yarn.
See DROPS lesson: Can I use a different yarn than the one mentioned in the pattern?
What are the yarn groups?
All our yarns are categorised into yarn groups (from A to F) according to thickness and knitting tension – group A contains the thinnest yarns and group F the thickest. This makes it easier for you to find alternative yarns to our patterns, should you wish to switch yarn. All yarns within the same group have a similar knitting tension and can easily replace each other. However, different yarn qualities have different structures and properties which will give the finished work a unique look and feel.
How do I use the yarn calculator?
At the top of all our patterns you’ll find a link to our yarn calculator, which is a helpful tool should you wish to use a different yarn than suggested. By filling in the yarn quality you wish to replace, the amount (in your size) and number of strands, the calculator will present good alternative yarns with the same knitting tension. Additionally it will tell you how much you’ll require in the new qualities and whether you’ll need to work with multiple strands. Most skeins are 50g (some are 25g or 100g).
If the pattern is worked with multiple colours, every colour will have to be calculated separately. Similarly, if the pattern is worked with several strands of different yarns (for example 1 strand Alpaca and 1 strand Kid-Silk) you will have to find alternatives for each, individually.
Why do you show discontinued yarns in the patterns?
Since different yarns have different qualities and textures we have chosen to keep the original yarn in our patterns. However, you can easily find options among our available qualities by using our yarn calculator, or simply pick a yarn from the same yarn group.
It is possible that some retailers still have discontinued yarns in stock, or that someone has a few skeins at home that they would like to find patterns for.
The yarn calculator will provide both alternative yarn as well as required amount in the new quality.
What size should I knit?
If you think it's hard to decide what size to make, it can be a good idea to measure a garment you own already and like the size of. Then you can pick the size by comparing those measures with the ones available in the pattern's size chart.
You'll find the size chart at the bottom of the pattern.
See DROPS lesson: How to read size chart
Why do I get the wrong knitting tension with the suggested needle size?
The needle size provided in the pattern serves only as a guide, the important thing is to follow the knitting tension. And since knitting tension is very individual, you will have to adjust the needle size to ensure that YOUR tension is the same as in the pattern – maybe you’ll have to adjust 1, or even 2 needle sizes, up or down to achieve the correct tension. For this, we recommend that you work test swatches.
Should you work with a different knitting tension than the one provided, the measurements of the finished garment might deviate from the measurement sketch.
See DROPS lesson: How to measure your tension/gauge
See DROPS video: How to make a tension/gauge swatch
Why is the pattern worked top-down?
Working a garment top-down provides more flexibility and room for personal adjustment. For example it is easier to try the garment on while working, as well as making adjustments to length of yoke and shoulder caps.
The instructions are carefully explaining every step, in the correct order. Diagrams are adjusted to the knitting direction and are worked as usual.
How do I work according to a knitting diagram?
The diagram depicts all rows/rounds, and every stitch seen from the right side. It is read from bottom to top, from right to left. 1 square = 1 stitch.
When working back and forth, every other row is worked from the right side and every other row is worked from the wrong side. When working from the wrong side, the diagram will have to be worked reversed: from left to right, knit stitches are purled, purl stitches are knit etc.
When working in the round every round is worked from the right side and the diagram are worked from right to left on all rounds.
See DROPS lesson: How to read knitting diagrams
How do I work according to a crochet diagram?
The diagram depicts all rows/rounds, and every stitch seen from the right side. It is worked from bottom to top, from right to left.
When working back and forth every other row is worked from the right side: from right to left and every other row is worked from the wrong side: from left to right.
When working in the round, every row in the diagram are worked from the right side, from right to left.
When working a circular diagram you start in the middle and work your way outwards, counter clockwise, row by row.
The rows usually start with a given number of chain stitches (equivalent to the height of the following stitch), this will either be depicted in the diagram or explained in the pattern.
See DROPS lesson: How to read crochet diagrams
How do I work several diagrams simultaneously on the same row/round?
Instructions for working several diagrams after each other on the same row/round, will often be written like so: “work A.1, A.2, A.3 a total of 0-0-2-3-4 times". This means you work A.1 once, then A.2 is worked once, and A.3 is repeated (in width) the number of times provided for your size – in this case like so: S = 0 times, M = 0 times, L=2 times, XL= 3 times and XXL = 4 times.
The diagrams are worked as usual: begin with the first row in A.1, then work the first row in A.2 etc.
See DROPS lesson: How to read knitting diagrams
See DROPS lesson: How to read crochet diagrams
Why are the sleeves shorter in larger sizes?
The total width of the garment (from wrist-to-wrist) will be larger in the larger sizes, despite the actual sleeves being shorter. The larger sizes have longer sleeve caps and wider shoulders, so there will be a good fit in all sizes.
Where on the garment is the length measured?
The measurement sketch/schematic drawing provides information regarding the full length of the garment. If it’s a jumper or a jacket the length is measured from the highest point on the shoulder closest to the neckline, and straight down to the bottom of the garment. It is NOT measured from the tip of shoulder. Similarly, the length of yoke is measured from the highest point on the shoulder and down to where yoke is split into body and sleeves.
On a jacket measures are never taken along bands, unless specifically stated. Always measure inside band stitches when measuring the length.
See DROPS lesson: How to read a schematic drawing
What is a repeat?
Diagrams are often repeated on the round or in height. 1 repeat is the diagram the way it appears in the pattern. If it says to work 5 repeats of A.1 in the round, then you work A.1 a total of 5 times after/next to each other in the round. If it says to work 2 repeats of A.1 vertically/in height you work the entire diagram once, then begin again at the start and work the entire diagram one more time.
Why does the piece start with more chain stitches than it’s worked with?
Chain stitches are slightly narrower than other stitches and to avoid working the cast-on edge too tight, we simply chain more stitches to begin with. The stitch count will be adjusted on the following row to fit the pattern and measurement sketch.
Why increase before the rib edge when the piece is worked top-down?
The rib edge is more elastic and will contract slightly compared to, for example, stocking stitch. By increasing before the rib edge, you avoid a visible difference in width between the rib edge and the rest of the body.
Why increase in the cast-off edge?
It’s very easy to cast off too tightly, and by making yarn overs while casting off (and simultaneously casting these off) you avoid a too tight cast off edge.
See DROPS video: How to bind off with yarn overs (yo)
How do I increase/decrease on every 3rd and 4th row/round alternately?
To achieve an even increase (or decrease) you can increase on, for example: every 3rd and 4th row alternately, like so: work 2 rows and increase on the 3rd row, work 3 rows and increase on the 4th. Repeat this until the increase is complete.
See DROPS lesson: Increase or decrease 1 st on every 3rd and 4th row alternately
How can I work a jacket in the round instead of back and forth?
Should you prefer to work in the round instead of back and forth, you may of course adjust the pattern. You’ll need to add steeks mid-front (usually 5 stitches), and follow the instructions. When you would normally turn and work from the wrong side, simply work across the steek and continue in the round. At the end you’ll cut the piece open, pick up stitches to work bands, and cover the cut edges.
See DROPS video: How to knit steeks and cut open
Can I work a jumper back and forth instead of in the round?
Should you prefer to work back and forth instead of in the round, you may of course adjust the pattern so you work the pieces separately and then assemble them at the end. Divide the stitches for the body in 2, add 1 edge stitch in each side (for sewing) and work the front and back pieces separately.
See DROPS lesson: Can I adapt a pattern for circular needles into straight needles?
Why is the pattern slightly different than what I see in the photo?
Pattern repeats can vary slightly in the different sizes, in order to get the correct proportions. If you’re not working the exact same size as the garment in the photo, yours might deviate slightly. This has been carefully developed and adjusted so that the complete impression of the garment is the same in all sizes.
Make sure to follow instructions and diagrams for your size!
How do I make a women’s size garment into a men’s size one?
If you have found a pattern you like which is available in women’s size it’s not very difficult to convert it to men’s size. The biggest difference will be the length of sleeves and body. Start working on the women size that you think would fit across the chest. The additional length will be worked right before you cast off for the armhole/sleeve cap. If the pattern is worked top-down you can add the length right after the armhole or before the first decrease on sleeve.
Regarding additional yarn amount, this will depend on how much length you add, but it is better with a skein too many than too few.
How do I prevent a hairy garment from shedding?
All yarns will have excess fibres (from production) that might come off as lint or shedding. Brushed yarns (ie hairier yarns) have more of these loose, excess fibres, causing more shedding.
Shedding also depends on what is worn under or over the garment, and whether this pulls at the yarn fibres. It’s therefore not possible to guarantee that there will be no shedding
Below are some tips on how to get the best result when working with hairier yarns:
1. When the garment is finished (before you wash it) shake it vigorously so the looser hairs come off. NOTE: do NOT use a lint roller, brush or any method that pulls at the yarn.
2. Place the garment in a plastic bag and put it in your freezer - the temperature will cause the fibres to become less attached to each other, and excess fibres will come off easier.
3. Leave in the freezer for a few hours before taking it out and shaking it again.
4. Wash the garment according to the instructions on the yarn label.
Why does my garment pill?
Pilling is a natural process that happens to even the most exclusive of fibers. It's a natural sign of wear and tear that is hard to avoid, and that is most visible in high friction areas of your garment like a sweater's arms and cuffs.
You can make your garment look as new by removing the pilling, using a fabric comb or a pill/lint remover.
White Sails |
||||||||||||||||
|
|
|||||||||||||||
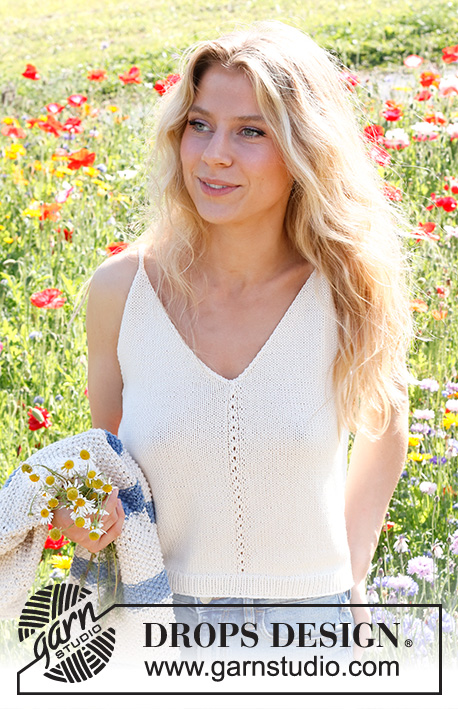
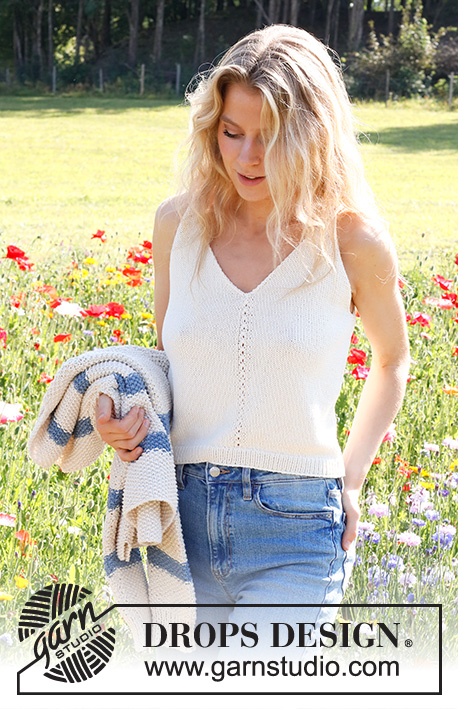
Knitted top in DROPS Safran. The piece if worked bottom up in stocking stitch. Sizes S - XXXL.
DROPS 230-1 |
||||||||||||||||
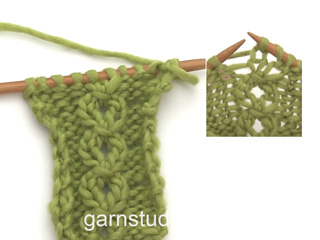
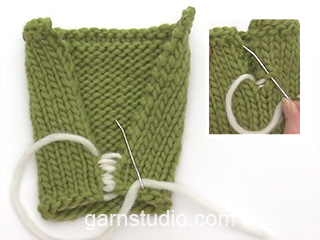
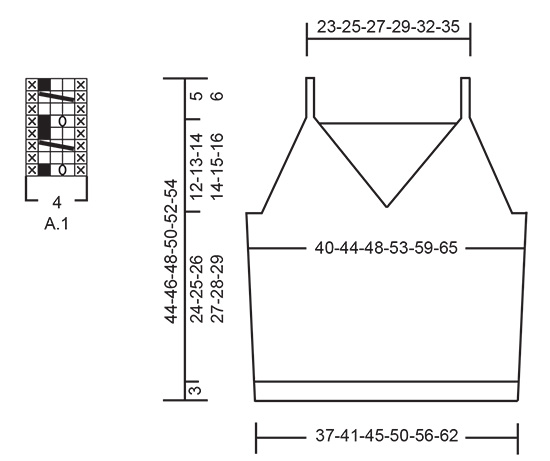
------------------------------------------------------- EXPLANATIONS FOR THE PATTERN: ------------------------------------------------------- RIDGE/GARTER STITCH (worked back and forth): Knit all rows. 1 ridge = knit 2 rows. PATTERN: See diagram A.1. The diagram shows all rows in the pattern from the right side. INCREASE TIP (sides): All increases are worked from the right side. Increase 1 stitch inside the 2 outermost stitches by making 1 yarn over. On the next row purl the yarn over twisted to avoid a hole. Then work the new stitch in stocking stitch. DECREASE TIP (for the armholes and V-neck): FROM THE RIGHT SIDE: After the 1 edge stitch: Slip 1 stitch as if to knit, knit 1 and pass the slipped stitch over the knitted stitch (= 1 stitch decreased). Before the 1 edge stitch: Work until there are 3 stitches left, knit 2 together, 1 edge stitch in garter stitch (= 1 stitch decreased). FROM THE WRONG SIDE: After the 1 edge stitch: Purl 2 together (= 1 stitch decreased). Before the 1 edge stitch: Work until there are 3 stitches left, purl 2 twisted together, edge stitch in garter stitch (= 1 stitch decreased). ------------------------------------------------------- START THE PIECE HERE: ------------------------------------------------------- TOP – SHORT OVERVIEW OF THE PIECE: The back and front pieces are worked separately, back and forth and bottom up. Straps are worked on the front piece, then sewn onto the back piece. BACK PIECE: Cast on 100-112-122-136-150-166 stitches with needle size 2.5 mm and DROPS Safran. Purl 1 row from the wrong side, then work rib (knit 1, purl 1), with 1 edge stitch in GARTER STITCH on each side – read description above. When the rib measures 3 cm, knit 1 row from the right side where you decrease 10-12-12-14-14-16 stitches evenly spaced = 90-100-110-122-136-150 stitches. Change to needle size 3 mm. Work stocking stitch back and forth with 1 edge stitch in garter stitch on each side. REMEMBER THE KNITTING TENSION! When the piece measures 6 cm, increase 1 stitch on each side – read INCREASE TIP. Increase like this every 6 cm a total of 4 times on each side = 98-108-118-130-144-158 stitches. When the piece measures 26-27-28-29-30-31 cm, work 2 ridges over the outermost 6-8-10-12-14-16 stitches on each side (the other stitches are continued in stocking stitch). After the 2 ridges, cast off 5-7-9-11-13-15 stitches at the beginning of the next 2 rows for the armholes = 88-94-100-108-118-128 stitches. Continue with stocking stitch and 1 edge stitch in garter stitch on each side. AT THE SAME TIME on the first row from the right side decrease 1 stitch on each side for the armholes – read DECREASE TIP. Decrease like this every 2nd row (each row from the right side) a total of 16-17-18-19-21-22 times = 56-60-64-70-76-84 stitches. Knit 1 row from the right side where you increase 7-7-7-7-9-9 stitches evenly spaced = 63-67-71-77-85-93 stitches. Change to needle size 2.5 mm. Work rib as follows from the wrong side: 1 edge stitch in garter stitch, * purl 1, knit 1 *, work from *-* until there are 2 stitches left, purl 1 and1 edge stitch in garter stitch. Continue this rib for 3 cm. Cast off a little loosely. FRONT PIECE: Cast on 100-112-122-136-150-166 stitches with needle size 2.5 mm and DROPS Safran. Purl 1 row from the wrong side, then work rib (knit 1, purl 1) with 1 edge stitch in garter stitch on each side. When the rib measures 3 cm, knit 1 row from the right side where you decrease 10-12-12-14-14-16 stitches evenly spaced = 90-100-110-122-136-150 stitches. Change to needle size 3 mm. Work stocking stitch back and forth with 1 edge stitch in garter stitch on each side. Purl 1 row from the wrong side with 1 edge stitch in garter stitch on each side. The next row is worked as follows from the right side: 1 edge stitch in garter stitch, 42-47-52-58-65-72 stitches in stocking stitch, A.1, 42-47-52-58-65-72 stitches in stocking stitch and 1 edge stitch in garter stitch. Continue this pattern. When the piece measures 6 cm, increase 1 stitch on each side. Increase like this every 6 cm a total of 4 times on each side = 98-108-118-130-144-158 stitches. When the piece measures 26-27-28-29-30-31 cm (adjust so the next row is either row 3 or 7 in A.1), work 2 ridges over the outermost 6-8-10-12-14-16 stitches on each side (the other stitches are continued in stocking stitch and pattern as before). After the 2 ridges work the next row from the right side as follows: Cast off 5-7-9-11-13-15 stitches for the armhole, work 42-45-48-52-57-62 stitches in stocking stitch, place the next 2 stitches on a cable needle in front of the piece, knit the next 3 stitches together and place these 43-46-49-53-58-63 stitches on a thread or extra needle = PART-1. PART-2: Knit twisted together the 2 stitches from the cable needle, work 41-44-47-51-56-61 stitches in stocking stitch and 6-8-10-12-14-16 stitches in garter stitch. Turn, cast off 5-7-9-11-13-15 stitches for the armhole, work stocking stitch until there is 1 stitch left and 1 stitch in garter stitch = 43-46-49-53-58-63 stitches. OVERVIEW OF THE NEXT SECTION: Continue with stocking stitch and 1 edge stitch in garter stitch on each side. AT THE SAME TIME on the first row from the right side, begin to decrease for the armhole and V-neck. Decrease inside the 1 edge stitch – read DECREASE TIP; the decreases are different for the armhole and neck - read ARMHOLE and V-NECK before continuing. ARMHOLE: Decrease every 2nd row (each row from the right side) a total of 16-17-18-19-21-22 times. V-NECK: Decrease every row (both right side and wrong side) a total of 7-7-9-9-13-17 times, then every 2nd row (each row from the right side) 15-17-17-18-17-17 times. After all the decreases there are 5-5-5-7-7-7 stitches left for the strap. STRAP: = 5-5-5-7-7-7 stitches. Knit 1 row from the right side, * push the stitches back to the beginning of the needle, tighten the strand and knit the 5-5-5-7-7-7 stitches from the right side again *, work from *-* until the strap measures 9-9-10-11-11-11 cm – work to desired length; the strap is sewn to the back piece later. Cut the strand, pull it through the 5-5-5-7-7-7 stitches, tighten and fasten well. PART-1: Place the 43-46-49-53-58-63 stitches from PART-1 back on needle size 3 mm. Work stocking stitch back and forth with 1 edge stitch in garter stitch on each side. AT THE SAME TIME on the first row from the right side, begin to decrease for the armhole and V-neck in the same way as on PART-2 = 5-5-5-7-7-7 stitches left for the strap. Work the strap in the same way as on part-2. ASSEMBLY: Sew the straps to the back piece – outermost on each side. Sew the side seams inside the 1 edge stitch. |
||||||||||||||||
Diagram explanations |
||||||||||||||||
|
||||||||||||||||
Have you made this or any other of our designs? Tag your pictures in social media with #dropsdesign so we can see them! Do you need help with this pattern?You'll find tutorial videos, a Comments/Questions area and more by visiting the pattern on garnstudio.com. © 1982-2024 DROPS Design A/S. We reserve all rights. This document, including all its sub-sections, has copyrights. Read more about what you can do with our patterns at the bottom of each pattern on our site. |
With over 40 years in knitting and crochet design, DROPS Design offers one of the most extensive collections of free patterns on the internet - translated to 17 languages. As of today we count 304 catalogues and 11422 patterns - 11422 of which are translated into English (UK/cm).
We work hard to bring you the best knitting and crochet have to offer, inspiration and advice as well as great quality yarns at incredible prices! Would you like to use our patterns for other than personal use? You can read what you are allowed to do in the Copyright text at the bottom of all our patterns. Happy crafting!
Comments / Questions (67)
Huleux Justine wrote:
Bonjour, je tricote ce modèle en taille S. Sur le devant à 26cm de hauteur nous avons 98 mailles. 5m à rabattre + 42 mailles jersey + 2 maille sur épingle + 3mailles ensemble + 43 maille = 95 mailles et non 98. Que fais-je ?
15.08.2022 - 00:40DROPS Design answered:
Bonjour Mme Huleux, ce sont en fait ces 46 mailles que vous mettez en attente (= les 45 mailles tricotées + la diminution (les 3 m ens à l'end) et vous tricotez les mailles restantes pour le côté gauche du devant: PARTIE-2: les 2 m de l'aiguille à torsade (à tricoter ensemble) et les 44 m suivantes + les 8 m point mousse. Bon tricot!
15.08.2022 - 09:02Marie-ange Froment wrote:
Que veut dire:"ajuster pour que le rgsoit un rg3ou7de A2? ou se trouve le diagramme A2? merci
12.08.2022 - 23:01DROPS Design answered:
Bonjour Mme Froment, il fallait lire A.1 et non A.2 (correction faite, merci pour votre retour); vous devez ajuster la hauteur en cm (tricotez plus ou moins de 26-27-28-29-30-31 cm de sorte que le tour suivant soit un rang 3 ou bien un rang 7 de A.1. Bon tricot!
15.08.2022 - 07:54Vilarinho Luce wrote:
Après un rang endroit que veut dire pousser les mailles de nouveau au début de l’aiguille serrer le fil et tricoter à l’endroit sur l’endroit de nouveau
26.07.2022 - 20:51DROPS Design answered:
Bonjour, regardez la video ICI. Bon tricot!
26.07.2022 - 21:12Anna wrote:
Buona serata Sto lavorando la misura S Ho un problema con il davanti Dove dice : a 26 cm fare 2 coste a legaccio Poi chiudere 5 mg x lo scalfo Ma debbo fare anche l'altro lato chiudere le 5 maglie? Grazie
26.07.2022 - 19:54DROPS Design answered:
Buongiorno Anna, deve lavorare come indicato perchè in quel punto le 5 maglie dell'altro lato verranno intrecciate nella parte 2. Buon lavoro!
27.07.2022 - 15:13Eleonora wrote:
Hi there! Sorry, I don’t quite understand this part ‘ work 2 ridges over the outermost 6-8-10-12-14-16 stitches on each side (the other stitches are continued in stocking stitch)’. Does it mean I have to cast off these 6-16 stitches?
23.07.2022 - 08:01DROPS Design answered:
Dear Eleonora, for the first time you have to work ridge edge on both sides of the piece: so you work 6-8-10-12-14-16 st garter st, then knit to the last 6-8-10-12-14-16 st and work these 6-8-10-12-14-16 sts garter st. Continue this way till you have 2 ridges on each side of piece. After the 2 ridges, cast off 5-7-9-11-13-15 stitches at the beginning of the next 2 rows (i.e. on each side of piece - just above the ridges) for the armholes = 88-94-100-108-118-128 sts. In this way bottom of the armholes will have nice ridge edge. Happy knitting!
23.07.2022 - 10:08Judith Flapper wrote:
Oeps opmerking genoemd ipv vraag. In patroon is sprake van telpatroon A2 maar ik zie alleen A1. Wat moet ik volgen, krijg ik het middenpatroon (telpatroon) wanneer ik alleen A1 volg of moet ik A1 herhalen? Ik begrijp het niet helemaal. Dank voor uw antwoord. Vriendelijke groet, Judith Flapper
08.07.2022 - 11:42DROPS Design answered:
Dag Judith,
Oeps, er staat inderdaad een foutje in de tekst, het moet natuurlijk A.1 zijn in plaats van A.2. Je herhaalt inderdaad het telpatroon steeds in de hoogte om de rand met gaatjes midden voor te creëren.
24.07.2022 - 13:09Judith Flapper wrote:
Vraag: in het patroon is sprake van telpatroon 2 maar ik zie alleen telpatroon 1, daarnaast vraag ik me af als je alleen telpatroon 1 doet of je dan de helft van het telpatroon maakt omdat nergens telpatroon 2 wordt genoemd? Alvast dank voor het antwoord. Vriendelijke groet, Judith Flapper
08.07.2022 - 11:39MJ Pepper wrote:
I am having a devil of a time trying to make sense of this pattern. Normally, GAUGE shows itself clearly and accurately. This time, converting centimeters to inches NEVER proves itself. I have gone through the pattern several times, and yet there isn't one line that is correct... AND I AM USING the patterns gauge. Thank you for any help you can give me. Your friend, MJ, the SKEINdinavian
05.07.2022 - 02:17DROPS Design answered:
Dear Mrs MJ Pepper, try out the English US/in pattern to get the measurements in both cm and inches - you can always check and convert here- hope it can help if I didn't misunderstand your question. Happy knitting!
06.07.2022 - 08:58Laura wrote:
E un’altra domanda: quando si devono mettere le due maglie centrali sul ferro ausiliare all’inizio dello scollo a V quando si gira e si comincia il lavoro il filo è a sx di queste due maglie. Come faccio a lavorarle se ho il filo dalla parte sbagliata?
03.07.2022 - 21:16DROPS Design answered:
Buongiorno Laura, deve tagliare il filo e iniziare dal punto corretto. Buon lavoro!
06.07.2022 - 16:28Laura wrote:
Buongiorno, sto realizzando la parte davanti. Seguendo lo schema in totale vengono diminuite 10 maglie per gli scalfi? 5 su un ferro e 5 in quello successivo? È normale che sia così diverso dal retro?
03.07.2022 - 19:51DROPS Design answered:
Buojgiorno Laura, sia sul dietro che sul davanti vengono diminuite 10 maglie in 2 ferri successivi, poi c'è un modellamento graduale dello scalfo. Buon lavoro!
06.07.2022 - 16:23