Clicking the ORDER button will redirect you to Saules siulas website
The yarn cost is calculated from the pattern’s smallest size and the yarn’s cheapest product type. Looking for an even better price? You might find it on the DROPS Deals!
-------------------------------------------------------
Alternative Yarn – See how to change yarns here
Yarn Groups A to F – Use the same pattern and change the yarn here
Yarn usage using an alternative yarn – Use our yarn converter here
-------------------------------------------------------
Clicking the ORDER button will redirect you to Saules siulas website
The yarn cost is calculated from the pattern’s smallest size and the yarn’s cheapest product type. Looking for an even better price? You might find it on the DROPS Deals!
This pattern has been corrected. Click here to see the correction/s.
= knit | |
= purl | |
= knit 2 together | |
= slip 1 stitch as if to knit, knit 1 and pass the slipped stitch over the knitted stitch | |
= between 2 stitches make 1 yarn over. On the next round, knit the yarn over twisted to avoid a hole | |
= this square has no stitch; it was decreased earlier. Go straight to next symbol in diagram. |
Each of our patterns has specific tutorial videos to help you.
These step-by-step tutorials might also help you:
Why is the knitting/crochet tension so important?
Knitting tension is what determines the final measurements of your work, and is usually measured per 10 x 10 cm. It is provided like so: number of stitches in width x number of rows in height - eg: 19 stitches x 26 rows = 10 x 10 cm.
The knitting tension is very individual; some people knit/crochet loosely while others work tightly. You adjust the knitting tension with the needle size, which is why the suggested needle size is only meant as a guide! You need to adjust this (up or down) to ensure that YOUR knitting tension matches the knitting tension provided in the pattern. If you work with a different knitting tension than provided you will have a different yarn consumption, and your work will have different measurements than what the pattern suggests.
The knitting tension also determines which yarns can replace each other. As long as you achieve the same knitting tension you can replace one yarn with another.
See DROPS lesson: How to measure your tension/gauge
See DROPS video: How to make a gauge tension swatch
How do I know how many balls of yarn I need?
The required amount of yarn is provided in grams, eg: 450 g. To calculate how many balls you’ll need you first need to know how many grams are in 1 ball (25g, 50g or 100g). This information is available if you click on the individual yarn quality on our pages. Divide the amount required with the amount of each ball. For example, if each ball is 50g (the most common amount), the calculation will be as follows: 450 / 50 = 9 balls.
Can I use a different yarn than what the pattern suggests?
The important thing when changing from one yarn to another is that the knitting/crochet tension remains the same. This is so that the measurements of the finished piece will be the same as on the sketch provided. It is easier to achieve the same knitting tension using yarns from the same yarn group. It is also possible to work with multiple strands of a thinner yarn to achieve the knitting tension of a thicker one. Please try our yarn converter. We recommend you to always work a test swatch.
Please NOTE: when changing yarn the garment might have a different look and feel to the garment in the photo, due to individual properties and qualities of each yarn.
See DROPS lesson: Can I use a different yarn than the one mentioned in the pattern?
What are the yarn groups?
All our yarns are categorised into yarn groups (from A to F) according to thickness and knitting tension – group A contains the thinnest yarns and group F the thickest. This makes it easier for you to find alternative yarns to our patterns, should you wish to switch yarn. All yarns within the same group have a similar knitting tension and can easily replace each other. However, different yarn qualities have different structures and properties which will give the finished work a unique look and feel.
How do I use the yarn calculator?
At the top of all our patterns you’ll find a link to our yarn calculator, which is a helpful tool should you wish to use a different yarn than suggested. By filling in the yarn quality you wish to replace, the amount (in your size) and number of strands, the calculator will present good alternative yarns with the same knitting tension. Additionally it will tell you how much you’ll require in the new qualities and whether you’ll need to work with multiple strands. Most skeins are 50g (some are 25g or 100g).
If the pattern is worked with multiple colours, every colour will have to be calculated separately. Similarly, if the pattern is worked with several strands of different yarns (for example 1 strand Alpaca and 1 strand Kid-Silk) you will have to find alternatives for each, individually.
Why do you show discontinued yarns in the patterns?
Since different yarns have different qualities and textures we have chosen to keep the original yarn in our patterns. However, you can easily find options among our available qualities by using our yarn calculator, or simply pick a yarn from the same yarn group.
It is possible that some retailers still have discontinued yarns in stock, or that someone has a few skeins at home that they would like to find patterns for.
The yarn calculator will provide both alternative yarn as well as required amount in the new quality.
What size should I knit?
If you think it's hard to decide what size to make, it can be a good idea to measure a garment you own already and like the size of. Then you can pick the size by comparing those measures with the ones available in the pattern's size chart.
You'll find the size chart at the bottom of the pattern.
See DROPS lesson: How to read size chart
Why do I get the wrong knitting tension with the suggested needle size?
The needle size provided in the pattern serves only as a guide, the important thing is to follow the knitting tension. And since knitting tension is very individual, you will have to adjust the needle size to ensure that YOUR tension is the same as in the pattern – maybe you’ll have to adjust 1, or even 2 needle sizes, up or down to achieve the correct tension. For this, we recommend that you work test swatches.
Should you work with a different knitting tension than the one provided, the measurements of the finished garment might deviate from the measurement sketch.
See DROPS lesson: How to measure your tension/gauge
See DROPS video: How to make a tension/gauge swatch
Why is the pattern worked top-down?
Working a garment top-down provides more flexibility and room for personal adjustment. For example it is easier to try the garment on while working, as well as making adjustments to length of yoke and shoulder caps.
The instructions are carefully explaining every step, in the correct order. Diagrams are adjusted to the knitting direction and are worked as usual.
How do I work according to a knitting diagram?
The diagram depicts all rows/rounds, and every stitch seen from the right side. It is read from bottom to top, from right to left. 1 square = 1 stitch.
When working back and forth, every other row is worked from the right side and every other row is worked from the wrong side. When working from the wrong side, the diagram will have to be worked reversed: from left to right, knit stitches are purled, purl stitches are knit etc.
When working in the round every round is worked from the right side and the diagram are worked from right to left on all rounds.
See DROPS lesson: How to read knitting diagrams
How do I work according to a crochet diagram?
The diagram depicts all rows/rounds, and every stitch seen from the right side. It is worked from bottom to top, from right to left.
When working back and forth every other row is worked from the right side: from right to left and every other row is worked from the wrong side: from left to right.
When working in the round, every row in the diagram are worked from the right side, from right to left.
When working a circular diagram you start in the middle and work your way outwards, counter clockwise, row by row.
The rows usually start with a given number of chain stitches (equivalent to the height of the following stitch), this will either be depicted in the diagram or explained in the pattern.
See DROPS lesson: How to read crochet diagrams
How do I work several diagrams simultaneously on the same row/round?
Instructions for working several diagrams after each other on the same row/round, will often be written like so: “work A.1, A.2, A.3 a total of 0-0-2-3-4 times". This means you work A.1 once, then A.2 is worked once, and A.3 is repeated (in width) the number of times provided for your size – in this case like so: S = 0 times, M = 0 times, L=2 times, XL= 3 times and XXL = 4 times.
The diagrams are worked as usual: begin with the first row in A.1, then work the first row in A.2 etc.
See DROPS lesson: How to read knitting diagrams
See DROPS lesson: How to read crochet diagrams
Why are the sleeves shorter in larger sizes?
The total width of the garment (from wrist-to-wrist) will be larger in the larger sizes, despite the actual sleeves being shorter. The larger sizes have longer sleeve caps and wider shoulders, so there will be a good fit in all sizes.
Where on the garment is the length measured?
The measurement sketch/schematic drawing provides information regarding the full length of the garment. If it’s a jumper or a jacket the length is measured from the highest point on the shoulder closest to the neckline, and straight down to the bottom of the garment. It is NOT measured from the tip of shoulder. Similarly, the length of yoke is measured from the highest point on the shoulder and down to where yoke is split into body and sleeves.
On a jacket measures are never taken along bands, unless specifically stated. Always measure inside band stitches when measuring the length.
See DROPS lesson: How to read a schematic drawing
What is a repeat?
Diagrams are often repeated on the round or in height. 1 repeat is the diagram the way it appears in the pattern. If it says to work 5 repeats of A.1 in the round, then you work A.1 a total of 5 times after/next to each other in the round. If it says to work 2 repeats of A.1 vertically/in height you work the entire diagram once, then begin again at the start and work the entire diagram one more time.
Why does the piece start with more chain stitches than it’s worked with?
Chain stitches are slightly narrower than other stitches and to avoid working the cast-on edge too tight, we simply chain more stitches to begin with. The stitch count will be adjusted on the following row to fit the pattern and measurement sketch.
Why increase before the rib edge when the piece is worked top-down?
The rib edge is more elastic and will contract slightly compared to, for example, stocking stitch. By increasing before the rib edge, you avoid a visible difference in width between the rib edge and the rest of the body.
Why increase in the cast-off edge?
It’s very easy to cast off too tightly, and by making yarn overs while casting off (and simultaneously casting these off) you avoid a too tight cast off edge.
See DROPS video: How to bind off with yarn overs (yo)
How do I increase/decrease on every 3rd and 4th row/round alternately?
To achieve an even increase (or decrease) you can increase on, for example: every 3rd and 4th row alternately, like so: work 2 rows and increase on the 3rd row, work 3 rows and increase on the 4th. Repeat this until the increase is complete.
See DROPS lesson: Increase or decrease 1 st on every 3rd and 4th row alternately
How can I work a jacket in the round instead of back and forth?
Should you prefer to work in the round instead of back and forth, you may of course adjust the pattern. You’ll need to add steeks mid-front (usually 5 stitches), and follow the instructions. When you would normally turn and work from the wrong side, simply work across the steek and continue in the round. At the end you’ll cut the piece open, pick up stitches to work bands, and cover the cut edges.
See DROPS video: How to knit steeks and cut open
Can I work a jumper back and forth instead of in the round?
Should you prefer to work back and forth instead of in the round, you may of course adjust the pattern so you work the pieces separately and then assemble them at the end. Divide the stitches for the body in 2, add 1 edge stitch in each side (for sewing) and work the front and back pieces separately.
See DROPS lesson: Can I adapt a pattern for circular needles into straight needles?
Why is the pattern slightly different than what I see in the photo?
Pattern repeats can vary slightly in the different sizes, in order to get the correct proportions. If you’re not working the exact same size as the garment in the photo, yours might deviate slightly. This has been carefully developed and adjusted so that the complete impression of the garment is the same in all sizes.
Make sure to follow instructions and diagrams for your size!
How do I make a women’s size garment into a men’s size one?
If you have found a pattern you like which is available in women’s size it’s not very difficult to convert it to men’s size. The biggest difference will be the length of sleeves and body. Start working on the women size that you think would fit across the chest. The additional length will be worked right before you cast off for the armhole/sleeve cap. If the pattern is worked top-down you can add the length right after the armhole or before the first decrease on sleeve.
Regarding additional yarn amount, this will depend on how much length you add, but it is better with a skein too many than too few.
How do I prevent a hairy garment from shedding?
All yarns will have excess fibres (from production) that might come off as lint or shedding. Brushed yarns (ie hairier yarns) have more of these loose, excess fibres, causing more shedding.
Shedding also depends on what is worn under or over the garment, and whether this pulls at the yarn fibres. It’s therefore not possible to guarantee that there will be no shedding
Below are some tips on how to get the best result when working with hairier yarns:
1. When the garment is finished (before you wash it) shake it vigorously so the looser hairs come off. NOTE: do NOT use a lint roller, brush or any method that pulls at the yarn.
2. Place the garment in a plastic bag and put it in your freezer - the temperature will cause the fibres to become less attached to each other, and excess fibres will come off easier.
3. Leave in the freezer for a few hours before taking it out and shaking it again.
4. Wash the garment according to the instructions on the yarn label.
Why does my garment pill?
Pilling is a natural process that happens to even the most exclusive of fibers. It's a natural sign of wear and tear that is hard to avoid, and that is most visible in high friction areas of your garment like a sweater's arms and cuffs.
You can make your garment look as new by removing the pilling, using a fabric comb or a pill/lint remover.
Wednesday Mood |
|||||||||||||||||||
|
|
||||||||||||||||||
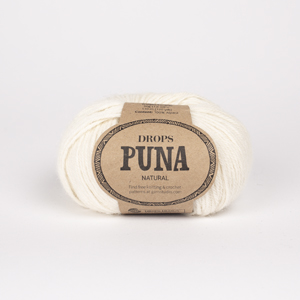
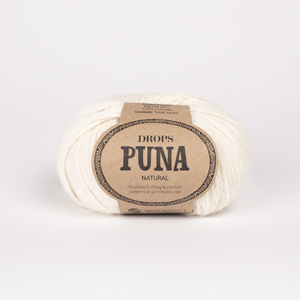
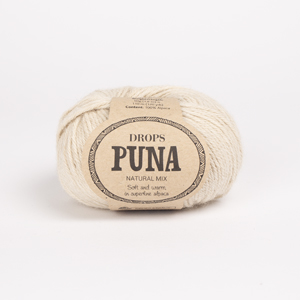
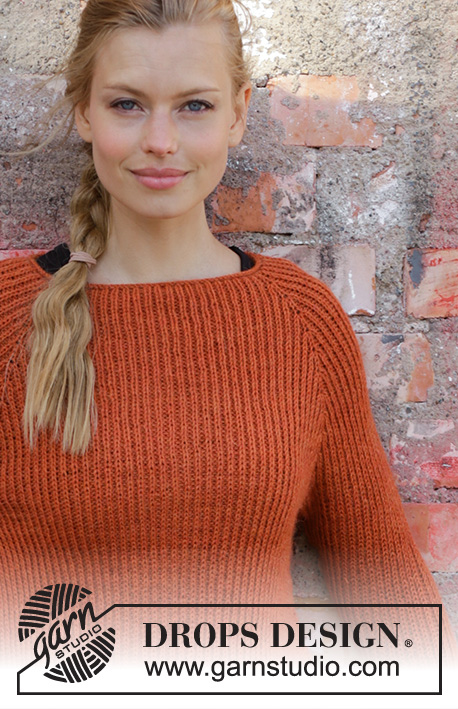
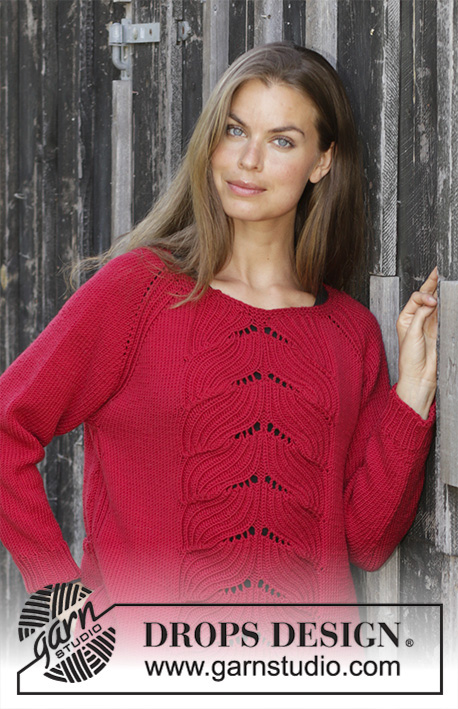
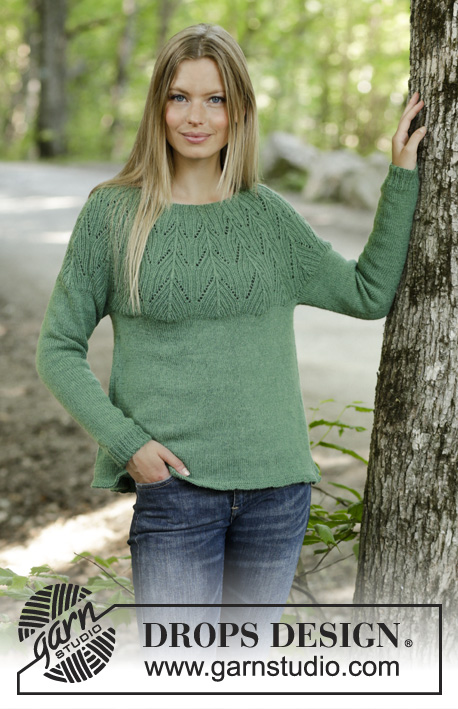
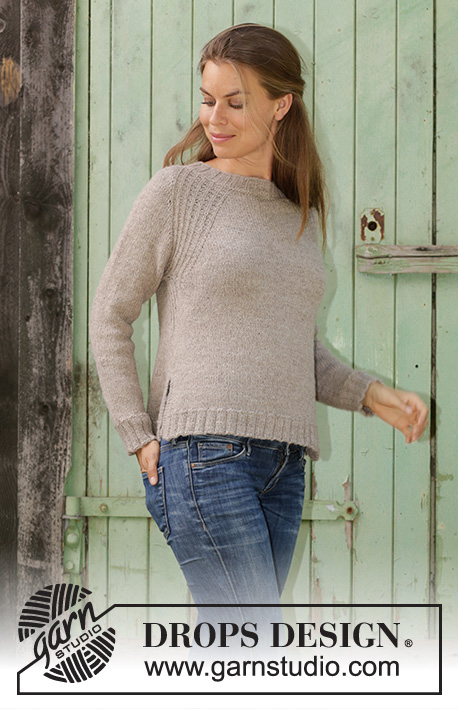
Knitted jumper with raglan in DROPS Puna or DROPS Daisy. The piece is worked top down with texture. Sizes S - XXXL.
DROPS 196-30 |
|||||||||||||||||||
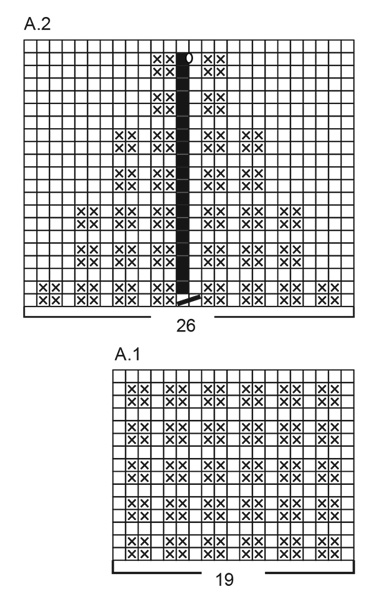
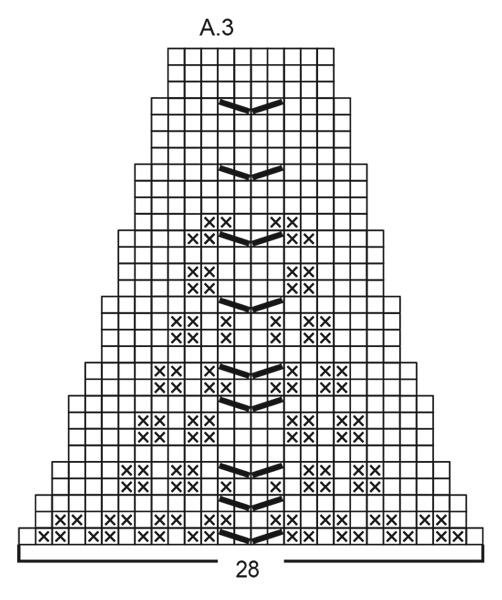
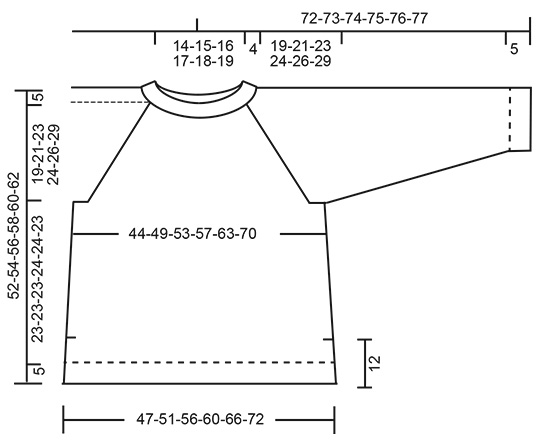
EXPLANATIONS FOR THE PATTERN: ------------------------------------------------------- PATTERN: See diagrams A.1 to A.3. The diagrams show all rows in the pattern seen from the right side. INCREASE TIP-1 (evenly spaced): To work out how to increase evenly, count the total number of stitches on the needle (e.g. 110 stitches) and divide by the number of increases to be made (e.g. 4) = 27.5. In this example, increase by making 1 yarn over alternately after the 27th and 28th stitch. On the next round work the yarn overs twisted to avoid holes. RAGLAN: Increase 1 stitch on each side of A.1 in each transition between body and sleeves (= 8 stitches increased on the round). Increase 1 stitch by making 1 yarn over. On the next round knit the yarn overs twisted to avoid holes. Then work the new stitches in stocking stitch. INCREASE TIP-2 (for sides of body): Work until there are 2 stitches left before the marker thread, 1 yarn over, knit 4 (marker thread sits in the middle of these 4 stitches), 1 yarn over. On the next round knit the yarn over twisted to avoid a hole. Then work the new stitch in stocking stitch. RIDGE/GARTER STITCH (worked back and forth): 1 ridge = Knit 2 rows. DECREASE TIP (for sleeves): Decrease 1 stitch on each side of the marker thread as follows: Work until there are 2 stitches left before the marker thread, knit 2 together, (marker thread sits here), slip 1 stitch as if to knit, knit 1 and pass the slipped stitch over the knitted stitch. ------------------------------------------------------- START THE PIECE HERE: ------------------------------------------------------- JUMPER - SHORT OVERVIEW OF THE PIECE: Neck, yoke and body are worked in the round with circular needle, top down. The body is divided at the split and then the front and back pieces are finished separately, back and forth on the needle. The sleeves are worked in the round with short circular needle/double pointed needles, top down. NECK: Cast on 110-115-120-125-135-145 stitches with circular needle size 3.5 mm and Puna or Daisy. Knit 1 round. Then work rib (= knit 3 / purl 2) for 4 cm. Knit 1 round where you increase 4-7-10-9-11-17 stitches evenly on round – read INCREASE TIP-1 = 114-122-130-134-146-162 stitches. Purl 1 round. Change to circular needle size 4 mm and work yoke as described below. YOKE: THE PIECE IS NOW MEASURED FROM HERE! The first round is worked as follows: Make 1 yarn over, knit 18-22-26-28-34-42 stitches (= back piece), make 1 yarn over, work A.1 (= 19 stitches), make 1 yarn over, knit 1 (= sleeve), make 1 yarn over, work A.1 (= 19 stitches), make 1 yarn over, knit 18-22-26-28-34-42 stitches (= front piece), make 1 yarn over, work A.1 (= 19 stitches), make 1 yarn over, knit 1 (= sleeve), make 1 yarn over, work A.1 (= 19 stitches). The first increase to RAGLAN – read description above, is now finished. Continue this pattern and increase every 2nd round a total of 24-27-30-33-36-39 times = 306-338-370-398-434-474 stitches. REMEMBER THE KNITTING TENSION! When all the increases to raglan are finished, the piece measures approx. 17-19-21-24-26-28 cm. Continue working pattern and with knit (but without increasing) until the piece measures 19-21-23-24-26-29 cm (adjust so that the next round in the pattern is a knitted row). The next round is worked as follows: Work 75-85-95-103-115-129 stitches as before (= back piece), place the next 69-75-81-87-93-99 stitches on 1 thread for sleeve, cast on 8 new stitches on the needle (= in side under sleeve), work the next 84-94-104-112-124-138 stitches as before (= front piece), place the next 69-75-81-87-93-99 stitches on 1 thread for sleeve, cast on 8 new stitches on the needle (= in side under sleeve), and work the last 9 stitches as before (= back piece). Body and sleeves are finished separately. THE PIECE IS NOW MEASURED FROM HERE! BODY: = 184-204-224-240-264-292 stitches. Insert 1 marker thread in each side; in the middle of the 8 stitches cast on under each sleeve. Allow the marker threads to follow your work onwards; they will be used when you increase. Continue in the round and work A.2 (= 26 stitches) over the 8 new stitches cast on under each sleeve and the 9 stitches on each side of these (i.e. 13 stitches on each side of the marker thread in each side). When A.2 has been completed in height the piece measures approx. 7½ cm. Continue in the round with knit and on the next round increase 1 stitch on each side of both marker threads – read INCREASE TIP-2 (= 4 stitches increased on the round). Increase like this every 3 cm a total of 3 times = 196-216-236-252-276-304 stitches. Continue working until the piece measures 16-16-16-17-17-16 cm. Now divide the piece for the front and back pieces and each is finished separately, back and forth on the needle. Place the 98-108-118-126-138-152 stitches between the 2 marker threads in each side on 1 thread for the front piece. Work the back piece as follows: BACK PIECE: = 98-108-118-126-138-152 stitches. Work stocking stitch with 5 stitches in GARTER STITCH – read description above, on each side of the piece. When the piece measures 23-23-23-24-24-23 cm increase 30-30-30-37-40-41 stitches evenly on row (but not over the stitches in garter stitch) = 128-138-148-163-178-193 stitches. Change to circular needle size 3.5 mm and work 1 ridge. The next row is worked as follows – from the right side: 5 stitches in garter stitch, * knit 3, purl 2 *, work from *-* until there are 8 stitches left on the row, knit 3 and 5 stitches in garter stitch. Work rib like this for 5 cm. Cast off with knit over knit and purl over purl – to avoid the cast-off edge being tight you can cast off with a needle size 4 mm. The whole jumper measures approx. 52-54-56-58-60-62 cm from the shoulder down. FRONT PIECE: = 98-108-118-126-138-152 stitches. Place the stitches back on circular needle size 4 mm and work in the same way as for the back piece. SLEEVE: Place the 69-75-81-87-93-99 stitches from the thread on the one side of the piece on short circular needle/double pointed needles size 4 mm and knit up 1 stitch in each of the 8 stitches cast on under the sleeve = 77-83-89-95-101-107 stitches. Insert 1 marker thread in the middle of the 8 stitches under the sleeve and allow this marker thread to follow your work onwards. The marker thread will be used a little later when decreasing mid under sleeve. Work A.3 (= 28 stitches) mid under sleeve (i.e. 14 stitches of A.3 on each side of the marker thread). The remaining stitches on the round are knitted. When A.3 has been completed in height, you have decreased 18 stitches = 59-65-71-77-83-89 stitches. Continue in the round with knit and on the next round decrease 2 stitches under the sleeve – read DECREASE TIP. Decrease like this every 10th-7th-6th-5th-4th-3rd round a total of 7-9-11-13-15-17 times = 45-47-49-51-53-55 stitches. Continue with knit until the piece measures 37-35-34-33-32-29 cm (shorter measurements in larger sizes due to longer yoke). Knit 1 round where you increase 5-8-6-9-7-10 stitches evenly on round = 50-55-55-60-60-65 stitches. Change to double pointed needles size 3.5 mm and purl 1 round. Then work rib (= knit 3 / purl 2) for 5 cm. Cast off with knit over knit and purl over purl – to avoid the cast-off edge being tight you can cast off with a needle size 4 mm. Work the other sleeve in the same way. |
|||||||||||||||||||
Diagram explanations |
|||||||||||||||||||
|
|||||||||||||||||||
Have you made this or any other of our designs? Tag your pictures in social media with #dropsdesign so we can see them! Do you need help with this pattern?You'll find tutorial videos, a Comments/Questions area and more by visiting the pattern on garnstudio.com. © 1982-2024 DROPS Design A/S. We reserve all rights. This document, including all its sub-sections, has copyrights. Read more about what you can do with our patterns at the bottom of each pattern on our site. |
With over 40 years in knitting and crochet design, DROPS Design offers one of the most extensive collections of free patterns on the internet - translated to 17 languages. As of today we count 304 catalogues and 11422 patterns - 11422 of which are translated into English (UK/cm).
We work hard to bring you the best knitting and crochet have to offer, inspiration and advice as well as great quality yarns at incredible prices! Would you like to use our patterns for other than personal use? You can read what you are allowed to do in the Copyright text at the bottom of all our patterns. Happy crafting!
Comments / Questions (23)
Pia wrote:
A.2 skal det diagram læses oppefra og ned eller nedfra og op.
26.03.2024 - 17:54DROPS Design answered:
Hej Pia. Det skal læses nedfra og op. Mvh DROPS Design
27.03.2024 - 14:02Diana wrote:
Hallo,in der Anleitung steht,nach den letzten Raglanzunahmen hat die Arbeit eine Lävon 26cm ( Gr.Xxl) .Es soll weiter gearbeitet werden,bis die Arbeit eine Länge von 26cm hat. Heisst das,ich beginne gleich mit dem Rumpfteil?
11.02.2024 - 18:50DROPS Design answered:
Liebe Diana, in diese Größe wird die Arbeit nach der letzten Zunahmen verteilt, Viel Spaß beim stricken!
12.02.2024 - 09:07Vicki Hood wrote:
I\'m on the part of A.2 chart. Just starting. What does the black square on space 14, on A.12 chart mean? Is this a knit or purl.? Pattern is very confusing.
04.06.2023 - 05:16DROPS Design answered:
Dear Vicki, the black square represents an empty space. On the first round of A.2, you decrease 1 stitch; this black square would represent the position of the decreased stitch. Since it has been decreased already, when working the chart, simply ignore this symbol and go to the next symbol of the chart (you don't need to skip any stitches). Happy knitting!
04.06.2023 - 17:44Vicki Hood wrote:
Problem with the YOKE. I worked the first round of the RAGLAN. But having a problem with the following: "Continue this pattern and increase every 2nd round a total of 24-27-30-33-36-39 times = 306-338-370-398-434-474 stitches." Looking at the A-1 Chart, and What would be every 2nd round on the Chart? 1st row is the knit purl purl knit etc. 2nd row knit purl purl knit etc, 3rd row is a knit row then it repeats. On what row is considered "every 2nd round" ?
26.03.2023 - 22:16DROPS Design answered:
Hi Vicki, The first increases for raglan are worked on the first (bottom row) of diagram A.1. The 2nd set of increases will be on row 3, the third on row 5, etc, so every other row in the diagram. Happy knitting!
27.03.2023 - 06:50Hansson wrote:
Tycker mycket om Drops och alla lektioner som lärt mig sticka! Tack😀 MEN varför visar ni inte foto med baksidan av tröjorna också, det skulle underlätta mycket för mig att förstå mönstret lättare då.
02.09.2022 - 09:59Theresa wrote:
I am working on the first size. Please could you help me with marking the Raglan increases in the first round. I am confused as to where to place the markers . Kind regards Theresa
26.04.2021 - 20:58DROPS Design answered:
Dear Theresa, before you start knitting, it helps, if you take a colored pen, and whenever you see a string of numbers cisrcle the number corresponding to the size you knit (if you are making the smallest size, that should be the first number, everywhere). Increases are done on both side of each pattern A.1. If you need markers to see where you at, when you follow the first round for the raglan increases, put a marker before and after A.1. Happy Knitting!
26.04.2021 - 23:13Inger Marie Greger Huun wrote:
Mønster A.3 Går utfra at der hvor symbol for felling u arm møtes er midt under ermet, og for hver gang felles d 2 masker. Jeg får ikke mønsteret til å stemme videre oppover. - Ser at det er forsøkt å beskrive en korrigering. Den skjønner jeg ikke noe av! Mvh Inger Huun
24.02.2021 - 21:15DROPS Design answered:
Hej Inger, jo men det er allerede korrigeret i diagrammet, så følger du diagrammet så bliver det korrekt. God fornøjelse!
26.02.2021 - 08:28May-britt Dalgaard wrote:
Første del af bærestykke, jeg har 134 masker på pinden i str. Xl men følger jeg hvad der står i opskriften bliver det til 132 masker når der er strikket 4xa1 + 2 x 28 masker så er en smule forvirret.
28.07.2020 - 14:51DROPS Design answered:
Slå om, 28 ret (= bagstykke), slå om, strik A.1 (= 19 masker), slå om, 1 ret (= ærme), slå om, strik A.1 (= 19 masker), slå om, 28 masker ret (= forstykke), slå om, strik A.1 (= 19 masker), slå om, 1 ret (= ærme), slå om, strik A.1 (= 19 masker) = 134 m + 8 omslag. God fornøjelse!
04.08.2020 - 13:16Maja wrote:
Hej, jeg vil gerne strikke blusen i en anden garn, som giver 19m pr 10 cm. På grund af garnets kvalitet, viljeg ikke går ned i pinde str, men vil høre om det kan anbefaldes, at jeg strikker blusen i størrelse S isf M? Mange tak, Maja
29.04.2020 - 09:48DROPS Design answered:
Hej Maja, ja det kan du gøre, eller så vælger du en bluse med raglan som er lavet til 19 masker :) DROPS 202-8
29.04.2020 - 10:07Monika wrote:
Czy pierwszy ściągacz ten przy szyji nie powinno być jedno oczko lewe i 3/2 prawe? Zdaje się, że jest błąd w tłumaczeniu?
18.01.2020 - 21:06DROPS Design answered:
Witaj Moniko, faktycznie był tam błąd: powinien być ściągacz: 3 oczka prawe / 2 oczka lewe (poprawione we wzorze). Dziękujemy i pozdrawiamy!
20.01.2020 - 09:28