
Popular categories
Looking for a yarn?


|
|
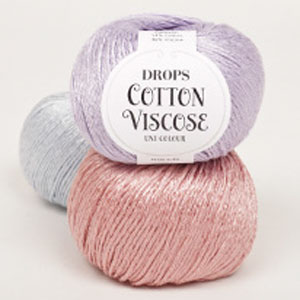
Country Colours |
|
|
|
|
DROPS waistcoat in “Cotton Viscose” with crochet squares on front piece and split with buttons on back piece. Size XS to XXL.
DROPS 115-17 |
|
|
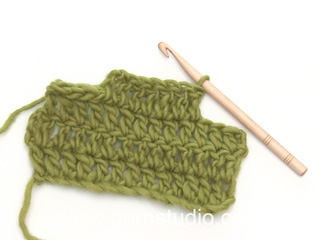
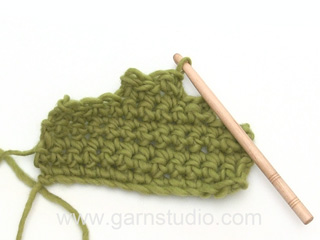
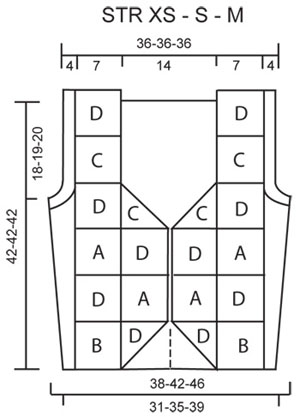
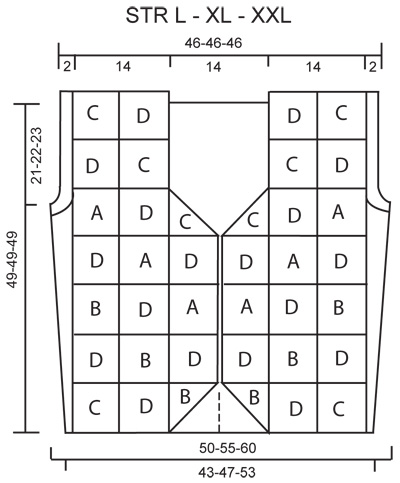
CROCHET TIP (apply to square): Replace first tr on round with 3 ch, replace first dc on round with 1 ch and finish each round with 1 sl st in first st from beg of round. BOBBLE: 1 bobble = 3 tr crochet tog, i.e. wait with the last pull-through in each tr until you have crochet all 3 tr, yarn round needle and pull thread through all 4 loops on hook. PATTERN (apply to back piece): ROW 1: 1 tr in each dc, at the end of row turn piece with 1 ch. ROW 2: 1 dc in each tr, at the end of row turn piece with 3 ch. Repeat row 1 and 2 . DECREASING TIP (apply to armholes): Dec as follows at the end of row: Work row until 1 st remain, turn and work return row. Dec as follows at beg of row: Work 1 sl st in first st, continue as before. ---------------------------------------------------------- ---------------------------------------------------------- WAISTCOAT: Front piece is worked in squares. Back piece + side piece is worked in rows with pattern. COLOURS OF THE SQUARES: The squares are crochet in 4 different colour combinations: SQUARE-A: the beg + round 1 = heather, round 2 = lilac, round 3, 4 and 5 = light pink. SQUARE-B: the beg + round 1 = brown, round 2 = light pink, round 3, 4and 5 = heather. SQUARE-C: the beg + round 1 = heather, round 2 = brown, round 3, 4 and 5 = lilac. SQUARE-D: the beg + round 1 = lilac, round 2 = heather, round 3, 4 and 5 = brown. NUMBER OF SQUARES: SIZE XS-S-M: Crochet 4 whole squares of A, 2 whole squares of B, 2 whole squares + 2 half squares of C and 8 whole + 2 half squares of D = a total of 16 whole + 4 half squares. SIZE L-XL-XXL: Crochet 6 whole squares of A, 4 whole + 2 half squares of B, 6 whole + 2 half squares of C and 18 whole squares of D = a total of 34 whole + 4 half squares. WHOLE SQUARE: Crochet 5 ch with crochet hook size 3.5 mm and form a ring with 1 sl st in first ch. ROUND 1: 12 tr in ring - SEE CROCHET TIP! ROUND: 2 tr in each tr = 24 tr. ROUND 3: * 1 dc in tr, 5 ch, skip 1 tr, 1 dc in next tr, 2 ch, skip 1 tr, 1 dc in next tr, 2 ch, skip 1 tr *, repeat from *-* a total of 4 times = 12 ch-loops (4 large and 8 small), finish with 1 sl st in first st from beg of round. ROUND 4: * Crochet [-] in the large ch-loops: [1 BOBBLE – see above, 2 ch, 1 bobble, 4 ch (= corner), 1 bobble, 2 ch and 1 bobble], 2 ch, 1 tr in dc between the 2 small ch-loops, 2 ch *, repeat from *-* a total of 4 times, finish with 1 sl st at the top of first bobble. ROUND 5: In all 2-ch-loops crochet 3 dc and in all 4-ch-loops (= corners) crochet 5 dc. Square measures 7 x 7 cm. HALF SQUARE: Crochet 5 ch with crochet hook size 3.5 mm and form a ring with 1 sl st in first ch. ROW 1: 8 tr in ring, turn piece. ROW 2: 1 tr in first tr, 2 tr in each of the next 7 tr = a total of 15 tr, turn piece. ROW 3: 5 ch, skip 1 tr, 1 dc in next tr, 2 ch, skip 1 tr, 1 dc in next tr, 2 ch, skip 1 tr, 1 dc in next tr, 5 ch (= corner), skip 1 tr, 1 dc in next tr, 2 ch, skip 1 tr, 1 dc in next tr, 2 ch, skip 1 tr, 1 dc in next tr, 4 ch, skip the last but one tr, 1 dc in last tr, turn piece. ROW 4: 5 ch (= 1 tr + 2 ch), in the first ch-loop crochet: 1 bobble, 2 ch and 1 bobble, then work 2 ch, 1 tr in dc between the 2 small ch-loops, 2 ch, in the large ch-loop crochet [-]: [1 bobble, 2 ch, 1 bobble, 4 ch (= corner), 1 bobble, 2 ch and 1 bobble], 2 ch, 1 tr in dc between the 2 small ch-loops, 2 ch, in the last ch-loop crochet: 1 bobble, 2 ch and 1 bobble, finish with 2 ch and 1 tr in the first ch from previous row, turn piece. ROW 5: 1 ch, crochet 3 dc in all 2-ch-loops and 5 dc in 4-ch-loop at the corner, finish with 3 dc in 4th and 5th ch from beg of row. BACK PIECE + SIDE PIECE: The first 8 cm are worked in 2 pieces (for split). PIECE-1 (= left side, with buttonhole band): Crochet 47-57-66-59-71-83 loose ch with crochet hook size 3.5 mm and brown (less sts in size L than size M because there are more squares in size L). Work first row as follows: 1 dc in second ch from hook, 1 dc in each of the next 3-1-4-3-3-3 ch, * skip 1 ch, 1 dc in each of the next 5 ch *, repeat from *-* = 39-47-55-49-59-69 dc. Now continue in PATTERN – see above. REMEMBER CROCHET TENSION! Put piece aside when it measures 8 cm. PIECE-2 (= right side): Crochet 41-51-60-53-65-77 loose ch with crochet hook size 3.5 mm and brown. Work first row as follows: 1 dc in second ch from hook, 1 dc in each of the next 3-1-4-3-3-3 ch, * skip 1 ch, 1 dc in each of the next 5 ch *, repeat from *-* = 34-42-50-44-54-64 dc. Continue in pattern When piece measures 8 cm put it aside (make sure to finish on the same row as Piece-1). BACK PIECE: Now crochet the 2 pieces tog as follows: Place the extra 5 buttonhole band sts on left piece under the 5 first sts on the right piece, crochet pieces tog – continue the pattern, i.e. crochet through 2 layers on 5 sts in the middle = 68-84-100-88-108-128 sts. Insert a marker 3-7-11-2-6-11 sts in from each side (= the sides), AT THE SAME TIME on second row with tr inc 1 st on each side of both markers (= 4 inc sts in total) – inc by working 2 tr in 1 dc. Repeat the inc on every other row a total of 7 times = 96-112-128-116-136-156 sts. When piece measures 24-23-22-28-27-26 cm dec for armhole as follows: SIDE PIECE: Only crochet on the first 6-8-10-4-7-10 sts at one side, continue the pattern back and forth on these sts, AT THE SAME TIME dec 1 st towards armhole on every row – SEE DECREASING TIP – until all sts have been dec. Repeat on the other side. BACK PIECE: Only crochet on the middle 68-72-76-92-98-104 sts, continue the pattern back and forth on these sts, AT THE SAME TIME dec 1 st each side on every row – SEE DECREASING TIP – until there are 56-56-56-84-84-84 sts left on row. Continue until piece measures 40-40-40-47-47-47 cm. Now work 3 rows on only the 14-14-14-28-28-28 sts each side (the middle 28 sts = neck), and then cut the thread. ASSEMBLY: Sew the squares tog to 2 front pieces in colours as shown in chart. NOTE: See diagram for your size. Sew tog in outer loops of sts with brown. Sew front piece to back piece and sew shoulder seams – sew edge to edge with brown. BORDER ROUND ARMHOLE: Crochet 6-6-6-3-3-3 rounds of dc round armholes with brown. Now work 1 round with picots as follows: 1 dc in first st, * 3 ch, 1 dc in first ch, skip 1 st, 1 dc in next st *, repeat from *-*, finish with 1 sl st in first dc. BORDER ROUND WAISTCOAT: Crochet round the whole garment with brown. Beg at the bottom by split on back piece, continue along bottom edge, up along front piece, round neck, down along the other front piece, and along bottom edge to the split mid back (i.e. do not crochet along the sides of split mid back). Work 2 rows dc. NOTE: in all outward facing corners work 3 dc and in all inward facing corners skip 1 st. Now work 1 row with picots as described for armholes – also crochet this row along the sides of split mid back. Sew on 3-3-3-4-4-4 buttons to the second row with dc on left front piece and use the picots as buttonholes. Sew 4 buttons on buttonhole band on the left side of split mid back and use the picots as buttonholes. |
|
|
|
|
|
|
Have you made this or any other of our designs? Tag your pictures in social media with #dropsdesign so we can see them! Do you need help with this pattern?You'll find tutorial videos, a Comments/Questions area and more by visiting the pattern on garnstudio.com. © 1982-2024 DROPS Design A/S. We reserve all rights. This document, including all its sub-sections, has copyrights. Read more about what you can do with our patterns at the bottom of each pattern on our site. |


With over 40 years in knitting and crochet design, DROPS Design offers one of the most extensive collections of free patterns on the internet - translated to 17 languages. As of today we count 304 catalogues and 11422 patterns - 11422 of which are translated into English (UK/cm).
We work hard to bring you the best knitting and crochet have to offer, inspiration and advice as well as great quality yarns at incredible prices! Would you like to use our patterns for other than personal use? You can read what you are allowed to do in the Copyright text at the bottom of all our patterns. Happy crafting!
Comments / Questions (35)
Bonjour, pour les augmentations du dos, on place un marqueur sur la 11ième bride et on augmente avant et après: c'est ok pour le premier rang mais pour les autres rangs de brides, c'est toujours une augmentation de chaque côté de la 11ième? Merci pour votre aide!
08.08.2022 - 21:44DROPS Design answered:
Bonjour Ayaka, vous devez augmenter à chaque fois de chaque côté de ce marqueur, autrement dit, la 2ème fois, vous augmentez dans la 12ème maille à partir du bord de chaque côté (et vous avez 2 brides en plus au milieu) et ainsi de suite. Bon crochet!
09.08.2022 - 08:50Hi, when crocheting the back why do you start decreasing separately on each side? What about the middle? Do you cut the yarn to move to the far side then again to work up the middle? Could you not just do the correct number of full rows with decreases at each end like the rows in the next section? Sorry, I hope this makes sense.
29.07.2020 - 17:43DROPS Design answered:
Dear Abigail, you cut the yarn after you worked SIDE PIECES and join it to work back piece, crocheting over the middle 68-104 sts (see size), and decrease 1 st on every row on each side (= 2 sts in total on every row) for the armholes until there are 56-84 sts, this mean simply decrease 2 sts on every row a total of 6-8-10-4-7-10 times/rows. Happy crocheting!
30.07.2020 - 08:48Hva menes med de fem ekstra stolpemasker? Jeg greier ikke å forstå hvordan bakstykkene på 8 cm skal hekles sammen.
10.01.2018 - 09:09DROPS Design answered:
Hei Ingvild. De 5 ekstra stolpemaskene er knappestolpen som hekles på venstre bakstykket. Når begge bakstykkene måler 8 cm skal bakstykkene hekles sammen til et bakstykke, da legges de 5 ekstra stolpemaskene på venstre del under de 5 første m på høyre del og de hekles sammen – fortsett mønsteret (det hekles altså gjennom 2 lag over 5 m på midten). God Fornøyelse!
24.01.2018 - 09:06Bonjour, En fait, ça n'est pas clair pour moi...Pour chaque devant, il y a 4 coins. Pour celui du haut (carré C, demi-carré C), on saute 1m. Et pour les suivants, on crochète 3 m ?
12.10.2017 - 15:41DROPS Design answered:
Bonjour Martine, pour chaque devant, on saute 1 m au niveau des carrés C/C (encolure), puis on crochète 3 m dans le coin des carrés C/D de l'encolure/bordure devant et dans les 2 derniers coins en bas du devant. Bon crochet!
12.10.2017 - 16:01Re-bonsoir, En fait ma question précédente concernant le travail sur les coins est passée inopinément en commentaire....
11.10.2017 - 19:37DROPS Design answered:
Bonjour Martine, c'est bien exact, les coins vers l'extérieur sont en bas du gilet (on crochète 3 ms pour un joli arrondi) et les coins vers l'intérieur sont ceux des carrés C de l'encolure, on saute 1 m pour former un joli arrondi. Bon crochet!
12.10.2017 - 09:07Bonjour, Pour finir, que doit-on comprendre par coins ouverts vers l'extérieur ou intérieur ? --- Intérieurs: les coins en haut de C et en bas de D ? Merci beaucoup par avance.
11.10.2017 - 19:33Bonjour, Lorsqu'il est écrit à la fin de la la 2ème partie ( côté droit) : "mettre en attente"... En fait, on doit continuer de suite en superposant les milieux ... ? (Et donc en reprenant la partie gauche.) D'avance, merci.
04.10.2017 - 17:09DROPS Design answered:
Bonjour Martine, on reprend les 2 côtés pour crocheter le dos en superposant les 5 m des 2 côtés (celles du côté gauche sous celles du côté droit) et en les crochetant ensemble. Bon crochet!
05.10.2017 - 08:49Merci. Lorsqu'il est écrit de piquer dans la bride, ce n'est pas piquer entre les brides mais bien dans la maille (du haut de la bride)...?
20.09.2017 - 17:01DROPS Design answered:
Bonjour Martine, quand on doit faire 1 maille serrée ou 1 bride dans 1 bride, on pique le crochet sous les 2 brins de la bride du rang/tour précédent, comme on le fait normalement. Bon crochet!
20.09.2017 - 17:54Bonjour, Merci, je voulais avoir confirmation. Un petit détail: 2 vidéos sont proposées pour débuter ce carré. J'ai choisi le cercle magique mais peut-être faut-il un trou plus accentué et donc choisir de faire 5m...
20.09.2017 - 13:33DROPS Design answered:
Bonjour Martine, vous pouvez au choix commencer avec l'une ou l'autre technique, il faut juste que votre carré soit bien plat. Bon crochet!
20.09.2017 - 13:52Bonjour, J'ai un souci pour débuter la nope au 4ème tour du carré. Finir le tour 3 avec une maille coulée dans la ms du tour précédent et ensuite ...? ----3 m en l'air pour la 1ere B ? Merci d'avance.
19.09.2017 - 18:05DROPS Design answered:
Bonjour Martine, le tour 4 commence par 1 nope, soit 3 brides écoulées ensemble, au début du tour, crochetez 3 ml (= 1ère bride) puis crochetez 2 brides mais sans faire le dernier jeté à la fin de chacune de ces 2 brides, et écoulez toutes les boucles sur le crochet. Bon crochet!
20.09.2017 - 08:35