
Popular categories
Looking for a yarn?


|
||||||||||||||||||||||||||||
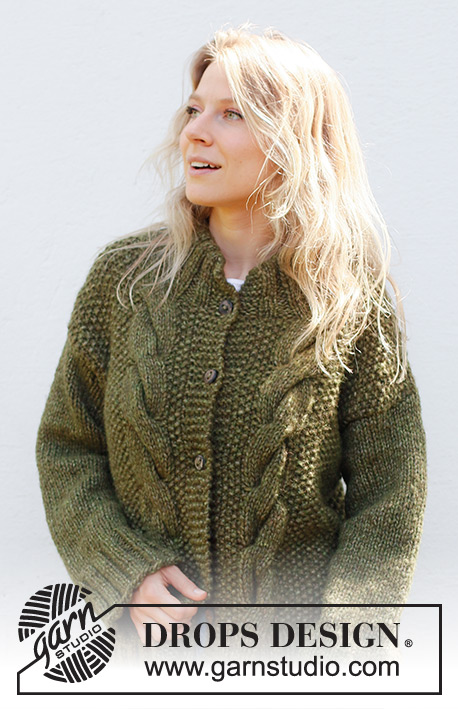
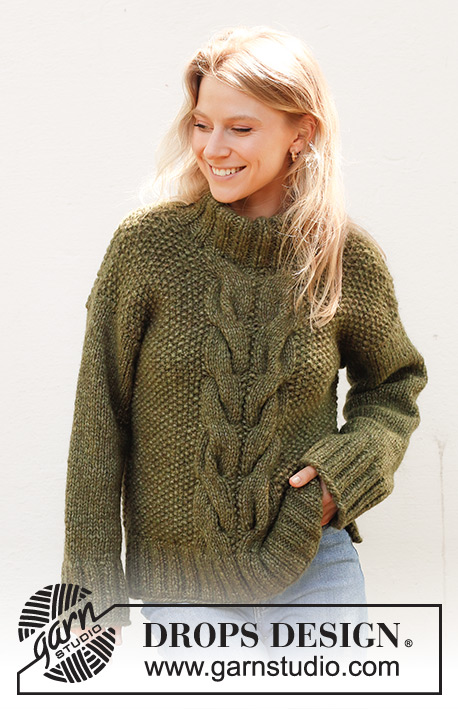
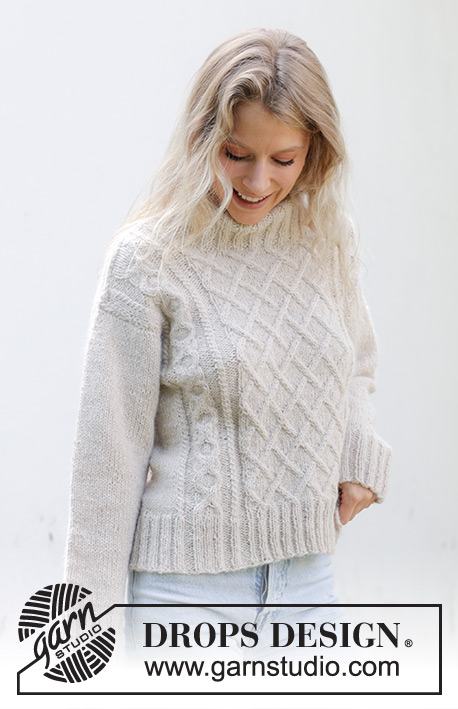
Cable Beach Sweater |
||||||||||||||||||||||||||||
 |
 |
|||||||||||||||||||||||||||
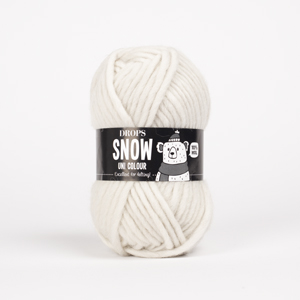
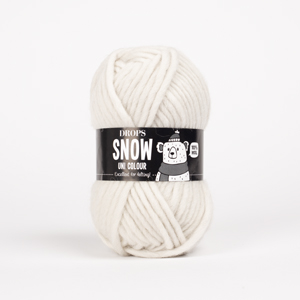
Knitted over-sized jumper in DROPS Snow. The piece is worked top down with cables, split in sides and double neck. Sizes S - XXXL.
DROPS 243-23 |
||||||||||||||||||||||||||||
|
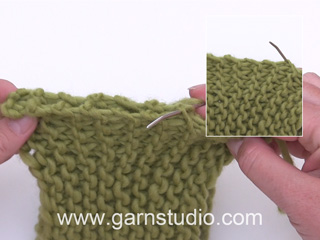
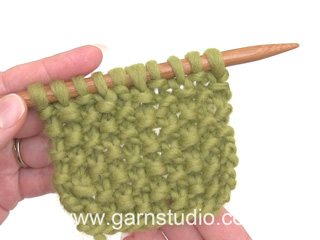
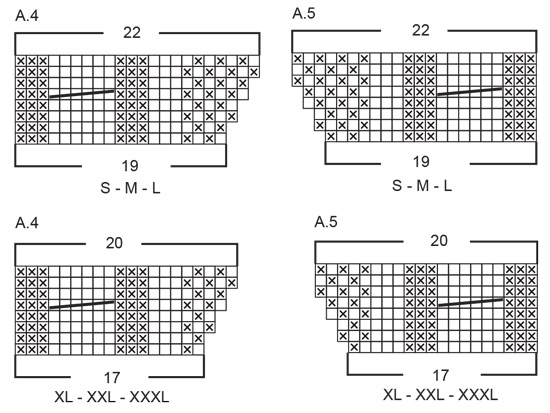
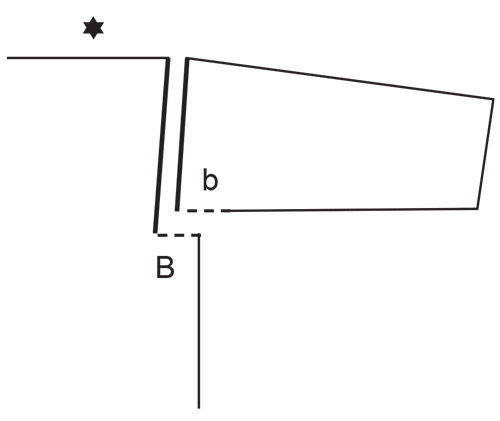
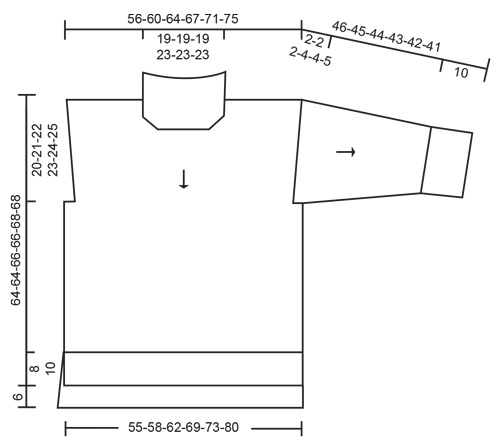
------------------------------------------------------- EXPLANATIONS FOR THE PATTERN: ------------------------------------------------------- PATTERN: See diagrams A.1 to A.7. Choose diagram for your size (applies to A.2 – A.5). The diagrams show all rows in the pattern from the right side. DECREASE TIP-1 (for armholes on back piece): Decrease 1 stitch outermost on each side by working the outermost 2 stitches together. The stitches are knitted together if the next/last stitch is purled or purled together if the next/last stitch is knitted. DECREASE TIP-2: Start 3 stitches before the marker-thread, knit 2 together, knit 2 (marker-thread sits between these 2 stitches), slip 1 stitch knit-wise, knit 1 and pass the slipped stitch over the knitted stitch (2 stitches decreased). ------------------------------------------------------- START THE PIECE HERE: ------------------------------------------------------- JUMPER – SHORT OVERVIEW OF THE PIECE: The front piece is worked top down, with moss stitch and cables. The back piece is worked top down with moss stitch. The back piece is 6 cm longer than the front piece. Stitches are knitted up along the armholes and the sleeves are worked in the round with double pointed needles/short circular needle, top down in stocking stitch. The edges are worked in rib. Pieces are sewn together as explained below. The high neck is worked in the round to finish. FRONT PIECE: Start with the left shoulder (when the garment is worn), then work the right shoulder before the two are joined together for the front piece. LEFT SHOULDER: Cast on 20-22-24-24-26-28 stitches with circular needle size 8 mm and DROPS Snow. Purl 1 row from the wrong side. Work as follows from the right side: A.2 over the first 17-17-17-15-15-15 stitches, A.1 over the next 2-4-6-8-10-12 stitches and work the first stitch in A.1. There are 22-24-26-26-28-30 stitches. Continue the pattern. When A.2 is finished, possibly repeat the last 2 rows in A.2 until the piece measures 3-3-4-3-4-5 cm from the cast-on edge. Work as follows from the right side: A.4 over the first 19-19-19-17-17-17 stitches, continue A.1 over the last 3-5-7-9-11-13 stitches. Continue this pattern. AT THE SAME TIME, cast on stitches for the neckline at the end of each row from the wrong side as follows: 1 stitch 3 times, then cast on 16-16-16-20-20-20 stitches at the end of the last row = 41-43-45-49-51-53 stitches. Lay the piece to one side and work the right shoulder. RIGHT SHOULDER: Cast on 20-22-24-24-26-28 stitches with circular needle size 8 mm and DROPS Snow. Purl 1 row from the wrong side. Work as follows from the right side: A.1 over the first 2-4-6-8-10-12 stitches, work the first stitch in A.1, work A.3 over the last 17-17-17-15-15-15 stitches. There are 22-24-26-26-28-30 stitches. Continue the pattern. When A.3 is finished, repeat possibly the last 2 rows in A.3 until the piece measures 3-3-4-3-4-5 cm from the cast-on edge. Work as follows from the right side: Continue A.1 over the first 3-5-7-9-11-13 stitches, work A.5 over the last 19-19-19-17-17-17 stitches and cast on 1 stitch for the neckline at the end of the first row from the right side. Continue the pattern. AT THE SAME TIME, cast on stitches for the neckline at the end of each row from the right side as follows: 1 stitch 2 times = 25-27-29-29-31-33 stitches. When A.5 is finished (last row is from the wrong side), join the 2 shoulders together for the front piece. FRONT PIECE: Place the stitches from both shoulders on circular needle size 8 mm (the 16-16-16-20-20-20 cast-on stitches are for the neckline mid-front) = 66-70-74-78-82-86 stitches. Work as follows from the right side: Continue A.1 over the first 3-5-7-9-11-13 stitches, purl over purl and knit over knit across the next 15 stitches, A.1 over the middle 30 stitches (making sure you continue the pattern correctly over A.4 and A.5), knit over knit and purl over purl across the next 15 stitches and continue A.1 over the last 3-5-7-9-11-13 stitches. Work this pattern back from the wrong side. Now start cabling mid-front from the right side: Continue A.1 over the first 3-5-7-9-11-13 stitches, work A.6A, A.6B, A.6C and continue A.1 over the last 3-5-7-9-11-13 stitches. Continue this pattern. REMEMBER THE KNITTING TENSION! When the piece measures 20-21-22-23-24-25 cm from the cast-on edge on the shoulder, cast on 2-2-2-4-4-6 stitches for the armholes at the end of the next 2 rows = 70-74-78-86-90-98 stitches. Work the new stitches in A.1 (= 5-7-9-13-15-19 stitches in A.1 on each side of A.6). Continue until A.6 has been worked 3 times in height. The piece measures approx. 56-56-57-56-57-58 cm from the cast-on edge on the shoulder. Continue working until the piece measures 56-56-58-56-58-58 cm, i.e., in sizes L and XXL you can work 2 or 4 more rows at the beginning of A.6, finishing after a row from the wrong side – AT THE SAME TIME, on the last row from the wrong side (all sizes), increase 4-2-4-4-2-2 stitches evenly over both the first 5-7-9-13-15-19 and the last 5-7-9-13-15-19 stitches = 78-78-86-94-94-102 stitches. Change to circular needle size 6 mm. Work rib back and forth as follows: A.1 over the first 3 stitches, * knit 2, purl 2 *, work from *-* 1-1-2-3-3-4 times in total, knit 2, A.7A, A.7B, A.7C, * knit 2, purl 2 *, work from *-* 1-1-2-3-3-4 times in total, knit 2, A.1 over the last 3 stitches. Continue this rib for 8-8-8-10-10-10 cm. Cast off a little loosely. The front piece measures approx. 64-64-66-66-68-68 cm from the shoulder. BACK PIECE: Start with the left shoulder (when the garment is worn), then the right shoulder before the two are joined together for the back piece. LEFT SHOULDER: Cast on 20-22-24-24-26-28 stitches with circular needle size 8 mm and DROPS Snow. Purl 1 row from the wrong side. Then work A.1 back and forth over all stitches. When the piece measures 3 cm, and the next row is from the right side, cast on 2 stitches for the neckline at the end of the row = 22-24-26-26-28-30 stitches. Work back from the wrong side. Lay the piece to one side and work the right shoulder. RIGHT SHOULDER: Cast on 20-22-24-24-26-28 stitches with circular needle size 8 mm and DROPS Snow. Purl 1 row from the wrong side. Then work A.1 back and forth over all stitches but start A.1 with purl 1 (so the pattern fits after stitches are cast on for the neckline mid-back). When the piece measures 2 cm and the next row is from the wrong side, cast on for the neckline at the end of each row from the wrong side as follows: 2 stitches 1 time and 17-17-17-21-21-21 stitches 1 time = 39-41-43-47-49-51 stitches. Now join the 2 shoulders together for the back piece. BACK PIECE: Place the stitches from both shoulders on circular needle size 8 mm (the 17-17-17-21-21-21 cast-on stitches = neckline mid-back) = 61-65-69-73-77-81 stitches. Start from the right side and continue A.1 back and forth over all stitches, with knit over purl and purl over knit. When the piece measures 6-5-7-6-8-6 cm from the cast-on edge, decrease 1 stitch on each side – read DECREASE TIP-1. Decrease like this every 6-5-7-6-8-6 cm a total of 2-3-2-3-2-3 times = 57-59-65-67-73-75 stitches. NOTE: This gives the back piece the same shape as the front piece. When the piece measures 20-21-22-23-24-25 cm from the cast-on edge on the shoulder, cast on 2-2-2-4-4-6 stitches for the armholes at the end of the next 2 rows = 61-63-69-75-81-87 stitches. Work the new stitches in A.1. When the piece measures 56-58-58-56-58-58 cm, work the outermost 9 stitches on each side as follows from the right side: 3 stitches in A.1, knit 2, purl 2, knit 2 – the other stitches are continued in A.1. When the piece measures 62-62-64-62-64-64 cm, work as follows from the right side: 3 stitches in A.1, knit 2, purl 2, knit 2, stocking stitch over the next 43-45-51-57-63-69 stitches and increase 26-30-30-30-30-36 stitches evenly over these stitches, knit 2, purl 2, knit 2, A.1 over the last 3 stitches = 87-93-99-105-111-123 stitches. Change to circular needle size 6 mm and work as follows from the wrong side: 3 stitches in A.1, purl 2, knit 2, purl 2, * knit 3, purl 3 *, work from *-* a total of 11-12-13-14-15-17 times, knit 3, purl 2, knit 2, purl 3, 3 stitches in A.1. Continue this rib for 8-8-8-10-10-10 cm. Cast off a little loosely. The back piece measures approx. 70-70-72-72-74-74 cm. ASSEMBLY-1: Sew the shoulder seams inside the cast-on edge. SLEEVES: Use short circular needle size 8 mm and DROPS Snow. Knit up 44-46-48-50-52-54 stitches from the right side, inside 1 stitch along the armhole. Work stocking stitch back and forth for 2-2-2-4-4-5 cm. Now join the sleeve and finish working in the round. Insert 1 marker-thread mid-under the sleeve and allow it to follow your work onwards. When the sleeve measures 6-6-6-8-7-8 cm from the knitted-up stitches, decrease 2 stitches under the sleeve – read DECREASE TIP-2. Decrease like this every 6-6-4½-4½-3½-3½ cm a total of 5-5-6-6-7-7 times = 34-36-36-38-38-40 stitches. Work until the sleeve measures 36-35-34-33-32-31 cm. There is 10 cm left; try the jumper on and work to desired length. Knit 1 round and increase 14-12-18-16-16-20 stitches evenly spaced = 48-48-54-54-54-60 stitches. Change to double pointed needles size 6 mm. Work rib (knit 3, purl 3) for 10 cm. Cast off a little loosely. Work the other sleeve in the same way. ASSEMBLY-2: Sew the side seams in the outermost loop of the outermost stitch – starting at the armhole and working as far as the rib on the front piece (split of 8-8-8-10-10-10 cm on the front piece and 14-14-14-16-16-16 cm on the back piece). Sew the openings under each sleeve – see sketch. NECK: Use short circular needle size 6 mm and DROPS Snow. Knit up from the right side 72-72-78-84-84-90 stitches, inside 1 edge stitch, around the neckline (stitch number must be divisible by 6). Work rib in the round (knit 3, purl 3) for 20-20-20-22-22-22 cm. Cast off a little loosely. Fold the neck double to the inside and fasten with a couple of stitches on each shoulder. |
||||||||||||||||||||||||||||
Diagram explanations |
||||||||||||||||||||||||||||
|
||||||||||||||||||||||||||||

|
||||||||||||||||||||||||||||
|
||||||||||||||||||||||||||||

|
||||||||||||||||||||||||||||
|
||||||||||||||||||||||||||||
|
||||||||||||||||||||||||||||
|
Have you made this or any other of our designs? Tag your pictures in social media with #dropsdesign so we can see them! Do you need help with this pattern?You'll find tutorial videos, a Comments/Questions area and more by visiting the pattern on garnstudio.com. © 1982-2024 DROPS Design A/S. We reserve all rights. This document, including all its sub-sections, has copyrights. Read more about what you can do with our patterns at the bottom of each pattern on our site. |
||||||||||||||||||||||||||||


With over 40 years in knitting and crochet design, DROPS Design offers one of the most extensive collections of free patterns on the internet - translated to 17 languages. As of today we count 304 catalogues and 11422 patterns - 11422 of which are translated into English (UK/cm).
We work hard to bring you the best knitting and crochet have to offer, inspiration and advice as well as great quality yarns at incredible prices! Would you like to use our patterns for other than personal use? You can read what you are allowed to do in the Copyright text at the bottom of all our patterns. Happy crafting!
Comments / Questions (31)
Nog een vraag over het achterpand bij 56 cm in XL: de steken combinatie zoals aangegeven moet aan de goede kant gebreid worden. Wat doe ik dan aan de verkeerde kant? Gewoon A.1 breien of recht over averecht en averecht over recht (en dus eigenlijk hetzelfde als aan de goede kant) Alvast bedankt voor de reactie!
01.04.2024 - 11:56DROPS Design answered:
Dag Carlyn,
In de telpatronen staat ook aangegeven hoe je de steken aan de verkeerde kant breit. (Dus recht aan de goede kant, averecht aan de verkeerde kant etc. In he telpatroon staan alle naalden weergegeven. Dus zowel de heengaande als de teruggaande naalden.
03.04.2024 - 20:58Hallo, Bij het achterpand moet je als het werk in xl 62cm meet meerderen. Lees ik het goed dat dit moet over de 57 steken in tricotsteek? Kan ik het beste meerderen door 2x in 1 steek te breien, door een omslag of door tussen twee steken een draad op te halen? Wat past het beste bij dit patroon gezien de gaatjes die de laatste 2 methodes veroorzaken? Alvast bedankt voor de reactie!
21.03.2024 - 11:06DROPS Design answered:
Dag Carlyn,
Je meerdert inderdaad alleen over die 57 steken en niet over de andere steken. Dus je verdeelt de meerderingen over die 57 steken. Zelf meerder ik graag door de draad tussen 2 steken van de vorige naald op te nemen en deze gedraaid te breien. Door hem gedraaid te breien heb je geen last van gaatjes.
21.03.2024 - 20:48Hallo, Ik ben bezig met het achterpand en op een gegeven moment moet ik als het werk 56 cm meet, bepaalde steken breien aan de goede kant. Moet ik dit één toer doen of moet ik het zo lezen dat ik vanaf dat moment aan de goede kant deze steken combinatie moet breien? Alvast bedankt voor de reactie!
21.03.2024 - 10:52DROPS Design answered:
Dag Carlyn,
Vanaf dat moment moet je de steken op die manier breien.
21.03.2024 - 20:45Hallo, Ik ben bezig met het achterpand en op een gegeven moment moet ik als het werk 56 cm meet, bepaalde steken breien aan de goede kant. Moet ik dit één toer doen of moet ik het zo lezen dat ik vanaf dat moment aan de goede kant deze steken combinatie moet breien? Alvast bedankt voor de reactie!
21.03.2024 - 10:51Hello! When reading over the “Diagram Explained” I’m not sure what to do with the stich corresponding the black box(no stitch). I understand that I don’t “work” or “slip” the stitch but where do I put it? Should I leave it on the needle and continue knitting, move it to another needle, or let it fall off the needle?
21.03.2024 - 01:30DROPS Design answered:
Hi Tina, When you come to a black square, work the next stitch according to the square after the black square; e.g., in A.2 S-M-L, working from right to left on the first row, K1, P1, K1, P1, K3, P3, K1, 1 yo, K2, 1 yo, K1, P3. Hope this helps and happy knitting!
21.03.2024 - 06:41Bij de linker schouder achter moet je 2 steken opzetten en dan de teruggaande naald breien. De zojuist opgezette steken, moeten die dan juist wel of juist niet gebreid worden?
13.03.2024 - 11:31DROPS Design answered:
Dag Carlyn
Je zet deze steken op aan het einde van de naald, dan keer je het werk en begin je dus met het breien van de zojuist opgezette steken.
14.03.2024 - 22:06Der er 4 - 5 billeder til hver opskrift, men aldrig et eneste foto af modellens ryg. Hvorfor?
06.02.2024 - 21:51DROPS Design answered:
Hei Birgit. Noen oppskriften har bilde bak andre ikke. Som regel er plagget ganske lik foran og bak. Men ditt ønsket om bilde bakfra er oversendt til design avd og fotograf. mvh DROPS Design
09.02.2024 - 08:02Hei! Finner ikke diagram for A.1 - har dette falt ut av oppskriften? Evt hvordan skal det strikkes? Takk på forhånd
02.02.2024 - 18:14DROPS Design answered:
Hei Charlotte, Diagram A.1 er øverst på høyre siden av diagrammene. Diagrammene finner du på bunnen av oppskriften. God fornøyelse
07.02.2024 - 06:47This is related to my previous question? So I only knit that way for one row? And then continue back and forth until it reached 62 cm and then increase the stitches to create the ribbing on the back?
08.01.2024 - 08:11DROPS Design answered:
Dear Mrs Meier-Roeder, from 56 to 62 cm work A.1 with the 9 sts on each side as explained before, then when piece measures 62 cm knit the middle stitches increasing evenly then start ribbing edge on next row from WS. Happy knitting!
08.01.2024 - 11:10After reaching 56 cm on the back piece, are you supposed to continue with the A1, knit 2 purl 2 knit 2, A1 rib for the outermost 9 stitches until you reach a length of 62 cm? A photo of the back ofthis sweater would be helpful.
06.01.2024 - 20:10DROPS Design answered:
Dear Mary, after reaching 56cm, work as follows for the back piece: 3 stitches in A.1, knit 2, purl 2, knit 2, repeat A.1 the whole row until 9 stitches are left, knit 2, purl 2, knit 2, 3 stitches in A.1. Happy knitting!
07.01.2024 - 18:33