
Popular categories
Looking for a yarn?


|
||||||||||||||||||||||
Warm Apricot |
||||||||||||||||||||||
|
|
||||||||||||||||||||||
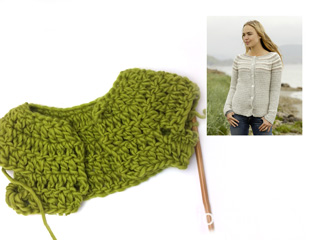
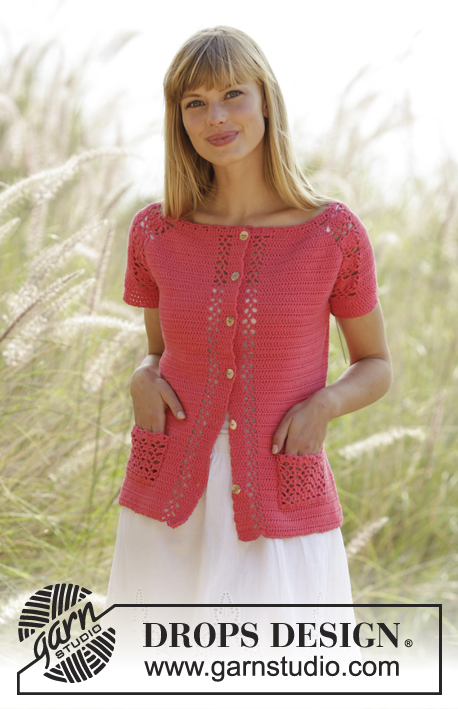
Crochet DROPS top with lace pattern and raglan in ”Safran”. The piece is worked top down. Size: S - XXXL.
DROPS Extra 0-1287 |
||||||||||||||||||||||
|
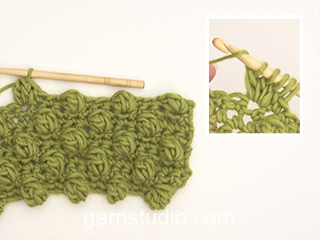
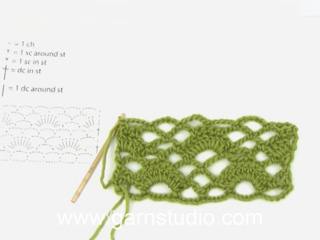
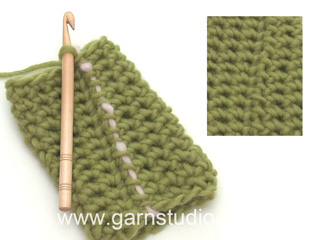
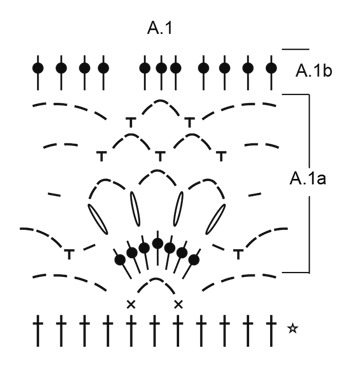
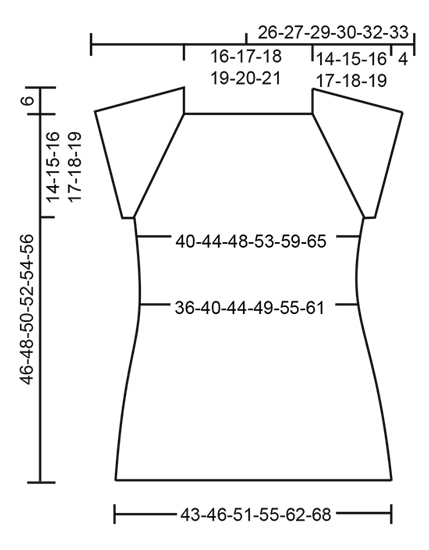
PATTERN: See diagrams A.1. CROCHET INFO: Replace first dc at on every dc round with ch 3, finish the round with 1 sl st in 3rd ch from beg of round. On every sc round, replace first sc with 1 ch and finish round with 1 sl st in 1st ch from beg of round. INCREASE TIP-1: Inc 1 dc by working 2 dc in same dc. INCREASE TIP-2 (applies to sides of body): Work until 3 dc remain before marker thread, work 2 dc in next dc (= 1 dc inc), work 1 dc in each of the next 4 dc (marker thread is in the middle of these sts), work 2 dc in next dc (= 1 dc inc). RAGLAN: Inc for raglan on each side of A.1. Inc 2 sts BEFORE A.1 as follows: Work until 2 dc remain before A.1, work 2 dc in each of the next 2 dc (= 2 dc inc). Inc 2 sts AFTER A.1 as follows: Work 2 dc in each of the first 2 dc after A.1 (= 2 dc inc). Inc 1 sts BEFORE A.1 as follows: Work until 1 dc remains before A.1, work 2 dc in next dc (= 1 dc inc). Inc 1 sts AFTER A.1 as follows: Work 2 dc in first dc after A.1 (= 1 dc inc). The inc on body and sleeves are uneven as explained in pattern. DECREASE TIP: Work until 4 dc remain before marker thread, work the next 2 dc tog as follows: Work 1 dc in next dc but wait with last pull through (= 2 sts on hook), work 1 dc in next dc, but on last pull through pull yarn through all sts on hook - 1 dc have been dec, work 1 dc in each of the next 4 dc (marker thread is between these sts), work the next 2 dc tog (= 1 dc dec). ---------------------------------------------------------- YOKE: The piece is worked top down. Work 161-166-171-176-181-186 ch on hook size 3.5 mm/E/4 with Safran. Work next round as follows: Work 1 dc in 4th ch from hook (= 2 dc) - READ CROCHET INFO, 1 dc in each of the next ch 2, * skip ch 1, 1 dc in each of the next 4 ch *, repeat from *-* the entire row = 128-132-136-140-144-148 dc. Then work next round as follows: Work 1 dc in each of the first 18-19-20-21-22-23 dc AT THE SAME TIME inc 4-5-5-6-7-8 dc evenly – READ INCREASE TIP-1 – (= half back piece), A.1 over the next 11 dc, 2 dc in next dc, 1 dc in each of the next 4 dc, 2 dc in next dc, A.1 over the next 11 dc (= sleeve), 1 dc in each of the next 36-38-40-42-44-46 dc AT THE SAME TIME inc 8-10-10-12-14-16 dc evenly (= front piece), A.1 over the next 11 dc, 2 dc in next dc, 1 dc in each of the next 4 dc, 2 dc in next dc, A.1 over the next 11 dc (= sleeve), 1 dc in each of the last 18-19-20-21-22-23 dc AT THE SAME TIME inc 4-5-5-6-7-8 dc evenly. On front and back piece there are now 44-48-50-54-58-62 dc and on sleeve there are A.1, 8 dc and A.1. On next round inc for RAGLAN – see explanation above! INC AS FOLLOWS ON FRONT AND BACK PIECE: Inc 2 dc every round 3-4-7-9-13-16 times in total, then 1 dc every round 12-12-10-9-6-5 times in total. INC AS FOLLOWS ON SLEEVES: Inc 2 dc every round 0-0-1-3-4-4 times in total, then 1 dc every round 15-16-16-15-15-17 times in total. REMEMBER THE CROCHET GAUGE! When A.1 have been worked 1 time vertically, repeat A.1a over A.1. After all inc there are 80-88-98-108-122-136 dc on front piece and back piece, on sleeve there are A.1, 38-40-44-50-54-58 dc and A.1. Piece measures approx. 14-15-16-17-18-19 cm / 5½''-6''-6¼''-6¾''-7''-7½''. Work next round as follows: Work 1 dc in each of the first 40-44-49-54-61-68 dc, work 8 ch (= under sleeve), insert 1 marker thread in the middle between the new ch, skip: A.1a, 38-40-44-50-54-58 dc and A.1a (= sleeve), work 1 dc in each of the next 80-88-98-108-122-136 dc, 8 ch (= under sleeve), insert 1 marker thread in the middle of the new sts, skip: A.1a and 38-40-44-50-54-58 dc and A.1a (= sleeve), work 1 dc in each of the next 40-44-49-54-61-68 dc = 160-176-196-216-244-272 dc and 16 ch. Insert 1 marker in piece, NOW MEASURE PIECE FROM HERE. Move marker threads when working, leave the marker in piece. BODY: Work 1 dc in every dc, 1 dc in every ch. There are 88-96-106-116-130-144 dc between marker threads on back piece and front piece. When piece measures 3 cm / 1'' (measured from marker), dec 1 st on each side of each marker thread in the side (= 4 sts dec) - READ DECREASE TIP! Repeat dec every 4-4-3½-4½-4½-4½ cm / 1½"-1½"-1 1/4"-1 3/4"-1 3/4"-1 3/4" 3-3-4-3-3-4 more times = 160-176-192-216-244-268 dc in total. When piece measures 17-18-19-20-21-22 cm / 6¾''-7''-7½''-8''-8¼''-8¾'' (measured from marker), inc 1 st on each side of each marker thread (= 4 dc inc) – see INCREASE TIP-2. Repeat inc every 1½ cm / ½'' 6-6-7-6-6-7 more times = 188-204-224-244-272-300 dc. Continue with 1 dc in every dc until piece measures 32-33-34-35-36-37 cm / 12½''-13½''-13 3/8''-13¾''-14¼''-14½'' (measured from marker). Piece measures approx. 46-48-50-52-54-56 cm / 18''-19''-19¾''-20½''-21¼''-22'' in total from neck edge. Work 1 edge around the top as follows: Work * 1 sc in first/next dc, ch 4, skip approx. 1 cm / 3/8'' *, repeat from *-* around the entire top. Fasten off. SLEEVE EDGE: Sleeve is worked in the round, top down. Beg by working mid under sleeve as follows: Work 1 sc in 5th ch of the 8 ch worked in armhole on body. Work 3 ch (= 1 dc). Then work with 1 dc in each of the next ch 3, A.1a as before, 1 dc in each of the next 38-40-44-50-54-58 dc, A.1a as before, 1 dc in each of the last 4 ch under sleeve, finish with 1 sl st in 3rd ch at beg of round. Work 1 dc in every dc and A.1a until 1 whole repetition of A.1a has been worked. Then work 1 dc in every dc, work A.1b over A.1a = 68-70-74-80-84-88 dc. On next round work 1 dc in every dc AT THE SAME TIME dec 12 dc evenly = 56-58-62-68-72-76 dc. Work 1 dc in every dc until sleeve edge measures approx. 4 cm / 1½''. Work * 1 sc in first/next dc, ch 4, skip approx. 1 cm / 3/8'' *, repeat from *-* around the entire sleeve. Fasten off. Work a sleeve edge around the other sleeve. NECK EDGE: Beg mid back. Work ch 1, * 1 sc in first/next dc, ch 4, skip approx. 1 cm / 3/8'' *, repeat from *-* around the entire neck, finish with 1 sl st in first ch, make sure to avoid a tight neck edge. |
||||||||||||||||||||||
Diagram explanations |
||||||||||||||||||||||
|
||||||||||||||||||||||
|
||||||||||||||||||||||
|
||||||||||||||||||||||
|
Have you made this or any other of our designs? Tag your pictures in social media with #dropsdesign so we can see them! Do you need help with this pattern?You'll find tutorial videos, a Comments/Questions area and more by visiting the pattern on garnstudio.com. © 1982-2024 DROPS Design A/S. We reserve all rights. This document, including all its sub-sections, has copyrights. Read more about what you can do with our patterns at the bottom of each pattern on our site. |
||||||||||||||||||||||


With over 40 years in knitting and crochet design, DROPS Design offers one of the most extensive collections of free patterns on the internet - translated to 17 languages. As of today we count 304 catalogs and 11422 patterns - 11417 of which are translated into English (US/in).
We work hard to bring you the best knitting and crochet have to offer, inspiration and advice as well as great quality yarns at incredible prices! Would you like to use our patterns for other than personal use? You can read what you are allowed to do in the Copyright text at the bottom of all our patterns. Happy crafting!
Comments / Questions (71)
Hello, I would like some clarification, please, on completion and repeats of A1. Should the whole of A1 be completed, including A1b, (ie 7 rounds) before repeating with A1a? Thank you
11.05.2024 - 15:14DROPS Design answered:
Dear Christine, yes, when it says A.1 it means the whole chart (A.1a and A.1b). Then, you just repeat one section of the chart, specifically A.1a. Happy knitting!
12.05.2024 - 20:46Merçi pour votre réponse. NÉANMOINS je ne TROUVE tj pas ds explications info crochet : si on dois au début Joindre la 1ère maille de la chainette avec la dernière si comne vous dite ce modèle est crocheté en rond..
02.04.2024 - 16:50DROPS Design answered:
Bonjour Valérie, le tout premier rang est bien un rang, pas un tour: vous crochetez 1 bride dans la 4ème maille en l'air à partir du crochet, puis 1 bride dans les mailles en l'air suivantes (pensez bien à sauter celles indiquées), puis vous joignez à la fin de ce rang par 1 maille coulée dans la 3ème maille en l'air à partir du crochet (cf info crochet) et continuez en rond (tours). Bon crochet!
03.04.2024 - 08:28Bonjour. Je ne vois pas ds explications s'il faut au début joindre les mailles chainettes en rond par mc puisque çe modèle se crochète de haut en bas..il n'y a pas non plus d'explications à la fin pour coudre les côtés. Merçi de clarifier svp
25.03.2024 - 13:17DROPS Design answered:
Bonjour Val, ce modèle se crochète en rond (pas de coutures côté), retrouvez sous INFO CROCHET au tout début des explications comment commencer/terminer les tours. Bon crochet!
02.04.2024 - 09:34Non ho capito quando va chiuso in cerchio il lavoro. All’inizio viene lavorato in piano?
16.08.2023 - 17:41DROPS Design answered:
Buongiorno Laura, la lavorazione inizia subito in tondo. Buon lavoro!
17.08.2023 - 10:00Porqué es tan difícil explicar con claridad cómo se deben hacer los aumentos? Tanto para el cuerpo como en las mangas? \r\nEs decir: aumentar 2/1 puntos en la espalda más 2/1 puntos en el delantero y 2/1 puntos antes y después de cada manga las veces/vueltas indicadas en cada caso, de acuerdo con cada talla. Tampoco estaría mal indicar los puntos totales que se deben aumentar en cada vuelta.\r\nLa labor es muy bonita pero las instrucciones bastante caóticas!
23.05.2023 - 00:06Buenos días: Me gustaría que me aclararan cuándo se comienza a tejer en redondo ya que en la explicación del patrón, después de hacer las cadenetas iniciales, dice que se comienza a tejer el primero punto alto en la cuarta cadeneta y no veo en ningún punto de la explicación cuando se cierra el círculo y se empieza a tejer en redondo. Gracias por todo.
02.04.2023 - 10:51DROPS Design answered:
Hola Tamar, cada vuelta se termina con 1 punto enano en la 3ª cadeneta/1ª cadeneta del inicio de la vuelta.
02.04.2023 - 22:41Pour obtenir l’effet de côtes du point de brides sur la photo, on dirait que vous avez tourné l’ouvrage à chaque rang pour obtenir un groupe de deux rangs ce qui suppose que vous avez fait un rang sur l’envers et un rang sur l’endroit créant ainsi un effet de côtes. Est-ce le cas? Comment avez-vous fait? Merci
17.06.2022 - 14:13DROPS Design answered:
Bonjour Mme Dionne, ce top se crochète en rond, mais vous pouvez tout à fait le crocheter alternativement sur l'endroit et sur l'envers si vous le souhaitez, il suffit alors de joindre la dernière maille par 1 maille coulée au début du rang, puis tourner et ainsi travailler alternativement sur l'endroit et sur l'envers. Bon crochet!
20.06.2022 - 07:26Many thanks for your swift reply. I now understand about the front and back increases but am still confused about the sleeves. Each sleeve has 2 A1 so do you Inc before and after each A1 as this would add stiches to the front and back also. Or is it correct to say you inc after the first A1 and before the second?
18.05.2022 - 10:45DROPS Design answered:
Dear Marion, you have to increase for sleeve after the A.1 (between front/sleeve and back/sleeve) at the beginning of sleeve and before the next A.1 (between sleeve/front and sleeve/back) at the end of sleeve. Ie the number of trebles (UK-English) will increase between both raglan lines/A.1 on sleeves, front and back pieces. Can this help?
18.05.2022 - 12:38I'm very confused with inc for raglan. Where do you do the increases? Is it in the middle of the front and back plus between the A1 on the sleeves? If so, I don't understand the relevance of the explanation, Raglan, which talks about increasing before and after the A1. I'm making size XL . If increased before and after the A1 would have far too many stitches.
17.05.2022 - 16:17DROPS Design answered:
Dear Mrs Isle, the increases for raglan will be worked on a different rythm on body and on sleeves, in XL you will increase on body 2 sts on each side (beg + end of front/back piece = 8 sts for body) a total of 9 times and only 1 st on each side (= 4 sts for body) a total of 9 times, at the same time, increase on sleeve 2 sts 3 times and 1 st 15 times, this means you will have to increase at the beg (before A.1) and at the end (after A.1) of the front/back/sleeves either 2 or 1 stitch as explained under RAGLAN. Happy crocheting!
18.05.2022 - 08:06Mam dwa pytania: 1. dodawanie oczek na przodzie i tyle , rozumiem że DODAWANIE OCZEK-1 , czy mam dodać oczka w dowolnym miejscu tyłu i przodu? 2. Dodawanie oczek na rękawach, czyli wg mnie reglan: mam dodawać oczka przed i za każdym schematem (mam ich po 2 na bokach sweterka)? Czy przed pierwszym i po ostatnim schemacie. Będę wdzięczna za podpowiedź.
07.04.2022 - 13:44DROPS Design answered:
Witaj Doroto, 1. jak jest napisane, aby ‘równomiernie dodać o.’ to dodajesz je mniej więcej co podobną liczbę o. Zobacz również kurs DROPS TUTAJ. 2. Dodawanie o. na rękawach dotyczy reglanu. Np. rozmiarze S dodajesz 15 razy 1 sł w każdym okr. (4 dodane sł w okr. na rękawy) > tzn. na reglan na rękawach dodajesz 1 o. tylko po jednej stronie schematu A.1, tej po stronie rękawa (a nie na tyle i przodzie). Jednocześnie dodajesz o. na tyle i przodzie, ale w innej kolejności/w innej liczbie (S: dodajesz 3 razy 2 sł w każdym okr., dalej 12 razy 1 sł w każdym okr.). Zobacz również część REGLAN. Pozdrawiamy!
11.04.2022 - 08:41