
Popular categories
Looking for a yarn?


|
||||||||||||||||||||||
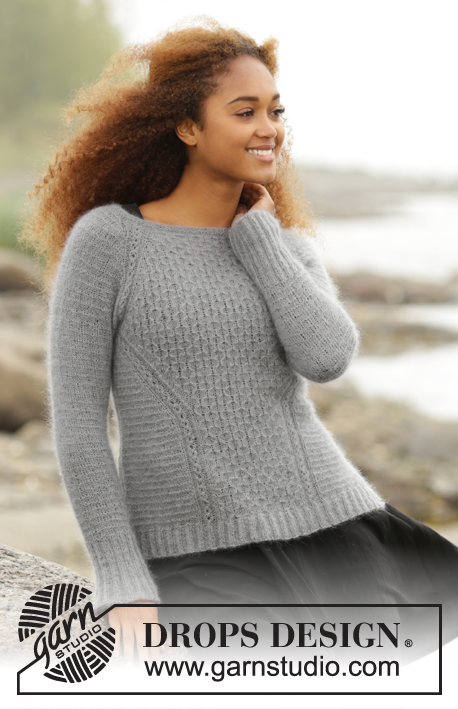
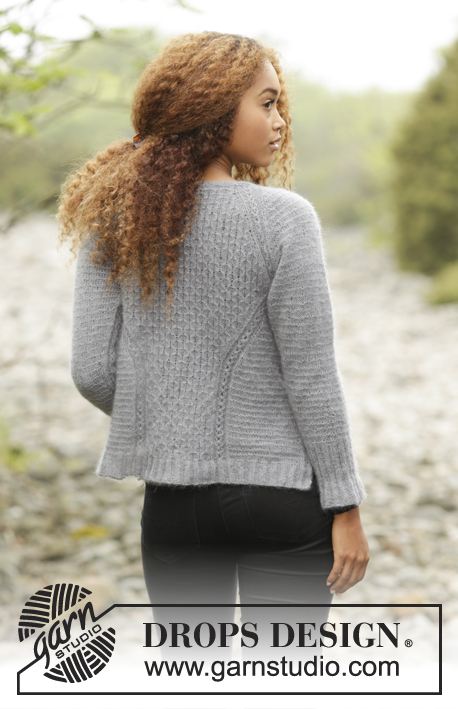
Misty Harbor Cardigan |
||||||||||||||||||||||
 |
 |
|||||||||||||||||||||
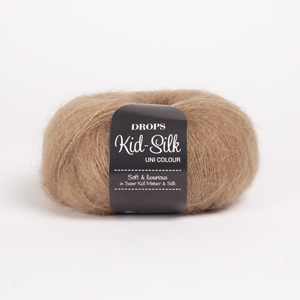
Knitted DROPS jacket, worked top down with raglan and textured pattern in “Kid-Silk”. Size: S - XXXL.
DROPS 171-23 |
||||||||||||||||||||||
|
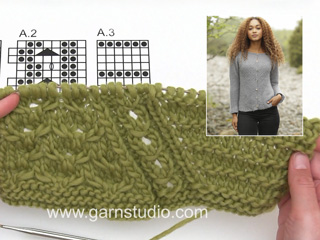
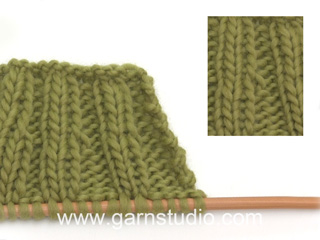
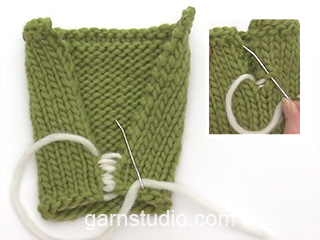
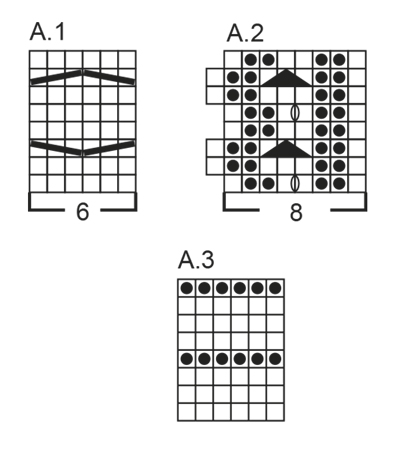
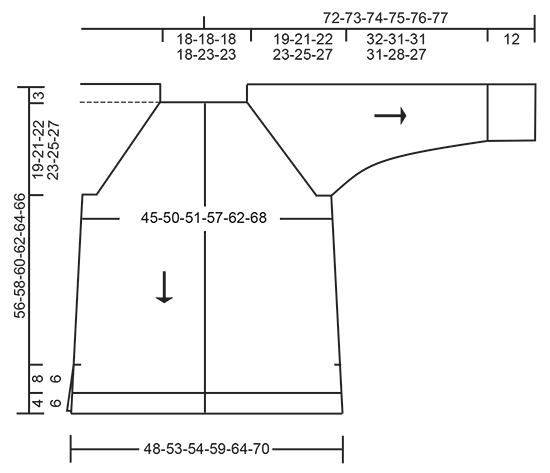
GARTER ST (back and forth): K all rows. 1 ridge = K2 rows. PATTERN: See diagrams A.1 to A.3. The diagrams show all rows in pattern seen from RS. RAGLAN: Inc for raglan on each side of A.2 in every transition between sleeve and body. Inc 1 st by making 1 YO, on next row work YO twisted to avoid holes. Work the inc sts in stockinette st until the fit A.1 on body and work them in A.3 on sleeves NOTE: Inc differently on body and sleeves as explained in pattern and on some round there will only be inc on front and back piece and not on sleeves. DISPLACEMENT IN A.2 (applies to front and back piece after armhole): A.2 should be displaced from the side under sleeve to mid front/mid back. Displacement is always done from RS as explained in pattern. On right front piece and right side of back piece this is done as follows: Work as before until A.2, make 1 YO, work A.2 as before but when last st in A.2 remains slip this st as if to K, K 1 and psso. Continue pattern as before. On next row work YO twisted to avoid holes - work new sts in A.3. On left front piece and left side of back piece this is done as follows: Work as before until 1 st remains before A.2, K next st tog with first st in A.2, work A.2 as before, make 1 YO and work the remaining sts as before. On next row work YO twisted to avoid holes - work new sts in A.3. INCREASE TIP (applies to sides of body): Inc 1 st by making 1 YO, on next row work YO twisted to avoid holes. Work the inc sts in A.3. DECREASE TIP (applies to sleeves): Dec 2 sts mid under sleeve as follows: Beg 2 sts before A.2, K 2 tog, work A.2 (= 8 sts), slip next st as if to K, K 1, psso (= 2 sts dec). BUTTONHOLES: Dec for buttonhole on right band (when garment is worn). All buttonholes are dec from WS as follows: K tog second and third st from edge and make 1 YO. On next row K the YO (= hole). Dec for buttonholes on first row from WS after neck edge, dec the next 6-7 buttonholes with approx. 8 cm / 3⅛" between each. ---------------------------------------------------------- JACKET: Work back and forth on circular needle from mid front, work top down. YOKE: Cast on 110-110-110-110-134-134 sts (includes 5 band sts in each side towards mid front) on circular needle size 3 mm / US 2.5 with Kid-Silk. Work 2 ridges in GARTER ST - see explanation above. K 1 row from RS while inc 20 sts evenly in all sizes (do not inc over bands) = 130-130-130-130-154-154 sts. Switch to circular needle size 3.5 mm / US 4 and P 1 row from WS but K the 5 edge sts in each side (= bands) - remember BUTTONHOLES on right band - see explanation above. Work next row as follows from RS: 5 band sts in garter st, A.1 over the next 18-18-18-18-24-24 sts (= 3-3-3-3-4-4 repetitions of 6 sts on left front piece), A.2 (= 8 sts in raglan line), A.3 over the next 8 sts (= sleeve), A.2 (= 8 sts in raglan line), A.1 over the next 36-36-36-36-48-48 sts (= 6-6-6-6-8-8 repetitions of 6 sts on back piece), A.2 (= 8 sts in raglan line), A.3 over the next 8 sts in stockinette st (= sleeve), A.2 (= 8 sts in raglan line), A.1 over the next 18-18-18-18-24-24 sts (= 3-3-3-3-4-4 repetitions of 6 sts on right front piece and 5 band sts in garter st. Continue pattern like this. REMEMBER THE KNITTING GAUGE AT THE SAME TIME on next row beg inc for RAGLAN – see explanation above! NOTE: Inc differently on body and sleeves: BODY: Inc on every row 0-6-5-12-10-16 times in total, then on every other row 18 times in total in all sizes and finally every 4th row 6-6-7-6-8-8 times in total. SLEEVES: Inc every other row a total of 14-19-27-30-33-32 times, and on every 4th row a total of 8-7-4-3-3-5 time. After all inc are done there are 314-354-374-406-442-470 sts on needle. Work next row as follows from WS (if last row was worked from WS, work 1 row from RS to beg on WS now): Work as before over the first 47-53-53-59-65-71 sts on right front piece, continue A.2 over the next 4 sts (= ½ repetition with A.2) and cast in addition on 6-6-7-7-7-8 new sts towards the side = 57-63-64-70-76-83 sts on right front piece. Insert 1 marker, NOW MEASURE PIECE FROM HERE! Slip the remaining sts on 1 stitch holder or on another needle. RIGHT FRONT PIECE: = 57-63-64-70-76-83 sts. READ ALL OF THE FOLLOWING SECTION BEFORE CONTINUING: Work next row as follows from RS: 2 edge sts in garter st, 0-0-1-1-1-2 sts pattern according to diagram A.3, continue with A.2 over the next 8 sts, continue A.1 as before until band and finish with 5 band sts as before. Continue pattern like this. AT THE SAME TIME on next row from RS beg DISPLACEMENT IN A.2 – see explanation above. Repeat displacement like this every other row (i.e. every row from RS) 36 times in total – NOTE: When displacing A.2, the total no of sts will be the same but there will be fewer sts in A.1 towards mid front and more sts in A.3 towards the side. Sts in A.1 that do not fit in pattern when displacing, is worked in stockinette st until they fit pattern again. AT THE SAME TIME when piece measures 6 cm / 2⅜" from marker, inc 1 st inside 2 edge st in garter st in the side - READ INCREASE TIP. Inc like this every 6 cm / 2⅜" a total of 3 times = 60-66-67-73-79-86 sts. After last displacement there will be 1-2-2-3-4-5 repetitions of A.1 before band towards mid front. Continue pattern back and forth without displacement until piece measures 30-30-31-30-30-30 cm / 11¾"-11¾"-12¼"-11¾"-11¾"-11¾" from marker (jacket measures approx. 52-54-56-56-58-60 cm / 20½"-21¼"-22"-22"-22½"-23½" from shoulder and down). P 1 row from WS while inc 5-3-6-4-2-3 sts evenly = 65-69-73-77-81-89 sts - NOTE: Continue the 2 edge sts in the side and the 5 band sts towards mid front in garter st and continue A.2 with K over K and P over P (i.e. do not inc over A.2 or sts in garter st). Switch to circular needle size 3 mm / US 2.5 and work next row from RS as follows: 2 edge sts in garter st, * K 2, P 2 *, repeat from *-* until 7 sts remain on needle, finish with K 2 and 5 band sts in garter st (adjust so that rib fits rib in A.2). Continue rib like this but on next row from RS inc all 2 P sts to 3 P sts (inc 1 st by making 1 YO in transition between K and P, on next row K YO twisted to avoid holes) = 79-84-89-94-99-109 sts. When rib measures 4-4-4-6-6-6 cm / 1½"-1½"-1½"-2⅜"-2⅜"-2⅜", loosely bind off with garter st over garter st, K over K and P over P (to avoid a tight bind-off edge bind off with 2 strands Kid-Silk). Jacket measures now approx. 56-58-60-62-64-66 cm / 22"-22¾"-23⅝"-24⅜"-25¼"-26" from shoulder and down. RIGHT SLEEVE: Worked in the round on a short circular needle/double pointed needles. Slip the next 60-68-78-82-88-90 sts from stitch holder or extra needle on a short circular needle size 3.5 mm / US 4 and cast in addition on 12-12-14-14-14-16 new sts mid under sleeve = 72-80-92-96-102-106 sts. Insert 1 marker, NOW MEASURE PIECE FROM HERE! Continue A.3 in the round but now work A.2 only over the middle 8 sts under sleeve. When sleeve measures 1½ cm / ½", dec 1 st on each side of A.2 - READ DECREASE TIP (= 2 sts dec). Dec a total of 13-16-21-22-23-24 times in Size S: On every 7th round, in size M: Alternately on every 5th and 6th round, in size L + XL: On every 4th round, in size XXL: Alternately on every 3rd and 4th round and in size XXXL: On every 3rd round = 46-48-50-52-56-58 sts. When sleeve measures 32-31-31-31-28-27 cm / 12½"-12¼"-12¼"-12¼"-11"-10½", K 1 round while inc 14-16-18-16-16-14 sts evenly = 60-64-68-68-72-72 sts. Switch to double pointed needles size 3 mm / US 2.5 and work rib in the round over all sts (= K 2/P 2 but adjust to continue rib over A.2 mid under sleeve). When rib measures 8 cm / 3⅛", inc all P 2 to P 3 (inc as on right front piece) = 75-80-85-85-90-90 sts. When rib measures 12 cm / 4¾" (or desired length, sleeve measures now approx. 44-43-43-43-40-39 cm / 17¼"-17"-17"-17"-15¾"-15¼"), bind off with K over K and P over P (to avoid a tight bind-off edge bind off with 2 strands Kid-Silk). BACK PIECE: Beg from WS, cast on 6-6-7-7-7-8 sts on circular needle size 3.5 mm / US 4, work the next 92-104-104-116-128-140 sts from stitch holder/extra needle and cast on 6-6-7-7-7-8 new sts at the end of row = 104-116-118-130-142-156 sts on needle. Insert 1 marker, NOW MEASURE PIECE FROM HERE! Work next row as follows from RS: 2 edge sts in garter st, 0-0-1-1-1-2 sts pattern according to diagram A.3, continue A.2 over the next 8 sts, continue A.1 over the next 84-96-96-108-120-132 sts, continue A.2 over the next 8 sts, work 0-0-1-1-1-2 sts pattern according to diagram A.3 and end with 2 edge sts in garter st. Continue pattern back and forth as follows: AT THE SAME TIME on next row from RS start DISPLACEMENT IN A.2. Continue the displacement on every 2nd row (i.e. on every row from RS) until 6-8-8-10-10-12 repetitions of A.1 remains in the middle (i.e. 36-48-48-60-60-72 sts of A.1). The continue pattern without displacements. AT THE SAME TIME when piece measures 6 cm / 2⅜" from marker, inc 1 st inside 2 edge sts in garter st in each side - READ INCREASE TIP. Inc like this every 6 cm / 2⅜" a total of 3 times = 110-122-124-136-148-162 sts. When piece measures 30-30-31-30-30-30 cm / 11¾"-11¾"-12¼"-11¾"-11¾"-11¾" from marker (jacket measures now approx. 52-54-56-56-58-60 cm / 20½"-21¼"-22"-22"-22½"-23½" from shoulder) P 1 row from WS while inc 8-8-6-6-6-8 sts evenly – NOTE: Continue the 2 edge sts in each side in garter st and continue A.2 with K over K and P over P (i.e. do not inc over A.2 or sts in garter st) = 118-130-130-142-154-170 sts. Switch to circular needle size 3 mm / US 2.5 and work next row from RS as follows: 2 edge sts in garter st, * K 2, P 2 *, repeat from *-* until 4 sts remain on needle, finish with K 2 and 2 edge sts in garter st (adjust so that rib fits rib in A.2). Continue rib like this but on next row from RS, inc all 2 P sts to 3 P sts = 146-161-161-176-191-211 sts. When rib measures 4-4-4-6-6-6 cm / 1½"-1½"-1½"-2⅜"-2⅜"-2⅜", loosely bind off with garter st over garter st, K over K and P over P (to avoid a tight bind-off edge bind off with 2 strands Kid-Silk). LEFT SLEEVE: Slip the next 60-68-78-82-88-90 sts from stitch holder/extra needle on a short circular needle size 3.5 mm / US 4 and cast in addition on 12-12-14-14-14-16 new sts mid under sleeve = 72-80-92-96-102-106 sts. Then work in the round as on right sleeve. LEFT FRONT PIECE: Beg from WS, cast on 6-6-7-7-7-8 sts on circular needle 3.5 mm, continue A.2 over the next 4 sts (= ½ repetition of A.2) and work as before over the last 47-53-53-59-65-71 sts from stitch holder/extra needle = 57-63-64-70-76-83 sts on left front piece. Work next row as follows from RS: 5 band sts in garter st, continue A.1 over the next 42-48-48-54-60-66 sts, continue A.2 over the next 8 sts, work 0-0-1-1-1-2 sts pattern according to diagram A.3 and finish with 2 edge sts in garter st. Continue pattern like this and work the same way as on right front piece but reversed. When rib is worked at the bottom of front piece, work first row as follows from RS: 5 band sts in garter st, * K 2, P 2 *, repeat from *-* until 4 sts remain on needle, finish with K 2 and 2 edge sts in garter st. ASSEMBLY: Sew side seams from armhole and down – sew edge to edge in outer loops of edge sts to get a flat seam but stop when approx. 12 cm / 4¾" remain in each side (= vent). Sew the opening under the sleeves. Sew the buttons on to the left band. |
||||||||||||||||||||||
Diagram explanations |
||||||||||||||||||||||
|
||||||||||||||||||||||
|
||||||||||||||||||||||
|
||||||||||||||||||||||
|
Have you made this or any other of our designs? Tag your pictures in social media with #dropsdesign so we can see them! Do you need help with this pattern?You'll find tutorial videos, a Comments/Questions area and more by visiting the pattern on garnstudio.com. © 1982-2024 DROPS Design A/S. We reserve all rights. This document, including all its sub-sections, has copyrights. Read more about what you can do with our patterns at the bottom of each pattern on our site. |
||||||||||||||||||||||


With over 40 years in knitting and crochet design, DROPS Design offers one of the most extensive collections of free patterns on the internet - translated to 17 languages. As of today we count 304 catalogs and 11422 patterns - 11417 of which are translated into English (US/in).
We work hard to bring you the best knitting and crochet have to offer, inspiration and advice as well as great quality yarns at incredible prices! Would you like to use our patterns for other than personal use? You can read what you are allowed to do in the Copyright text at the bottom of all our patterns. Happy crafting!
Comments / Questions (52)
Is there a way to translate the comments so they show up in English? I would love to read what the others are saying about this pattern before I start. Thank you, Denise
22.07.2016 - 18:44DROPS Design answered:
Dear Mrs Homer, you can use an online translator to translate the previous comments in English. Happy knitting!
23.07.2016 - 07:50Je ne comprends vraiment pas les augmentations. Combien d augmentations je dois avoir sur 1 rang car si je fais le calcul selon votre explication j ai 10 augmentations par rang je m excuse de demander beaucoup de question car je n ai jamais tricote un morceau en commencant par le haut
11.07.2016 - 23:55DROPS Design answered:
Bonjour Silange, tout va dépendre de votre taille, vous augmenterez: 2 m sur chaque manche (au début et à la fin de chaque manche) et/ou 1 m sur chaque devant (à la fin du devant gauche et au début du devant droit) et 2 m pour le dos (au début et à la fin du dos). Bon tricot!
12.07.2016 - 09:49Je ne comprends pas les augmentations est ce : 5 mailles point mousse, 18 mailles A1,1 motif A2 sans augmentation, une augmentation de chaque cote du jersey, motif A2 avec une augmentation de chaque cote, jersey avec 1 augmentation de chaque cote, motif A2 sans augmentation, 18 mailles A1, 5 mailles au point mouse
11.07.2016 - 01:43DROPS Design answered:
Bonjour Silange, on augmente différemment pour le raglan dos/devants et pour les manches en fonction de chaque taille. Les augm. du raglan se font avant/après A.2 en fonction de la partie à augmenter: avant A.2 pour le devant gauche, après/avant A.2 pour le dos et les manches et après A.2 pour le devant droit. Ainsi, en fonction de la taille, on va augmenter soit au début tous les rangs sur le dos et les devants mais tous les 2 rangs sur les manches (sauf en taille S) par ex. Bon tricot!
11.07.2016 - 09:58Combien de balles pour faire ce modele. Moi je compte 5 est c est bien ca?
10.07.2016 - 17:02DROPS Design answered:
Bonjour Silange, effectivement, il faut 5 pelotes Kid-Silk en taille S: 5 x 25 g la pelote Kid-Silk = 125 g. Bon tricot!
11.07.2016 - 09:48Hei. Diagram og plaggets mål mangler i oppskriften. Vil dette bli oppdatert snarlig? Mvh Isabel
30.06.2016 - 11:15DROPS Design answered:
Hei Isabel. Pröv refresh (F5), diagram osv er der :)
30.06.2016 - 11:32Håper oppskriften snart ligger ute! Nydelig jakke!
29.06.2016 - 14:46Smuk og elegant :)
15.06.2016 - 13:32Interesting design, flattering to most figures.
14.06.2016 - 19:07Laura wrote:
Such an interesting & pretty design - love it!
11.06.2016 - 07:34Ce point est très joli et structure bien la silhouette!!
08.06.2016 - 13:50