Magic Autumn

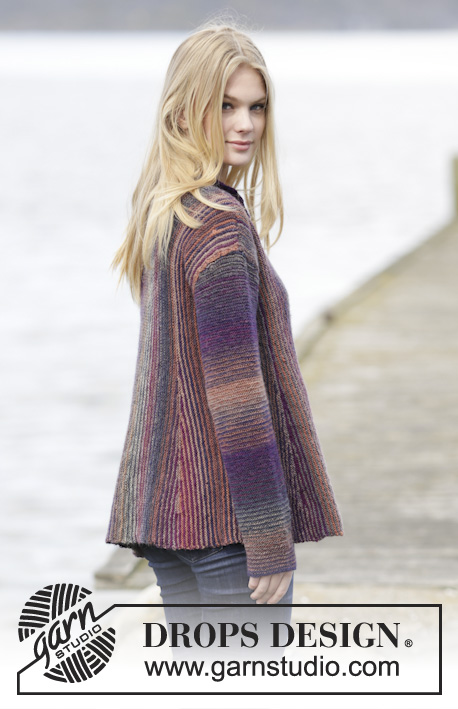
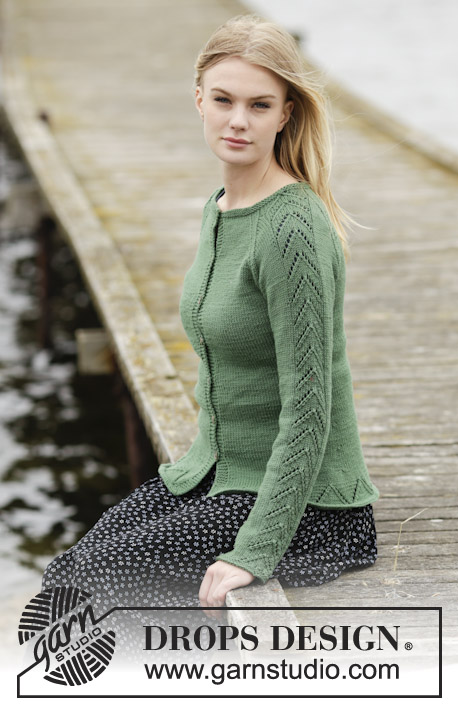
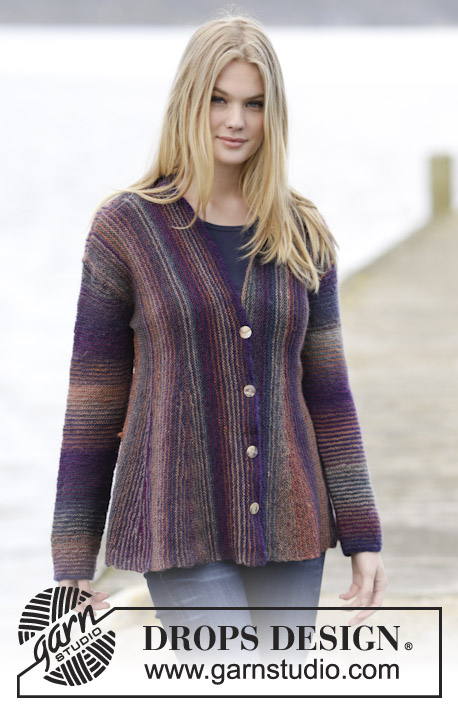
Knitted DROPS jacket in garter st with pleats and shawl collar, worked sideways in ”Delight”. Size: S - XXXL.

DROPS 164-15
DROPS design: Pattern no de-144
Yarn group A
----------------------------------------------------------
Size: S - M - L - XL - XXL - XXXL

Materials:
DROPS DELIGHT from Garnstudio
450-500-500-550-600-700 g color no 18, fall forest

DROPS CIRCULAR NEEDLE (80 cm / 32'') SIZE 3.5 mm/US 4 - or size needed to get 23 sts x 45 rows in garter st = 10 x 10 cm / 4'' x 4''.
DROPS BUTTON ARCHED (white), NO 522: 5 pieces for all sizes.

NOTE: On garments worked form side to side it is very important that the knitting gauge is exactly right.

-------------------------------------------------------

Alternative Yarn – See how to change yarns here
Yarn Groups A to F – Use the same pattern and change the yarn here
Yarn usage using an alternative yarn – Use our yarn converter here

-------------------------------------------------------

Pattern instructions

NOTE: This pattern is written in American English. All measurements in charts are in cm. For conversion from inches to cm - click here. There are different terms for crocheting in American and British English. If this pattern includes crochet, click for "crochet terms" here. For this pattern in British English, please click here.
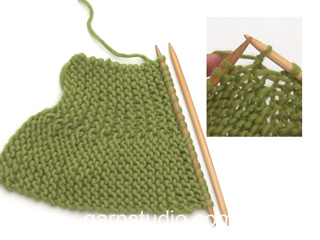
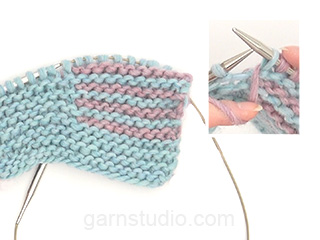
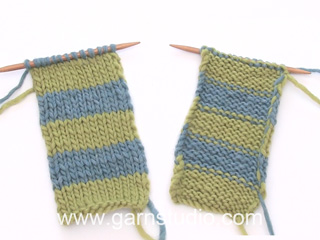
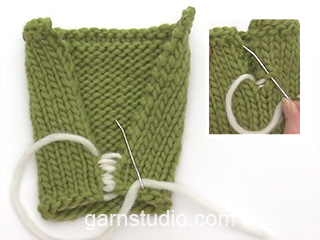
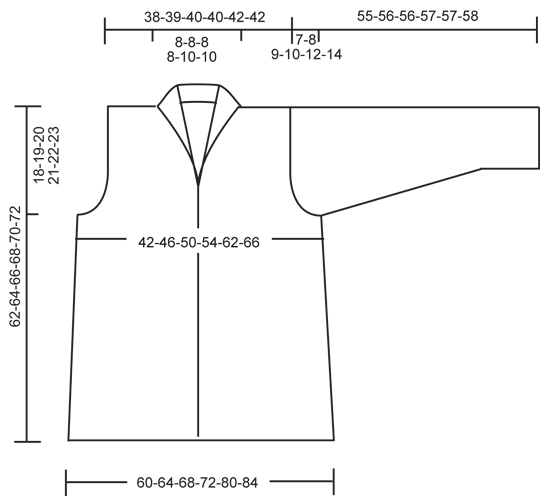
KNITTING TIP: Garter st is very elastic. The garment will therefore be somewhat longer and wider according to the measurements in chart.

STRIPES:
To get more stripes on garment work alternately with 2 balls. * Work 2 rows with the first ball, work 2 rows with the other ball *, repeat from *-*. Switch yarn at beg of a row from WS. Pull yarn upwards in bottom edge of garment/side of sleeve.

PLEAT: Work 1 pleat with short rows as follows (1st row = WS):
work 75 sts, turn and work back,
work 68 sts, turn and work back,
work 62 sts, turn and work back,
work 55 sts, turn and work back,
work 49 sts, turn and work back,
work 42 sts, turn and work back,
work 36 sts, turn and work back,
work 29 sts, turn and work back,
work 23 sts, turn and work back,
work 16 sts, turn and work back,
work over all sts on needle, turn and work back,
work 16 sts, turn and work back,
work 23 sts, turn and work back,
work 29 sts, turn and work back,
work 36 sts, turn and work back,
work 42 sts, turn and work back,
work 49 sts, turn and work back,
work 55 sts, turn and work back,
work 62 sts, turn and work back,
work 68 sts, turn and work back,
work 75 sts, turn and work back.

MEASURING TIP: Measure from cast-on edge. Measure where pleat is most narrow.
----------------------------------------------------------

BACK PIECE:
Worked back and forth on circular needle. The whole piece is worked in garter st, i.e. K all rows. Beg working in the side. Read KNITTING TIP!

Loosely cast on 102-104-106-109-111-113 sts on circular needle size 3.5 mm / US 4 with Delight. Work STRIPES - see explanation above. Work 5-11-13-15-19-21 rows (1st row = RS). REMEMBER THE KNITTING GAUGE At the end of next row (from WS), cast on 3 new sts for armhole. Then cast on new sts at the end of every 6th row (= from WS): 3 sts 0-0-1-2-4-5 times = 105-107-112-118-126-131 sts. On the end of next row from WS, cast on 38-41-40-39-35-35 sts = 143-148-152-157-161-166 sts. Continue to work in garter st over all sts until piece measures 9-10-11-12-14-16 cm / 3½"-4"-4½"-4 3/4"-5½"-6 1/4" (adjust so that next row is from RS). K 1 row from RS. Then work PLEAT - see explanation above. When pleat has been worked, work 1 row over all sts (from WS). Continue back and forth over all sts until piece measures 17-19-21-23-26-28 cm / 6 3/4"-7½"-8 1/4"-9"-10 1/4"-11" - READ MEASURING TIP. Now bind off 5 sts at beg of next row (from RS) for neck = 138-143-147-152-156-161 sts. Continue to work until piece measures 25-27-29-31-36-38 cm / 9 3/4"-10½"-11½"-12 1/4"-14 1/4"-15". Now cast on 5 sts at the end of row (from WS) = 143-148-152-157-161-166 sts. Continue back and forth over all sts until piece measures 32-35-38-41-47-49 cm / 12½"-13 3/4"-15"-16"-18½"-19 1/4" (adjust so that next row is from RS). K 1 row from RS. Then work Pleat. When pleat is done, work 1 row over all sts. Work until piece measures approx. 40-43-45-47-52-54 cm / 15 3/4"-17"-17 3/4"-18½"-20½"-21 1/4". Now bind off 38-41-40-39-35-35 sts at beg of next row (from RS) for armhole = 105-107-112-118-126-131 sts. On next row (from RS) bind off 3 sts at beg of row. Then bind off at beg of every 6th row: 3 sts 0-0-1-2-4-5 times = 102-104-106-109-111-113 sts. Work back and forth until piece measures 42-46-50-54-62-66 cm / 16½"-18"-19 3/4"-21 1/4"-24½"-26". Loosely bind off.

LEFT FRONT PIECE:
Cast on and work from the side to mid front. Loosely cast on 102-104-106-109-111-113 sts on circular needle size 3.5 mm / US 4 with Delight. Work stripes and cast on new sts for armhole as on back piece = 143-148-152-157-161-166 sts. When piece measures 6-7-8-9-12-14 cm / 2½"-2 3/4"-3"-3½"-4 3/4"-5½", work pleat. When pleat has been worked, work 1 row over all sts (from WS). Continue back and forth over all sts. When piece measures 13-15-17-17-19-21 cm / 5"-6"-6 3/4"-6 3/4"-7½"-8 1/4" - READ MEASURING TIP, work pleat. When pleat has been worked, work 1 row over all sts (from WS). Work until piece measures 3-3-3-5-6-6 cm / 1"-1"-1"-2"-2½"-2½" after last pleat (piece now measures approx. 17-19-21-23-26-28 cm / 6 3/4"-7½"-8 1/4"-9"-10 1/4"-11" in total). Now cast on 23-23-23-23-28-28 new sts at the end of a row from WS = 166-171-175-180-189-194 sts. Work back and forth over all sts for 6-6-6-6-8-8 cm / 2½"-2½"-2½"-2½"-3"-3". Loosely bind off.

RIGHT FRONT PIECE:
Cast on and work from mid front to the side. Loosely cast on 166-171-175-180-189-194 sts on circular needle size 3.5 mm / US 4 with Delight. Work stripes back and forth over all sts for 3 cm / 1''. Now dec for buttonhole on a row from WS as follows: Work 24 sts, * K 2 tog, 1 YO, work 20-20-20-22-22-22 sts *, repeat from *-* 4 times, work the rest of row. ( = 4 buttonholes). Continue in garter st and stripes over all sts until piece measures 6-6-6-6-8-8 cm / 2½"-2½"-2½"-2½"-3"-3". On next row from RS, bind off the first 23-23-23-23-28-28 sts = 143-148-152-157-161-166 sts. Continue back and forth over all sts until piece measures approx. 9-9-9-11-12-13 cm / 3"-3"-3"-4½"-4 3/4"-5". Then work pleat. When pleat has been worked, work 1 row over all sts (from WS). Continue back and forth over all sts until piece measures approx. 17-18-19-20-20-21 cm / 6 3/4"-7"-7½"-8"-8"-8 1/4" (adjust so that next row is from WS). Then work pleat. When pleat has been worked, work 1 row over all sts (from WS). AT THE SAME TIME when piece measures 4-4-3-2-2-2 cm / 1½"-1½"-1"-3/4"-3/4"-3/4" after last pleat, bind off the first 38-41-40-39-35-35 sts (from RS) for armhole. On next row (from RS) bind off 3 sts at beg of row. Then bind off at beg of every 6th row: 3 sts 0-0-1-2-4-5 times = 102-104-106-109-111-113 sts. Continue back and forth over all sts until piece measures 6-7-8-9-12-14 cm / 2½"-2 3/4"-3"-3½"-4 3/4"-5½" after last pleat. Loosely bind off.

SLEEVE:
Worked back and forth in garter st. Loosely cast on 55-57-60-62-62-66 sts (includes 1 edge st in each side) on circular needle size 3.5 mm / US 4 with Delight. Work stripes. When piece measures 5-5-5-7-9-7 cm / 2"-2"-2"-2 3/4"-3½"-2 3/4", inc 1 st in each side every 5-4-3½-2½-2-2 cm / 2"-1½"-1 1/4"-7/8"-3/4"-3/4" 9-11-12-15-17-18 times in total = 73-79-84-92-96-102 sts. When piece measures 48-48-47-47-45-44 cm / 19"-19"-18½"-18½"17 3/4"-17 1/4", bind off 3 sts in each side for sleeve cap. NOTE: Shorter measurements in the larger sizes because of longer sleeve cap and wider shoulders. Then bind off for sleeve cap in each side on every other row: 2 sts 2-2-2-2-1-0 times and 1 st 0-12-14-15-24-28 times. Then bind off 2 sts in each side until piece measures 54-55-55-56-56-57 cm / 21¼''-21 5/8''-21 5/8''-22''-22''-22½''. Now bind off 3 sts in each side 1 time. Bind off the remaining sts, piece measures approx. 55-56-56-57-57-58 cm / 21 5/8''-22''-22''-22½''-22½''-22¾''.

ASSEMBLY:
Sew the shoulder seams. Sew in sleeves. Sew sleeve and side seams in one inside 1 edge st. Sew shawl collar tog mid back and sew it to the neckline. Sew the buttons on to the left band.

This pattern has been corrected.

Updated online: 12.10.2016
Correction: 4 buttons/buttonholes instead of 5

Diagram

All measurements in charts are in cm.

diagram measurements
Do you have a question? See a list of frequently asked questions (FAQ)

Knitting tension is what determines the final measurements of your work, and is usually measured per 10 x 10 cm. It is provided like so: number of stitches in width x number of rows in height - eg: 19 stitches x 26 rows = 10 x 10 cm.

The knitting tension is very individual; some people knit/crochet loosely while others work tightly. You adjust the knitting tension with the needle size, which is why the suggested needle size only serve as a guide! You need to adjust this (up or down) to ensure that YOUR knitting tension matches the knitting tension provided in the pattern. If you work with a different knitting tension than provided you will have a different yarn consumption, and your work will have different measurements than what the pattern suggests.

The knitting tension also determines which yarns can replace each other. As long as you achieve the same knitting tension you can replace one yarn with another.

See DROPS lesson: How to measure your tension/gauge

See DROPS video: How to make a gauge tension swatch

The required amount of yarn is provided in grams, eg: 450 g. To calculate how many balls you’ll need you first need to know how many grams are in 1 ball (25g, 50g or 100g). This information is available if you click on the individual yarn quality on our pages. Divide the amount required with the amount of each ball. For example, if each ball is 50g (the most common amount), the calculation will be as follows: 450 / 50 = 9 balls.

The important thing when changing from one yarn to another is that the knitting/crochet tension remains the same. This is so that the measurements of the finished piece will be the same as on the sketch provided. It is easier to achieve the same knitting tension using yarns from the same yarn group. It is also possible to work with multiple strands of a thinner yarn to achieve the knitting tension of a thicker one. Please try our yarn converter. We recommend you to always work a test swatch.

Please NOTE: when changing yarn the garment might have a different look and feel to the garment in the photo, due to individual properties and qualities of each yarn.

See DROPS lesson: Can I use a different yarn than the one mentioned in the pattern?

All our yarns are categorised into yarn groups (from A to F) according to thickness and knitting tension – group A contains the thinnest yarns and group F the thickest. This makes it easier for you to find alternative yarns to our patterns, should you wish to switch yarn. All yarns within the same group have a similar knitting tension and can easily replace each other. However, different yarn qualities have different structures and properties which will give the finished work a unique look and feel.

Click here for an overview of the yarns in each yarn group

At the top of all our patterns you’ll find a link to our yarn converter, which is a helpful tool should you wish to use a different yarn than suggested. By filling in the yarn quality you wish to replace, the amount (in your size) and number of strands, the converter will present good alternative yarns with the same knitting tension. Additionally it will tell you how much you’ll require in the new qualities and whether you’ll need to work with multiple strands. Most skeins are 50g (some are 25g or 100g).

If the pattern is worked with multiple colours, every colour will have to be converted separately. Similarly, if the pattern is worked with several strands of different yarns (for example 1 strand Alpaca and 1 strand Kid-Silk) you will have to find alternatives for each, individually.

Click here to see our yarn converter

Since different yarns have different qualities and textures we have chosen to keep the original yarn in our patterns. However, you can easily find options among our available qualities by using our yarn converter, or simply pick a yarn from the same yarn group.

It is possible that some retailers still have discontinued yarns in stock, or that someone has a few skeins at home that they would like to find patterns for.

The yarn converter will provide both alternative yarn as well as required amount in the new quality.

If you think it's hard to decide what size to make, it can be a good idea to measure a garment you own already and like the size of. Then you can pick the size by comparing those measures with the ones available in the pattern's size chart.

You'll find the size chart at the bottom of the pattern.

See DROPS lesson: How to read size chart

The needle size provided in the pattern serves only as a guide, the important thing is to follow the knitting tension. And since knitting tension is very individual, you will have to adjust the needle size to ensure that YOUR tension is the same as in the pattern – maybe you’ll have to adjust 1, or even 2 needle sizes, up or down to achieve the correct tension. For this, we recommend that you work test swatches.

Should you work with a different knitting tension than the one provided, the measurements of the finished garment might deviate from the measurement sketch.

See DROPS lesson: How to measure your tension/gauge

See DROPS video: How to make a gauge tension swatch

Working a garment top-down provides more flexibility and room for personal adjustment. For example it is easier to try the garment on while working, as well as making adjustments to length of yoke and shoulder caps.

The instructions are carefully explaining every step, in the correct order. Diagrams are adjusted to the knitting direction and are worked as usual.

The diagram depicts all rows/rounds, and every stitch seen from the right side. It is read from bottom to top, from right to left. 1 square = 1 stitch.

When working back and forth, every other row is worked from the right side and every other row is worked from the wrong side. When working from the wrong side, the diagram will have to be worked reversed: from left to right, knit stitches are purled, purl stitches are knit etc.

When working in the round every round is worked from the right side and the diagram are worked from right to left on all rounds.

See DROPS lesson: How to read knitting diagrams

The diagram depicts all rows/rounds, and every stitch seen from the right side. It is worked from bottom to top, from right to left.

When working back and forth every other row is worked from the right side: from right to left and every other row is worked from the wrong side: from left to right.

When working in the round, every row in the diagram are worked from the right side, from right to left.

When working a circular diagram you start in the middle and work your way outwards, counter clockwise, row by row.

The rows usually start with a given number of chain stitches (equivalent to the height of the following stitch), this will either be depicted in the diagram or explained in the pattern.

See DROPS lesson: How to read crochet diagrams

Instructions for working several diagrams after each other on the same row/round, will often be written like so: “work A.1, A.2, A.3 a total of 0-0-2-3-4 times". This means you work A.1 once, then A.2 is worked once, and A.3 is repeated (in width) the number of times provided for your size – in this case like so: S = 0 times, M = 0 times, L=2 times, XL= 3 times and XXL = 4 times.

The diagrams are worked as usual: begin with the first row in A.1, then work the first row in A.2 etc.

See DROPS lesson: How to read knitting diagrams

See DROPS lesson: How to read crochet diagrams

The total width of the garment (from wrist-to-wrist) will be larger in the larger sizes, despite the actual sleeves being shorter. The larger sizes have longer sleeve caps and wider shoulders, so there will be a good fit in all sizes.

The measurement sketch/schematic drawing provides information regarding the full length of the garment. If it’s a jumper or a jacket the length is measured from the highest point on the shoulder (usually closest to the neckline), and straight down to the bottom of the garment. It is NOT measured from the tip of shoulder. Similarly, the length of yoke is measured from the highest point on the shoulder and down to where yoke is split into body and sleeves.

See DROPS lesson: How to read a schematic drawing

Diagrams are often repeated on the round or in height. 1 repeat is the diagram the way it appears in the pattern. If it says to work 5 repeats of A.1 in the round, then you work A.1 a total of 5 times after/next to each other in the round. If it says to work 2 repeats of A.1 vertically/in height you work the entire diagram once, then begin again at the start and work the entire diagram one more time.

Chain stitches are slightly narrower than other stitches and to avoid working the cast-on edge too tight, we simply chain more stitches to begin with. The stitch count will be adjusted on the following row to fit the pattern and measurement sketch.

The rib edge is more elastic and will contract slightly compared to, for example, stocking stitch. By increasing before the rib edge, you avoid a visible difference in width between the rib edge and the rest of the body.

It’s very easy to cast off too tightly, and by making yarn overs while casting off (and simultaneously casting these off) you avoid a too tight cast off edge.

See DROPS video: How to bind off with yarn overs (yo)

To achieve an even increase (or decrease) you can increase on, for example: every 3rd and 4th row alternately, like so: work 2 rows and increase on the 3rd row, work 3 rows and increase on the 4th. Repeat this until the increase is complete.

See DROPS lesson: Increase or decrease 1 st on every 3rd and 4th row alternately

Should you prefer to work in the round instead of back and forth, you may of course adjust the pattern. You’ll need to add steeks mid-front (usually 5 stitches), and follow the instructions. When you would normally turn and work from the wrong side, simply work across the steek and continue in the round. At the end you’ll cut the piece open, pick up stitches to work bands, and cover the cut edges.

See DROPS video: How to knit steeks and cut open

Should you prefer to work back and forth instead of in the round, you may of course adjust the pattern so you work the pieces separately and then assemble them at the end. Divide the stitches for the body in 2, add 1 edge stitch in each side (for sewing) and work the front and back pieces separately.

See DROPS lesson: Can I adapt a pattern for circular needles into straight needles?

Pattern repeats can vary slightly in the different sizes, in order to get the correct proportions. If you’re not working the exact same size as the garment in the photo, yours might deviate slightly. This has been carefully developed and adjusted so that the complete impression of the garment is the same in all sizes.

Make sure to follow instructions and diagrams for your size!

If you have found a pattern you like which is available in women’s size it’s not very difficult to convert it to men’s size. The biggest difference will be the length of sleeves and body. Start working on the women size that you think would fit across the chest. The additional length will be worked right before you cast off for the armhole/sleeve cap. If the pattern is worked top-down you can add the length right after the armhole or before the first decrease on sleeve.

Regarding additional yarn amount, this will depend on how much length you add, but it is better with a skein too many than too few.

All yarns will have excess fibres (from production) that might come off as lint or shedding. Brushed yarns (ie hairier yarns) have more of these loose, excess fibres, causing more shedding.

Shedding also depends on what is worn under or over the garment, and whether this pulls at the yarn fibres. It’s therefore not possible to guarantee that there will be no shedding

Below are some tips on how to get the best result when working with hairier yarns:

1. When the garment is finished (before you wash it) shake it vigorously so the looser hairs come off. NOTE: do NOT use a lint roller, brush or any method that pulls at the yarn.

2. Place the garment in a plastic bag and put it in your freezer - the temperature will cause the fibres to become less attached to each other, and excess fibres will come off easier.

3. Leave in the freezer for a few hours before taking it out and shaking it again.

4. Wash the garment according to the instructions on the yarn label.

Pilling is a natural process that happens to even the most exclusive of fibers. It's a natural sign of wear and tear that is hard to avoid, and that is most visible in high friction areas of your garment like a sweater's arms and cuffs.

You can make your garment look as new by removing the pilling, using a fabric comb or a pill/lint remover.

Still can't find the answer you need? Then scroll down and leave your question so one of our experts can try to help you. This will be done normally within 5 to 10 working days.
In the meantime, you can read the questions and answers that others have left to this pattern or join the DROPS Workshop on Facebook to get help from fellow knitters/crocheters!

You might also like...

Post a comment to pattern DROPS 164-15

We would love to hear what you have to say about this pattern!

If you want to leave a question, please make sure you select the correct category in the form below, to speed up the answering process. Required fields are marked *.

Comments / Questions (84)

country flag Bernadette Tijssens wrote:

Klopt de tekening wel? Het is toch een rechte mouw. IN het rugpand wordt daarom toch ook gemeerderd voor de mouw?..

12.02.2020 - 16:47

country flag Judith Beckett wrote:

I can't find the instructions for the shawl collar, and the photo if the jacket doesn't show one, but its mentioned several times and appears in the assembly diagram. Can you please send me the knitting instruction for the shawl collar. Thankyou.

09.12.2019 - 22:53

DROPS Design answered:

Dear Mrs Beckett, the shawl collar is here a small one, ie an edge that will be sewn along neckline on back piece. On left front piece the 23-38 sts cast on from WS at the end of the piece are for the shawl collar and on right front piece, these 23-28 sts are cast on at the beg and cast off after 6-8 cm. Happy knitting!

10.12.2019 - 09:44

country flag Teji wrote:

I have started one in the small size. Cast on 3 stitches at the end of the 6th row. Then do I cast on 38 stitches at the end of the 12th row ? ( as do not need to cast on 3 stitches every 6th row ?

17.07.2019 - 16:14

DROPS Design answered:

Dear Teji, in size S, you cast on first 3 sts at the end of row from WS then cast on 38 sts at the end of next row from WS. There are no other step in the smaller size. Happy knitting!

18.07.2019 - 10:12

country flag Jean Gordon wrote:

Can no 164_15 be knitted on a brother knitting machine

25.05.2019 - 18:11

DROPS Design answered:

Dear Jean, the pattern was written for handknitters. It might be done on a machine, but this largely depends on the type of your machine, and what it knows. Unfortunately we cannot help you with instructions for machine knitting. Hapy Crafting!

26.05.2019 - 20:49

country flag Marie Daniel wrote:

Magnifique veste. J\'aime la forme et les rayure. Je pense que je vais la tricoter. ! Très jolie. !!

19.05.2019 - 04:17

country flag Anna Larsen wrote:

Ja, selvfølgelig! Jeg lukker af med begge tråde. Tak for rådet!

30.04.2019 - 15:45

DROPS Design answered:

Hej Anna, Fint at det løste sig :)

03.05.2019 - 10:19

country flag Anna Larsen wrote:

Nej, tråden havner IKKE det rigtige sted! Jeg er udmærket klar over, at der skal lukkes af i starten af hver pind. Men i starten af pinden i trådskifte-siden, vil den tråd jeg IKKE strikker med, blive hængende 3 masker ude. Og derfor danne en løkke, når jeg hiver den ind over de 3 aflukkede masker. Prøv selv!

26.04.2019 - 15:46

DROPS Design answered:

Hei Anna. Beklager, jeg fikk ikke med meg at du mente ved trådbytte. Du kan da enten felle av de 3 maskene med begge trådene slik at begge trådene er på rett sted - denne kanten skal uansett sys inn i ermhullet så det vil ikke være synlig. Eller så kan du klippe tråden om du heller ønsker det. God fornøyelse

30.04.2019 - 10:17

country flag Anna Larsen wrote:

Indtagning til ærmekuppel: Luk 3 masker af i hver side. Hvis jeg gør det, kommer den tråd, der skal skiftes til ved næste garnskifte, til at 'hænge' 3 masker for langt ude. Hvad er jeres forslag til løsning?

23.04.2019 - 16:06

DROPS Design answered:

Hei Anna. Fell på starten av pinnen (altså du feller på hver pinne, men annenhver pinne i hver side). Da havner alltid tråden på riktig sted. God fornøyelse

26.04.2019 - 14:15

country flag Birgit Bang-Jensen wrote:

Jeg mener bestemt, at Anne Larsen har ret - i hvert fald har jeg "kæmpet" med det samme problem. Hvis man til venstre forstykke følger opskriften, dvs. skifter farve i begyndelsen af vrang-pinden, vil farveskiftet skulle ske i den ende, der bliver halskant, ikke bunden af trøjen, når opslagskanten vendes mod ryggen. Tak til Anna for løsningen. mvh Birgit

30.01.2019 - 17:17

country flag Anna wrote:

- jeg må lige korrigere mig selv: Det nytter IKKE bare at strikke to pinde fra samme side lige efter hinanden. Problemet ér, at den side, der i opskriften er vrangen, (den med de markante striber), er dén, jeg gerne vil have som retside. Problemet løses ed at strikke venstre forstykke efter opskriften til højre forstykke og omvendt. Husk, at knaphullerne så skal placeres i det forstykke, der strikkes fra siden til midt foran.

28.01.2019 - 05:28

DROPS Design answered:

Hej Anna, Super at du løste det selv. Rigtig god fornøjelse!

08.02.2019 - 15:46