
Popular categories
Looking for a yarn?


|
||||||||||||||||
Leona |
||||||||||||||||
 |
 |
|||||||||||||||
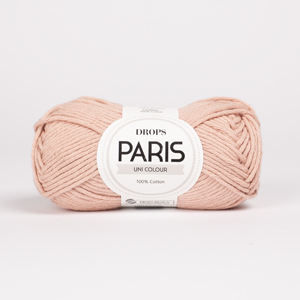
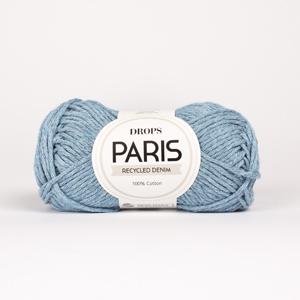
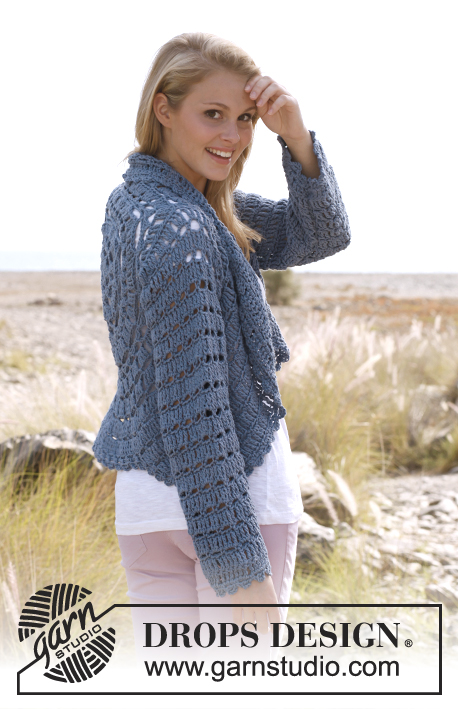
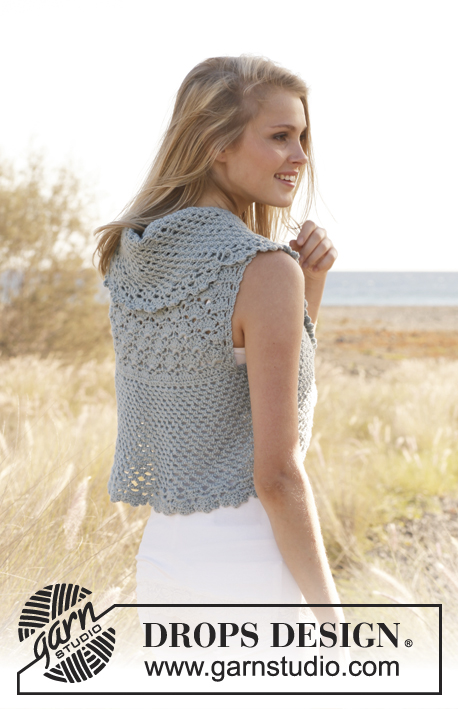
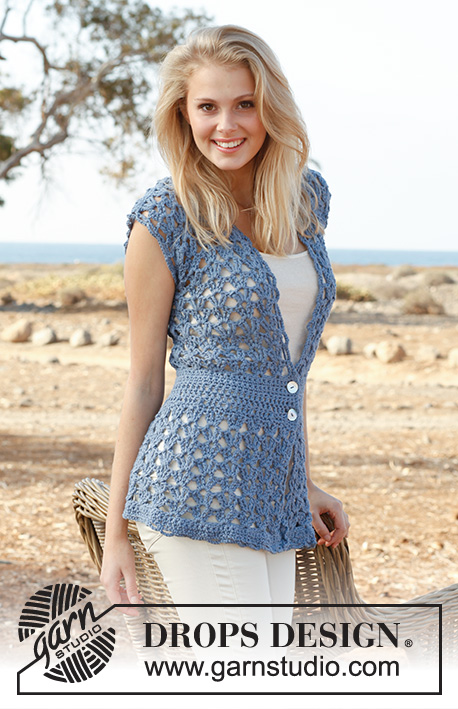
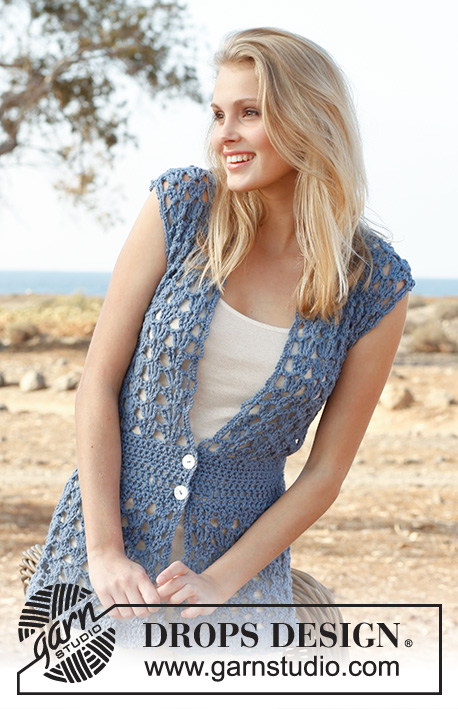
Crochet DROPS vest with fan pattern in ”Paris”. Size S-XXXL.
DROPS 145-4 |
||||||||||||||||
|
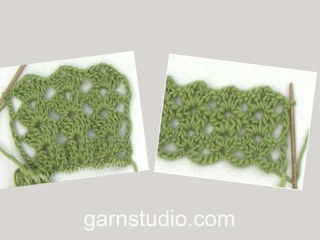
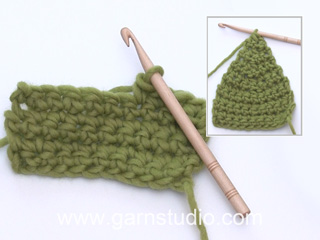
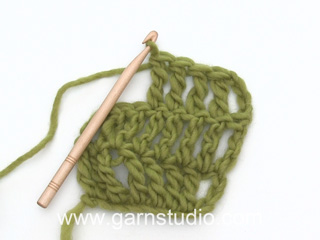
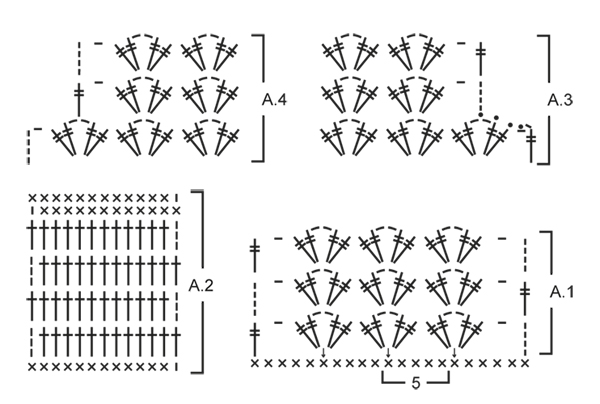
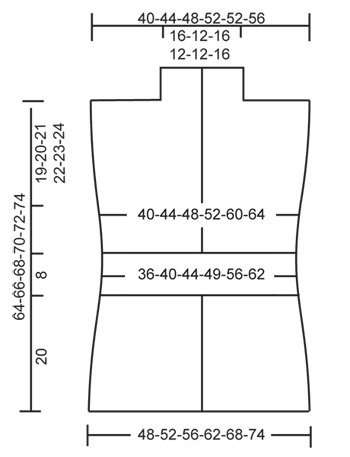
PATTERN: See diagrams A.1 and A.2 (diagrams A.3 and A.4 show dec for armhole in size XXL + XXXL). INCREASE TIP: Inc 1 sc by working 2 sc in same st. DECREASE TIP (dec 1 sc): Work 1 sc but wait with last pull through (= 2 sts on hook), then work next sc but on last pull through, pull yarn through all sts on hook = 1 sc dec. ---------------------------------------------------------- VEST: Read US/UK above! Worked back and forth from mid front. With Paris ch 189-204-219-242-264-287 on hook size 6 mm / J/10, turn. ROW 1: 1 sc in 2nd ch from hook, * skip ch 1, 1 sc in each of the next 2 ch *, repeat from *-* until 4-4-4-3-4-3 ch remain, skip next ch and finish with 1 sc in each of the last 3-3-3-2-3-2 ch = 126-136-146-161-176-191 sc on row, turn piece. ROW 2: ch 1, then work 1 sc in every sc from previous row = 126-136-146-161-176-191 sc, turn piece. ROW 3: Work as 2nd row. ROW 4: Then work pattern according to diagram A.1, i.e. ch 5 (= 1 tr + 1 ch), * skip 4 sc, in next sc work 2 tr + ch 2 + 2 tr *, repeat from *-* until 5 sc remain, skip 4 sc and finish with ch 1 and 1 tr in last sc = 24-26-28-31-34-37 tr-groups, turn piece. ROW 5: ch 5, in ch-space in every tr-group work 2 tr + ch 2 + 2 tr, finish row with 1 ch and 1 tr in 4th ch on beg of previous row = 24-26-28-31-34-37 tr-groups, turn piece. Repeat 5th row until piece measures approx. 16 cm / 6¼". Work next row as follows: ch 4 (= 1 tr), in ch-space in the middle of every tr-group work 2 tr + ch 1 (instead of 2 ch) + 2 tr, finish row with 1 tr in 4th ch from beg of previous row = 24-26-28-31-34-37 tr-groups, turn piece. Ch 1, 1 sc in same st, then work 1 sc in every tr the entire row, finish with 1 sc in 4th ch from beg of previous row, turn piece = 98-106-114-126-138-150 sc. Continue to work as follows: ROW 1: Work pattern according to diagram A.2, i.e. work ch 1, then work 1 sc in every sc the entire row AT THE SAME TIME dec 18-18-18-18-14-14 sc evenly – READ DECREASE TIP = 80-88-96-108-124-136 sc, turn piece. ROW 2: 3 ch (= 1 dc), then work 1 dc in every sc the entire row = 80-88-96-108-124-136 dc on row. ROW 3-5: Work as 2nd row = 80-88-96-108-124-136 dc. ROW 6: Work 1 sc in every dc AT THE SAME TIME adjust no of sts as follows: Size S + M + L + XL + XXL: Inc 5-9-5-5-5 sc evenly – READ INCREASE TIP. Size XXXL: Dec 3 sts evenly – READ DECREASE TIP = 85-97-101-113-129-133 sc, turn piece. ROW 7: ch 1, 1 sc in same st, then work 1 sc in every sc from previous row = 85-97-101-113-129-133 sc, turn piece. ROW 8: ch 5, * skip 3 sc, in next sc work 2 tr + ch 2 + 2 tr *, repeat from *-* until 4 sc remain on row, skip 3 sc and finish with 1 ch and 1 tr in last sc on row = 20-23-24-27-31-32 tr-groups on row, turn piece. ROW 9: Then work pattern according to diagram A.1 again, i.e. ch 5, in ch-space in the middle of every tr-group work 2 tr + ch 2 + 2 tr, finish row with ch 1 and 1 tr in 4th ch on beg of previous row = 20-23-24-27-31-32 tr-group. Repeat 9th row upwards. AT THE SAME TIME when piece measures 45-46-47-48-49-50 cm / 17¾"-18"-18½"-19"-19¼"-19¾", divide for markers as follows: Insert 1 marker after 5-6-6-7-8-8 tr-groups in from each side (= 10-11-12-13-15-16 tr-groups between markers on back piece). Finish each part separately. BACK PIECE: = 10-11-12-13-15-16 tr-groups. Continue back and forth with tr-groups as shown in A.1. AT THE SAME TIME on 1st row dec for armholes in each side in size XXL + XXXL as follows: Dec 1 tr-group on beg of row as shown in A.3, work as before until 1 tr-group remains on row, finish row as shown in A.4 (do not dec in the other sizes) = 10-11-12-13-13-14 tr-groups remain on row. Continue pattern back and forth until 1 row remains before piece measures 64-66-68-70-72-74 cm / 25¼"-26"-26¾"-27½"-28⅜"-29⅛". Now work 1 row with tr-groups only over the outermost 3-4-4-5-5-5 tr-groups in the one side of piece: ch 5, * in ch-space in the middle of next tr-group work 2 tr + ch 2 + 2 tr *, repeat from *-* 3-4-4-5-5-5 times in total, finish with 1 tr in last tr in same tr-group, turn piece. Now work 1 row sc as follows: ch 1, 1 sc in same st, * 1 sc in each of the first 2 tr, 1 sc in ch-space in the middle of tr-group, 1 sc in each of the next 2 tr *, repeat from *-* 3-4-4-5-5-5 times in total, finish with 1 sc in last ch and 1 sc in 4th ch from beg of previous row = 18-23-23-28-28-28 sc on row. Fasten off. Repeat on the other shoulder (i.e. do not work over the middle 4-3-4-3-3-4 tr-groups = neck.) RIGHT FRONT PIECE: = 5-6-6-7-8-8 tr-groups. Continue back and forth with tr-groups as on back piece. AT THE SAME TIME on 1st row dec for armhole in the side in size XXL + XXXL as shown in A.4 (do not dec in the other sizes) = 5-6-6-7-7-7 tr-groups. Continue pattern back and forth until piece measures approx. 64-66-68-70-72-74 cm / 25¼"-26"-26¾"-27½"-28⅜"-29⅛" - make sure that same no of rows with tr-groups has been worked as on back piece. Now work 1 row sc as on back piece only over the outermost 3-4-4-5-5-5 tr-groups on shoulder (i.e. do not work over the 2 tr-groups towards the neck = collar) = 18-23-23-28-28-28 sc. Fasten off. Insert 1 marker on the shoulder. Now work tr-groups back and forth over collar as follows: ch 5, in ch-space in first tr-group work 2 tr + ch 2 + 2 tr, in ch-space in next tr-group work 2 tr + ch 2 + 2 tr, ch 1 and finish with 1 tr in last tr in same tr-group. Continue back and forth like this until collar measures approx. 10-8-10-8-8-10 cm / 4"-3⅛"-4"-3⅛"-3⅛"-4" from marker on shoulder. Then work 1 row sc as follows: ch 1, 1 sc in same st, 1 sc in next ch, 1 sc in each of the first 2 tr, 1 sc in ch-space in the middle of tr-group, 1 sc in each of the next 2 tr *, repeat from *-* 2 times in total, finish with 1 sc in last ch and 1 sc in 4th ch from beg of previous row = 14 sc, cut the yarn. LEFT FRONT PIECE: Work as right front piece but reversed. When dec for armhole in size XXL + XXXL, dec 1 tr-group as shown in A.3. ASSEMBLY: Sew shoulder seams edge to edge to avoid a chunky seam. Sew collar tog mid back (sew edge to edge) and sew it on to neck line at the back of neck. Sew on buttons on right front piece – see picture. Button through the crochet edge explained below. CROCHET EDGE: Work a finishing edge around the entire opening on vest and around both armholes as follows: 1 sc in first st, * ch 5, skip approx. 2½ cm / ⅞", 1 sc in next st/ch-space *, repeat from *-* the entire round and finish with ch 5 and 1 sl st in sc from beg of round. |
||||||||||||||||
Diagram explanations |
||||||||||||||||
|
||||||||||||||||
|
||||||||||||||||
|
||||||||||||||||
|
Have you made this or any other of our designs? Tag your pictures in social media with #dropsdesign so we can see them! Do you need help with this pattern?You'll find tutorial videos, a Comments/Questions area and more by visiting the pattern on garnstudio.com. © 1982-2024 DROPS Design A/S. We reserve all rights. This document, including all its sub-sections, has copyrights. Read more about what you can do with our patterns at the bottom of each pattern on our site. |
||||||||||||||||


With over 40 years in knitting and crochet design, DROPS Design offers one of the most extensive collections of free patterns on the internet - translated to 17 languages. As of today we count 304 catalogs and 11422 patterns - 11417 of which are translated into English (US/in).
We work hard to bring you the best knitting and crochet have to offer, inspiration and advice as well as great quality yarns at incredible prices! Would you like to use our patterns for other than personal use? You can read what you are allowed to do in the Copyright text at the bottom of all our patterns. Happy crafting!
Comments / Questions (189)
Beste, in december ook al gevraagd, maar ik snap het nog niet. Als ik het hele pand open leg, dan heb ik eerst linkervoorpand achterpand en rechtervoorpand. Nu heb ik bovenop linkervoorpand (ook van links naar rechts gezien) eerst 23 vaste en dan nog twee dst-groepen. Haak ik nu dus bij de voorpanden verder over de twee dst-groepen? Of zitten deze aan de verkeerde kant. Moet ik eerste bij linkervoorpand de twee dst-groepen hebben en dan de vasten?
26.04.2016 - 12:29DROPS Design answered:
Hoi Claudieke. De kraag = de 2 dstk-groepen richting hals (aan de halszijde) en NIET aan de schouderzijde. Als je klaar bent met de schouder = 23 v, haak je alleen over de kraagsteken.
26.04.2016 - 13:44Bonjour vous dite de faire comme le dos sur les 5 gr de db mais de ne pas faire les 2 ER gr de db si je ne fait pas sur les 2 er gr il en reste 3 et pas 5?? Et combien de rangs je doit faire avant de faire les 18 ms? De quel cote je doit commencer les gr de 5 db sur les devant? Me dire pour ch cote car ses important pour arriver a faire les 18 ms si non ca arrive a 16 ms merci
04.04.2016 - 16:35DROPS Design answered:
Bonjour Marie, pour les devants, crochetez le même nombre de rangs de groupes de DB que pour le dos sur les 5 groupes de DB, puis 1 rang de ms sur l'épaule comme pour le dos sur 3 groupes de DB seulement en taille S. les 2 groupes de DB non travaillés et gardés pour le col se trouve en début de rang sur l'endroit pour le devant droit (côté opposé à l'emmanchure). Bon crochet!
05.04.2016 - 08:46Bonjour votre reponse ne repond pas a mais 6 questions. Est qu il serait possible de repondre a mais 6 queations pour que je puisse finir cette belle veste. Vos patrons ne sont pas ecrit clairement. Merci
04.04.2016 - 16:22DROPS Design answered:
Bonjour Marie, je pensais avoir répondu à vos questions, pouvez-vous les formuler différemment, j'ai dû mal comprendre. Merci.
05.04.2016 - 08:40Bonjour ca ne repond pas a mais 6 questions. Est qui serait possible de repondre a mais 6 questions??? Votre reponse n en dit pas plus que le patron. Si vos patrons aurais des explications clair ont ne poserais pas des questions. Pourquoi ne pas les corriger? Merci
04.04.2016 - 15:56DROPS Design answered:
Bonjour Marie, pour le devant, vous crochetez l'épaule comme pour le dos, sauf que vous ne faites pas les derniers rangs sur les 2 groupes de B côté encolure - soit 5 groupes en taille S - les 18 ms (et non ml) sont crochetés pour l'épaule du devant comme pour le dos (= on a le même nombre de groupes de B pour chaque épaule). Le col se fait ensuite séparément (questions 3&4 répondues précédemment). La bordure se commence sur l'endroit, vous pouvez joindre le fil en bas du devant droit ou au milieu dos, au choix. Bon crochet!
04.04.2016 - 16:16Bonjour 1- Est qu ont doit faire comme le dos sois 3groupes de db a la fin? 2 -Et de quel cote ont doit commencer pour le groupe de 5 db cote col ou epaule pour chaque cote car si non les 18 ml n arrive pas? 3 -Quand ont crochete le col le milieu n est pas prie avec l epaule? 4- je suppose que le col une fois cousu doit monter sur le cou? 5- pour la bordure de finition ont commence par le bord en bas? 6 -de quel cote ont le commence? Merci
03.04.2016 - 18:01DROPS Design answered:
Bonjour Marie, pour l'épaule des devants, on crochète comme pour le dos à 64-72 cm mais pas au-dessus des 2 groupes côté encolure. On crochète ensuite le col sur ces 2 groupes - il sera ensuite assemblé à l'autre devant puis le long de l'encolure dos. Bon crochet!
04.04.2016 - 09:13I have done the sides now I am trying to crochet after the 66 cm for the back piece. It says to work one row of tr on the 4 outermost tr's. I don't understand :) please help I need it delivered today
18.02.2016 - 18:39DROPS Design answered:
Dear Mrs Moss, when piece measures 66 cm you will now create necline working only on the 4 outermost tr-groups on one side (= shoulders) leaving the mid tr groups unworked for neckline. Repeat on the other side for 2nd shoulder. Happy crocheting!
19.02.2016 - 10:07I love this pattern. BUT I have done the back piece and right side up to 66 cm. I cannot figure it out after that. Please help
18.02.2016 - 00:16DROPS Design answered:
Dear Mrs Moss, when right front piece measure 66 cm, work 1 sc row as you did on back piece but only over the 4 tr groups on shoulder - the remaining 2 groups towards neckline are then worked later. After this sc row, cut the yarn and join to work over the remaining 2 tr groups towards neckline until this piece measure 8 cm from marker this will then be sewn along neckline on back piece (to mid back). Happy crocheting!
18.02.2016 - 10:08Hallo! Ich bin gerade mit der Weste fertig und komme nun zu dem Teil, an dem sich Rücken und Vorderseite trennen. Wie (und wo genau) setzte ich denn nun am Rückenteil das neue Garn an, so dass es hält? Ich habe an der Stelle ja keine offenen Maschen. Danke und Viele Grüße, Eva
12.01.2016 - 14:49DROPS Design answered:
Liebe Eva, haben Sie die Anwort dür Constanze auf die Frage vom 15.9.2015 gesehen? Da geht es auch darum, wie und wo am Rücken begonnen wird.
11.03.2016 - 08:45Bij het rechtervoorpand zegt men Knip de draad af, zet vast en plaats een markeerder. Haak nu dstk-groepen heen en weer over kraag als volgt. Hier ga ik mis. In eerste dstk-groep, Is dit binnen- of buitenkant?, maar ik houd dan ook twee dstk-groepen over. Wat is hier precies de bedoeling. Alvast bedankt.
15.12.2015 - 22:06DROPS Design answered:
Beste Claudieke. De kraag is middenvoor, dus voor je rechter voorpand aan de rechterkant (gezien van de goede kant). Je had 2 dstk-groepen voor de kraag en in deze twee dstk-groepen haak je: 5 l, haak in l-lus in eerste dstk-groep: 2 dstk en 2 l en 2 dstk, haak in l-lus in volgende dstk-groep: 2 dstk en 2 l en 2 dstk, haak 1 l en eindig met 1 dstk in laatste dstk in dezelfde dstk-groep. Dit is de sjaalkraag die je bij het afwerken tegen de hals op het achterpand naait. Lees ook onder AFWERKEN.
22.12.2015 - 16:52De schouder van het rugpand, is dat 1 toer dubbele stokjes,over de breedte van de schouder en 1 toer vaste? Of 2 toeren dubbele stokjes en 1 toer vaste B.v.d. Laura
22.11.2015 - 18:49DROPS Design answered:
Beste Laura. 1 toer dstk en 1 toer vasten
23.11.2015 - 13:38