
Popular categories
Looking for a yarn?


|
||||||||||||||||
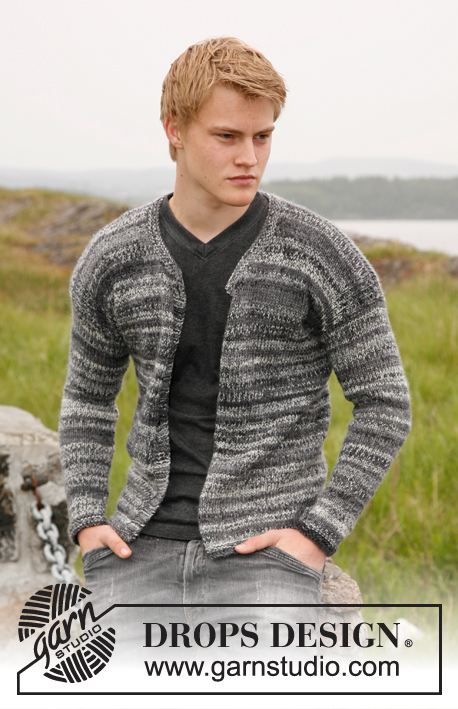
Rambling Man |
||||||||||||||||
 |
 |
|||||||||||||||
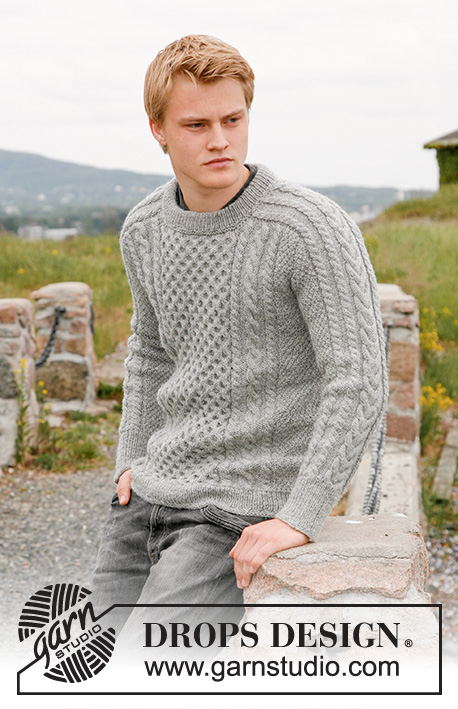
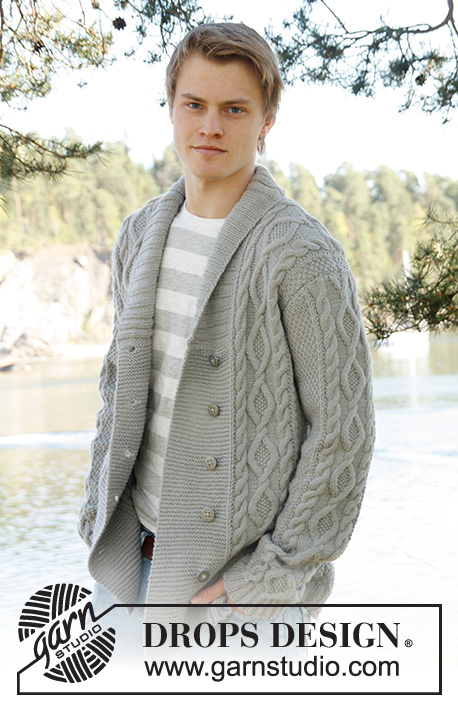
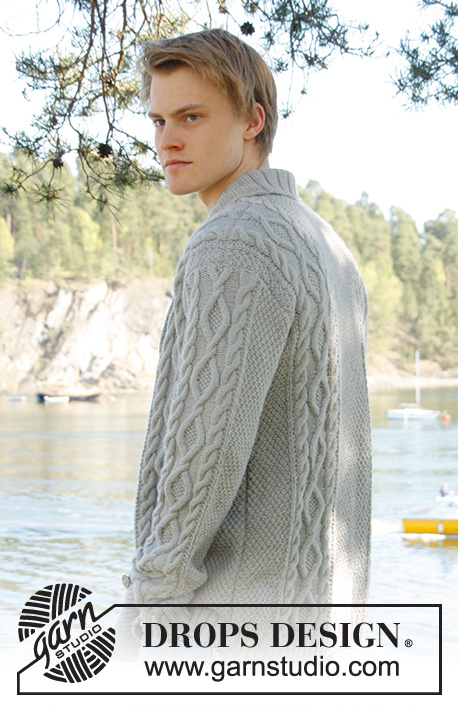
Men's knitted jacket in DROPS Lima, with cable pattern and shawl collar. Size: S - XXXL.
DROPS Extra 0-850 |
||||||||||||||||
|
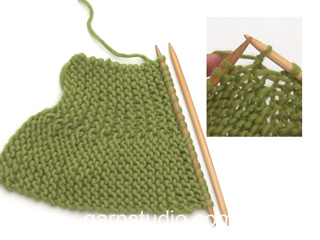
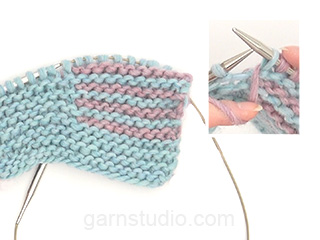
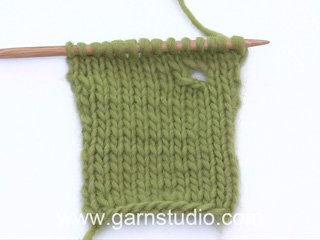
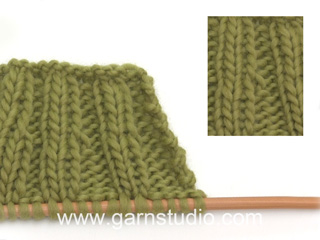
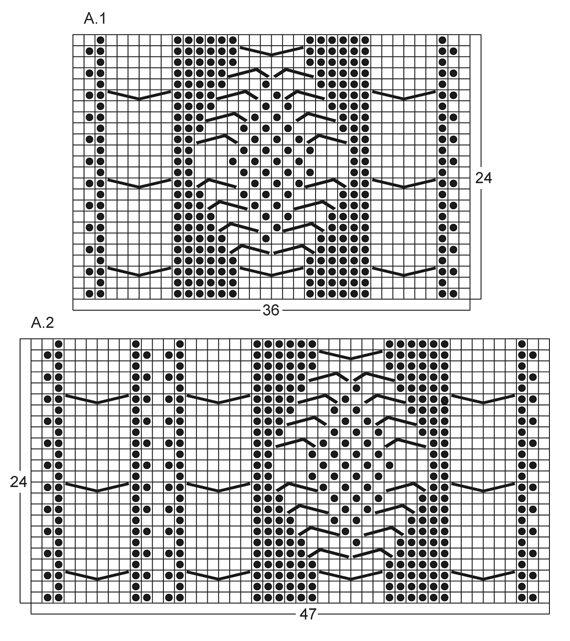
KNITTING TIPS: This design is written with button holes on right front edge, if you wish standard button holes for men, you can make the button holes on left front edge. GARTER ST (back and forth on needle): K all rows. NOTE: All edge sts are worked in garter st. PATTERN: See diagram A.1 to A.4, diagrams show all rows in 1 pattern repetition from RS. SHORT ROWS: RIGHT FRONT PIECE: Work 1 short row on row 3 of every pattern repetition vertically until finished measurements as follows: On 3rd row in pattern (= RS), work 26-26-26-26-30-30 band sts, turn and K back. Then work over all sts on row as before. LEFT FRONT PIECE: Work 1 short row on row 2 of every pattern repetition vertically until finished measurements as follows: On 2nd row in pattern (= WS), work 26-26-26-26-30-30 band sts, turn and K back. Then work over all sts on row as before. BUTTON HOLES: Bind off for 5 button holes from RS on right band. 1 BUTTON HOLE = bind off 7th and 8th st from mid front and cast on 2 new sts on next row over these sts. Bind off for button holes when piece measures: SIZE S: 14, 22, 30, 38 and 46 cm / 5½",8¾",11¾",15" and 18" SIZE M: 15, 23, 31, 39 and 47 cm / 6",9",12¼",15¼" and 18½" SIZE L: 16, 24, 32, 40 and 48 cm / 6¼",9½",12½",15¾" and 19" SIZE XL: 17, 25, 33, 41 and 49 cm / 6¾",9¾",13",16⅛" and 19¼" SIZE XXL: 18, 26, 34, 42 and 50 cm / 7",10¼",13⅜",16½" and 19¾" SIZE XXXL: 19, 27, 35, 43 and 51 cm / 7½",10⅝",13¾",17" and 20" INCREASE TIP: Inc 1 st by making 1 YO, on next row work YO twisted (i.e. work in back loop of st instead front) to avoid holes. ---------------------------------------------------------- BACK PIECE: Worked back and forth on needle. Cast on 136-156-168-180-196-204 sts (includes 1 edge st in each side) on circular needle size 3.5 mm / US 4 with Lima. Work rib as follows (1st row = RS): 1 edge st in GARTER ST - see explanation above, * K 2, P 2 *, repeat from *-*, finish with K 2 and 1 edge st in garter st. Continue to work like this until rib measures 5-5-5-6-6-6 cm / 2"-2"-2"-2⅜"-2⅜"-2⅜". On last row from WS, P while AT THE SAME TIME dec 20-22-24-26-26-26 sts evenly = 116-134-144-154-170-178 sts. Then switch to needle size 4 mm / US 6 and work next row from RS as follows: 1 edge st in garter st, 8-16-20-24-20-24 sts in A.4, work A.1 one time in size S - XL, work A.2 one time in size XXL and XXXL, 26-28-30-32-34-34 sts in A.4, then work A.1 one time in size S - XL, work A.3 one time in size XXL and XXXL, finish with 8-16-20-24-20-24 sts in A.4 and 1 edge st in garter st. REMEMBER THE GAUGE! Continue to work like this until piece measures 47-48-49-50-51-52 cm / 18½"-19"-19¼"-19¾"-20"-20½". Then bind off for armholes at the beg of every row in each side as follows: bind off 3 sts 0-1-1-2-2-2 times, 2 sts 1-1-1-2-2-2 times, 1 st 4-7-9-8-4-8 times = 104-110-116-118-142-142 sts. Continue with pattern as before until piece measures 66-68-70-72-74-76 cm / 26"-26¾"-27½"-28⅜"-29⅛"-30". Now bind off the middle 20-22-24-26-28-28 sts for neck and finish each part separately. Bind off 2 sts on next row from neck = 40-42-44-44-55-55 sts remain on shoulder. Continue with pattern as before. When piece measures 68-70-72-74-76-78 cm / 26¾"-27½"-28⅜"-29⅛"-30"-30¾", loosely bind off sts with K over K and P over P. RIGHT FRONT PIECE: Worked back and forth on needle. Cast on 83-91-95-99-111-115 sts (includes 1 edge st in the side) on circular needle size 3.5 mm / US 4 with Lima. Work rib as follows (1st row = RS): 26-26-26-26-30-30 sts in garter st (= band sts), * K 2, P 2 *, repeat from *-*, finish with 1 edge st in garter st. Continue with rib and band sts in garter st until rib measures 5-5-5-6-6-6 cm / 2"-2"-2"-2⅜"-2⅜"-2⅜". On last row from WS, P over all sts in rib while AT THE SAME TIME dec 12-12-12-12-13-13 sts evenly (do not dec over band sts) = 71-79-83-87-98-102 sts. Then switch to needle size 4 mm / US 6 and work next row from RS as follows: 26-26-26-26-30-30 band sts, work A.1 one time in size S - XL, work A.3 one time in size XXL and XXXL, 8-16-20-24-20-24 sts in A.4 and 1 edge in garter st. On next row from RS (= 3rd row in pattern) work SHORT ROWS - read explanation above. Continue with pattern and band sts at the front - while AT THE SAME TIME work 1 short row on 3rd row in every pattern repetition vertically until finished measurement. When piece measures 14-15-16-17-18-19 cm / 5½"-6"-6¼"-6¾"-7"-7½", bind off for BUTTON HOLES on right band - see explanation above! Continue to work until piece measures 47-48-49-50-51-52 cm / 18½"-19"-19¼"-19¾"-20"-20½". Then bind off at beg of next row from RS as follows: bind off the first 25-25-25-25-29-29 sts, insert a marker (this marks where to beg the knit up for collar), work the rest of row. Then bind off for armhole on every row from WS as follows: 3 sts 0-1-1-2-2-2 times, 2 sts 1-1-1-2-2-2 times, 1 st 4-7-9-8-4-8 times = 40-42-44-44-55-55 sts remain on shoulder. Continue with pattern as before. When piece measures 68-70-72-74-76-78 cm / 26¾"-27½"-28⅜"-29⅛"-30"-30¾", loosely bind off sts with K over K and P over P. LEFT FRONT PIECE: Cast on and work rib as on right front piece but reversed (i.e. * P 2, K 2 *, repeat from *-*) with 26-26-26-26-30-30 band sts in garter st. Continue to work until rib measures 5-5-5-6-6-6 cm / 2"-2"-2"-2⅜"-2⅜"-2⅜". On last row from WS, P over all sts in rib while AT THE SAME TIME dec 12-12-12-12-13-13 sts evenly (do not dec over band sts) = 71-79-83-87-98-102 sts. Then switch to needle size 4 mm / US 6 and work next row from RS as follows: 1 edge st in garter st, 8-16-20-24-20-24 sts in A.4, work A.1 one time in size S - XL, work A.2 one time in size XXL and XXXL, 26-26-26-26-30-30 band sts in garter st. On next row from WS (= 2nd row in pattern) work SHORT ROWS - read explanation above. Continue to work the same way as on right front piece but without button holes. SLEEVE: Worked back and forth on needle. Cast on 74-78-82-86-90-90 sts (includes 1 edge st in each side) on circular needle size 3.5 mm / US 4 with Lima. Work rib as follows (1st row = RS): 1 edge st in garter st, * K 2, P 2 *, repeat from *-* and finish with 1 edge st in garter st. Continue to work like this until rib measures 5-5-5-6-6-6 cm / 2"-2"-2"-2⅜"-2⅜"-2⅜". On last row from WS, P while AT THE SAME TIME dec 12-14-16-18-18-18 sts evenly = 62-64-66-68-72-72 sts. Then switch to needle size 4 mm / US 6 and work next row from RS as follows: 1 edge st in garter st, 12-13-14-15-17-17 sts in A.4, work A.1 one time, 12-13-14-15-17-17 sts in A.4, finish with 1 edge st in garter st. AT THE SAME TIME when piece measures 6 cm / 2⅜", inc 1 st inside 1 edge st in each side - Read INCREASE TIP above. NOTE: Work the inc sts in A.4. Repeat inc every 3½-3-2½-2½-2½-2½ cm / 1¼"-1⅛"-⅞"-⅞"-⅞"-⅞" a total of 14-15-16-17-16-17 times = 90-94-98-102-104-106 sts. Continue until piece measures 54-53-51-50-48-48 cm / 21¼"-21"-20"-19¾"-19"-19" (shorter measurements in the larger sizes because of longer sleeve cap and broader shoulder width), bind off at beg of every row in each side: 3 sts 1-1-1-2-2-2 times, 2 sts 1-1-2-2-2-2 times and 1 st 2-2-3-3-4-4 times. Then bind off 2 sts in each side until piece measures 61-61-60-60-59-59 cm / 24"-24"-23⅝"-23⅝"-23¼"-23¼", then bind off 3 sts 1 time in each side. When piece measures approx. 62-62-61-61-60-60 cm / 24⅜"-24⅜"-24"-24"-23⅝"-23⅝", loosely bind off sts with K over K and P over P. ASSEMBLY: Sew shoulder seams and sew in sleeves inside 1 edge st. Sew sleeve and side seams in one inside 1 edge st. Sew buttons on to left front piece, approx. 2½ cm / ⅞" from last K st in pattern. SHAWL COLLAR: Pick up sts from RS inside 1 edge st on circular needle size 3.5 mm / US 4. Start mid front at marker on right front piece as follows: Pick up approx. 60-70 sts up to shoulder, then 30-40 sts along the neck and 60-70 sts down along left front piece until marker = 150-180 sts. K 1 row from WS while AT THE SAME TIME adjusting no of sts to 144-148-156-164-172-180. Then work rib on next row from RS as follows: 1 sts in garter st, * K 2, P 2 *, repeat from *-* and finish with K 2 and 1 st in garter st. Continue like this until collar measures approx. 5-5-5-6-6-6 cm / 2"-2"-2"-2⅜"-2⅜"-2⅜". Now inc 1 st in each of the middle 14-14-14-16-16-16 P-sections seen from RS (= back of neck) = 158-162-170-180-188-196 sts. Continue until collar measures approx. 12-12-12-12-14-14 cm / 4¾"-4¾"-4¾"-4¾"-5½"-5½", then loosely bind off with K over K and P over P. Fasten collar with fine stitches at the bottom in each side towards band from WS (so that the seam is not visible from RS) – sew edge to edge to avoid a chunky seam. |
||||||||||||||||
Diagram explanations |
||||||||||||||||
|
||||||||||||||||

|
||||||||||||||||
|
||||||||||||||||
|
Have you made this or any other of our designs? Tag your pictures in social media with #dropsdesign so we can see them! Do you need help with this pattern?You'll find tutorial videos, a Comments/Questions area and more by visiting the pattern on garnstudio.com. © 1982-2024 DROPS Design A/S. We reserve all rights. This document, including all its sub-sections, has copyrights. Read more about what you can do with our patterns at the bottom of each pattern on our site. |
||||||||||||||||


With over 40 years in knitting and crochet design, DROPS Design offers one of the most extensive collections of free patterns on the internet - translated to 17 languages. As of today we count 304 catalogs and 11422 patterns - 11417 of which are translated into English (US/in).
We work hard to bring you the best knitting and crochet have to offer, inspiration and advice as well as great quality yarns at incredible prices! Would you like to use our patterns for other than personal use? You can read what you are allowed to do in the Copyright text at the bottom of all our patterns. Happy crafting!
Comments / Questions (260)
In het patroon staat bij het achterpand net na de boord : begin met telpatroon A 4 maar dat is er niet kan het een vergissing zijn?
13.03.2020 - 16:45DROPS Design answered:
Dag Anke,
Deze staat (een beetje verstopt :) onder de maattekening, zeg maar onder de mouw. Het is een klein telpatroontje voor dubbele gerstekorrel.
22.03.2020 - 12:25Bj comment faire après le point mousse et côtés 2/2 pour que le point de fantaisie soit dans le même sens pour le modèle rambling man devant droit merci
04.03.2020 - 15:55DROPS Design answered:
Bonjour Mme Van Damme, je ne suis pas sûre de bien comprendre votre question, dans cette veste, on rabat les mailles point mousse des bordures des devants, et on continue les torsades comme avant. Tout à la fin, on va relever les mailles du col (le long de la fin des devants et de l'encolure dos) et les tricoter en côtes 2/2 puis les assembler aux mailles point mousse rabattues. Bon tricot!
04.03.2020 - 16:58May I ask how many sts should I have (beside ones in A1)after binding off stitches for sleeve size M?
16.01.2020 - 15:59DROPS Design answered:
Dear Mrs Deni, the number of remaining stitches after all bind off for sleeve will depend on your tension in height, most important is here the height in cm so that the sleeve has the right length. Happy knitting!
17.01.2020 - 07:57Bonjour, je termine le modèle LI-014 et je ne comprends pas les augmentations du col châle. Je dois ajouter 16 mailles à raison d'1 maille par section (soit 16 rangs ?), mais comme il s'agit de côtes 2x2, comment faut-il procéder ? Faut-il ajouter la maille au milieu ? Maille endroit ou maille envers, est-ce important ? Merci de votre réponse.
07.01.2020 - 16:01DROPS Design answered:
Bonjour Mme Follin, vous augmentez le nombre de mailles envers (vues sur l'endroit) des côtes = vous augmentez 16 m sur un seul rang, vous aurez ainsi 16 fois 3 m env, mais les autres mailles seront 2 m end et 2 m env comme avant. Bon tricot!
08.01.2020 - 08:09I made the Rambling Man sweater into a knee length coat so I eliminated the ribbing on the sleeves and bottom of the coat. I replaced the ribbing on the sleeve with garter stitch. My question is about the collar. If I wanted to use garter stitch on the shawl part would I follow the same directions in terms of increases and number of stitches? With no other ribbing on the sweater I thought the change might look better. Your thoughts.
29.12.2019 - 18:22DROPS Design answered:
Dear Amy, what you descrile is posible, but be aware and take it into consideration that while ribbing pulls the stitches in, the garter stitch pushes them apart a little bit, so the collar with garter stitch might sit a bit off, somewhat wavy. Happy Knitting!
29.12.2019 - 20:34This question concerns men's DROPS Rambling Man 0-850 pattern. I am working on the right front piece. The garter (band) stitches do not lie as flat as the K2 P2 rib, so the bottom of the sweater is uneven. How can I make the two different parts of the bottom of the sweater even? Thanks very much.
23.12.2019 - 03:20DROPS Design answered:
Dear Bethm try knitting the rows with garter stitch with a different sized needle. Generally, using smaller needles for garter stitch helps with the unevennes. I hope this helps. Happy Knitting!
24.12.2019 - 17:05Bonjour , Je ne comprends pas que faire quand vous notez:" augmenter une maille dans chacune des 14 sections envers centrales ( = encolure dos ) , vu sur endroit = 162m. Modele: Rambling Man explication du col chale. Merci pour votre reponse
11.12.2019 - 14:03DROPS Design answered:
Bonjour Mme Labatut, vous tricotez d'abord le col en côtes 2 m end/2 m env, avec 2 m end et 1 m lis au point mousse de chaque côté (vu sur l'endroit). Pour que le col se retourne joliment, on va augmenter dans les 14 ou 16 (cf tailles) sections 2 m envers du milieu du col (= côté encolure dos) et on aura ainsi des côtes 2 m end/2 m env comme avant, puis 14 ou 16 fois 2 m end/3 m env au milieu du rang et on termine ensuite par des côtes 2 m end/2 m env. Bon tricot!
11.12.2019 - 14:34I'm knitting size M and need help with sleeves.Hiw to work yarn overs in pattern? For example, I work 1 row by making k1,than p,k,p...than A1....Second row k1,p,k,p...A1....on 3rd I will increase by making YO..How to work them in pattern afterwards?
28.11.2019 - 08:44DROPS Design answered:
Dear Dusica, see answer below, make sure that the pattern is always the same, ie you should always have 2 rows K over K, P over P, then on next row, P over K, K over P, and 4th row with K over K and P over P. Happy knitting!
28.11.2019 - 09:56Hello, I'm knitting size M and need help with sleeves.At the part where it says increase by making YO and than work yarn overs in pattern. Can you give me a clue?For example, I work first row as indicated k1,(p,k...)than A1 ....second row k1,p,k...now on 3rd row I will increase by making YO.How do I continue in row 4 by working yarn covers in pattern?
28.11.2019 - 08:41DROPS Design answered:
Dear Dusica, the increases should be worked in pattern A.4, ie the first yarn over at the beg of row from WS should be purled if the next stitch should be knitted, and it should be knitted if the next stitch should be purled. Same at the end of the row: if the last stitch in A.4 is a P stitch, K the yarn over, if the last st is a K stitch, P the yarn over - remember to K or P twisted (= into back of loop) to avoid holes. Happy knitting!
28.11.2019 - 09:53Bonjour, D'abord merci pour tous ses modèles magnifique. Il me manque 4 pelotes de LIMA colour: 9010 Dyelot: 392183 puis-je être sure d'accord le même bain en le recommandant sur internet. Merci d'avance pour votre réponse
15.11.2019 - 20:42DROPS Design answered:
Bonjour Mme Labatut, nous vous recommandons de vous adresser directement à votre magasin (même par mail ou téléphone) pour toute information complémentaire sur le réassort d'un même bain, n'hésitez pas à en contacter plusieurs si besoin. Bon tricot!
18.11.2019 - 08:27