
Popular categories
Looking for a yarn?


|
|||||||||||||||||||
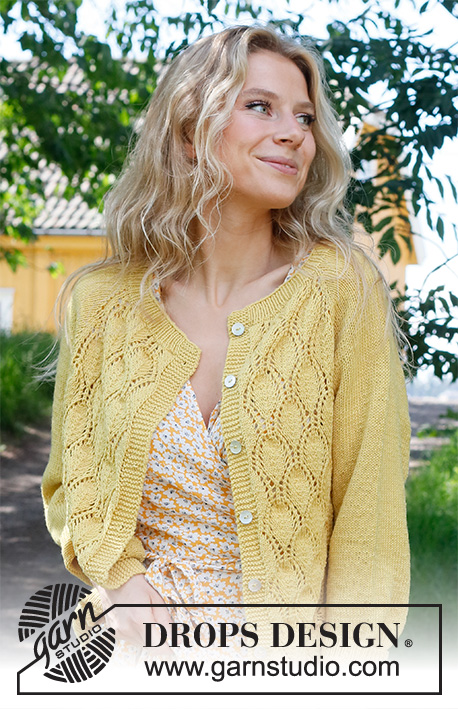
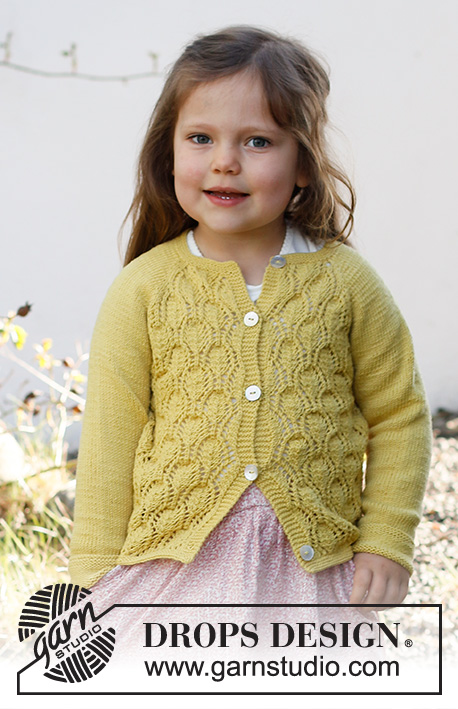
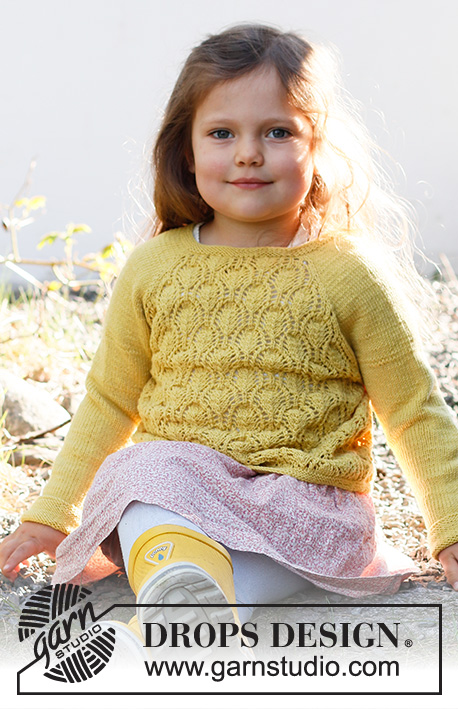
Queen Bee |
|||||||||||||||||||
 |
 |
||||||||||||||||||
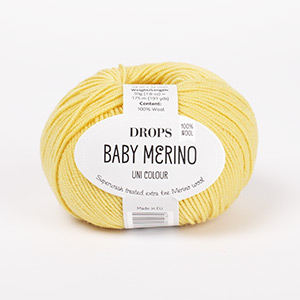
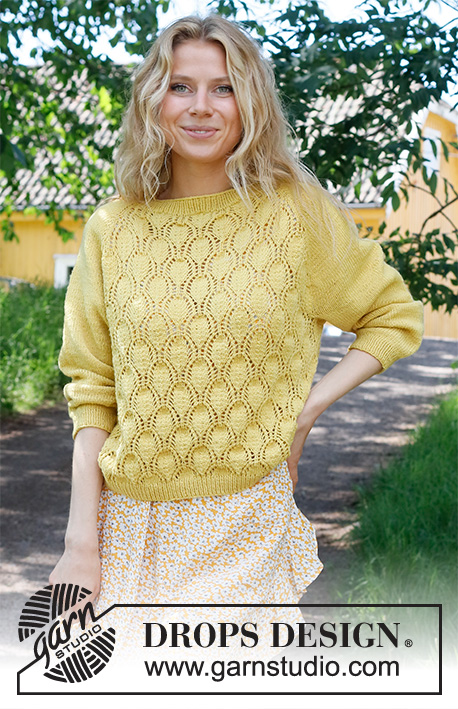
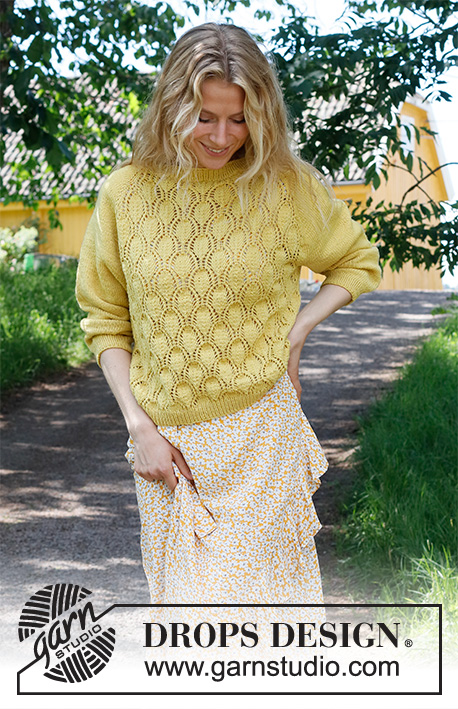
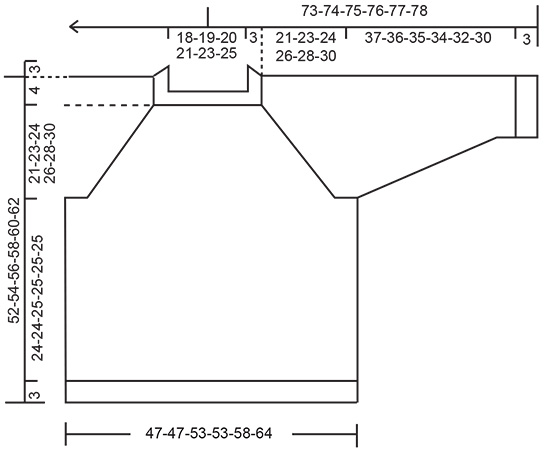
Knitted sweater in DROPS BabyMerino. The piece is worked top down, with raglan and lace pattern. Sizes S - XXXL
DROPS 231-16 |
|||||||||||||||||||
|
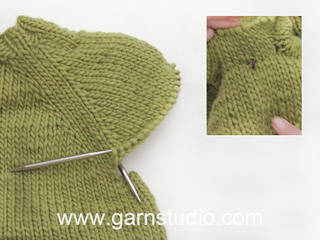
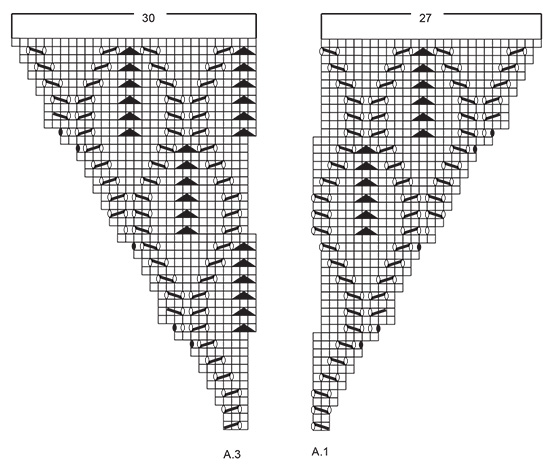
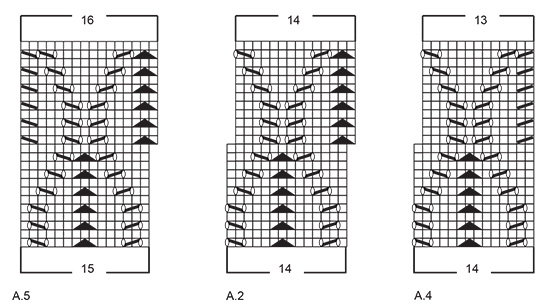
------------------------------------------------------- EXPLANATIONS FOR THE PATTERN: ------------------------------------------------------- PATTERN: See diagrams A.1 to A.5. RAGLAN: The increases to raglan on the front and back piece are included in the diagrams. Increase to raglan on each side of the sleeves as follows: Increase 1 stitch after markers 1 and 3 and before markers 2 and 4 by making 1 yarn over. The yarn overs are knitted twisted on the next round to avoid holes. Then work the new stitches in stockinette stitch. DECREASE TIP (for sleeves): Decrease 1 stitch on either side of the marker as follows: Work until there are 3 stitches left before the marker, knit 2 together, knit 3 (marker sits in the middle stitch of these 3 stitches), slip 1 stitch as if to knit, knit 1 and pass the slipped stitch over the knitted stitch (2 stitches decreased). ------------------------------------------------------- START THE PIECE HERE: ------------------------------------------------------- SWEATER - SHORT OVERVIEW OF THE PIECE: The piece is worked in the round with circular needle, top down. The sleeves are worked in the round with short circular needle/double pointed needles. NECK: Cast on 124-130-134-138-148-158 stitches with circular needle size 2.5 MM = US 1.5 and DROPS Baby Merino. Knit 1 round, then work rib (knit 1, purl 1) for 3 cm = 1⅛". Change to circular needle size 3 MM = US 2.5. Knit 1 round and increase 10-4-28-24-42-60 stitches evenly spaced (increase by working yarn overs) = 134-134-162-162-190-218 stitches. Knit 1 round; the yarn overs are knitted twisted. Insert 1 marker at the beginning of the round (transition between the back piece and right sleeve). THE PIECE IS NOW MEASURED FROM HERE! REMEMBER THE KNITTING GAUGE! YOKE: Work the next round as follows: Right sleeve: Knit 1, insert marker-1, make 1 yarn over, knit 18, 1 yarn over, insert marker-2, knit 1. Front piece: Work A.1, A.2 over 42-42-56-56-70-84 stitches, A.3. Left sleeve: Knit 1, insert marker-3, make 1 yarn over, knit 18, 1 yarn over, insert marker-4, knit 1. Back piece: Work A.1, A.2 over 42-42-56-56-70-84 stitches, A.3. Continue this pattern and increase to RAGLAN – read description above, every 2nd round a total of 24-27-32-36-39-41 times. When A.1 and A.3 have been completed, continue as follows: Right sleeve: Continue with stockinette stitch and increase every 2nd round as before. Front piece: Work A.4, A.2 over 70-70-84-84-98-112 stitches, A.5. Left sleeve: Continue with stockinette stitch and increase every 2nd round as before. Back piece: Work A.4, A.2 over 70-70-84-84-98-112 stitches, A.5. Continue working until the piece measures 21-23-24-26-28-30 cm = 8¼"-9"-9½"-10¼"-11"-11¾" from the marker on the neck. When the sleeve-increases are finished there are 334-346-394-410-450-486 stitches. Work the next round as follows: Place the first 68-74-84-92-98-102 stitches on 1 thread for the sleeve, cast on 13 stitches (in side under sleeve), work pattern as before over the next 99-99-113-113-127-141 stitches (front piece), place the next 68-74-84-92-98-102 stitches on 1 thread for the sleeve, cast on 13 stitches (in side under sleeve), work pattern as before over the last 99-99-113-113-127-141 stitches (back piece). The body and sleeves are finished separately. BODY: = 224-224-252-252-280-308 stitches. Work A.2 over all stitches (continuing from the correct row in the diagrams) for 24-24-25-25-25-25 cm = 9½"-9½"-9¾"-9¾"-9¾"-9¾". Knit 1 round where you increase 24-24-26-26-30-32 stitches evenly spaced = 248-248-278-278-310-340 stitches. Change to circular needle size 2.5 MM = US 1.5 and work rib (knit 1, purl 1) for 3 cm = 1⅛". Bind off. SLEEVES: Place the 68-74-84-92-98-102 stitches from the thread on the one side of the piece on short circular needle/double pointed needles size 3 MM = US 2.5 and knit up 1 stitch in each of the 13 stitches cast on under the sleeve = 81-87-97-105-111-115 stitches. Insert a marker in the middle of the new stitches under the sleeve and start at the marker. Work stockinette stitch in the round for 3 cm = 1⅛". Now decrease 2 stitches under the sleeve – read DECREASE TIP. Decrease like this every 4-3½-2½-2-1½-1½ cm = 1½"-1¼"-1"-¾"-½"-½" a total of 8-9-12-14-15-15 times = 65-69-73-77-81-85 stitches. Continue working until the sleeve measures 37-36-35-34-32-30 cm = 14½"-14¼"-13¾"-13⅜"-12½"-11¾". Knit 1 round where you increase 1 stitch = 66-70-74-78-82-86 stitches. Change to double pointed needles size 2.5 MM = US 1.5 and work rib (knit 1, purl 1) for 3 cm = 1⅛". Bind off. The sleeve measures approx. 40-39-38-37-35-33 cm = 15¾"-15¼"-15"-14½"-13¾"-13" from the division. Work the other sleeve in the same way. |
|||||||||||||||||||
Diagram explanations |
|||||||||||||||||||
|
|||||||||||||||||||
|
|||||||||||||||||||
|
|||||||||||||||||||
|
|||||||||||||||||||
|
Have you made this or any other of our designs? Tag your pictures in social media with #dropsdesign so we can see them! Do you need help with this pattern?You'll find tutorial videos, a Comments/Questions area and more by visiting the pattern on garnstudio.com. © 1982-2024 DROPS Design A/S. We reserve all rights. This document, including all its sub-sections, has copyrights. Read more about what you can do with our patterns at the bottom of each pattern on our site. |
|||||||||||||||||||


With over 40 years in knitting and crochet design, DROPS Design offers one of the most extensive collections of free patterns on the internet - translated to 17 languages. As of today we count 304 catalogs and 11422 patterns - 11417 of which are translated into English (US/in).
We work hard to bring you the best knitting and crochet have to offer, inspiration and advice as well as great quality yarns at incredible prices! Would you like to use our patterns for other than personal use? You can read what you are allowed to do in the Copyright text at the bottom of all our patterns. Happy crafting!
Comments / Questions (33)
Hej jeg er i gang med forstykke, der står man skal tage ud til ranglan ved hver 2., Er det når man strikker mønster eller når man strikker ret ? Og det er IKKE inkluderet i diagrammerne vel? Jeg er lidt i tvivl. På forhånd tak.
08.03.2023 - 17:56DROPS Design answered:
Hej Josefine, jo raglanudtagningerne er tegnet ind i diagrammerne :)
09.03.2023 - 09:23Hej og tak for svar! Måske er det så en god idé at forklare det i opskriften. Og ikke mindst at vise det i måltegningen, som jo er misvisende. Dejligt at jeg nu kan komme videre. Hilsen Annette
30.01.2023 - 17:09Tak for svar! Men 56 pinde giver 17,5cm. Så er der 5,5 cm op til de 23cm. Det understreges flere steder i opskriften, at de 3cm rib ikke skal medregnes. Betyder det, at man skal strikke 5,5cm uden udtagninger?
26.01.2023 - 19:41DROPS Design answered:
Hej Annette, ja du har helt ret, ja det betyder det - god fornøjelse!
30.01.2023 - 15:38Jeg har strikket 14 cm fra mærket og har nu maskeantallet til at dele i krop og ærmer. Opskriften siger at jeg skal dele efter 23 cm. Skal jeg strikke 9 cm uden udtagninger før deling? Jeg strikker i drops alpaca og strikkefastheden passer. Butikken hvor jeg købte garnet er lukket (“strikkes” i Glostrup). Hilsen en erfaren strikker, som ellers ikke har problemer med jeres opskrifter. Annette
21.01.2023 - 10:15DROPS Design answered:
Hej Annette, du strikker først 3 cm, strikker 2 omgange + udtagningerne til raglan på hver 2.p 27 x 2 = 56 pinde / 32 pinde på 10 cm = 18 cm + de 3 cm rib = 21 cm Strik de sidste 2 cm uden udtagninger :)
26.01.2023 - 15:36Hola. Ya me he dado cuenta. Hay que continuar con los aumentos para las mangas en todas las tallas excepto en la S, que es la única que pide aumentar 24 veces. Disculpen la molestia. Muy bonito el patrón. Saludos
15.01.2023 - 09:03Buenos días. Según leo en el patrón, los aumentos en el ranglan deben hacerse cada 2ª vuelta un total de 24 veces ( se llega a 68 puntos cada manga). Eso coincide con las 48 vueltas de A1 y A3. Por lo tanto, entiendo que después de acabar A1 y A3 ya no hay que seguir con los aumentos en las mangas. Entonces, ¿ por qué en el patrón dice que hay que continuar aumentando las mangas? Gracias.
15.01.2023 - 08:37DROPS Design answered:
Hola Inés, el siguiente párrafo, dónde se continúan con aumentos para las mangas, se utiliza sobre todo en el caso de las tallas más grandes, dónde una sola repetición de A.1 y A.3 no es suficiente para llegar al número de puntos necesario. Para la talla S, la primera vuelta con aumentos, no cuenta como 1 de los 24 aumentos indicados, por lo que sólo tendrías que aplicar las instrucciones del patrón después de A.1/A.3 para las 2 últimas filas.
15.01.2023 - 10:38Non combacia il numero delle maglie con il numero della disposizione iniziale dello sprone
28.11.2022 - 00:34DROPS Design answered:
Buonasera Laura, ci spiega meglio cosa non le torna? Buon lavoro!
28.11.2022 - 22:21Thank you that made everything so much clearer. Christine
06.09.2022 - 06:54Setting up first pattern row. Says A1 and A2 over 56 stitches then A3. This does not work. I wrote out the pattern( as I am using charts for the first time) to make sure I was following the instructions but I end up finishing about 4 stitches short on the A2 chart. I have counted my stitches 3 times and undone the knitting 3 times but still get the same result.
05.09.2022 - 10:29DROPS Design answered:
Dear Christine you should work as follows: A.1 (=3 sts on first row + 1 increase for the raglan), then repeat A.2 (= 14 sts) a total of 4 times (= over the next 56 sts), then work A.3 (= starting with 3 sts on first row + 1 increase for the arglan). Can this help?
05.09.2022 - 13:31Wenn am Vorder- und Rückenteil A1 und A3 in der Höhe fertig sind, wird laut Anleitung der Rumpf mit A4, A2 und A5 gestrickt. Bei den Ärmeln weiter 2 Zunahmen jd. 2. Reihe. Bei Vorder-und Rückseite bleibt die Maschenanzahl jedoch gleich. Ist das korrekt?
16.05.2022 - 13:58DROPS Design answered:
Liebe Christiane, ja genau, beim Vorder- und Rückenteil sind die Raglanzunahmen fertig, aber nicht bei den Ärmeln deshalb muss man immer noch nur bei den Ärmeln zunehmen. Viel Spaß beim stricken!
16.05.2022 - 16:48