
Popular categories
Looking for a yarn?


|
|||||||||||||||||||||||||||||||||||||||||||||||||||||||
Beach Comfort |
|||||||||||||||||||||||||||||||||||||||||||||||||||||||
 |
 |
||||||||||||||||||||||||||||||||||||||||||||||||||||||
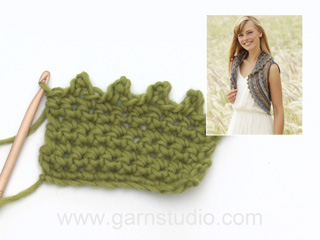
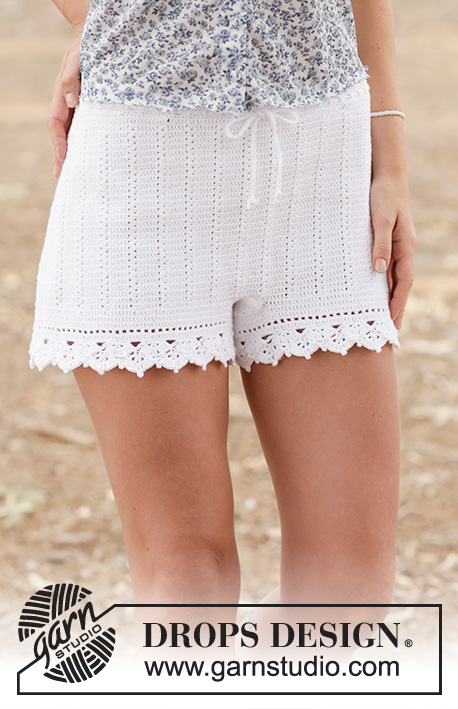
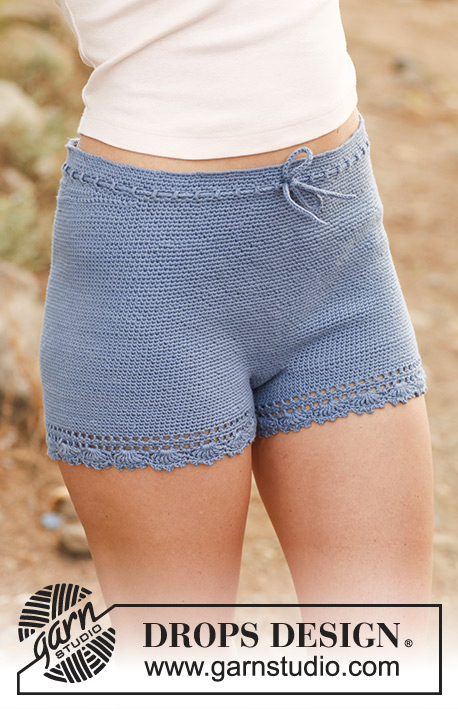
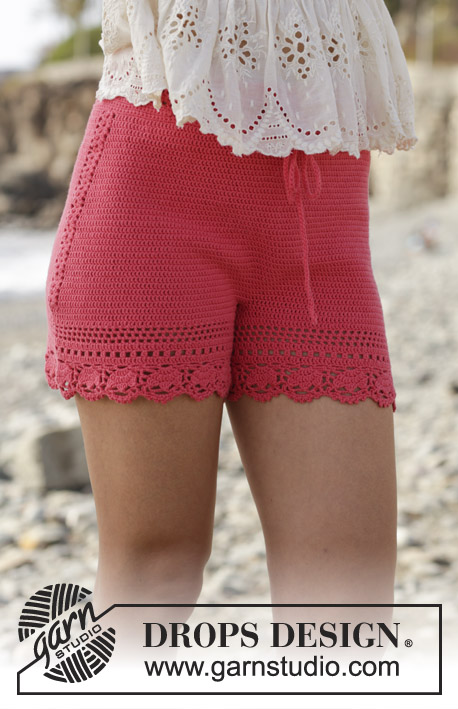
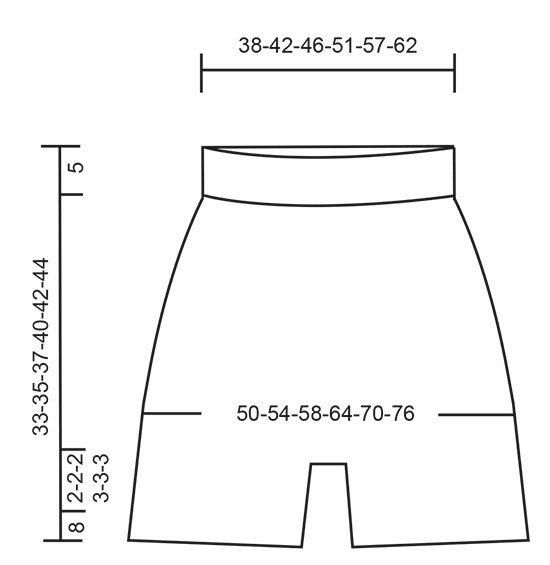
Crocheted shorts with lace pattern. Size: S - XXXL Piece is crocheted in DROPS Safran.
DROPS 190-25 |
|||||||||||||||||||||||||||||||||||||||||||||||||||||||
|
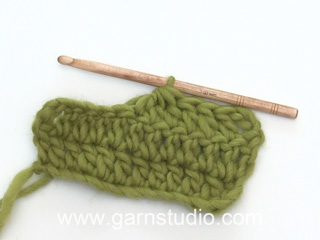
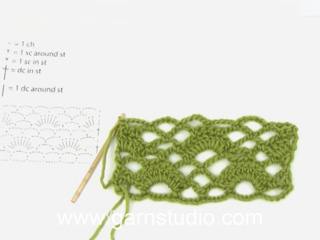
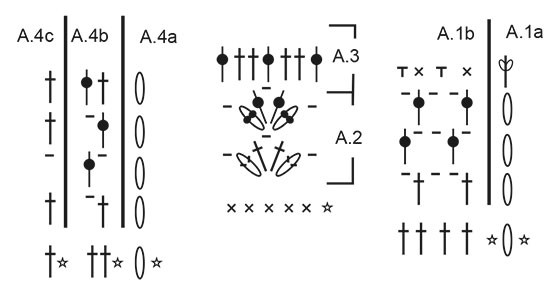
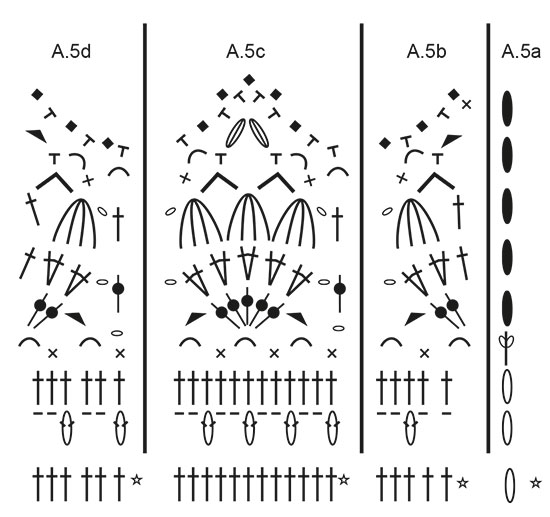
INFORMATION FOR PATTERN: PATTERN: See diagrams A.1 to A.5. CROCHET INFORMATION: On every round with single crochets replace first single crochet with 1 chain stitch. Finish round with 1 slip stitch in 1st chain stitch from beginning of round. At beginning of every round with double crochets replace first double crochet with 3 chain stitches. Finish round with 1 slip stitch in 3rd chain stitch from beginning of round. INCREASE TIP-1 (applies to sides): Work until 1 double crochet remains before A.2, work 2 double crochets in next double crochet, work A.2 and 2 double crochets in next double crochet (= 2 double crochets increased). Repeat in the other side (= 4 double crochets increased on round). INCREASE TIP-2 (applies to mid back): Increase 2 double crochets as follows: Work until 2 double crochets remain before marker, work 2 double crochets in first double crochet, 1 double crochet in each of the next 2 double crochets (marker is in the middle of these double crochets) and 2 double crochets in next double crochet (= 2 double crochets increased). Increase 4 double crochets as follows: Work until 4 double crochets remain before marker, work 2 double crochets in first double crochet, 1 double crochet in next double crochet, 2 double crochets in next double crochet, 1 double crochet in each of the next 2 double crochets (marker is in the middle of these double crochets) and 2 double crochets in next double crochet, 1 double crochet in next double crochet, 2 double crochets in next double crochet (= 4 double crochets increased). INCREASE TIP-3: Increase 1 double crochet by working 2 double crochets in same stitch. ---------------------------------------------------------- SHORTS: Work in the round top down. Work 244-274-299-329-369-404 chain stitches with Safran on hook size 2.5 mm and form a ring with 1 slip stitch in first chain stitch. Insert 1 marker thread at beginning of round = mid back. Work first round as follows: Work 1 chain stitch (= 1 single crochet) - read CROCHET INFO, 1 single crochet in each of the first 3 chain stitches, * skip 1 chain stitch, 1 single crochet in each of the next 4 chain stitches *, work from *-* 48-54-59-65-73-80 times in total = 196-220-240-264-296-324 single crochets. Then work 1 single crochet in every single crochet until piece measures 2 cm / ¾". REMEMBER THE CROCHET GAUGE! Now work in the round according to diagram A.1 as follows: Work A.1a (shows how rounds begin and end and is worked in addition to A.1b), work A.1b 49-55-60-66-74-81 times in total in width. Continue until A.1a/b have been worked vertically. Then work the shorts higher in the back as follows: Work 10-11-12-13-14-15 single crochets past the marker thread mid back, turn and work 1 slip stitch in first stitch, then 1 single crochet in each of the next 19-21-23-25-27-29 single crochets, turn and work 1 slip stitch in first stitch, then 1 single crochet in each of the next 29-31-35-38-41-44 stitches (slip stitches are also worked). Continue like this by working 10-11-12-13-14-15 stitches more on every turn until a total of 140-154-192-208-224-240 stitches have been worked. Turn again and work until marker thread mid back. Now work in the round as follows: Work 1 double crochet in each of the first 47-53-58-64-72-79 stitches (= half back piece), A.2 over the next 5 single crochets (= the side), work 1 double crochet in each of the next 92-104-114-126-142-156 stitches (= front piece), A.2 over the next 5 single crochets (= the side), work 1 double crochet in each of the last 47-53-58-64-72-79 stitches (= half back piece). Continue pattern like this (then repeat last round in A.2) - AT THE SAME TIME increase in the sides and mid back as follows: SIDES: Increase on each side of A.1, in each side as follows - read INCREASE TIP-1! Increase like this every 3rd-4th-4th-4th-4th-4th round 9-8-8-9-9-10 times in total (= 36-32-32-36-36-40 double crochets increased). MID BACK: When piece measures 15-16-17-19-20-22 cm / 5⅞"-6 ¼"-6⅝"-7⅜"-7⅞"-8⅝" (measured mid front), increase mid back as follows – read INCREASE TIP-2. Increase like this with 2 double crochets mid back on every round 4-8-10-10-10-10 times in total, then increase 4 double crochets on every round 5-3-3-3-3-3 times in total (= 28-28-28-32-32-32 double crochets increased). When all increases are done there are 260-280-300-332-364-396 double crochets on round. Continue with 1 double crochet in every double crochet until piece measures 22-24-26-28-30-32 cm / 8⅝"-9⅜"-10 ¼"-11"-11 ¾"-12 ½" mid front and 26-28-31-33-35-37 cm / 10 ¼"-11"-12⅛"-13"-13 ¾"-14 ½" mid back. Now divide for legs as follows: Work 1 slip stitch in each of the first 5-5-6-6-6-7 double crochets on round, turn and work back over the first 10-10-12-12-12-14 double crochets (i.e. 5-5-6-6-6-7 double crochets on each side of marker thread mid back). These 10-10-12-12-12-14 double crochets = gusset. Work double crochets back and forth over these double crochets for 10-11-12-13-14-15 cm / 4"-4⅜"-4¾"-5⅛"-5½-6", cut the thread. Fasten gusset edge to edge to the middle 10-10-12-12-12-14 stitches towards mid front. Then work leg. LEG: Work 1 double crochet in each of the 115-125-133-149-165-179 double crochets around one leg, work in addition A.3 (= 7 double crochets) over A.2 and work 26-28-32-34-36-38 double crochet along gusset = 148-160-172-190-208-224 double crochets. Then work 2-2-3-3-4-4 rounds with double crochets - on last round increase 8-8-8-2-8-4 double crochets evenly – read INCREASE TIP-3 = 156-168-180-192-216-228 double crochets. Now work in the round according to diagram A.4 as follows: Work A.4a (shows how rounds begin and end and is worked in addition to A.4b/c), work A.4b 77-83-89-95-107-113 times in total, A.1d. Continue until A.4a/b/c are done vertically = 156-168-180-192-216-228 double crochets. Now work in the round according to diagram A.5 as follows: Work A.5a (shows how rounds begin and end and is worked in addition to A.5b/c), A.5b, A.5c 12-13-14-15-17-18 times in total, and A.5d. Continue until A.5a/b/c/d have been worked vertically. Fasten off. Work the other leg the same way. TIE RIBBON: Work 120-140-150-160-170-180 cm / 47 ¼"-55⅛"-59"-63"-66⅞"-70⅞" with LOOSE chain stitches, turn and work 1 slip stitch in every chain stitch. Thread the tie in the middle row with eyelet holes at the top of shorts – start mid front. |
|||||||||||||||||||||||||||||||||||||||||||||||||||||||
Diagram explanations |
|||||||||||||||||||||||||||||||||||||||||||||||||||||||
|
|||||||||||||||||||||||||||||||||||||||||||||||||||||||
|
|||||||||||||||||||||||||||||||||||||||||||||||||||||||
|
|||||||||||||||||||||||||||||||||||||||||||||||||||||||
|
|||||||||||||||||||||||||||||||||||||||||||||||||||||||
|
Have you made this or any other of our designs? Tag your pictures in social media with #dropsdesign so we can see them! Do you need help with this pattern?You'll find tutorial videos, a Comments/Questions area and more by visiting the pattern on garnstudio.com. © 1982-2024 DROPS Design A/S. We reserve all rights. This document, including all its sub-sections, has copyrights. Read more about what you can do with our patterns at the bottom of each pattern on our site. |
|||||||||||||||||||||||||||||||||||||||||||||||||||||||


With over 40 years in knitting and crochet design, DROPS Design offers one of the most extensive collections of free patterns on the internet - translated to 17 languages. As of today we count 304 catalogs and 11422 patterns - 11417 of which are translated into English (US/in).
We work hard to bring you the best knitting and crochet have to offer, inspiration and advice as well as great quality yarns at incredible prices! Would you like to use our patterns for other than personal use? You can read what you are allowed to do in the Copyright text at the bottom of all our patterns. Happy crafting!
Comments / Questions (54)
Dois je faire mes augmentation côté avant et après a3 car mon dessin a3 se décalé une fois sur le devant droit et une fois sur la fesse gauche pourquoi
31.07.2019 - 10:24DROPS Design answered:
Bonjour Laurette, les augmentations du milieu devant se font de chaque côté du point ajouré comme indiqué sous AUGMENTATIONS. Le point ajouré sur les côtés doit continuer toujours l'un au-dessus de l'autre et ne pas être décalé, les augmentations du milieu dos permettent l'aisance nécessaire et vont donner plus de largeur au dos, mais sans toucher la ligne de point ajouré. Bon crochet!
08.08.2019 - 11:26Pourquoi le motif du côté se décale et ne reste pas sur les côtés Où commence le début de chaque rang
30.07.2019 - 20:11DROPS Design answered:
Bonjour Laurette! Le début du tour est au milieu dos. Quant au decalage: vous travaillez en suivant le diagramme A.1 qui se compose de A.1a et de A.1b (montre comment commencer et terminer les tours et SE FAIT EN PLUS de A.1b). N'ommetez pas le diagramme A.1a et lisez attentivement INFO CROCHET. Bon crochet!
31.07.2019 - 08:31Hallo ich habe eine Frage zu diesem Modell. Es geht um die mittlere Zunahme. Laut Anleitung steht da zwei Maschen vor dem makierer die Zunamen zwei Stübchen häkeln in die nächste auch ein stäbchen,dann ist die Reihe zu Ende muss ich die mit einer kettmasche beenden und dann die Zunahme nach den drei luftmaschen weiter machen ? Das ist nicht beschrieben
25.07.2019 - 16:58DROPS Design answered:
Liebe Barbara, ja, Sie beenden die Runden wie zuvor, d.h. Sie häkeln 1 Kett-Masche am Runden-Ende und ersetzen das 1. Stäbchen durch 3 Luftmaschen, dann häkeln Sie die andere Zunahme. Viel Spaß beim Weiterhäkeln!
26.07.2019 - 09:24Hannah, maybe it’s your length, not sure though. Anyway, DROPS, I need some help with the pipes. I don’t understand how you devide the pipes in two even parts. Help please?
13.07.2019 - 11:12DROPS Design answered:
Dear Sarah, when you have the correct number of sts for your size and piece measures 22-32 cm (see size) on mid front/26-37 cm on mid back you work first a gusset over the middle 10-14 sts on the middle: working the last section under SHORTS, just before LEGS. Crocheting this gusset will divide the piece into 2 equal parts that will be then worked in the round over the sts from previous round on shorts + along the stitches worked for the gusset. Happy crocheting!
15.07.2019 - 09:27Oh wow! I thought I was the only one with this problem, but apparently not. Maybe DROPS could change the pattern a little?
13.07.2019 - 11:10Yes, the same for me Oma. I even used the exact same yarn but still...
13.07.2019 - 11:09Is*
13.07.2019 - 11:07Ik ben een S maar de broek ik veelste groot....l
13.07.2019 - 11:06Heisann, jeg prøver å hekle denne flotte shortsen, men sliter litt her: nå kan det hekles rundt diagram A.1a den er grei. Men på A.1b der det skal hekles fastmaske om luftmaskebuen? Hvordan gjør jeg det når det ikke er noen lufmaskebuer? Står litt fast her😅
26.04.2019 - 15:34DROPS Design answered:
Hei Anette. Jeg antar du mener på siste omgangen i A.1b (4 rad, om du ikke teller med raden med stjerne) ? omgangen før hekles slik: 1 stav, 2 luftmasker, 1 stav, 1 luftmaske osv. (altså annenhver stav og luftmaske/luftmaskebue). På siste omgangen skal det hekles fastmasker rundt hele omgangen, annenhver fastmaske i staven og annenhver fastmaske om luftmasken/luftmaskebuen. God fornøyelse
30.04.2019 - 09:32Kuuluuko lahkeiden kuvion viidennellä rivillä todellakin tehdä 8 ketjusilmukkaa peräkkäin? Kuviossa ei käsketä tekemään välillä kiinteitä silmukoita ketjusilmukkakaariin mutta kuvan perusteella niin on kuitenkin tehty.
06.03.2019 - 10:44