
Popular categories
Looking for a yarn?


Comments / Questions (38)
![]() Solrun wrote:
Solrun wrote:
Hei. Jeg strikker størrelse 1-3 mnd. jeg har 202 masker som i oppskriften, men ved deling til bol og ermer får jeg 16 masker for mye. 29+40+48+40+29=186. Hvor hører disse maskene til? Mvh Solrun
03.02.2026 - 10:17DROPS Design answered:
Hej Solrun. I storlek 1-3 mnd blir delningen såhär: 32+42+54+42+32= 202 masker. Mvh DROPS Design
06.02.2026 - 12:30
![]() Birthe Munksgaard wrote:
Birthe Munksgaard wrote:
Jeg ønsker hjælp til forståelse af et punkt i opskriften. Efter udtagning af skuldre og ærmer skal jeg tage 8 masker ud over forstykker, bagstykket og ærmerne - men åbenbart uden at maskeantallet på forstykkerne øges. Og ved slutudtagning passer maskeantallet ikke. Kan jeg mon få hjælp til det🙏Mvh birthe
16.01.2026 - 10:51DROPS Design answered:
Hei Birthe. Vi skal hjelpe deg så godt vi kan, men hvilken str. strikker du. mvh DROPS Design
29.01.2026 - 14:06
![]() Angela wrote:
Angela wrote:
Collo: "... alla fine delle coste, lavorare 1 ferro a diritto da rovescio del lavoro (si suppone che le coste finiscano con un ferro sul diritto del lavoro?) su cui aumentare le maglie (10-14 ecc..) in modo uniforme. Lavorare un ferro a rovescio dal rovescio del lavoro." Come è possibile se siamo già sul rovescio del lavoro?
05.01.2026 - 15:43DROPS Design answered:
Buonasera Angela, grazie per la segnalazione, il primo ferro dopo le coste è sul diritto del lavoro. Abbiamo corretto il testo. Buon lavoro!
06.01.2026 - 22:24
![]() MatthewWowly wrote:
MatthewWowly wrote:
Дезинфекция в Питере! Комнаты, Коттеджи, Офисные помещения. Тщательный наведение порядка по лояльным ценам. Освободите свой график! Позвоните нам уборку прямо сейчас! Тапайте Уборка Квартир Дешево
11.10.2025 - 21:08
![]() Paola wrote:
Paola wrote:
Potrei avere questo modello convertito in soli ferri dritti? Non posso usare i ferri circolari. Grazie
28.09.2025 - 06:32DROPS Design answered:
Hi Paola, the sweater is worked back and forth, so you can use straight needles as soon as you have enough room to place all the stitches on them. Sleeves are worked in the round, so you can make them on double pointed needles. Happy knitting!
28.09.2025 - 09:15
![]() Egle wrote:
Egle wrote:
My garter band is twisting into inside very much. Is there something I can do to fix it now? How can I avoid it in the future?
01.09.2025 - 19:28DROPS Design answered:
Hi Mrs Egle, bloking will help. Put the jacket in lukewarm water until it is soaking wet. Gently squeeze out the water from the jacket - using a towel! The jacket should be only slightly damp when placed on a carpet, mattress or blocking boards - carefully stretch it to the correct measure and secure the edges with pins. Happy knitting!
15.09.2025 - 10:04
![]() Nicole wrote:
Nicole wrote:
Bonjour AUGMENTATIONS POUR LES MANCHES: Continuer en jersey avec 5 mailles de bordure devant au point mousse de chaque côté. EN MÊME TEMPS, au rang suivant sur l'endroit, (augmenter 4 mailles pour les manches ainsi: Pourquoi au rang suivant après les augmentation des épaules je suis sur l'endroit ?? par contre j'ai 3,5cm au lieu de 4 cm est ce que je continue a augmenter de 0.5 pour avoir les 4 cm excuser moi pour les message merci de votre aide a suivre
02.07.2025 - 10:53DROPS Design answered:
Bonjour Nicole, les mesures sont souvent arrondies à l'unité supérieure, continuez ainsi avec les augmentations de l'empiècement, et, quand ces augmentations sont faites, si vous n'avez pas la hauteur indiquée, tricotez - sans plus augmenter cette fois- jusqu'à la hauteur indiquée pour la taille choisie. Bon tricot!
02.07.2025 - 16:10
![]() Nicole wrote:
Nicole wrote:
TAILLE: (préma) 0/1 - 1/3 - 6/9 - 12/18 mois (2 ans) Stature de l'enfant en cm: (40/44) 48/52 - 56/62 - 68/74 - 80/86 (92) Ps))elle est où la 4e taille 6/9 3e por Moi
23.06.2025 - 09:08DROPS Design answered:
Bonjour Nicole, le 6/9 mois correspond au 68/74, 4ème taille en comptant la taille préma, 3ème taille après la parenthèse. Dans cette taille, vous allez monter 84 mailles, vous aurez 150 mailles après les augmentations des épaules, 186 après les augmentations des manches et 218 mailles après les augmentations de l'empiècement. Les nombres indiqués précédemment correspondent à la taille 1/3 mois (3ème taille en comptant la taille préma). Bon tricot!
23.06.2025 - 16:21
![]() Nicole wrote:
Nicole wrote:
TAILLE.préma) 0/1 - 1/3 - 6/9 - 12/18 mois (2 ans)Stature de 48/52 - 56/62 - 68/74 - 80/86 (92)Bonjour La faut rectifier et préciser car avec habitude de tricoter avec vous jamais je me suis trompé les tailles sont confuses car la quatrième est est 12/18 mois donc les épaules ont combien de mailles et le devant dos ok pour la bordure 5 maille Merci de votre réponse merci de préciser
23.06.2025 - 08:37DROPS Design answered:
Bonjour Nicole, la 4ème taille est la taille 6/9 mois: TAILLE: (préma) 0/1 - 1/3 - 6/9 - 12/18 mois (2 ans), mais dans le nombre de mailles que vous indiquez, cela correspond à la 3ème taille = 1/3 mois: 1ère taille = préma, 2ème taille: 0/1 mois, 3ème taille: 1/3 mois, 4ème taille: 6/9 mois etc... Notez également que lorsque que les explications indiquent par ex: TAILLE 0/1 - 1/3 - 6/9 - 12/18 mois (2 ans):, dans cette partie, la 1ère taille est 0/1 mois, la 2ème 1/3 mois etc... car la taille préma n'est pas concernée par cette partie. Je ne suis donc pas bien sûre de la taille que vous réalisez. Merci pour votre compréhension.
23.06.2025 - 08:44
![]() Nicole wrote:
Nicole wrote:
Je précise ma question pour le 6/9moi les épaules ont 10 mailles le devant+bordure 31 maille dans les commentaires ci dessous vous dites 32 maille pour le devant. donc si je mets mon marqueur entre 2 maille les épaules feront 8 mailles par épaule pour avoir 32 sur le devant est-ce bien celà ?? J'ai bien les 134 mailles après les épaules j'ajoute 4 x 11 milles = 178 mailles Merci de vos précisions merci de votre aide
21.06.2025 - 23:45
|
|||||||||||||
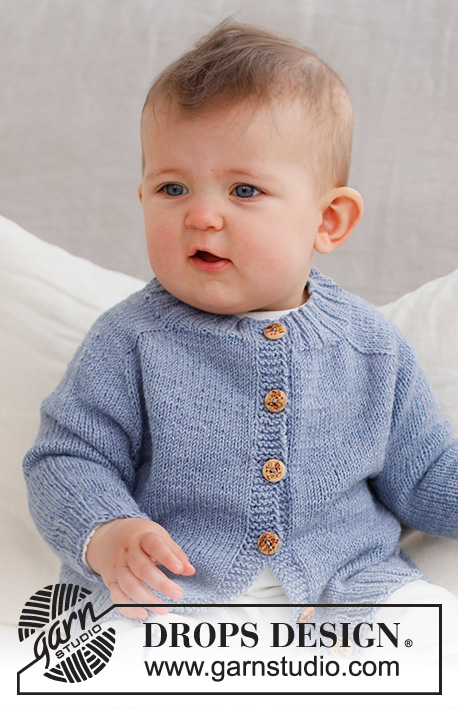
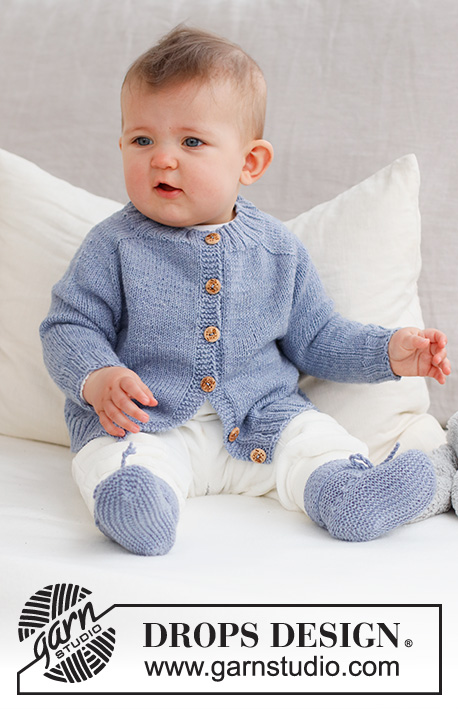
Blue Pebbles Cardigan#bluepebblescardigan |
|||||||||||||
 |
 |
||||||||||||
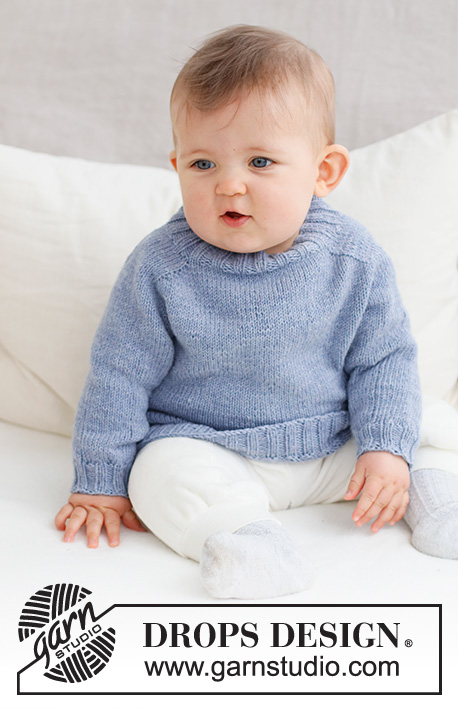
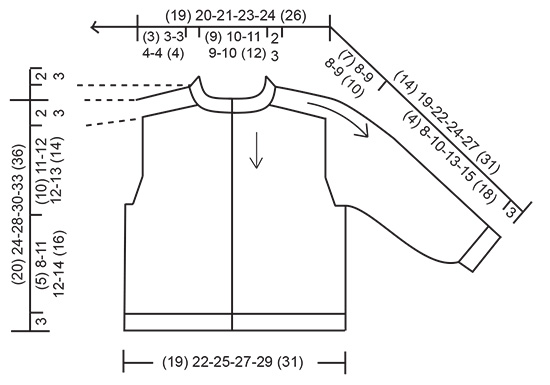
Knitted jacket for baby in DROPS BabyMerino. The piece is worked top down with saddle-shoulders. Sizes: Premature to 2 years.
DROPS Baby 43-3 |
|||||||||||||
|
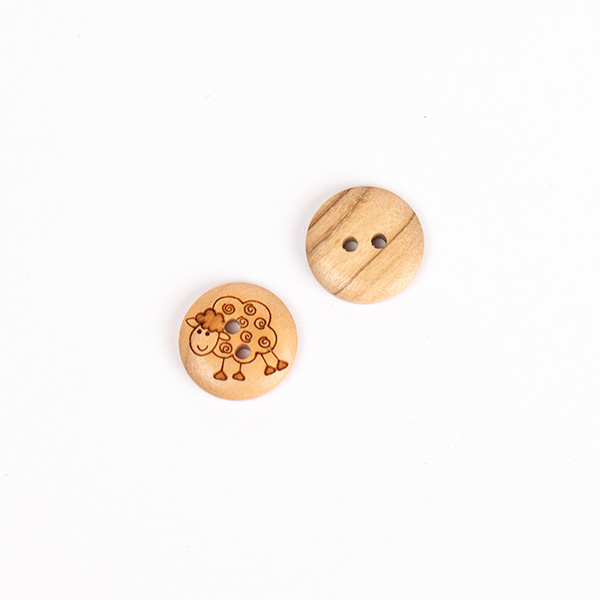
------------------------------------------------------- EXPLANATIONS FOR THE PATTERN: ------------------------------------------------------- RIDGE/GARTER STITCH (worked back and forth): Knit all rows. 1 ridge = knit 2 rows. INCREASE TIP-1 (saddle-shoulders, sleeves and yoke from the right side): BEFORE MARKER: The new stitch twists to the right. Use left needle to pick up thread between 2 stitches from row below, pick up thread from behind and knit stitch in front loop. AFTER MARKER: The new stitch twists to the left. Use left needle to pick up thread between 2 stitches from row below, pick up thread from front and knit stitch in back loop. INCREASE TIP-2 (for saddle-shoulders from the wrong side): BEFORE MARKER: The new stitch twists to the (seen from the right side). Use left needle to pick up thread between 2 stitches from row below, pick up thread from front and purl stitch in back loop. AFTER MARKER: The new stitch twists to the left (seen from the right side). Use left needle to pick up thread between 2 stitches from row below, pick up thread from behind and purl stitch in front loop. DECREASE TIP (for sleeves): Start 3 stitches left before the marker, knit 2 together, knit 2 (marker sits between these 2 stitches), slip 1 stitch as if to knit, knit 1 and pass the slipped stitch over the knitted stitch (= 2 stitches decreased). BUTTONHOLES: Work the buttonholes on the right band (when the garment is worn). Work from the right side when there are 3 stitches left: Make 1 yarn over, knit 2 together and knit 1. On the next row (wrong side) knit the yarn over to leave a hole. The first buttonhole is worked when the neck measures 1½-2 cm = ½"-¾", the other (3) 4-5-5-5 (5) buttonholes are worked with (5) 5-5-5-5½ (6) cm = (2") 2"-2"-2"-2⅛" (2⅜") between each one. ------------------------------------------------------- START THE PIECE HERE: ------------------------------------------------------- JACKET – SHORT OVERVIEW OF THE PIECE. The neck and yoke are worked back and forth with circular needle, from mid front and top down. Stitches are increased for the saddle-shoulders, sleeves and yoke. The yoke is divided for body and sleeves and the body continued back and forth. The sleeves are worked in the round with double pointed needles. NECK: Cast on (72) 76-80-84-88 (96) stitches with circular needle size 2.5 MM = US 1.5 and DROPS Baby Merino. Purl 1 row from the wrong side. The next row is worked as follows from the right side: 5 band stitches in GARTER STITCH – read description above, * knit 2, purl 2 *, work from *-* until there are 7 stitches left, knit 2 and 5 band stitches in garter stitch. Work this rib for (2) 2-2-3-3 (3) cm = (¾") ¾"-¾"-1⅛"-1⅛" (1⅛") – remember the BUTTONHOLES on the right band – read description above. When the rib is finished, knit 1 row from the right side where you increase (10) 14-14-18-18 (18) stitches evenly spaced (do not increase over the bands) = (82) 90-94-102-106 (114) stitches. Purl 1 row from the wrong side (the bands are knitted). YOKE: Change to circular needle size 3 MM = US 2.5. Insert 1 marker after the band; the yoke is measured from this marker! In addition, insert 4 other markers without working the stitches and each marker is inserted between 2 stitches; these markers are used when increasing for the shoulders and should have a different color to the marker on the neck. Marker 1: Start mid-front and count (18) 20-21-21-22-24 stitches (front piece), insert the marker before the next stitch. Marker 2: Count (10) 10-10-14-14 (14) stitches from marker 1 (shoulder), insert the marker before the next stitch. Marker 3: Count (26) 30-32-32-34 (38) stitches from marker 2 (back piece), insert the marker before the next stitch. Marker 4: Count (10) 10-10-14-14 (14) stitches from marker 3 (shoulder), insert the marker before the next stitch. There are (18) 20-21-21-22 (24) stitches left after marker 4 (front piece). Allow these markers to follow your work onwards. INCREASES FOR SADDLE SHOULDERS: Read the next section before continuing – on the first row from the right side, increase 4 stitches for the saddle-shoulders as follows: Work stockinette stitch and 5 band stitches in garter stitch on each side. Increase BEFORE markers 1 and 3 and AFTER markers 2 and 4 – read INCREASE TIP-1. You are only increasing on the front and back pieces. The number of shoulder stitches remains the same. On the next row (wrong side), increase 4 stitches as follows: Increase BEFORE markers 4 and 2 and AFTER markers 3 and 1– read INCREASE TIP-2. You are, therefore, increasing on EACH row but differently from the right and wrong side so the stitches lie neatly. Continue like this, increasing a total of (10) 10-10-12-12 (12) times = (122) 130-134-150-154 (162) stitches. REMEMBER THE KNITTING GAUGE! After the last increase, the piece measures approx. (3) 3-3-4-4 (4) cm = (1⅛") 1⅛"-1⅛"-1½"-1½" (1½") from the marker on the neck. Now increase for the sleeves as follows: INCREASES TO SLEEVES: Continue with stockinette stitch and 5 band stitches in garter stitch on each side. AT THE SAME TIME, on the next row from the right side increase 4 stitches for the sleeves as follows: Increase AFTER markers 1 and 3 and BEFORE markers 2 and 4 – remember INCREASE TIP-1. You are only increasing on the sleeves and the number of stitches on the front and back pieces remains the same. Increase like this every 2nd row (each row from the right side) a total of (10) 12-11-9-9 (10) times = (162) 178-178-186-190 (202) stitches. The piece measures approx. (9) 11-10-10-10 (10) cm = (3½") 4⅜"-4"-4"-4" (4") from the marker on the neck. Now increase for the yoke as follows. INCREASES TO YOKE: SIZE (premature): = (162) stitches. Continue with stockinette stitch but without increasing until the piece measures 10 cm = 4" from the marker on the neck. Go to ‘Divide for the body and sleeves’ below. SIZES 0/1 - 1/3 - 6/9 - 12/18 months (2 years): Move the 4 markers so each marker sits in the outermost stitch on each side of the back and front pieces, with 34-32-32-32 (34) stitches between the marker-stitches on the sleeves. On the next row from the right side increase 8 stitches by increasing both before and after each marker-stitch – remember INCREASE TIP-1. You are now increasing on the front and back pieces as well as the sleeves. Increase like this every 2nd row (each row from the right side) a total of 1-3-4-5 (5) times = 186-202-218-230 (242) stitches. After the last increase, the piece measures approx. 11-12-12-13 (13) cm = 4⅜"-4¾"-4¾"-5⅛" (5⅛") from the marker on the neck. Continue working until the piece measures 11-12-12-13 (14) cm = 4⅜"-4¾"-4¾"-5⅛" (5½") from the marker. DIVIDE FOR THE BODY AND SLEEVES: Work the first (26) 29-32-34-36 (38) stitches, place the next (34) 40-42-46-48 (50) stitches on a thread for the sleeve, cast on (4) 4-6-6-8 (8) stitches (in side under sleeve), work (42) 48-54-58-62 (66) stitches, place the next (34) 40-42-46-48 (50) stitches on a thread for the sleeve, cast on (4) 4-6-6-8 (8) stitches (in side under sleeve), work the last (26) 29-32-34-36 (38) stitches. The body and sleeves are finished separately. The piece is now measured from here! BODY: = (102) 114-130-138-150 (158) stitches. Continue with stockinette stitch and 5 band stitches in garter stitch on each side for a further (5) 8-11-12-14 (16) cm = (2") 3⅛"-4⅜"-4¾"-5½" (6¼"). Knit 1 row from the right side where you increase (14) 14-18-18-22 (22) stitches evenly spaced (do not increase over the bands) = (116) 128-148-156-172 (180) stitches. Change to circular needle size 2.5 MM = US 1.5 and work as follows from the wrong side: 5 band stitches in garter stitch, * purl 2, knit 2 *, work from *-* until there are 7 stitches left, purl 2 and 5 band stitches in garter stitch. Continue this rib for 3 cm = 1⅛". Bind off a little loosely. The jacket measures approx. (20) 24-28-30-33 (36) cm = (8") 9½"-11"-11¾"-13" (14¼") from the shoulder down. SLEEVES: Place the (34) 40-42-46-48 (50) stitches from the thread on the one side of the piece on double pointed needles size 3 MM = US 2.5 and knit up 1 stitch in each of the (4) 4-6-6-8 (8) stitches cast on under the sleeve = (38) 44-48-52-56 (58) stitches. Insert a marker in the middle of the (4) 4-6-6-8 (8) stitches under the sleeve. Start at the marker and work stockinette stitch in the round for 1 cm = ⅜". Now decrease 2 stitches under the sleeve (does not apply to sizes premature and 0/1 month) – read DECREASE TIP. Decrease like this every 3rd round a total of (0) 2-2-3-4 (4) times = (38) 40-44-46-48 (50) stitches. Continue working until the sleeve measures (4) 8-10-13-15 (18) cm = (1½") 3⅛"-4"-5⅛"-6" (7") from the division. There is approx. 3 cm = 1⅛" to finished length; try the jacket on and work to desired length. Knit 1 round where you decrease (2) 0-0-2-0 (2) stitches evenly spaced = (36) 40-44-44-48 (48) stitches. Change to double pointed needles size 2.5 MM = US 1.5 and work rib (knit 2, purl 2) for 3 cm = 1⅛". Bind off a little loosely The sleeve measures approx. (7) 11-13-16-18 (21) cm = (2¾") 4⅜"-5⅛"-6¼"-7" (8¼") from the division. Work the other sleeve in the same way. ASSEMBLY: Sew the buttons onto the left band. |
|||||||||||||
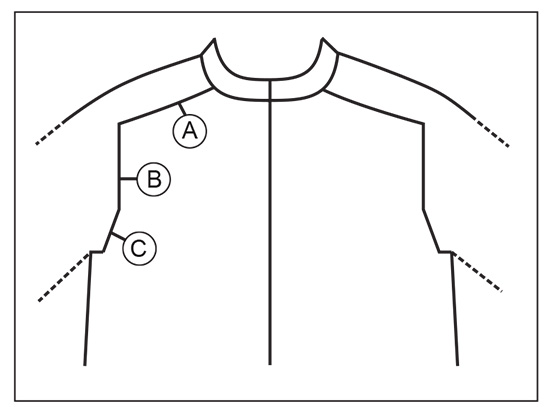
Diagram explanations |
|||||||||||||
|
|||||||||||||
 |
|||||||||||||
 |
|||||||||||||
Have you finished this pattern?Tag your pictures with #dropspattern #bluepebblescardigan or submit them to the #dropsfan gallery. Do you need help with this pattern?You'll find 30 tutorial videos, a Comments/Questions area and more by visiting the pattern on garnstudio.com. © 1982-2026 DROPS Design A/S. We reserve all rights. This document, including all its sub-sections, has copyrights. Read more about what you can do with our patterns at the bottom of each pattern on our site. |
|||||||||||||


With over 40 years in knitting and crochet design, DROPS Design offers one of the most extensive collections of free patterns on the internet - translated to 17 languages. As of today we count 324 catalogs and 12284 patterns - 12274 of which are translated into English (US/in).
We work hard to bring you the best knitting and crochet have to offer, inspiration and advice as well as great quality yarns at incredible prices! Would you like to use our patterns for other than personal use? You can read what you are allowed to do in the Copyright text at the bottom of all our patterns. Happy crafting!
Post a comment to pattern DROPS Baby 43-3
We would love to hear what you have to say about this pattern!
If you want to leave a question, please make sure you select the correct category in the form below, to speed up the answering process. Required fields are marked *.