
Popular categories
Looking for a yarn?


|
|||||||||||||
Toby |
|||||||||||||
 |
 |
||||||||||||
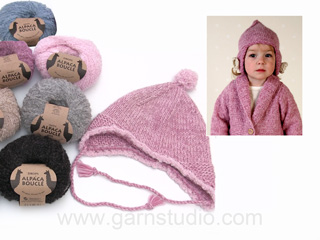
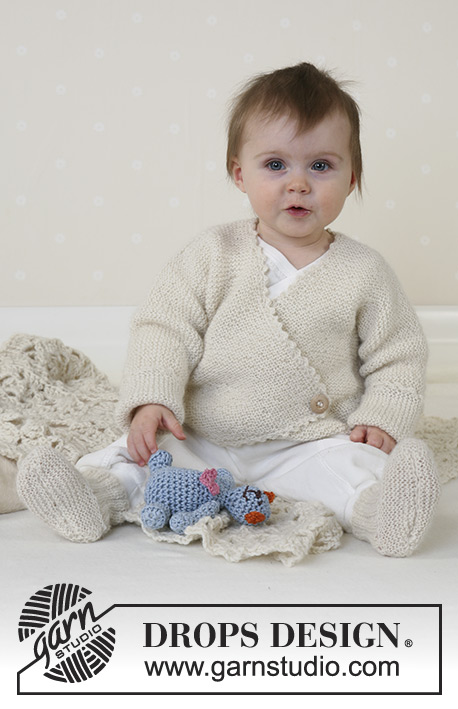
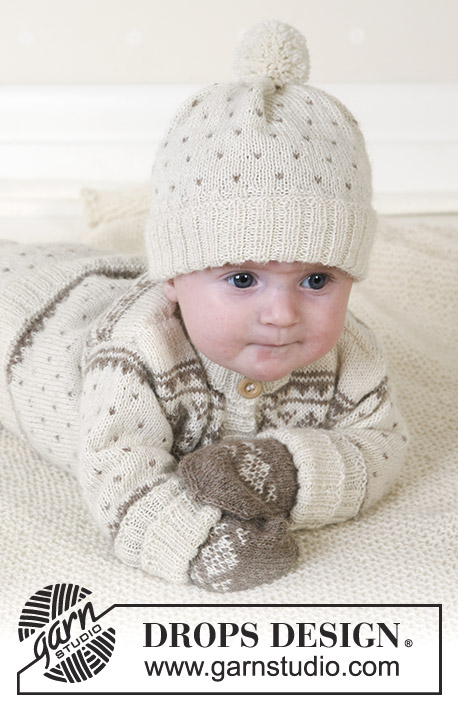
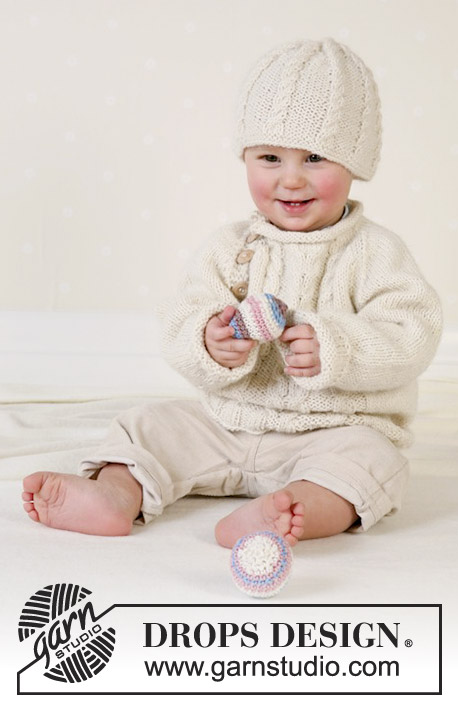
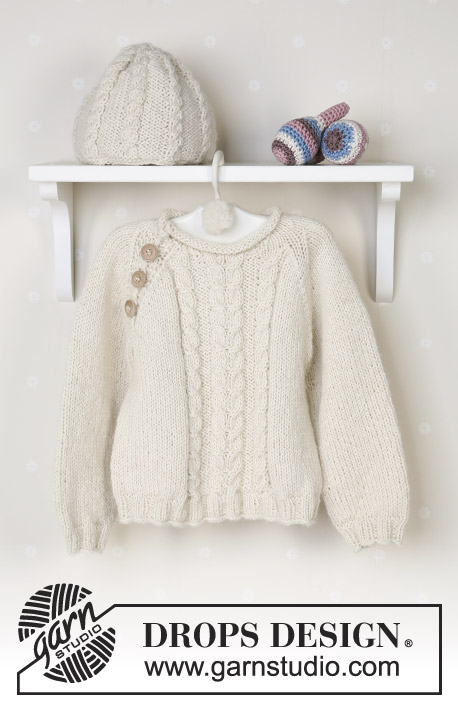
DROPS Jumper, hat, ball and rattle in Alpaca
DROPS Baby 13-7 |
|||||||||||||
|
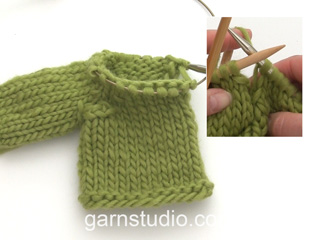
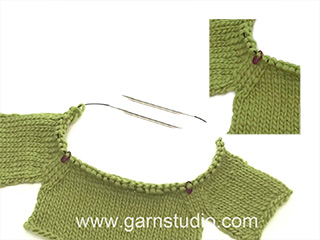
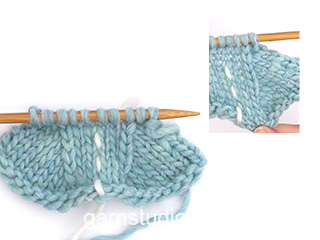
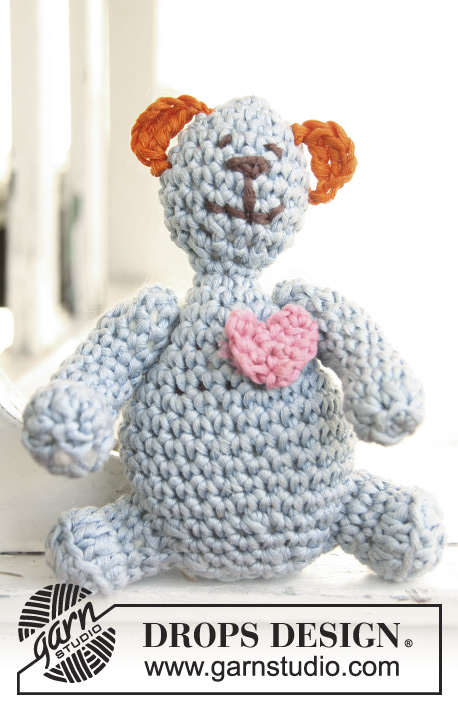
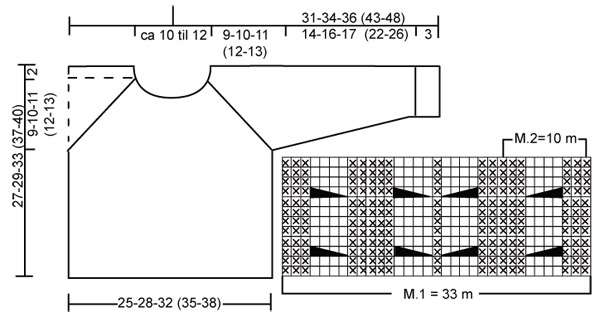
Knitting tension: 19 sts x 25 rows on needles size 4 mm and 2 threads of Alpaca in stocking sts = 10 x 10 cm. Rib: *K3, P3*, repeat from *-*. Pattern: See diagrams M.1 and M.2. The diagrams show the pattern from the right side and repeat the pattern until finish measures. Bind off tips (for the raglan): Bind off as follows from the right side: K 4 edge sts in garter sts, P2 tog. *Knit until 3 sts left before the next marking thread, slip a sts as if to knit, K1, psso, K2, K2 tog* repeat from *-* at the next 2 marking threads and continue until 6 sts left on row, slip a st as if to knit, K1, psso, K4 front edge sts in garter sts. Bind off as follows from the wrong side: K 4 edge sts in garter sts, K2 tog. *Knit until 3 sts left before the next marking thread, P2 twisted tog (this means instead of knitting into the back part of the st knit in the front part), P2, P2 tog* repeat from *-* at the next 2 marking threads and continue until 6 sts left on row, P 2 twisted tog, K4 front edge sts in garter sts. Button hole (for the raglan): Bind off for button holes on the raglan edge on the sleeve. Bind off as follows: K1, K2 tog, make a yo, K1. Bind off for button holes when the front edge measures as follows: Size 1/3 months: 2, 5 and 8 cm Size 6/9 months: 3, 6 and 9 cm Size 12/18 months: 3, 7 and 10 cm Size 2 years: 3, 7 and 10 cm Size 3/4 years: 4, 8 and 12 cm --------------------------------------------------------------- JUMPER: Front and back piece: Cast on 102-114-126 (138-150) sts with 2 threads of Alpaca on circular needle size 3.5mm. Knit 1 round of stocking sts and continue in Rib until the piece measures 3 cm. Change to circular needle size 4 mm and knit 1 round of stocking sts. Knit the next round as follows: 11-14-17 (20-23) sts of stocking sts, insert a marking thread into the 1st st of these sts (=the side), M.1 (= 33 sts) 11-14-17 (20-23) sts of stocking sts insert a marking thread into the last of these sts (= the side), 47-53-59 (65-71) sts of stocking sts. Continue until the piece measures 16-17-20 (23-25) cm. Bind off 5 sts each side for the armhole (= the sts with the marking thread + 2 sts each side) = 49-55-61 (67-73) sts for the front piece and 43-49-55 (61-67) sts for the back piece. Put the piece aside and knit the sleeves. SLEEVE Cast on 30-30-36 (36-36) sts with 2 threads of Alpaca on double pointed needles size 3.5 mm. Knit in round in stocking sts and continue in Rib until the piece measures 3 cm. Change to double pointed needles size 4 mm and continue in stocking sts. At the same time when piece measures 6 cm, inc 2 sts at the mid center underneath the sleeve on every 3rd-2nd-3rd(2.5-2.5) cm a total of 4-6-5(7-9) times = 38-42-46 (50-54) sts. When the piece measures 17-19-20(25-29) cm bind off 5 sts at the mid centre underneath the sleeve = 33-37-41(45-49) sts. Put the piece aside and knit another sleeve. YOKE Put sleeves in on the same needle as body piece where you cast off for armholes = 158-178-198 (218-238) sts. Insert a marking thread where sleeve meets body (= 4 marking threads). Knit forward and backward from the right “raglan seam” at the front. Cast on 4 more sts at the front piece ( = button edge) =162-182-202 (222-242) sts. Read all of the next section before continuing! Continue in stocking sts and with cables at the center mid front and 4 garter sts at the beginning and end of each row (for the button edge). At the same time bind off for the raglan – see bind off tips – bind off on every other row 11-11-12 (12-13) times and hereafter on every row 1-3-4 (6-7) times. NB: Bind off for button hole too – see explanation above. At the same time when the piece measures 23-25-29 (32-35) cm put 13-13-13 (15-15) sts at the center mid front on a thread for the neck. Continue to bind off for the neck on every other row: 2 sts 1 time, 1 st 2-2-2 (3-3) times. After all bind off for the raglan and the neck 45-49-53 (53-57) sts left on row. NECK Pick up approx. 23-27 sts at the front neck (including the sts on the thread) = a total of 68 to 84 sts all around the neck. Put all the sts on a circular needle size 4 mm – knit 1 row of stocking sts seen from the right side at the same time decrease the number of sts evenly distributed on row to 50-54-58 (62-66) sts. Knit 8 rows of stocking sts and bind off loosely – the neck should roll around. ASSEMBLY Sew the openings under the sleeves together. Put the button edges on top of each other with the button hole edge at the top and sew the the bottom of the edge from the wrong side. Sew in the buttons. _________________________________________ HAT: To fit head circumference: Approx. 40/42 – 42/44 – 44/46 (48/50 -50/52) cm. Cast on 80-90-90 (100-100) sts on double pointed needles size 4 mm with 2 threads of Alpaca. Knit 4 rounds of garter sts. Continue in M.2. When the piece measures 10-11-12 (13-14) cm bind off 1 purl st in between each cable. Repeat the bind off on every other row until all the purl sts are bound off = 32-36-36 (40-40) sts. On next round K all sts together 2 and 2 = 16-18-18 (20-20) sts. Cut the thread and pull it through the remaining sts. The hat now measures approx. 15-16-17 ( 18-19) cm in the length. _________________________________________ Ball and rattle: See pattern no. BabyDROPS 13 - 8 |
|||||||||||||
Diagram explanations |
|||||||||||||
|
|||||||||||||
|
|||||||||||||
|
Have you made this or any other of our designs? Tag your pictures in social media with #dropsdesign so we can see them! Do you need help with this pattern?You'll find tutorial videos, a Comments/Questions area and more by visiting the pattern on garnstudio.com. © 1982-2024 DROPS Design A/S. We reserve all rights. This document, including all its sub-sections, has copyrights. Read more about what you can do with our patterns at the bottom of each pattern on our site. |
|||||||||||||


With over 40 years in knitting and crochet design, DROPS Design offers one of the most extensive collections of free patterns on the internet - translated to 17 languages. As of today we count 304 catalogues and 11422 patterns - 11422 of which are translated into English (UK/cm).
We work hard to bring you the best knitting and crochet have to offer, inspiration and advice as well as great quality yarns at incredible prices! Would you like to use our patterns for other than personal use? You can read what you are allowed to do in the Copyright text at the bottom of all our patterns. Happy crafting!
Comments / Questions (40)
When you say use 2 strands of drops alpaca what does that mean? Thank you
05.03.2020 - 02:39DROPS Design answered:
Dear Chris, this means you are working with 2 strands of yarns held together as if there was just one (= with double thread/strand). Happy knitting!
05.03.2020 - 10:20I am knitting the hat and wonder if the diagram should be read from top to bottom or vice versa? Thanks!
10.12.2019 - 23:06DROPS Design answered:
Hi Conceicao, The diagram is read from bottom right to left and upwards. Happy knitting!
11.12.2019 - 07:23Als ik de mts wil breien staat er dat ik telpatroon m2 moet gebruiken, waar vind ik dat telpatroon?
19.11.2019 - 10:08DROPS Design answered:
Dag Alie,
Telpatroon M.2 vind je onderaan het patroon (M.2 is een gedeelte van telpatroon M.1 en is aangegeven bovenaan bij M.1)
19.11.2019 - 12:01"Continue to bind off for the neck on every other row: 2 sts 1 time, 1 st 2-2-2 (3-3) times." Could you help me with this please? Kind Regards, Julianne
23.07.2019 - 16:16DROPS Design answered:
Hi Julianne! Please do right shoulder (when the garment is worn) now: decrease 2 stitches (see the videos for the pattern) at the beginning of the row from the right side. Work all the stitches of the shoulder on the wrong side and at the beginning of the row from the right side decrease 1 stitch as many times as required in the size you are working (decrease always on the right side of your work). Do the same for the left shoulder, but this time decrease stitches at the end of row from the right side. Happy knitting!
23.07.2019 - 18:04Hello, l'm not clear on what this means " Insert a marker where sleeve meets body (= 4 markers). Knit forward and backward from the right “raglan seam” at the front. " Could you help, please and thank you? Julianne
06.07.2019 - 18:12DROPS Design answered:
Dear Julianne, when you slip alls titches on the same needle, you will insert a marker between each piece to mark the transitions between the pieces for the raglan, and work now back and forth (not in rounds anymore) starting with front piece stitches (see this video. Happy knitting!
08.07.2019 - 09:13Bonjour. Je n'arrive pas à comprendre si le devant et le dos sont tricotés en rond (sans couture donc, comme le suggèrent les finitions où il n'y a que le dessous des manches à coudre) ou s'il faut faire des allers-retours endroit envers et donc une couture côté. Merci de m'éclairer !
29.10.2018 - 12:40DROPS Design answered:
Bonjour Pascale, le pull se tricote en rond du bas en haut jusqu'aux emmanchures, on rabat les mailles des emmanchures et on tricote les manches - en rond également. On reprend ensuite toutes les pièces pour tricoter l'empiècement en rond jusqu'à l'encolure, où on continue en allers et retours. Bon tricot!
29.10.2018 - 14:08Bonjour, j'exécute le pull Toby en taille 3/4 ans. j'ai tricoté 10 cm dos/devant avec aiguilles circulaires. La largeur du pull est bien de 38 cm comme indiqué sur le modèle mais cela me semble beaucoup trop large. ... pour preuve un autre de vos pulls dans la même taille (lucky jack) indique 32 cm. Y a t-il une erreur sur le modèle Toby ? Merci d'avance pour votre réponse.
20.09.2018 - 14:47DROPS Design answered:
Bonjour Minalou, ce modèle date d'il y a quelques années, depuis, la forme des modèles a changé, vous pouvez ajuster en fonction des mesures souhaitées à l'aide du schéma, des explications et d'un modèle similaire si vous le souhaitez. Votre magasin saura vous assister si nécessaire, même par mail ou téléphone. Bon tricot!
20.09.2018 - 15:10Hallo, ich wollte die Mütze stricken, kann aber das Diagramm für M2 nicht finden. Kann man das noch irgendwo anders nachgucken oder könnte man es wieder hinzufügen? Danke
05.10.2016 - 10:06DROPS Design answered:
Liebe Katrin, M.2 ist im M.1, dh M.2 = die ersten 10 Maschen in M.2 (siehe oben im Diagram M.1).
05.10.2016 - 11:04Hej! Tänkte sticka en tröja Toby ( baby 13-7 ). I beskrivningen används alpackagarn och stickor Nr 4. Jag tänkte sticka i Drops Love you#6. rekomenderade stickor till det garnet är strl 3,5. Hur gör jag för att storleken ska bli den önskade? M.v.h. Anne
19.08.2016 - 16:14DROPS Design answered:
Hej Anne. Strik en pröve med DLY#6 og tjek din strikkefasthed er som angivet i mönstret. Juster evt med tykkere eller tyndere p for at faa den korrekte fasthed.
07.09.2016 - 14:13Ik vind breien op een rondbreinaald te moeilijk. Is het ook mogelijk om dit breisel ook op twee pennen te breien.
26.11.2015 - 14:50DROPS Design answered:
Hoi Mary. Je kan hier lezen hoe je een breiwerk aanpast van ronde naar rechte naalden. Veel breiplezier.
26.11.2015 - 15:43