
Popular categories
Looking for a yarn?


How to knit a dog jumper
Dogs can also feel chilly when the weather is cold, so why not knit a snuggly jumper with cables for your best friend? In this step-by-step lesson we’ll show you how to knit the The Lookout doggy sweater, pattern DROPS 102-43, with DROPS Karisma.
Follow the tutorial and if you have any questions by the end, leave them in the comments section so our experts can help you!

What do you need to get started?
Size: In this lesson we work size XS, and you’ll notice that this size is marked with bold font throughout the whole tutorial. Find the complete pattern here.
Size:
XS- S - M
The measures of the dog:
Chest width: approx 28/32 – 40/44 – 48/52 cm
Back length: approx 24– 32 - 40 cm
Examples of sizes of dogs: XS = Chihuahua, S = Bichon Frise, M = Cocker Spaniel
Materials:
DROPS Karisma from Garnstudio
100-150-200 g colour no. 21, medium grey
DROPS circular needle size 4 mm, 40 cm long (double pointed needles in XS) –or the size needed to obtain the correct knitting tension; 21 sts x 28 rows in stocking sts = 10 x 10 cm.
DROPS double pointed needle and small circular needle size 3mm
Some notes before we start...
RIB: * K2, P2 * , repeat from *-*
When we use *-* in the text, work whatever has been written between the stars, repeating this however many times stated in the pattern.
INCREASE TIP: Increase by making yarn overs. On the next round, work the yarn overs twisted to avoid holes.
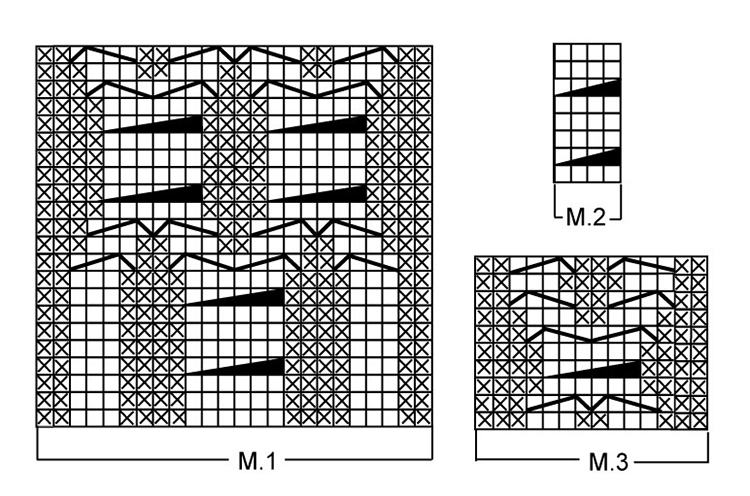
PATTERN: See diagrams M.1 to M.3 The diagrams are shown from the RS.
Diagram
Here's the complete diagram you'll need for the pattern. You will need to come back to it as you follow the pattern steps below.
 |
= K from the RS, P from the WS |
 |
= P from the RS, K from the WS |
 |
= Cable: Put 1 st on a cable needle behind the work, K3, P1 from the cable needle |
 |
= Cable: Put 3 sts on a cable needle in front of work, P1, K3 from cable needle. |
 |
= Cable: Put 2 sts on cable needle behind the work, K2, K2 from cable needle. |
 |
= Cable: Put 3 sts on cable needle behind the work, K3, K3 from cable needle. |
Let’s start knitting!
But first, some more notes: The garment is worked in the round from the neck down, then divided for the forelegs, where you work back and forth over part of the back, then work the part under the stomach, join the pieces together and work in the round. Stitches are cast off under the stomach followed by decreasing on each side for a few centimetres. To finish, ribbed edges are worked around the jumper and stitches are picked up around the holes for the forelegs and also worked with rib.
1)
Cast on 60-80-100 sts with double pointed needle size 3 mm and medium grey

2)
Work in Rib for 8-10-12 cm (= Collar which is folded double)

3)
Change to small circular needle size 4mm. K 1 round at the same time increase 16-32-54 sts evenly distributed - read INCREASE TIP = 76-112-154 sts.

4)
Continue the pattern as follows:
Size S: * M.2, P2 *, repeat from *-* 2 times, M.2, * M.3, M.2 *, repeat from *-* 2 times, M.1 (= mid back), * M.2, M.3 *, repeat from *-* 2 times
Size M: * M.2, P2 *, repeat from *-* 3 times, M.2, * M.3, M.2 *, repeat from *-* 3 times, M.1 (= mid back), * M.2, M.3 *, repeat from *-* 3 times
5)
At the same time when the piece measures 12 -16-20 cm (from the cast-on edge) split the work for the forelegs as follows (make sure to split so you work the cables from the right side): Put the first 10-16-22 sts
on a thread or a stitch holder (= underneath the stomach), turn the piece and continue the pattern back and forth,cast off 1 st on each side, at the beginning of the next 2 rows, = 64 -94-130 sts (= back piece).

6)
Knit back and forth over these sts for 6 -8-10 cm (the piece measures 18 -24-30 cm in total). be sure to knit the next row from right side, cut the thread.

7)
Put sts on a thread or stitch holder, and put sts from the thread or stitch holder underneath the stomach back on needle.

8)
Cast on 1 new st each side of these sts = 12-18-24 sts. Continue knitting the pattern back and forth with 1 P st each side.

9)
When knitted 6-8-10 cm put all sts on needle = 76-112-154 sts, be sure to knit the next round from right side

10)
When the piece measures 24-31-38 cm cast off 12-20-28 sts mid underneath the stomach

11)
Now knit the piece back and forth on needle – at the same time cast off each side on every other row: 3 sts 1 -1-1 time, 2 sts 2-3-4 times, 1 st 2-3-4 times, 2 sts 2-3-4 times
and 3 sts 1-1-1 time = 32-50-74 sts left on needle.
The piece measures approx. 30-39-48 cm.

12)
Assembly: Put the remaining sts on a small circular needle size 3mm and pick up sts around the casting off edge to a total of approx 84-108-140 sts. Knit Rib for 2-3-4 cm, cast off loosely with K over K and P
over P

13)
Leg: Pick up approx. 36-44-52 sts on double pointed needle size 3mm around 1 opening for leg.

14)
Knit Rib for 2-3-4 cm, cast off loosely with K over K and P over P. Repeat for the other opening.

Finished!
And so is the sweater complete. Thank you for following our tutorial, we hope you had fun and that we get to see pictures of your finished sweater. Post them on social media using hashtags #dropsalong and #thelookoutdogsweater or submit them to our gallery so we can feature them!
Need some help?
Should you want more information about the different stitches or techniques, here’s a list of lessons and video tutorials that will help:
- Lesson: How to increase evenly
- Video: How to cast on and knit stockinette stitch on double pointed needles
- Video: How to increase with a yarnover (yo)
- Video: How to knit a dog coat in DROPS 102-43
- Video: How to decrease by knitting 2 stitches together:
- Video: How to pick up stitches along sides
- Video: How to cast off in rib
- Video: How to work several cables after a chart
- Video: Overview how to work the dog coat in DROPS 102-43 – step by step


With over 40 years in knitting and crochet design, DROPS Design offers one of the most extensive collections of free patterns on the internet - translated to 17 languages. As of today we count 304 catalogues and 11422 patterns - 11422 of which are translated into English (UK/cm).
We work hard to bring you the best knitting and crochet have to offer, inspiration and advice as well as great quality yarns at incredible prices! Would you like to use our patterns for other than personal use? You can read what you are allowed to do in the Copyright text at the bottom of all our patterns. Happy crafting!
Me a gustado mucho. Te doy las gracias.
12.07.2020 - 08:15: