Cómo leer los diagramas de ganchillo

Un diagrama de ganchillo consiste de símbolos, 1 símbolo = 1 punto – la definición del símbolo explica qué tipo de punto es/cómo se trabaja. El diagrama muestra todos los puntos vistos por el lado derecho (a menos que se especifique de otra manera).

Un típico diagrama de ganchillo se ve así:

1: 1. A.1 es el nombre del diagrama y se refiere al diagrama entero - dentro de los corchetes. Todo lo que está dentro de los corchetes es 1 repetición del diagrama.
2: 2. Esta es la definición del símbolo, que explica cómo trabajar cada símbolo.
Flechas azules: El símbolo es trabajado en o alrededor del punto directamente abajo en el diagrama. A veces, se trabajan varios puntos en/alrededor del mismo punto.
Óvalos y flechas púrpura: No todos los puntos son trabajados, por ejemplo: a veces se trabaja un punto de cadena y el punto abajo es saltado.

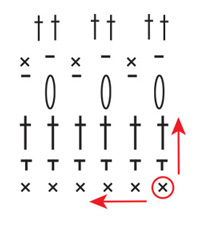
Un diagrama de ganchillo se lee de forma contraria a como leerías normalmente: de derecha a izquierda, de abajo para arriba. Es decir: comienzas en el símbolo de la esquina inferior derecha, y trabajas en dirección al lado izquierdo y hacia arriba (ver las flechas en ROJO en el diagrama abajo).

Si debes trabajar varias repeticiones de un diagrama (es decir: si debe ser repetido varias veces en la hilera/vuelta), trabajar hasta el fin de la hilera y comenzar nuevamente por el primer símbolo de la hilera.

De ida y vuelta:

Cuando se trabaja de ida y vuelta, se trabaja una hilera por el lado derecho de la labor y una hilera por el lado revés de la labor. Cuando se trabaja por el lado revés, el diagrama deberá ser leído en sentido contrario: de izquierda a derecha (ver la flecha roja por el lado derecho y la flecha azul por el lado revés abajo).

La hilera comienza generalmente con un determinado número de puntos de cadena – el número es equivalente a la altura del punto siguiente, y están incluidos para asegurar que estás comenzando por la parte de arriba del punto siguiente (ver los círculos verdes abajo). Si los puntos de cadena están incluidos en el diagrama (como en este ejemplo) todos los puntos son trabajados exactamente como aparecen. A veces el patrón incluye INFORMACIÓN PARA REALIZAR EL TRABAJO en la parte de arriba de las instrucciones, la cual te indica cuántos puntos debes trabajar al principio de cada hilera, y si estos puntos de cadena sustituyen el primer punto de la hilera (o si son adicionales). Si los puntos de cadena NO están incluidos en el diagrama: seguir las instrucciones dadas en INFORMACIÓN PARA REALIZAR EL TRABAJO.

En redondo:

Cuando se trabaja en redondo, todas las vueltas son trabajadas por el lado derecho: de derecha a izquierda (ver las flechas rojas abajo). De qué manera la vuelta comienza y termina es algo frecuentemente mostrado en un diagrama (ver A.2 abajo – cuadrado verde). De la misma manera como cuando se trabaja de ida y vuelta, la vuelta comienza con un determinado número de puntos de cadena, equivalente a la altura del punto siguiente. Al final de la vuelta, generalmente unes el principio y el fin de la vuelta con un punto bajísimo en el último de los puntos de cadena del principio (ver cuadrado azul abajo). Es decir: los puntos de cadena en A.2 = el principio de la vuelta, mientras que el punto bajísimo en A.2 = el fin de la vuelta.

Si tienes que trabajar varias repeticiones del diagrama (A.1) (es decir, es repetido varias veces en la vuelta) trabajas hasta el último punto y, después, comienzas nuevamente en el primer punto en la misma hilera de A.1. NOTA: en este ejemplo, SOLO se repite A.1, A.2 muestra cómo se trabaja el principio y el fin de toda la vuelta.

Varios diagramas diferentes trabajados consecutivamente en la hilera/vuelta:

Si estás trabajando varios diagramas diferentes uno después del otro en la misma hilera/vuelta, trabajar de la manera siguiente: Trabajar la 1ᵃ hilera del diagrama 1, continuar con la 1ª hilera del diagrama 2, después la 1ª hilera del diagrama 3, etc. RECUERDA: si estás trabajando de ida y vuelta, los diagramas tendrán que ser trabajados en sentido contrario por el lado revés – es decir: comenzar con el diagrama 3, después el diagrama 2 y, por último, el diagrama 1. Son también trabajados en sentido contrario, como habitualmente.

Diagramas circulares:

Cuando se trabaja en un círculo, es decir que comienzas en el centro y trabajas en dirección hacia afuera, esto generalmente es mostrado en un diagrama circular. El diagrama puede mostrar el círculo entero – en este caso cada símbolo es trabajado exactamente como aparece, o el diagrama puede mostrar una parte del círculo, que después es repetido un determinado número de veces para formar un círculo entero.

Círculo entero:

En un diagrama de círculo entero, comienzas por el símbolo en el centro del círculo: generalmente un pequeño círculo representando un determinado número de puntos de cadena, fijado con un punto bajísimo (ver el círculo rojo abajo). De la misma forma a cuando se trabaja en redondo, la vuelta comienza con un determinado número de puntos de cadena (equivalente a la altura del símbolo siguiente) y termina con un punto bajísimo en el último de estos puntos de cadena – es decir: equivalente a A.2 en nuestro ejemplo anterior (ver cuadrado azul) – NOTA: cuando los puntos de cadena son mostrados en el diagrama, ellos NO sustituyen ninguno de los otros símbolos, y cada símbolo es trabajado exactamente como aparece. Si los puntos de cadena SUSTITUYEN cualquier punto, esto habrá sido retirado del diagrama.

Se trabaja en el sentido contrario a las agujas del reloj: de derecha a izquierda, 1 símbolo después del otro (ver la flecha roja abajo). Los puntos de la primera vuelta generalmente son trabajados ALREDEDOR del anillo de puntos de cadena, lo que significa que colocas la aguja de ganchillo A TRAVÉS del centro del anillo de puntos de cadena, coges el hilo y lo pasas nuevamente a través del anillo (trabajando el punto como se hace habitualmente) – No trabajas el punto EN ninguno de los puntos de cadena, más bien ALREDEDOR del anillo de puntos de cadena. Al final de la vuelta, unir el principio y el fin con un punto bajísimo y comenzar la segunda vuelta del diagrama: la segunda vuelta más próxima al centro (ver la flecha verde).

Fracción de un círculo:

Si el diagrama representa solamente una fracción (parte) de un círculo, esto es porque esa fracción es repetida un determinado número de veces en redondo para formar un círculo entero. Comienzas por el símbolo de la parte de abajo (ver el círculo rojo) y trabajas de la misma manera como para un CÍRCULO ENTERO, pero A.2 será repetido un determinado número de veces en redondo. De la misma manera como cuando se trabaja en redondo, generalmente hay un diagrama separado que ilustra cómo comienza y termina la vuelta (ver A.1, cuadrado azul abajo). Comienzas por la hilera del diagrama más próxima al anillo de puntos de cadena, en la parte de abajo del diagrama, trabajas el(los) punto(s) de cadena de A.1, después trabajas el(los) símbolo(s) de A.2 (en la primera vuelta es solo 1 símbolo) y repites el(los) símbolo(s) de A.2 el número de veces indicado en el patrón.

Al final de la vuelta, unes la vuelta con el punto bajísimo de A.1. Cuando la primera vuelta esté hecha, continuar con la vuelta siguiente: la segunda vuelta más próxima al anillo de puntos de cadena (ver la flecha verde abajo).

Diagramas cuadrados / jacquards:

Algunos diagramas de ganchillo son mostrados en un diagrama de cuadrados, en el que 1 cuadrado = 1 punto. El tipo de punto a trabajar generalmente será explicado en las instrucciones del patrón, mientras que el propósito del diagrama es mostrar con qué colores se debe trabajar los puntos (ver el círculo rojo abajo = definición de los símbolos).

Trabajas como está explicado arriba, dependiendo de si trabajas DE IDA Y VUELTA, EN REDONDO o un DIAGRAMA CIRCULAR.

Comentarios (140)

Eliana Valenzuela wrote:

Muchas gracias, por mostrar sus tejidos son muy hermosos y muy explicativos, soy principiante cen tejido a crochet y me encanta. En esta cuarentena por el covil 19, estoy tejiendo y sobre todo a mi nieta de 4 años, un abrazó a la distancia.

27.04.2020 - 10:22:

Mary Kselman wrote:

Is there a step-by-step step pattern for drops pattern 171-21? Or a video? I love this jacket, but al finding it difficult to follow the diagram. Please help.

17.04.2020 - 00:50:

Marcy wrote:

Sad fact that due to visual learning disabilities suffered by millions of us, ALL your patterns are completely UNACCESSIBLE. Thank you for this "tutorial" but it is like GIBBERISH when people such as myself, cannot possibly make sense of the charts. I've tried reading your tutorial, watched videos, even paid to attend a class in a local yarn shop. I'm no closer to being able to use them. I paid someone to "translate" a pattern. There are other sources for patterns and yarn I'll use.

24.03.2020 - 23:25:

Mrs Blair wrote:

Do I build the diagram up or around?

14.03.2020 - 21:37:

DROPS Design answered:

Dear Mrs Blair, diagrams are usually worked bottom up, and repeated in the round - to get a more detailed answer please ask your question on the pattern you are working on. Thanks for your comprehension!

16.03.2020 - 10:40:

Pamela Goulden wrote:

Please have the lady crocheted on HGTV crochet the Flair for Spring # 632 demonstrate how to crochet this sweater. Thank you.

29.02.2020 - 02:57:

Pamela Goulden wrote:

Please give me row by row crochet instructions for pattern #w- 632. I’ve watched the video but still get confused with the symbols. I know how to crochet but not good at following diagrams. Help!

26.02.2020 - 10:43:

DROPS Design answered:

Dear Mrs Goulden, we are unfortunately not able to re-write all diagrams used in that pattern, this lesson should be able to help you to understand how to crochet a diagram - please contact your DROPS store - even per mail or telephone - or any crochet forum for any individual assistance. Thanks for your comprehension. Happy crocheting!

27.02.2020 - 10:10:

Linda Harding wrote:

Please could you print your patterns with UK written instructions - I have tried to understand the diagrams but just can’t understand them despite repeated attempts. Do you have a video that shows step by step how to follow a diagram?

08.01.2020 - 18:39:

DROPS Design answered:

Dear Mrs Harding, The DROPS patterns are knitted and crocheted by thousands and thousands of people  around the world. We understand however that in certain countries, with different knitting/crochet traditions than Scandinavia, our patterns might be written in a way that differs from what some are used to. But of course we want everyone to understand our patterns, so that’s why we have created an extensive library of tutorial videos as well as step by step lessons that explain how to follow the techniques we use and how to read the diagrams in our patterns. If you have a doubt about how to read a specific pattern make sure to leave a comment in that pattern so that we can help you.

09.01.2020 - 10:30:

Nona Soft wrote:

I have a question in pattern number 205_4 it is a sweater I can't understand how to work A1 in two stitches and repeat A2 over 32 how can I work I can't understand how to follow the diagram is A2 has increase??? Or not I hope you help me

23.12.2019 - 12:51:

DROPS Design answered:

Dear Mrs Soft, 205-4 is a knitting pattern; did you mean this one or any other one? You are welcome to ask your question in the comment sections of the pattern you are working on, it can be that way easier to help you. Happy crocheting!

02.01.2020 - 16:41:

Colleen wrote:

On my diagram for 195-14 on A1 two vertical dashes and I don’t know what stitch they are? Please help

03.12.2019 - 04:02:

DROPS Design answered:

Dear Colleen, if you think of the 2 dashes at the beg of row with sc (US-crochet) in A.2 there you have to work 2 chains, then 1 sc (US-crochet) in next stitch. Happy crocheting!

03.12.2019 - 13:05:

Elaine wrote:

I would like to know if you can print the pattern for the Drops Design Lily Pad round crochet rug (152-25). I cannot follow diagrams and would love to crochet this beautiful rug......Thank you in advance for your help.....Elaine

26.11.2019 - 18:31:

DROPS Design answered:

Dear Elaine, we only have diagram to this pattern, you will find above how to read them - see here. Happy crocheting!

27.11.2019 - 08:59:

Isidora Saldana wrote:

How can I get your videos to play. They\'re not working

04.11.2019 - 15:51:

DROPS Design answered:

Dear Mrs Saldana, Please make sure you have installed the newest version of Adobe Flash Player. If the problem persists, please take a look at Vimeo's FAQ. You can also find our videos on our You Tube Channel. Happy crocheting!

05.11.2019 - 10:53:

NATASHA COLE wrote:

There are a lot of Drops patterns I have ready in my stash to crochet but each time I get started I abandon them because I really do not understand how to read your patterns with the diagrams. Can you please do a video tutorial to explain how to follow crochet patterns that have the additional diagrams. For example the Escapade cardigan has multiple diagrams.

24.10.2019 - 18:25:

DROPS Design answered:

Dear Mrs Cole, when there are several diagrams to follow on a same row you can cut them and put them together in a montage so that you can follow them as explained under Several different diagrams worked consecutively on the row/round:. Your DROPS store will also be able to assist you reading diagrams, even per mail or telephone. Happy crocheting!

25.10.2019 - 10:14:

Aimee wrote:

Som total nybegynder i hækling søgte jeg info på 'Hvordan læses diagrammer'. Er det muligt at få symbolforklaringen på dansk, da jeg ikke har styr på de engelske navne for hæklemasker.

19.10.2019 - 12:45:

DROPS Design answered:

Hei Aimee. Ja, du kan finne alt på dansk. Velg den engelske side til "How to read crochet diagrams" (må være på den engelske side ettersom du skal oversette fra engelsk til dansk) og velg "Dictionary" til høyre (eller helt nederst på siden). Skriv inn ordet du vil oversette, f.eks "chain stitch". Det vil da komme opp en forklaring på hva en chain stitch er, på engelsk, men scroll litt ned og du ser oversettelser på mange språk. Klikk på Dansk og "luftmaske" , du vil da få en forklaring på hva en luftmaske er på dansk. God Fornøyelse!

21.10.2019 - 09:18:

Judy Lane wrote:

Hi I think I have figured out the pattern for the tangy squares but am having difficulty with round 2!!!! I am not sure about the symbol for the treble crochet around ch st/ch sp/ch st ring - it is obvious in round one because you work in to the ring.

05.09.2019 - 17:31:

DROPS Design answered:

Dear Mrs Lane, could you please ask your question under the pattern you are working on? It would be easier to help you when looking at the diagram you are working on. Thanks for your comprehension!

06.09.2019 - 08:37:

Heather wrote:

Could you please start giving written patterns also, I have a very hard time with the diagrams. I love all your crochet patterns and would love to make them but with my eyesight I have such a rough time.

15.08.2019 - 09:44:

DROPS Design answered:

Dear Heather, The DROPS patterns are knitted and crocheted by thousands and thousands of people  around the world. We understand however that in certain countries, with different knitting/crochet traditions than Scandinavia, our patterns might be written in a way that differs from what some are used to. But of course we want everyone to understand our patterns, so that’s why we have created an extensive library of tutorial videos as well as step by step lessons that explain how to follow the techniques we use and how to read the diagrams in our patterns. Give them a try!

15.08.2019 - 10:56:

Patricia Williams wrote:

The diagram, I have never followed a diagram. Is there a tutorial I can watch and do for the Sand Voyage Summer hat, please? I'm having a rough time trying to understand the diagram. Once I finished the sc rounds, what/where do i begin the vertical stitches?

18.06.2019 - 00:04:

DROPS Design answered:

Dear Mrs Williams, in this pattern you will start reading the diagram A.1 at the bottom corner on the right side (the row after the star), then crochet every row from the right towards the left following the symbol explained in diagram key. Happy crocheting!

18.06.2019 - 08:53:

Marianne wrote:

Har virkelig ledt efter sådan en tutorial i lang tid. Tak for hjælpen! :)

16.05.2019 - 12:47:

Sandra McCarthy wrote:

Pattern # w-767. I have read the complete pattern. I understand the instructions for the bag. I don't understand the Work A.2 over each repeat of A.1. I did reread the crochet info and am still confused. Also in the diagram what is the arrow saying? Start on the second row (of the diagram) working up and the bottom row (below the arrow) is worked as the third row after the top row.

16.04.2019 - 20:15:

DROPS Design answered:

Dear Mrs McCarthy, did you manage to work A.2 with the answer on your question you asked on the pattern? Remember also you can get individual assistance contacting your DROPS store, even per mail or telephone. Happy crocheting!

23.04.2019 - 16:25:

Inga wrote:

Gibt es diese Übersicht auch für Strickanleitungen?

20.03.2019 - 19:18:

DROPS Design answered:

Liebe Inga, hier finden Sie, wie man Strickdiagram liest. Viel Spaß beim stricken!

21.03.2019 - 10:08:

Katarina Hahn Persson wrote:

Hej jag vet inte hur jag skall läsa diagrammet till mönster nr. Drops 187-2. Tacksam för hjälp. // Katarina

18.03.2019 - 21:07:

DROPS Design answered:

Hej Katarina, första varvet i diagrammet består av stolpar och det har du redan virkat enligt mönstret. Varv 2 i diagrammet består av växelvis 1 lm och 1 stolpe i varannan stolpe varvet ut. Varv 3 består av 2 stolpar i varje lm från varvet innan. Fråga också gärna i butiken där du har köpt garnet. Lycka till :)

06.05.2019 - 08:59:

Deja un comentario o pregunta en esta lección

Tu dirección de email no será publicada. Los campos obligatorios están marcados con un *.