
Popular categories
Looking for a yarn?


|
|
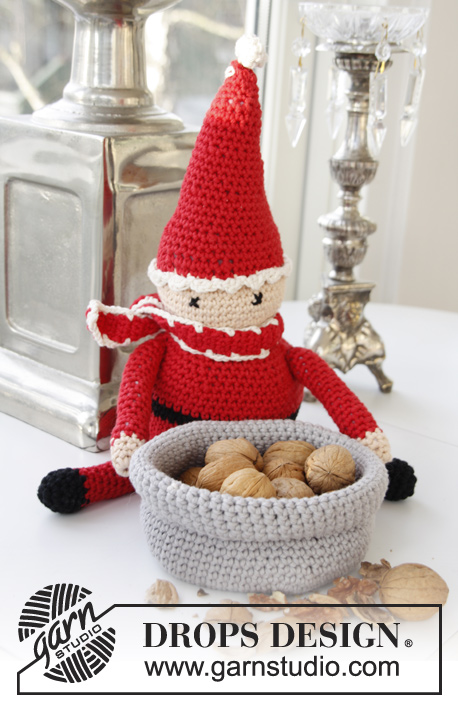
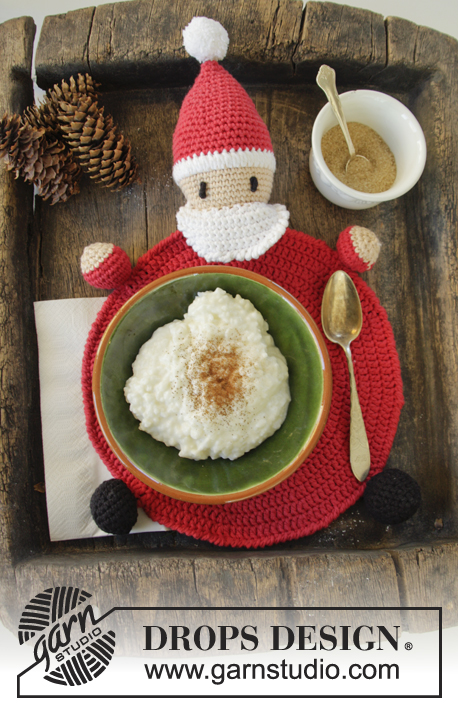
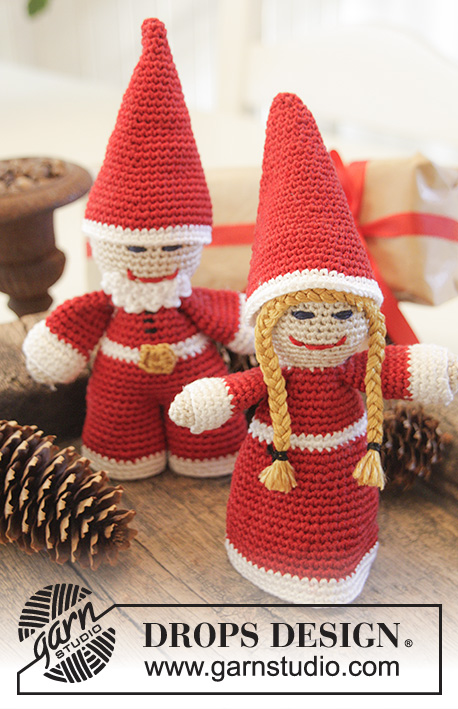
Meet The Kringles |
|
 |
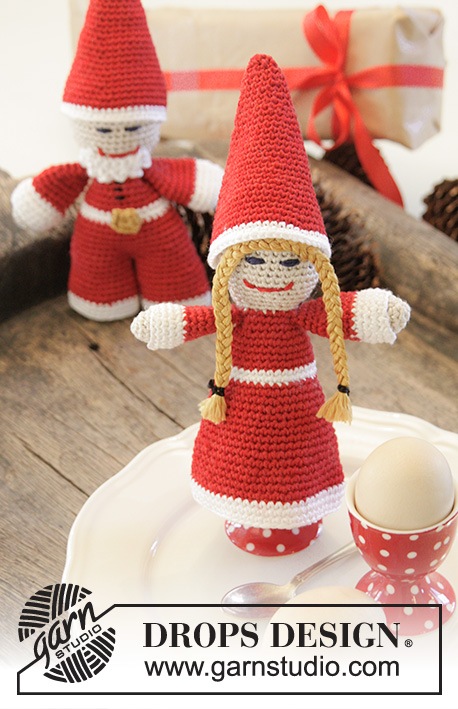 |
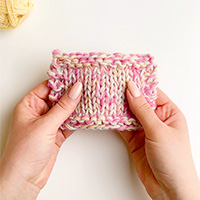
DROPS Christmas: Crochet Santas in "Cotton Viscose".
DROPS Extra 0-1063 |
|
|
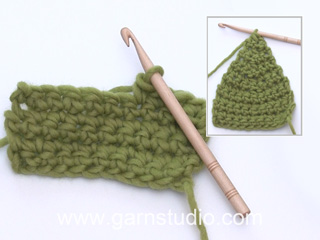
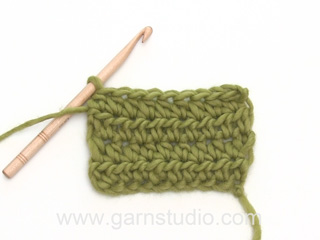
CROCHET INFO: Replace first sc at beg of every sc round with 1 ch. Finish every round with 1 sl st in ch from beg of round. CROCHET SC TOG: Insert hook in first sc and pull yarn through, insert hook in next sc and pull yarn through, make a YO and pull yarn through all 3 loops on hook. ---------------------------------------------------------- SANTA: Beg both Santas the same way and work around from the head and down. Work piece on male Santa while continuing in the round on female Santa. HEAD: Worked in the round. Work 3 ch on hook size 2.5 mm/C with off white and form a ring with 1 sl st in first ch. READ CROCHET INFO! ROUND 1: Work 6 sc in ch-ring. ROUND 2: Work 2 sc in every sc the entire round = 12 sc. ROUND 3: Work * 1 sc in next sc, 2 sc in next sc *, repeat from *-* the entire round = 18 sc. ROUND 4: Work 1 sc in every sc the entire round. ROUND 5: Work * 1 sc in each of the next 2 sc, then 2 sc in next sc *, repeat from *-* the entire round = 24 sc. ROUND 6: Work 1 sc in every sc the entire round. ROUND 7: Work * 1 sc in each of the next 3 sc, then 2 sc in next sc *, repeat from *-* the entire round = 30 sc. ROUND 8: Work 1 sc in every sc the entire round. ROUND 9: Work * 1 sc in each of the next 4 sc, then 2 sc in next sc *, repeat from *-* the entire round = 36 sc. ROUND 10-16: Work 1 sc in every sc the entire round. ROUND 17: READ CROCHET SC TOG! Work * 1 sc in each of the next 4 sc, work 2 sc tog *, repeat from *-* the entire round = 30 sc. ROUND 18: Work 1 sc in every sc the entire round. ROUND 19: Work * 1 sc in each of the next 3 sc, work 2 sc tog *, repeat from *-* the entire round = 24 sc. ROUND 20: Work 1 sc in every sc the entire round. Fill the ball with some poly stuffing. ROUND 21: Work * 1 sc in each of the next 2 sc, work 2 sc tog *, repeat from *-* the entire round = 18 sc. ROUND 22: Work 1 sc in every sc the entire round. Fasten off. Then work hand and sleeve. SLEEVE AND HAND: Then work sleeve as follows from hand and up. First work the hand, then the sleeve before slipping them tog and fastening them on the underside of head before working the body. Hand: Work 3 ch on hook size 2.5 mm/C and off white, form a ring with 1 sl st in first ch. ROUND 1: Work 6 sc in ch-ring. ROUND 2: Work 2 sc in every sc = 12 sc. ROUND 3-5: Work 1 sc in every sc. ROUND 6: Work * 1 sc in next sc, 2 sc in next sc *, repeat from *-* the entire round = 18 sc. Fasten off. Work another hand the same way. Sleeve: Work 18 ch on hook size 2.5 mm/C and white, form a ring with 1 sl st in first ch. ROUND 1: Work 1 sc in every ch = 18 sc. ROUND 2-3: Work 1 sc in every sc. ROUND 4: Now work sc from hand tog with sc from sleeve as follows: Put hand in sleeve with RS on hand towards WS on sleeve. Work tog sc from sleeve with sc from hand, work through both layers with sc but on hand only work in front loops of st. ROUND 5-8: Switch to red, work 1 sc in every sc. Fill the hand and arm with some cotton wool along the way. ROUND 9: Work * 1 sc in next sc, work 2 sc tog *, repeat from *-* the entire round = 12 sc. ROUND 10-12: Work 1 sc in every sc. ROUND 13: Place sleeve double and fasten it in last round on underside of head, work with sl sts through both loops on sleeve and only front loop of st on head. Fasten off. Repeat on the other sleeve so that there is one sleeve on each side of head. BODY FEMALE SANTA: Work body from the last 18 sc worked on head. Hold piece with RS towards you and beg mid back with red. ROUND 1: Work * 1 sc in each of the next 2 sc, work 2 sc in next sc *, repeat from *-* the entire round = 24 sc. ROUND 2-3: Work 1 sc in every sc the entire round. ROUND 4: Work * 1 sc in each of the next 3 sc, work 2 sc in next sc *, repeat from *-* the entire round = 30 sc. ROUND 5-7: Work 1 sc in every sc the entire round. ROUND 8: Work * 1 sc in each of the next 4 sc, work 2 sc in next sc *, repeat from *-* the entire round = 36 sc. ROUND 9: Switch to white and work 1 sc in every sc the entire round. ROUND 10: Work 1 sc in every sc the entire round. ROUND 11: Switch to red and work 1 sc in every sc the entire round. ROUND 12: Work * 1 sc in each of the next 5 sc, work 2 sc in next sc *, repeat from *-* the entire round = 42 sc. ROUND 13-15: Work 1 sc in every sc the entire round. ROUND 16: Work * 1 sc in each of the next 6 sc, work 2 sc in next sc *, repeat from *-* the entire round = 48 sc. ROUND 17-19: Work 1 sc in every sc the entire round. ROUND 20: Work * 1 sc in each of the next 7 sc, work 2 sc in next sc *, repeat from *-* the entire round = 54 sc. ROUND 21-23: Work 1 sc in every sc the entire round. ROUND 24: Work * 1 sc in each of the next 8 sc, work 2 sc in next sc *, repeat from *-* the entire round = 60 sc. ROUND 25: Work 1 sc in every sc the entire round. Finish round at the back and switch to white. ROUND 26-28: Work 1 sc in every sc the entire round. BODY MALE SANTA: Work as BODY FEMALE SANTA - see explanation above, to and with ROUND 16, there are 48 sc on round. Then divide the piece so that 24 sc are worked in the round for each leg. Work as follows: ROUND 17-19: Work 1 sc in every sc the entire round = 24 sc. ROUND 20: Work * 1 sc in each of the next 7 sc, work 2 sc in next sc *, repeat from *-* the entire round = 27 sc. ROUND 21-23: Work 1 sc in every sc the entire round. ROUND 24: Work * 1 sc in each of the next 8 sc, work 2 sc in next sc *, repeat from *-* the entire round = 30 sc. ROUND 25: Work 1 sc in every sc the entire round. Finish round at the back of leg and switch to white. ROUND 26-28: Work 1 sc in every sc the entire round. Work another leg the same way. HAT: Worked top down with hook size 2.5 mm/C and red. Work ch 3, then work in the third ch from hook as follows: ROUND 1: Work 3 sc in the third ch from hook and form a ring with 1 sl st in first sc = 3 sc. ROUND 2: Work 2 sc in every sc the entire round = 6 sc. ROUND 3: Work 1 sc in every sc. ROUND 4: Work * 1 sc in next sc, 2 sc in next sc *, repeat from *-* the entire round = 9 sc. ROUND 5: Work 1 sc in every sc. ROUND 6: Work * 1 sc in each of the next 2 sc, then 2 sc in next sc *, repeat from *-* the entire round = 12 sc. ROUND 7: Work 1 sc in every sc. ROUND 8: Work * 1 sc in each of the next 3 sc, then 2 sc in next sc *, repeat from *-* the entire round = 15 sc. ROUND 9: Work 1 sc in every sc. ROUND 10: Work * 1 sc in each of the next 4 sc, then 2 sc in next sc *, repeat from *-* the entire round = 18 sc. ROUND 11: Work 1 sc in every sc. ROUND 12: Work * 1 sc in each of the next 5 sc, then 2 sc in next sc *, repeat from *-* the entire round = 21 sc. ROUND 13: Work 1 sc in every sc. ROUND 14: Work * 1 sc in each of the next 6 sc, then 2 sc in next sc *, repeat from *-* the entire round = 24 sc. ROUND 15: Work 1 sc in every sc. ROUND 16: Work * 1 sc in each of the next 7 sc, then 2 sc in next sc *, repeat from *-* the entire round = 27 sc. ROUND 17: Work 1 sc in every sc. ROUND 18: Work * 1 sc in each of the next 8 sc, then 2 sc in next sc *, repeat from *-* the entire round = 30 sc. ROUND 19: Work 1 sc in every sc. ROUND 20: Work * 1 sc in each of the next 9 sc, then 2 sc in next sc *, repeat from *-* the entire round = 33 sc. ROUND 21: Work 1 sc in every sc. ROUND 22: Work * 1 sc in each of the next 10 sc, then 2 sc in next sc *, repeat from *-* the entire round = 36 sc. ROUND 23: Work 1 sc in every sc. ROUND 24: Work * 1 sc in each of the next 11 sc, then 2 sc in next sc *, repeat from *-* the entire round = 39 sc. ROUND 25: Work 1 sc in every sc. ROUND 26: Work * 1 sc in each of the next 12 sc, then 2 sc in next sc *, repeat from *-* the entire round = 42 sc. ROUND 27: Work 1 sc in every sc. ROUND 28: Work * 1 sc in each of the next 13 sc, then 2 sc in next sc *, repeat from *-* the entire round = 45 sc. ROUND 29: Work 1 sc in every sc. ROUND 30: Work * 1 sc in each of the next 14 sc, then 2 sc in next sc *, repeat from *-* the entire round = 48 sc. Switch to white. ROUND 31-32: Work 1 sc in every sc. Fasten off. BUCKLE AND BUTTONS: Work 3 ch with hook size 2.5 mm/C and yellow, form a ring with 1 sl st in first ch. Work ch 2, 1 hdc in ch-ring, ch 1, * 2 hdc in ch-ring, 1 ch *, repeat from *-* 3 times in total and finish with 1 sl st in 2 ch from beg of round. Cut the yarn and fasten buckle on the white section in the middle of male Santa. Embroider buttons on upper body on male Santa with some left-over black. DECORATION: Embroider on eyes with blue and mouth with red at the front of head. Fill the bodies with some poly stuffing or similar so that they stand by themselves, if they are to be used as egg warmers fill the bodies with only a little cotton wool. HAIR AND BEARD: Make a braid approx. 16 cm / 6¼" long of 9 strands yellow. Tie it in each end with some left-over black and cut the ends so that they split. Put the hat on female santa, sew braid with neat little stitches in the forehead below the hat and let them hang down on each side of face. Work a beard for male Santa as follows: Work 8 ch with white on hook size 2.5 mm/C, turn and work sc back, beg in second ch from hook = 7 sc. Turn and work * ch 2, 1 hdc in first ch, 1 sl st in next sc *, repeat from *-* the rest of row. Cut the yarn and fasten beard under male Santa's mouth. |
|
|
Have you made this or any other of our designs? Tag your pictures in social media with #dropsdesign so we can see them! Do you need help with this pattern?You'll find tutorial videos, a Comments/Questions area and more by visiting the pattern on garnstudio.com. © 1982-2024 DROPS Design A/S. We reserve all rights. This document, including all its sub-sections, has copyrights. Read more about what you can do with our patterns at the bottom of each pattern on our site. |
|


With over 40 years in knitting and crochet design, DROPS Design offers one of the most extensive collections of free patterns on the internet - translated to 17 languages. As of today we count 304 catalogs and 11422 patterns - 11417 of which are translated into English (US/in).
We work hard to bring you the best knitting and crochet have to offer, inspiration and advice as well as great quality yarns at incredible prices! Would you like to use our patterns for other than personal use? You can read what you are allowed to do in the Copyright text at the bottom of all our patterns. Happy crafting!
Comments / Questions (5)
According to the instructions, the head is the only piece stuffed, but it is left open at the neck. Is the Santa really just an empty shell, open from the neck down to the bottom of the legs? I feel as though I have missed an entire section of instruction on 'finishing'. P.S. I love this Santa pair!
12.12.2019 - 22:02DROPS Design answered:
Hello Ann! It says in the pattern to fill the bodies with some cotton wool or similar so that they stand by themselves. Happy crocheting!
13.12.2019 - 22:09In het patroon 0-1063 staan fouten zie opmerking Els 01.01.2015 en Maggie 09.11.2015de fouten zijn niet gecorrigeerd gaarne uw reactie
12.11.2015 - 12:03DROPS Design answered:
Hoi Hendrika. De fouten zijn nu gecorrigeerd.
19.02.2016 - 15:16Wurde die Anleitung berichtigt? Oder muss man aufpassen und berücksichtigen, was Els beschrieben hat, was ich allerdings nicht ganz verstehe....
09.11.2015 - 18:46DROPS Design answered:
Die Anleitung wurde noch nicht berichtigt. Beim Körper müssen Sie also ab der 1. Rd nicht * 1 fM in die ersten 3 fM, 2 fM in die nächste fM * häkeln, sondern * 1 fM in die ersten 2 fM, 2 fM in die nächste fM *, damit Sie die passenden Zunahmen erhalten. Das berücksichtigen Sie auch in den folgenden Rd, also immer 1 M weniger, als dort geschrieben steht. Es ist wichtig, dass Sie immer die M-Zahl erhalten, die am Ende genannt ist.
12.11.2015 - 20:53Voor al miijn kleinkinderen (9) heb ik een kerstman/vrouw gemaakt met groot succes! Ze zijn echt geweldig leuk en lief geworden. Er zit wèl een fout in het patroon. In 'LIJF KERSTVROUW' en 'LIJF KERSTMAN' staan de aantal steken vanaf het meerderen in toer 1 steeds één getal te ver. dat wil zeggen: lijf kerstvrouw, toer 1: haak *1 v in elke van de volgende 3 v' moet zijn: elke volgende 2 v.. en dat is in iedere toer verkeerd gezet. Ik hoop dat ik het duidelijk heb kunnen omschrijven.
01.01.2015 - 13:28Super joliiiiiiiiiiiiiii
17.12.2014 - 12:00