DROPS Air
DROPS Air
65% Alpaca, 28% Polyamide, 7% Wool
from 6.45 $ /50g
Get the yarn to make this pattern from 45.15$.

The yarn cost is calculated from the pattern’s smallest size and the yarn’s cheapest product type. Looking for an even better price? You might find it on the DROPS Deals!

DROPS SS24

Brume Cardigan

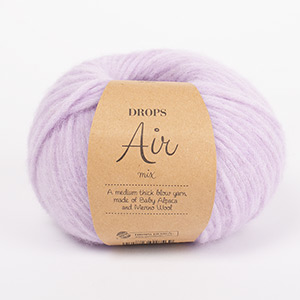
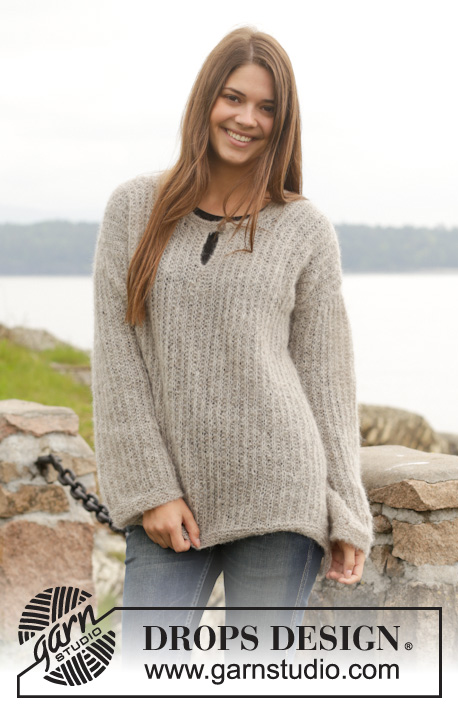
Knitted DROPS jacket with false English rib in "Air" or "Brushed Alpaca Silk". Size: S - XXXL.

DROPS 158-24
DROPS design: Pattern no ai-003
Yarn group C or A + A
-----------------------------------------------------------
Size: S - M - L - XL - XXL - XXXL
Finished measurements:
Bust: 96-100-108-116-130-142 cm / 37 3/4"-39½"-42½"-45 3/4"-51½"-55 3/4"
Full length: 68-70-72-74-76-78 cm / 26¾''-27½''-28 3/8''-29 1/8''-30''-30¾''

Materials:
DROPS AIR from Garnstudio
350-400-450-500-550-600 g color no 04, medium gray
Or use:
DROPS BRUSHED ALPACA SILK from Garnstudio
175-200-225-225-250-275 g color no 02, light gray

DROPS CIRCULAR NEEDLE (80 cm / 32'') SIZE 4 mm / US 6 - or size needed to get 19 sts in false rib = 4'' (10 cm).
DROPS MOTHER-OF-PEARL BUTTON NO 522: 6-6-6-7-7-7 pieces.

-------------------------------------------------------

Alternative Yarn – See how to change yarns here
Yarn Groups A to F – Use the same pattern and change the yarn here
Yarn usage using an alternative yarn – Use our yarn converter here

-------------------------------------------------------

DROPS Air
DROPS Air
65% Alpaca, 28% Polyamide, 7% Wool
from 6.45 $ /50g
Get the yarn to make this pattern from 45.15$.

The yarn cost is calculated from the pattern’s smallest size and the yarn’s cheapest product type. Looking for an even better price? You might find it on the DROPS Deals!

Pattern instructions

NOTE: This pattern is written in American English. All measurements in charts are in cm. For conversion from inches to cm - click here. There are different terms for crocheting in American and British English. If this pattern includes crochet, click for "crochet terms" here. For this pattern in British English, please click here.
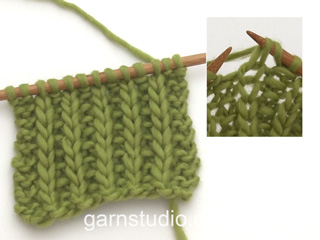
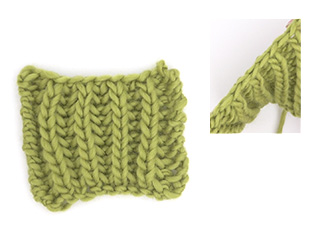
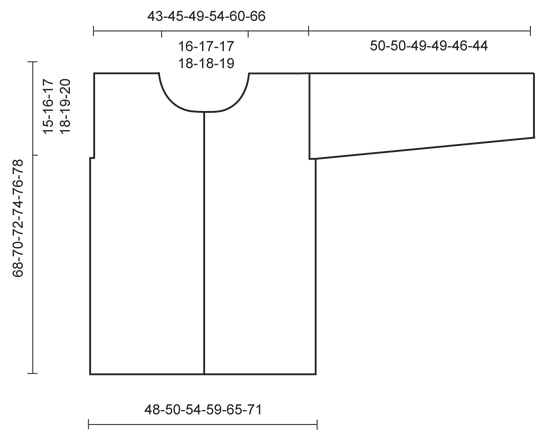
GARTER ST (back and forth on needle):
K all rows. 1 ridge = K2 rows.

MEASURING TIP:
All measurements must be done when piece is held up because the texture makes the piece elastic.

FALSE ENGLISH RIB:
Row 1: 1 edge st in garter st, * K 1, 1 YO, slip 1 st as if to P (with yarn behind piece) *, repeat from *-* until 2 sts remain, finish with K 1 and 1 edge st in garter st.
Row 2: 1 edge st in garter st, * K 1, P tog YO and slipped st *, repeat from *-* until 2 sts remain, finish with K 1 and 1 edge st in garter st.
Repeat 1st and 2nd row upwards.

DECREASE TIP (applies to sleeve):
Dec 1 st in each side by K 2 tog inside 1 edge st in garter st. Work sts in the side that do not fit the pattern in stockinette st.

BUTTONHOLES:
Dec for buttonhole by K tog 3rd and 4th st in garter st in band and make a YO, K YO on next row. Dec for buttonholes when piece measures:
SIZE S: 24, 33, 42, 51 and 60 cm / 9½",13",16½",20",23½"
SIZE M: 26, 35, 44, 53 and 62 cm / 10 1/4",13 3/4",17 1/4",21",24½"
SIZE L: 28, 37, 46, 55 and 64 cm / 11",14½",18",21½",25 1/4"
SIZE XL: 21, 30, 39, 48, 57 and 66 cm / 8 1/4",11 3/4",15 1/4",19",22½"
SIZE XXL: 23, 32, 41, 50, 59 and 68 cm / 9",12½",16 1/8",19 3/4",23 1/4",26 3/4"
SIZE XXL: 25, 34, 43, 52, 61 and 70 cm / 9 3/4",13½",17",20½",24",27½"
--------------------------------------------------------

JACKET:
Worked back and forth on circular needle.

BACK PIECE:
Cast on 93-97-105-113-125-137 sts on circular needle size 4 mm / US 6 with 2 strands Air or Brushed Alpaca Silk. Then continue piece with 1 strand. Work in GARTER ST – see explanation above – until piece measures 2 cm / 3/4''. REMEMBER THE GAUGE! Then work FALSE ENGLISH RIB - see explanation above. READ MEASURING TIP! When piece measures 53-54-55-56-57-58 cm / 21''-21¼''-21 5/8''-22''-22½''-22¾'', bind off 5 sts in each side. On next row cast on 1 edge st in each side which is worked in garter st until finished measurements = 85-89-97-105-117-129 sts. Continue to work until piece measures 64-66-68-70-72-74 cm / 25¼''-26''-26¾''-27½''-28 3/8''-29 1/8''. Work the first 27-29-32-36-41-47 sts, bind off the next 31-31-33-33-35-35 sts and work the rest of row. Then finish each shoulder separately. On next row dec 1 more st towards the neck = 26-28-31-35-40-46 sts. Work until piece measures 68-70-72-74-76-78 cm / 26¾''-27½''-28 3/8''-29 1/8''-30''-30¾''. K 1 row from WS and bind off with K on next row. Work the same way on the other side.

RIGHT FRONT PIECE:
Cast on 50-52-56-60-66-72 sts on circular needle size 4 mm / US 6 with 2 strands Air or Brushed Alpaca Silk. Then continue piece with 1 strand. Work back and forth in garter st until piece measures 2 cm / 3/4''. Then work false English rib with 4 band sts in garter st in towards mid front. When piece measures 24-26-28-21-23-25 cm / 9½"-10 1/4"-11"-8 1/4"-9"-9 3/4", dec for BUTTONHOLE - see explanation above! When piece measures 53-54-55-56-57-58 cm / 21''-21¼''-21 5/8''-22''-22½''-22¾'', bind off 5 sts in the side for armhole. On next row cast on 1 edge st in the side which is worked in garter st until finished measurements = 46-48-52-56-62-68 sts. Continue to work until piece measures 58-60-62-64-66-68 cm / 22¾''-23 5/8''-24 3/8''-25¼''-26''-26¾''. Now dec in every row from RS for neck towards mid front as follows: 10-10-11-11-12-12 sts 1 time, 3 sts 1 time and 2 sts 3 times and 1 st 1 time = 26-28-31-35-40-46 sts. Continue to work until piece measures 68-70-72-74-76-78 cm / 26¾''-27½''-28 3/8''-29 1/8''-30''-30¾''. K 1 row from WS and bind off with K from RS.

LEFT FRONT PIECE:
Work as right front piece but reversed. Do not dec for buttonholes on left band.

ASSEMBLY:
Sew tog shoulder seams inside bind-off edges.

SLEEVES:
Worked back and forth on circular needle, top down. Beg from RS and pick up 60-80 sts with circular needle size 4 mm / US 6 and Air or Brushed Alpaca Silk. Pick up sts between where sts were bind off for armhole (NOTE: Do not work over sts bind off for armhole). P 1 row - AT THE SAME TIME adjust no of sts to 57-61-65-69-73-77 and cast on 5 new sts in each side of piece = 67-71-75-79-83-87 sts. Then work piece in false English rib with 1 edge st in garter st in each side - AT THE SAME TIME when piece measures 3 cm / 1'', dec 1 st in each side - READ DECREASE TIP. Repeat dec every 4-4-3-3-3-2 cm / 1½"-1½"-1"-1"-1"-3/4" 9-10-11-12-13-14 times in total = 49-51-53-55-57-59 sts. Work until sleeve measures 48-48-47-47-44-42 cm / 19"-19"-18½"-18½"-17 1/4"-16½". Work in garter st over all sts for 2 cm / 3/4'' and bind off 2 strands. Make another sleeve the same way.

NECK EDGE:
Worked back and forth on circular needle with Air or Brushed Alpaca Silk. Pick up approx. 64-72 sts with circular needle size 4 mm / US 6 along neck edge, beg in right side of front piece from RS. K 1 row from WS. On next row dec for a buttonhole by K tog 3rd and 4th st and making a YO. K from WS, K YO to make a hole. Work 1 ridge. Bind off with 2 strands from RS.

ASSEMBLY:
Sew sleeves tog inside 1 edge st, sew sts cast on on sleeve to sts bind off for armhole on body. Finally sew down along the side of front piece and back piece. Sew on buttons.

This pattern has been corrected.

Updated online: 12.11.2014
DROPS CIRCULAR NEEDLE (80 cm / 32\'\') SIZE 4 mm / US 6 - or size needed to get 19 sts in false rib = 4\'\' (10 cm).
Updated online: 16.06.2015
under BACK PIECE:
....On next row cast on 1 edge st in each side which is worked in garter st until finished measurements = 85-89-97-105-117-129 sts. Continue to work until piece measures 64-66-68-70-72-74 cm. Work the first 27-29-32-36-41-47 sts, bind off the next 31-31-33-33-35-35 sts and work the rest of row. ....

Diagram

All measurements in charts are in cm.

diagram measurements
Do you have a question? See a list of frequently asked questions (FAQ)

Knitting tension is what determines the final measurements of your work, and is usually measured per 10 x 10 cm. It is provided like so: number of stitches in width x number of rows in height - eg: 19 stitches x 26 rows = 10 x 10 cm.

The knitting tension is very individual; some people knit/crochet loosely while others work tightly. You adjust the knitting tension with the needle size, which is why the suggested needle size only serve as a guide! You need to adjust this (up or down) to ensure that YOUR knitting tension matches the knitting tension provided in the pattern. If you work with a different knitting tension than provided you will have a different yarn consumption, and your work will have different measurements than what the pattern suggests.

The knitting tension also determines which yarns can replace each other. As long as you achieve the same knitting tension you can replace one yarn with another.

See DROPS lesson: How to measure your tension/gauge

See DROPS video: How to make a gauge tension swatch

The required amount of yarn is provided in grams, eg: 450 g. To calculate how many balls you’ll need you first need to know how many grams are in 1 ball (25g, 50g or 100g). This information is available if you click on the individual yarn quality on our pages. Divide the amount required with the amount of each ball. For example, if each ball is 50g (the most common amount), the calculation will be as follows: 450 / 50 = 9 balls.

The important thing when changing from one yarn to another is that the knitting/crochet tension remains the same. This is so that the measurements of the finished piece will be the same as on the sketch provided. It is easier to achieve the same knitting tension using yarns from the same yarn group. It is also possible to work with multiple strands of a thinner yarn to achieve the knitting tension of a thicker one. Please try our yarn converter. We recommend you to always work a test swatch.

Please NOTE: when changing yarn the garment might have a different look and feel to the garment in the photo, due to individual properties and qualities of each yarn.

See DROPS lesson: Can I use a different yarn than the one mentioned in the pattern?

All our yarns are categorised into yarn groups (from A to F) according to thickness and knitting tension – group A contains the thinnest yarns and group F the thickest. This makes it easier for you to find alternative yarns to our patterns, should you wish to switch yarn. All yarns within the same group have a similar knitting tension and can easily replace each other. However, different yarn qualities have different structures and properties which will give the finished work a unique look and feel.

Click here for an overview of the yarns in each yarn group

At the top of all our patterns you’ll find a link to our yarn converter, which is a helpful tool should you wish to use a different yarn than suggested. By filling in the yarn quality you wish to replace, the amount (in your size) and number of strands, the converter will present good alternative yarns with the same knitting tension. Additionally it will tell you how much you’ll require in the new qualities and whether you’ll need to work with multiple strands. Most skeins are 50g (some are 25g or 100g).

If the pattern is worked with multiple colours, every colour will have to be converted separately. Similarly, if the pattern is worked with several strands of different yarns (for example 1 strand Alpaca and 1 strand Kid-Silk) you will have to find alternatives for each, individually.

Click here to see our yarn converter

Since different yarns have different qualities and textures we have chosen to keep the original yarn in our patterns. However, you can easily find options among our available qualities by using our yarn converter, or simply pick a yarn from the same yarn group.

It is possible that some retailers still have discontinued yarns in stock, or that someone has a few skeins at home that they would like to find patterns for.

The yarn converter will provide both alternative yarn as well as required amount in the new quality.

If you think it's hard to decide what size to make, it can be a good idea to measure a garment you own already and like the size of. Then you can pick the size by comparing those measures with the ones available in the pattern's size chart.

You'll find the size chart at the bottom of the pattern.

See DROPS lesson: How to read size chart

The needle size provided in the pattern serves only as a guide, the important thing is to follow the knitting tension. And since knitting tension is very individual, you will have to adjust the needle size to ensure that YOUR tension is the same as in the pattern – maybe you’ll have to adjust 1, or even 2 needle sizes, up or down to achieve the correct tension. For this, we recommend that you work test swatches.

Should you work with a different knitting tension than the one provided, the measurements of the finished garment might deviate from the measurement sketch.

See DROPS lesson: How to measure your tension/gauge

See DROPS video: How to make a gauge tension swatch

Working a garment top-down provides more flexibility and room for personal adjustment. For example it is easier to try the garment on while working, as well as making adjustments to length of yoke and shoulder caps.

The instructions are carefully explaining every step, in the correct order. Diagrams are adjusted to the knitting direction and are worked as usual.

The diagram depicts all rows/rounds, and every stitch seen from the right side. It is read from bottom to top, from right to left. 1 square = 1 stitch.

When working back and forth, every other row is worked from the right side and every other row is worked from the wrong side. When working from the wrong side, the diagram will have to be worked reversed: from left to right, knit stitches are purled, purl stitches are knit etc.

When working in the round every round is worked from the right side and the diagram are worked from right to left on all rounds.

See DROPS lesson: How to read knitting diagrams

The diagram depicts all rows/rounds, and every stitch seen from the right side. It is worked from bottom to top, from right to left.

When working back and forth every other row is worked from the right side: from right to left and every other row is worked from the wrong side: from left to right.

When working in the round, every row in the diagram are worked from the right side, from right to left.

When working a circular diagram you start in the middle and work your way outwards, counter clockwise, row by row.

The rows usually start with a given number of chain stitches (equivalent to the height of the following stitch), this will either be depicted in the diagram or explained in the pattern.

See DROPS lesson: How to read crochet diagrams

Instructions for working several diagrams after each other on the same row/round, will often be written like so: “work A.1, A.2, A.3 a total of 0-0-2-3-4 times". This means you work A.1 once, then A.2 is worked once, and A.3 is repeated (in width) the number of times provided for your size – in this case like so: S = 0 times, M = 0 times, L=2 times, XL= 3 times and XXL = 4 times.

The diagrams are worked as usual: begin with the first row in A.1, then work the first row in A.2 etc.

See DROPS lesson: How to read knitting diagrams

See DROPS lesson: How to read crochet diagrams

The total width of the garment (from wrist-to-wrist) will be larger in the larger sizes, despite the actual sleeves being shorter. The larger sizes have longer sleeve caps and wider shoulders, so there will be a good fit in all sizes.

The measurement sketch/schematic drawing provides information regarding the full length of the garment. If it’s a jumper or a jacket the length is measured from the highest point on the shoulder (usually closest to the neckline), and straight down to the bottom of the garment. It is NOT measured from the tip of shoulder. Similarly, the length of yoke is measured from the highest point on the shoulder and down to where yoke is split into body and sleeves.

See DROPS lesson: How to read a schematic drawing

Diagrams are often repeated on the round or in height. 1 repeat is the diagram the way it appears in the pattern. If it says to work 5 repeats of A.1 in the round, then you work A.1 a total of 5 times after/next to each other in the round. If it says to work 2 repeats of A.1 vertically/in height you work the entire diagram once, then begin again at the start and work the entire diagram one more time.

Chain stitches are slightly narrower than other stitches and to avoid working the cast-on edge too tight, we simply chain more stitches to begin with. The stitch count will be adjusted on the following row to fit the pattern and measurement sketch.

The rib edge is more elastic and will contract slightly compared to, for example, stocking stitch. By increasing before the rib edge, you avoid a visible difference in width between the rib edge and the rest of the body.

It’s very easy to cast off too tightly, and by making yarn overs while casting off (and simultaneously casting these off) you avoid a too tight cast off edge.

See DROPS video: How to bind off with yarn overs (yo)

To achieve an even increase (or decrease) you can increase on, for example: every 3rd and 4th row alternately, like so: work 2 rows and increase on the 3rd row, work 3 rows and increase on the 4th. Repeat this until the increase is complete.

See DROPS lesson: Increase or decrease 1 st on every 3rd and 4th row alternately

Should you prefer to work in the round instead of back and forth, you may of course adjust the pattern. You’ll need to add steeks mid-front (usually 5 stitches), and follow the instructions. When you would normally turn and work from the wrong side, simply work across the steek and continue in the round. At the end you’ll cut the piece open, pick up stitches to work bands, and cover the cut edges.

See DROPS video: How to knit steeks and cut open

Should you prefer to work back and forth instead of in the round, you may of course adjust the pattern so you work the pieces separately and then assemble them at the end. Divide the stitches for the body in 2, add 1 edge stitch in each side (for sewing) and work the front and back pieces separately.

See DROPS lesson: Can I adapt a pattern for circular needles into straight needles?

Pattern repeats can vary slightly in the different sizes, in order to get the correct proportions. If you’re not working the exact same size as the garment in the photo, yours might deviate slightly. This has been carefully developed and adjusted so that the complete impression of the garment is the same in all sizes.

Make sure to follow instructions and diagrams for your size!

If you have found a pattern you like which is available in women’s size it’s not very difficult to convert it to men’s size. The biggest difference will be the length of sleeves and body. Start working on the women size that you think would fit across the chest. The additional length will be worked right before you cast off for the armhole/sleeve cap. If the pattern is worked top-down you can add the length right after the armhole or before the first decrease on sleeve.

Regarding additional yarn amount, this will depend on how much length you add, but it is better with a skein too many than too few.

All yarns will have excess fibres (from production) that might come off as lint or shedding. Brushed yarns (ie hairier yarns) have more of these loose, excess fibres, causing more shedding.

Shedding also depends on what is worn under or over the garment, and whether this pulls at the yarn fibres. It’s therefore not possible to guarantee that there will be no shedding

Below are some tips on how to get the best result when working with hairier yarns:

1. When the garment is finished (before you wash it) shake it vigorously so the looser hairs come off. NOTE: do NOT use a lint roller, brush or any method that pulls at the yarn.

2. Place the garment in a plastic bag and put it in your freezer - the temperature will cause the fibres to become less attached to each other, and excess fibres will come off easier.

3. Leave in the freezer for a few hours before taking it out and shaking it again.

4. Wash the garment according to the instructions on the yarn label.

Pilling is a natural process that happens to even the most exclusive of fibers. It's a natural sign of wear and tear that is hard to avoid, and that is most visible in high friction areas of your garment like a sweater's arms and cuffs.

You can make your garment look as new by removing the pilling, using a fabric comb or a pill/lint remover.

Still can't find the answer you need? Then scroll down and leave your question so one of our experts can try to help you. This will be done normally within 5 to 10 working days.
In the meantime, you can read the questions and answers that others have left to this pattern or join the DROPS Workshop on Facebook to get help from fellow knitters/crocheters!

You might also like...

Post a comment to pattern DROPS 158-24

We would love to hear what you have to say about this pattern!

If you want to leave a question, please make sure you select the correct category in the form below, to speed up the answering process. Required fields are marked *.

Comments / Questions (32)

country flag Birgit Bang-Jensen wrote:

Opskrift 158-24. Under falsk patent 2. p står: 1 kantm retstrik, * 1 r, strik omslaget og den løse m vr sm *, gentag fra *-* . men i videoen strikkes omslag og løs m ret sammen. Hvad er rigtigt ? mvh Birgit

11.01.2024 - 15:30

DROPS Design answered:

Hei Birgit. Videoen er en generell video som viser hvoran man kan strikke falsk patent. Du må følge det som står i den oppskriften du strikker etter. mvh DROPS Design

15.01.2024 - 14:14

country flag Ingrid Human wrote:

Kan ik dit vest BRUME met 1 recht 1 averecht breien? Gewoon op 2 naalden? Omdat ik 1m86 ben zal ik de mouwen aan moeten passen qua lengte. van de kop van de mouw tot aan mijn pols 63 dm. Maar veel smaller, 18 cm in omtrek. Graag advies, dank Ingrid

25.10.2022 - 22:10

DROPS Design answered:

Dag Inge,

Om een patroon aan te passen om op rechte naalden te breien hebben we een instructie gemaakt. Deze vind je hier.

Voor de mouwen kun je op basis van de stekenverhouding uitrekenen hoeveel steken je minder op wilt zetten, zodat je een smallere mouw krijgt.

De valse patentsteek kun je inderdaad vervangen door 1 recht, 1 averecht, maar maak dan wel eerst even een proeflapje voor de stekenverhouding.

26.10.2022 - 08:38

country flag Mirna De Ru wrote:

De cijfers bij het telpatroon, zijn dit steken of cm? Ik wil dit patroon graag op rechte naalden breien, maar heb niet zoveel ervaring met het omzetten van ronde naald tot rechte.

19.08.2021 - 15:24

country flag Carolina wrote:

Har precis stickar klart min Brume cardigan och ska välja knappar när jag ser att det står att jag ska ha 6 st knappar i st m. Har följt mönstret och gjort knapphål efter de angivna måtten 26, 35,44,53,62 cm vilket jag bara får till 5 hål? Har jag missförstått något? Ser ju att det är 6 knappar på koftan på bilden.

17.02.2021 - 21:24

DROPS Design answered:

Hej Carolina, kan det være den i halskanten som mangler? Ellers syr du bare det antal knapper i som modsvarer knaphullerne :)

23.02.2021 - 10:00

country flag Jani wrote:

Forstår ikke helt højre forstykke. Strikker i str. M. Skal lave knaphul når arbejdet måler 62 cm men skal tage ind til hals ved 60 cm. Skal man stadig lave knaphul ved 62 cm selvom der er taget ind til halsen?

08.10.2020 - 21:22

DROPS Design answered:

Hei Jani. Det siste knappehullet vil bli i halskanten, les HALSKANT i oppskriften, og da stemmer målet med 62 cm. mvh DROPS design

12.10.2020 - 13:04

country flag Rikke wrote:

Kan man strikke den i almindelig patent i stedet for falsk patent?

19.12.2019 - 11:36

DROPS Design answered:

Hej Rikke, Jo du kan strikke den teknik du har lyst til, men sørg for at du får 19 m på 10 cm. God fornøjelse!

15.01.2020 - 12:33

country flag Ruth wrote:

Wie mache ich die Schulternaht? Von links mit Steppstich ? Oder mit Maschenstich von vorn?

31.07.2019 - 13:21

DROPS Design answered:

Liebe Ruth, das bleibt Ihnen überlassen - wie es Ihnen am besten gefällt. :-) Viel Spaß beim Tragen der Jacke!

31.07.2019 - 16:42

country flag Rita Mossu wrote:

Rita 12.11.2016 kl. 14:50: Is de hoeveelheid wol wel voldoende ? voor Gebreid DROPS vest in valse patentsteek van "Air" bij de wol info staat dat er 150 meters voor 50 gr ..... op het wol etiket staat dat er 130 meters zijn voor 50 gr een verschil van 20 meters per bol !!!

14.11.2016 - 14:45

DROPS Design answered:

Hoi Rita. Graag even mijn antwoord op je vraag hieronder lezen.

14.11.2016 - 16:14

country flag Rita wrote:

Is de hoeveelheid wol wel voldoende ? voor Gebreid DROPS vest in valse patentsteek van "Air" bij de wol info staat dat er 150 meters voor 50 gr ..... op het wol etiket staat dat er 130 meters zijn voor 50 gr een verschil van 20 meters per bol !!!

12.11.2016 - 14:50

DROPS Design answered:

Hoi Rita. Ja, het is genoeg. De looplengte van Air is in mei 2015 aangepast van 130 naar 150 m. Dit patroon is voor die tijd geschreven en nieuwere patronen zijn allemaal aangepast. Het is dus alleen als je een patroon neemt van na mei 2015 (en je nog oude bollen hebt dat je eventueel een extra bol kan kopen als voorzorg).

14.11.2016 - 14:59

country flag Sylvia wrote:

I bought 4balls of Air in Fog I am looking for a plain short cardigan how many balls do I need and do you have a pattern that is just knitted in a 4m and 5 needles

09.08.2016 - 23:56

DROPS Design answered:

Dear Sylvia, you will find here relevant informations about amount of yarn when using an alternative. Happy knitting!

10.08.2016 - 08:43