DROPS Alpaca
DROPS Alpaca
100% Alpaca
from 4.85 $ /50g
Get the yarn to make this pattern from 29.10$.

The yarn cost is calculated from the pattern’s smallest size and the yarn’s cheapest product type. Looking for an even better price? You might find it on the DROPS Deals!

DROPS SS24

Take It Easy

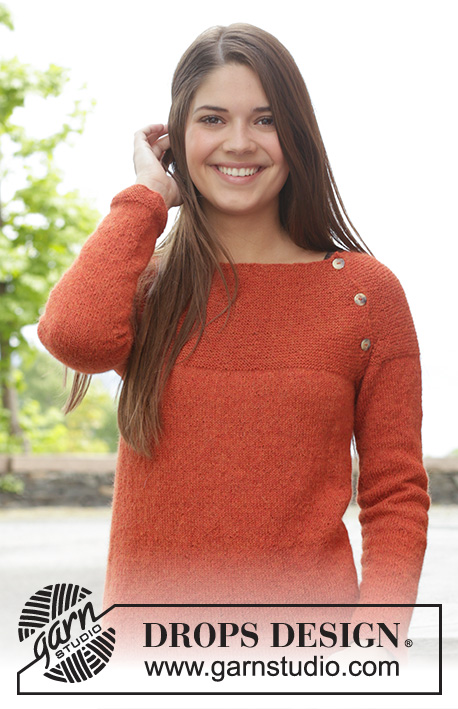
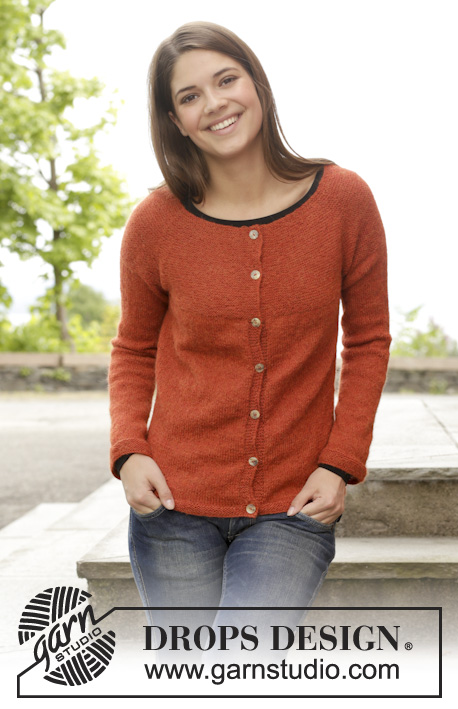
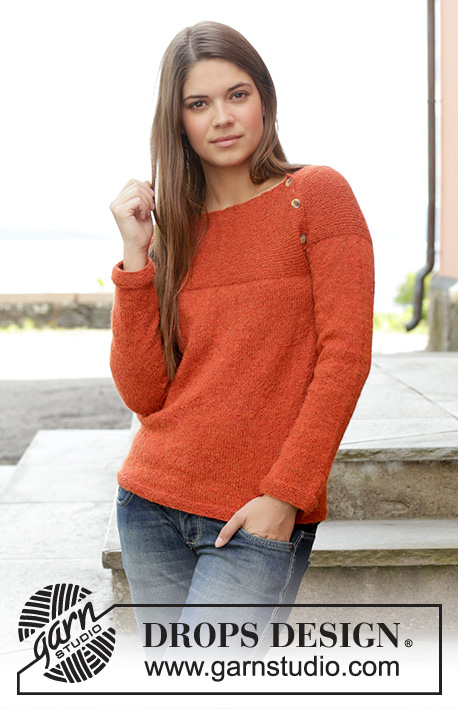
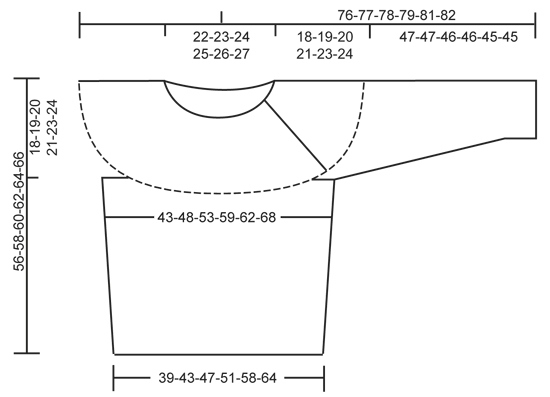
Knitted DROPS jumper in garter st with round yoke, worked top down in "Alpaca". Size: S - XXXL.

DROPS 158-3
DROPS design: Pattern no z-677
Yarn group A
----------------------------------------------------------
Size: S - M - L - XL - XXL - XXXL
Finished measurements:
Bust: 86-96-106-118-124-136 cm / 34"-37 3/4"-41 3/4"-46½"-48 3/4"-53½"
Full length: 56-58-60-62-64-66 cm / 22''-22¾''-23 5/8''-24 3/8''-25¼''-26''

Materials:
DROPS ALPACA from Garnstudio
300-350-400-400-450-500 g color no 2925, rust

DROPS DOUBLE POINTED NEEDLES and CIRCULAR NEEDLE (80 cm / 32'') SIZE 3 mm / US 2.5- or size needed to get 24 sts x 32 rows in stockinette st = 4'' x 4'' (10 x 10 cm).
DROPS DOUBLE POINTED NEEDLES and CIRCULAR NEEDLE (80 cm / 32'') SIZE 2.5 mm /US 1.5 - for edges in garter st.
DROPS MOTHER-OF-PEARL BUTTON NO 521: 3-3-3-4-4-4 pieces

-------------------------------------------------------

Alternative Yarn – See how to change yarns here
Yarn Groups A to F – Use the same pattern and change the yarn here
Yarn usage using an alternative yarn – Use our yarn converter here

-------------------------------------------------------

DROPS Alpaca
DROPS Alpaca
100% Alpaca
from 4.85 $ /50g
Get the yarn to make this pattern from 29.10$.

The yarn cost is calculated from the pattern’s smallest size and the yarn’s cheapest product type. Looking for an even better price? You might find it on the DROPS Deals!

Pattern instructions

NOTE: This pattern is written in American English. All measurements in charts are in cm. For conversion from inches to cm - click here. There are different terms for crocheting in American and British English. If this pattern includes crochet, click for "crochet terms" here. For this pattern in British English, please click here.
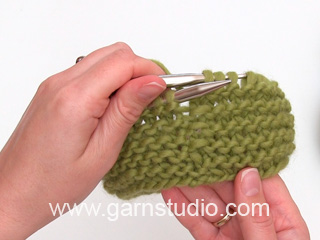
GARTER ST (back and forth on needle):
K all rows. 1 ridge = K2 rows.

GARTER ST (in the round on circular needle/double pointed needles):
* K 1 round and P 1 round *, repeat from *-*. 1 ridge = 2 rounds.

INCREASE TIP:
Inc 1 st by making a YO. On next row K YO twisted (i.e. work in back loop of st instead of front) to avoid holes.

DECREASE TIP:
Dec 1 st before marker as follows: Work until 2 sts remain before marker, slip 1 st as if to K, K 1, psso.
Dec 1 st after marker as follows: K 2 tog.

BUTTONHOLES:
Dec for buttonholes in band sts on left shoulder. 1 buttonhole = K tog third and fourth st from edge and make 1 YO.
Dec for buttonholes when piece measures (measured from cast-on edge):
SIZE S: 1, 8 and 15 cm / 3/8",3 1/8, 6''
SIZE M: 1, 9 and 17 cm / 3/8", 3½", 6 3/4"
SIZE L: 1, 9 and 17 cm / 3/8", 3½", 6 3/4"
SIZE XL: 1, 7, 13 and 19 cm / 3/8", 2 3/4", 5 1/8", 7½"
SIZE XXL: 1, 8, 15 and 22 cm / 3/8", 3 1/8", 6", 8 3/4"
SIZE XXXL: 1, 8, 15 and 22 cm / 3/8", 3 1/8", 6", 8 3/4"

----------------------------------------------------------

JUMPER:
The piece is worked top down.

YOKE:
Worked back and forth on circular needle. Cast on 114-118-122-126-130-134 sts (includes 6 band sts in one side of piece) on circular needle size 3 mm / US 2.5 with Alpaca. Work 1 ridge in GARTER ST - see explanation above. Insert 8 markers in piece from RS as follows: K 6, insert 1st marker, K 20 (= sleeve), insert 2nd marker, K 5, insert 3rd marker, K 24-26-28-30-32-34 (= back piece), insert 4th marker, K 5, insert 5th marker, K 20 (= sleeve), insert 6th marker, K 5, insert 7th marker, K 23-25-27-29-31-33, insert 8th marker, finish with K 6 band sts (= front piece). REMEMBER THE GAUGE! Now work piece in garter st.
Remember BUTTONHOLES - see explanation above. Then inc 1 st – READ INCREASE TIP, after 1st-3rd-5th and 7th marker and before 2nd-4th-6th and 8th marker (= 8 sts inc). Repeat inc every 4th row 20-22-23-24-26-28 more times. AT THE SAME TIME when piece measures 4-3-2-2-2-1½ cm / 1½"-1 1/8"-3/4"-3/4"-3/4"-½", inc as follows: Inc 4 sts evenly on back piece, 1 st on each sleeve and 4 sts evenly on front piece (= 10 sts inc). Repeat inc every 4-3-2-2-2-1½ cm / 1½"-1 1/8"-3/4"-3/4"-3/4"-½" 3-5-7-9-9-11 more times. When all inc are done there are 322-362-394-426-446-486 sts on needle. Piece measures approx. 18-19-20-21-23-24 cm / 7"-7½"-8"-8 1/4"-9"-9½".

Work next row as follows from RS: bind off the first 6 sts, slip the next 66-72-76-80-84-90 sts on a stitch holder for sleeve, cast on 10-10-10-12-12-12 new sts, insert 1 marker in the middle of the new sts, K 92-106-118-130-136-150 sts, slip the next 66-72-76-80-84-90 sts on a stitch holder for sleeve, cast on 10-10-10-12-12-12 new sts, insert 1 marker in the middle of the new sts, work the next 92-106-118-130-136-150 sts = 204-232-256-284-296-324 sts. NOW MEASURE PIECE FROM HERE!

BODY:
Work piece in the round on circular needle in stockinette st. When piece measures 4 cm / 1½'', dec 1 st on each side of markers in the side - READ DECREASE TIP (= 4 sts dec). Repeat dec every 8-4-4-3-7-10 cm / 3 1/8"-1½"-1½"-1 1/8"-2 3/4"-4'' 3-6-7-9-4-3 more times = 188-204-224-244-276-308 sts. When piece measures 36-37-38-39-39-40 cm / 14 1/4"-14½"-15"-15 1/4"-15 1/4"-15 3/4", switch to circular needle size 2.5 mm / US 1.5. Work 5 ridges–see explanations above. Bind off.

SLEEVE:
Worked in the round on double pointed needles.
Slip the 66-72-76-80-84-90 sts from stitch holder back on double pointed needles size 3 mm / US 2.5. Cast on 10-10-10-12-12-12 new sts under sleeve, insert 1 marker in the middle of the new sts = 76-82-86-92-96-102 sts. Work in stockinette st. When piece measures 4 cm / 1½'', dec 1 st on each side of marker. Repeat dec every 4-3-2½-2-2-1½ cm / 1½"-1 1/8"-7/8"-3/4"-3/4"-½" 9-12-13-15-16-18 more times = 56-56-58-60-62-64 sts. Work in stockinette st until piece measures 44-44-43-43-42-42 cm / 17 1/4"-17 1/4"-17"-17"-16½"-16½". Switch to double pointed needles size 2.5 mm / US 1.5. Work in garter st. Bind off when piece measures 47-47-46-46-45-45 cm / 18½"-18½"-18"-18"-17 3/4"-17 3/4" (shorter measurements in the larger sizes because of wider shoulders). Work the other sleeve the same way.

ASSEMBLY:
Sew tog under sleeves. Place band on the back of yoke and fasten. Sew on buttons.

Diagram

All measurements in charts are in cm.

diagram measurements

Each of our patterns has specific tutorial videos to help you.

Do you have a question? See a list of frequently asked questions (FAQ)

Knitting tension is what determines the final measurements of your work, and is usually measured per 10 x 10 cm. It is provided like so: number of stitches in width x number of rows in height - eg: 19 stitches x 26 rows = 10 x 10 cm.

The knitting tension is very individual; some people knit/crochet loosely while others work tightly. You adjust the knitting tension with the needle size, which is why the suggested needle size only serve as a guide! You need to adjust this (up or down) to ensure that YOUR knitting tension matches the knitting tension provided in the pattern. If you work with a different knitting tension than provided you will have a different yarn consumption, and your work will have different measurements than what the pattern suggests.

The knitting tension also determines which yarns can replace each other. As long as you achieve the same knitting tension you can replace one yarn with another.

See DROPS lesson: How to measure your tension/gauge

See DROPS video: How to make a gauge tension swatch

The required amount of yarn is provided in grams, eg: 450 g. To calculate how many balls you’ll need you first need to know how many grams are in 1 ball (25g, 50g or 100g). This information is available if you click on the individual yarn quality on our pages. Divide the amount required with the amount of each ball. For example, if each ball is 50g (the most common amount), the calculation will be as follows: 450 / 50 = 9 balls.

The important thing when changing from one yarn to another is that the knitting/crochet tension remains the same. This is so that the measurements of the finished piece will be the same as on the sketch provided. It is easier to achieve the same knitting tension using yarns from the same yarn group. It is also possible to work with multiple strands of a thinner yarn to achieve the knitting tension of a thicker one. Please try our yarn converter. We recommend you to always work a test swatch.

Please NOTE: when changing yarn the garment might have a different look and feel to the garment in the photo, due to individual properties and qualities of each yarn.

See DROPS lesson: Can I use a different yarn than the one mentioned in the pattern?

All our yarns are categorised into yarn groups (from A to F) according to thickness and knitting tension – group A contains the thinnest yarns and group F the thickest. This makes it easier for you to find alternative yarns to our patterns, should you wish to switch yarn. All yarns within the same group have a similar knitting tension and can easily replace each other. However, different yarn qualities have different structures and properties which will give the finished work a unique look and feel.

Click here for an overview of the yarns in each yarn group

At the top of all our patterns you’ll find a link to our yarn converter, which is a helpful tool should you wish to use a different yarn than suggested. By filling in the yarn quality you wish to replace, the amount (in your size) and number of strands, the converter will present good alternative yarns with the same knitting tension. Additionally it will tell you how much you’ll require in the new qualities and whether you’ll need to work with multiple strands. Most skeins are 50g (some are 25g or 100g).

If the pattern is worked with multiple colours, every colour will have to be converted separately. Similarly, if the pattern is worked with several strands of different yarns (for example 1 strand Alpaca and 1 strand Kid-Silk) you will have to find alternatives for each, individually.

Click here to see our yarn converter

Since different yarns have different qualities and textures we have chosen to keep the original yarn in our patterns. However, you can easily find options among our available qualities by using our yarn converter, or simply pick a yarn from the same yarn group.

It is possible that some retailers still have discontinued yarns in stock, or that someone has a few skeins at home that they would like to find patterns for.

The yarn converter will provide both alternative yarn as well as required amount in the new quality.

If you think it's hard to decide what size to make, it can be a good idea to measure a garment you own already and like the size of. Then you can pick the size by comparing those measures with the ones available in the pattern's size chart.

You'll find the size chart at the bottom of the pattern.

See DROPS lesson: How to read size chart

The needle size provided in the pattern serves only as a guide, the important thing is to follow the knitting tension. And since knitting tension is very individual, you will have to adjust the needle size to ensure that YOUR tension is the same as in the pattern – maybe you’ll have to adjust 1, or even 2 needle sizes, up or down to achieve the correct tension. For this, we recommend that you work test swatches.

Should you work with a different knitting tension than the one provided, the measurements of the finished garment might deviate from the measurement sketch.

See DROPS lesson: How to measure your tension/gauge

See DROPS video: How to make a gauge tension swatch

Working a garment top-down provides more flexibility and room for personal adjustment. For example it is easier to try the garment on while working, as well as making adjustments to length of yoke and shoulder caps.

The instructions are carefully explaining every step, in the correct order. Diagrams are adjusted to the knitting direction and are worked as usual.

The diagram depicts all rows/rounds, and every stitch seen from the right side. It is read from bottom to top, from right to left. 1 square = 1 stitch.

When working back and forth, every other row is worked from the right side and every other row is worked from the wrong side. When working from the wrong side, the diagram will have to be worked reversed: from left to right, knit stitches are purled, purl stitches are knit etc.

When working in the round every round is worked from the right side and the diagram are worked from right to left on all rounds.

See DROPS lesson: How to read knitting diagrams

The diagram depicts all rows/rounds, and every stitch seen from the right side. It is worked from bottom to top, from right to left.

When working back and forth every other row is worked from the right side: from right to left and every other row is worked from the wrong side: from left to right.

When working in the round, every row in the diagram are worked from the right side, from right to left.

When working a circular diagram you start in the middle and work your way outwards, counter clockwise, row by row.

The rows usually start with a given number of chain stitches (equivalent to the height of the following stitch), this will either be depicted in the diagram or explained in the pattern.

See DROPS lesson: How to read crochet diagrams

Instructions for working several diagrams after each other on the same row/round, will often be written like so: “work A.1, A.2, A.3 a total of 0-0-2-3-4 times". This means you work A.1 once, then A.2 is worked once, and A.3 is repeated (in width) the number of times provided for your size – in this case like so: S = 0 times, M = 0 times, L=2 times, XL= 3 times and XXL = 4 times.

The diagrams are worked as usual: begin with the first row in A.1, then work the first row in A.2 etc.

See DROPS lesson: How to read knitting diagrams

See DROPS lesson: How to read crochet diagrams

The total width of the garment (from wrist-to-wrist) will be larger in the larger sizes, despite the actual sleeves being shorter. The larger sizes have longer sleeve caps and wider shoulders, so there will be a good fit in all sizes.

The measurement sketch/schematic drawing provides information regarding the full length of the garment. If it’s a jumper or a jacket the length is measured from the highest point on the shoulder (usually closest to the neckline), and straight down to the bottom of the garment. It is NOT measured from the tip of shoulder. Similarly, the length of yoke is measured from the highest point on the shoulder and down to where yoke is split into body and sleeves.

See DROPS lesson: How to read a schematic drawing

Diagrams are often repeated on the round or in height. 1 repeat is the diagram the way it appears in the pattern. If it says to work 5 repeats of A.1 in the round, then you work A.1 a total of 5 times after/next to each other in the round. If it says to work 2 repeats of A.1 vertically/in height you work the entire diagram once, then begin again at the start and work the entire diagram one more time.

Chain stitches are slightly narrower than other stitches and to avoid working the cast-on edge too tight, we simply chain more stitches to begin with. The stitch count will be adjusted on the following row to fit the pattern and measurement sketch.

The rib edge is more elastic and will contract slightly compared to, for example, stocking stitch. By increasing before the rib edge, you avoid a visible difference in width between the rib edge and the rest of the body.

It’s very easy to cast off too tightly, and by making yarn overs while casting off (and simultaneously casting these off) you avoid a too tight cast off edge.

See DROPS video: How to bind off with yarn overs (yo)

To achieve an even increase (or decrease) you can increase on, for example: every 3rd and 4th row alternately, like so: work 2 rows and increase on the 3rd row, work 3 rows and increase on the 4th. Repeat this until the increase is complete.

See DROPS lesson: Increase or decrease 1 st on every 3rd and 4th row alternately

Should you prefer to work in the round instead of back and forth, you may of course adjust the pattern. You’ll need to add steeks mid-front (usually 5 stitches), and follow the instructions. When you would normally turn and work from the wrong side, simply work across the steek and continue in the round. At the end you’ll cut the piece open, pick up stitches to work bands, and cover the cut edges.

See DROPS video: How to knit steeks and cut open

Should you prefer to work back and forth instead of in the round, you may of course adjust the pattern so you work the pieces separately and then assemble them at the end. Divide the stitches for the body in 2, add 1 edge stitch in each side (for sewing) and work the front and back pieces separately.

See DROPS lesson: Can I adapt a pattern for circular needles into straight needles?

Pattern repeats can vary slightly in the different sizes, in order to get the correct proportions. If you’re not working the exact same size as the garment in the photo, yours might deviate slightly. This has been carefully developed and adjusted so that the complete impression of the garment is the same in all sizes.

Make sure to follow instructions and diagrams for your size!

If you have found a pattern you like which is available in women’s size it’s not very difficult to convert it to men’s size. The biggest difference will be the length of sleeves and body. Start working on the women size that you think would fit across the chest. The additional length will be worked right before you cast off for the armhole/sleeve cap. If the pattern is worked top-down you can add the length right after the armhole or before the first decrease on sleeve.

Regarding additional yarn amount, this will depend on how much length you add, but it is better with a skein too many than too few.

All yarns will have excess fibres (from production) that might come off as lint or shedding. Brushed yarns (ie hairier yarns) have more of these loose, excess fibres, causing more shedding.

Shedding also depends on what is worn under or over the garment, and whether this pulls at the yarn fibres. It’s therefore not possible to guarantee that there will be no shedding

Below are some tips on how to get the best result when working with hairier yarns:

1. When the garment is finished (before you wash it) shake it vigorously so the looser hairs come off. NOTE: do NOT use a lint roller, brush or any method that pulls at the yarn.

2. Place the garment in a plastic bag and put it in your freezer - the temperature will cause the fibres to become less attached to each other, and excess fibres will come off easier.

3. Leave in the freezer for a few hours before taking it out and shaking it again.

4. Wash the garment according to the instructions on the yarn label.

Pilling is a natural process that happens to even the most exclusive of fibers. It's a natural sign of wear and tear that is hard to avoid, and that is most visible in high friction areas of your garment like a sweater's arms and cuffs.

You can make your garment look as new by removing the pilling, using a fabric comb or a pill/lint remover.

Still can't find the answer you need? Then scroll down and leave your question so one of our experts can try to help you. This will be done normally within 5 to 10 working days.
In the meantime, you can read the questions and answers that others have left to this pattern or join the DROPS Workshop on Facebook to get help from fellow knitters/crocheters!

You might also like...

Take it easy

Marieke, Netherlands

Take It Easy

Noémie, France

Take It Easy

Sabine, Germany

Post a comment to pattern DROPS 158-3

We would love to hear what you have to say about this pattern!

If you want to leave a question, please make sure you select the correct category in the form below, to speed up the answering process. Required fields are marked *.

Comments / Questions (83)

country flag Jacquelien wrote:

Na 20 cm (maatL) wordt de knoopbies afgekant. Daarna de mouwen op aparte draden gezet en voor het lijf worden eerst 10 steken nieuw opgezet dan 118 gebreid (achterlijf), en nog eens 118 (voorlijf, maar moeten dat er niet 117 zijn?) Dan weer 10 nieuwe steken en dan wordt er gemeten. Wat doe ik met de 6 steken van het deel waar de knoopsgaten inzitten?

15.11.2023 - 21:50

DROPS Design answered:

Dag Jacyelien,

Je hebt 394 steken vlak voor de scheiding voor het lijf en de mouwen. Als je hier 6 steken aftrekt kom je op 388 steken. Als je deze verdeeld over 2 keer 76 voor de mouwen en 2 x 118 steken voor de panden, dan kom je precies uit. De laatste 6 steken horen bij de mouw.

18.11.2023 - 14:46

country flag Tove KITTELSRUD wrote:

Starter mønsteret på venstre side, i overgang venstre erme og stolpe til knapphull? Eller skal stolpen med rettstrikk være sist på pinnen? Skal knappehullene lages på stolpen? Veldig uklart for meg

02.08.2023 - 13:47

country flag Amanda wrote:

Jag har tre frågor: 1. Enligt mönstret ska markörerna placeras från rätsidan, men efter två varv rätstickning är jag på avigsidan. Gör jag fel? 2. Ska ökningarna göras från rätsidan eller avigsidan? 3. Spelar det någon roll om knapphålen görs från rätsidan eller avigsidan?

31.07.2023 - 10:44

DROPS Design answered:

Hej Amanda, du kan sätta i markörerna så du räknar från rätsidan, även om du skall sticka från avigsidan nästa gång. Du ökar från rätsidan. Nej bara du stickar tredje och fjärde m från kanten ihop :)

07.08.2023 - 11:33

country flag Marita Bjørnnes wrote:

Er det sånn at jeg må forholde meg til 2 ulike økemetoder, og at den ene økes hver 4 omgang, mens den andre hver 2. cm? De to økemetodene går parallelt helt til en skal dele til ermer og bol?

21.08.2022 - 09:43

DROPS Design answered:

Hei Marita. Ja, den ene økningen skal gjenta på hver 4.pinne, mens den 2. økningen oppgis i cm når den skal økes. (Kjekt å bruke maskemarkører med ulike farger for å huske når det skal økes). mvh DROPS Design

22.08.2022 - 13:54

country flag Robi wrote:

Buongiorno,ma facendo gli aumenti per il raglan ogni 4 ferri,questi(aumenti) verranno fatti nel rovescio del lavoro???Grazie

09.03.2022 - 08:08

DROPS Design answered:

Buonasera Robi, deve aumentare su un ferro, poi lavorare 3 ferri e aumentare sul 4°: si aumenterà sul diritto del lavoro. Buon lavoro!

10.03.2022 - 23:22

country flag Griet wrote:

Dankjewel👌

16.01.2022 - 16:13

country flag Griet wrote:

Na de pas moet je zes steken afkanten, is dit de kant waarin de knoopsgaten gemaakt zijn?

15.01.2022 - 12:54

DROPS Design answered:

Dag Griet,

Nee, dit is op de bies waar géén knoopsgaten zijn gemaakt en deze komt bij de afwerking onder de bies met de knoopsgaten te liggen.

16.01.2022 - 14:24

country flag Karlé Briedenhann wrote:

I would like to knit this beautiful pattern in a yarn from group B. Do you have similar patterns for that yarn group? Or is it possible to make this pattern from a yarn in group B. Thank you so much

20.06.2020 - 07:50

DROPS Design answered:

Dear Karle, using a yarn group B would give you a complete different tension - you will find jumpers worked top down and/or all jumpers worked in yarn group B here. Happy knitting!

22.06.2020 - 07:46

country flag Clerivet wrote:

Bonjour J'ai commencé à tricoter ce modèle. J'ai fait l'empiecement, aucun problème. Les choses se compliquent. Que faire des 2fois 6 mailles bordure ? Les 6 premières on les rabat mais que faire des 6 dernières ? Autre chose , vous n'expliquez pas ce que l'on doit faire des 2 fois 6mailles entre le dos et la manche et devant manche ? Merci pour votre retour

08.04.2020 - 09:15

DROPS Design answered:

Bonjour Mme Clerivet, quand vous avez vos 322 à 486 m (cf taille), tricotez simplement le rang suivant ainsi: rabattez les 6 premières mailles (pour la bordure boutonnée), mettez en attente (sans les tricoter) les mailles de la manche, montez 10/12 m pour le dessous de la manche, tricotez les 92 à 150 m suivantes, glissez les mailles de la 2ème manche en attente en montant 10/12 m et tricotez les dernières mailles = vous avez maintenant 204 à 324 m et vous terminez le dos et le devant en rond, l'empiècement est terminé, les 6 m rabattues pour la bordure seront ensuite placées pour boutonner. Bon tricot!

09.04.2020 - 16:26

country flag Virginie wrote:

Bonjour, l'empiècement se tricote sur des aiguilles circulaires mais on ne tricote pas en rond tout de suite, c'est bien ça ? on tricote en rond quand on arrive au dos et au devant ? merci beaucoup

29.12.2019 - 21:04

DROPS Design answered:

Bonjour Virginie! L'empiecement se tricote en allers et retours sur aiguille circulaire, le dos et le devant se tricotent en rond sur aiguille circulaire, en jersey. Bon tricot!

30.12.2019 - 14:40