
Popular categories
Looking for a yarn?


|
|||||||||||||
Little Lady Rose |
|||||||||||||
|
|
|||||||||||||
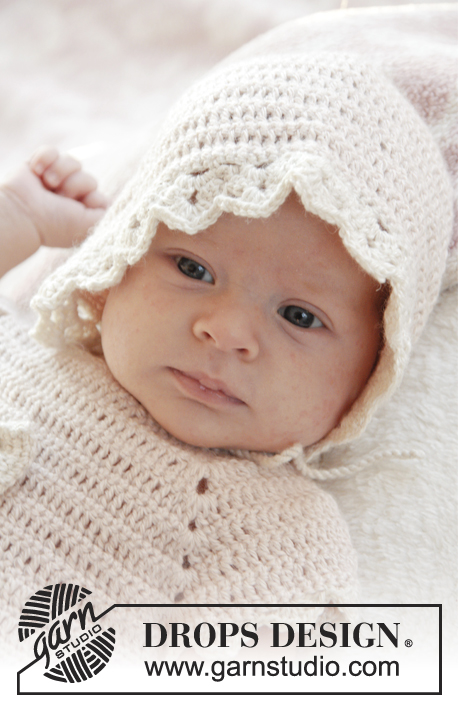
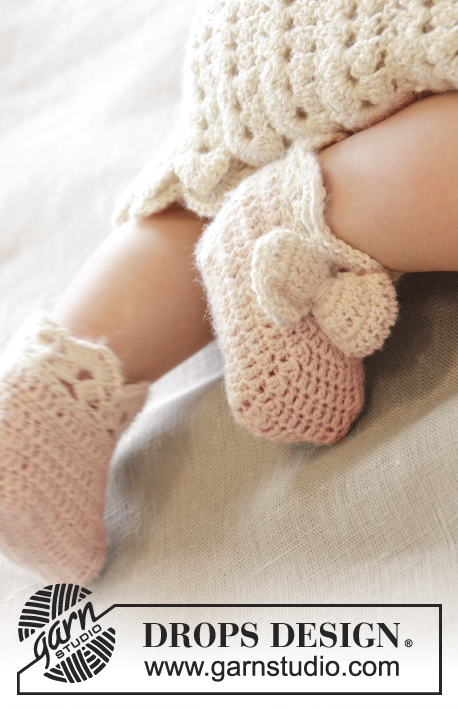
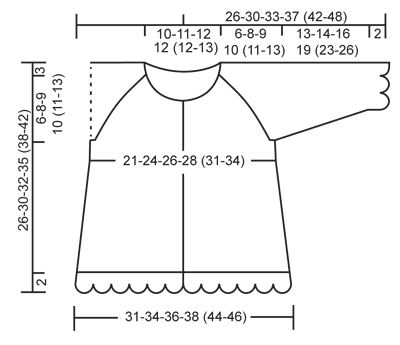
Crochet baby jacket with raglan and fan edges, worked top down in DROPS BabyAlpaca Silk. Size 0-4 years.
DROPS Baby 25-12 |
|||||||||||||
|
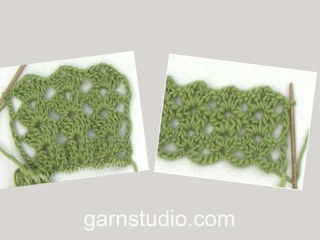
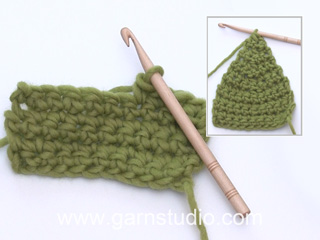
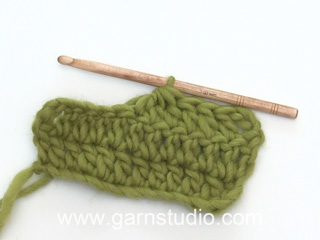
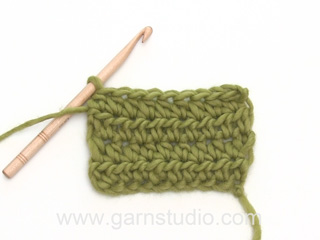
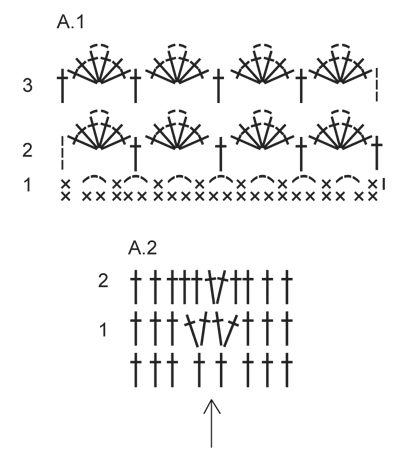
CROCHET INFO: Replace first sc at beg of every sc row with ch 1, finish row with 1 sc in 3rd ch from beg of previous row. Replace first dc at beg of every dc row with ch 3, finish row with 1 dc in ch from beg of previous row. TEXTURE ROWS: * 1 row sc (worked from WS), 1 row dc (worked from RS) *, repeat from *-* (1 row sc + 1 row dc = 1 texture row). INCREASE TIP: Inc 1 sc/dc by working 2 sc/dc in same st. DECREASE TIP: Work 1 sc/dc but wait with last pull through (= 2 sts on hook), then work next sc/dc but on last pull through, pull yarn through all sts on hook = 1 sc/dc dec. PATTERN: See diagram A.1. (A.2 applies to inc on collar). ---------------------------------------------------------- JACKET: The piece is worked top down. Worked back and forth from mid front. YOKE: Ch 83-87-91-91 (91-95) (includes 1 ch to turn with) on hook size 3.5 mm/E/4 with powder. Work 1 sc in 2nd ch from hook, then work 1 sc in every ch the entire row = 82-86-90-90 (90-94) sc on row (includes 5 band sts in each side towards mid front). Now insert 4 markers in piece for raglan as follows (beg mid front – NOTE: Do NOT work while inserting markers): Skip 15-16-17-17 (17-18) sc (= left front piece), insert 1 marker in next sc, skip 14 sc (= sleeve), insert 1 marker in next sc, skip 20-22-24-24 (24-26) sc (= back piece), insert 1 marker in next sc, skip 14 sc (= sleeve) and insert last marker in next sc (there are now 15-16-17-17 (17-18) sc on right front piece after last marker). READ ALL OF THE FOLLOWING SECTION BEFORE CONTINUING: READ CROCHET INFO and work next row as follows from RS: Work 1 dc in every sc but in every sc with marker work 2 dc + 2 ch + 2 dc = 94-98-102-102 (102-106) dc on row. Then work TEXTURE ROWS - see explanation above (work back and forth with 1 sc/dc in every st from previous row – but on every row with sc from WS work 2 ch over the 2 ch from previous row in raglan lines. On row with dc work 2 dc + 2 ch + 2 dc in both ch-spaces). AT THE SAME TIME on first row from RS (i.e. on row with dc) inc for raglan as follows: Work 2 dc + 2 ch + 2 dc in every ch-space in every raglan line (= 16 dc inc on row – note: work around both ch-spaces). Repeat inc on every row from RS 3-4-5-6 (7-8) more times (= 4-5-6-7 (8-9) times in total) = 158-178-198-214 (230-250) sts. REMEMBER THE CROCHET GAUGE! After last inc for raglan work 1 row with sc from WS as before. Work next row as follows from RS: Work 1 dc in each of the first 25-28-31-33 (35-38) sc (= left front piece), skip the next 34-38-42-46 (50-54) sc (= sleeve), work 6-6-6-6 (8-8) ch, work 1 dc in each of the next 40-46-52-56 (60-66) sc (= back piece), skip the next 34-38-42-46 (50-54) sc (= sleeve), work 6-6-6-6 (8-8) ch and work 1 dc in each of the last 25-28-31-33 (35-38) sc (= right front piece). Then finish body and sleeves separately. BODY: NOW MEASURE PIECE FROM HERE! Work 1st row from WS – work 1 sc in every dc from previous row and 1 sc in each of the 6-6-6-6 (8-8) ch under each armhole = 102-114-126-134 (146-158) sc on row. Insert 1 marker 28-31-34-36 (39-42) sts in from each side (= 46-52-58-62 (68-74) sts on back piece). Continue back and forth with TEXTURE ROWS. AT THE SAME TIME when piece measures 2-2-2-3 (2-3) cm / ¾"-¾"-¾"-1" (3/4"-1"), inc 1 st on each side of both markers – READ INCREASE TIP (= 4 sts inc). Repeat inc approx. every 1-1½-1½-1½ (1½-1½) cm / ⅜"-½"-½"-½" (½"-½") 10-10-10-10 (13-13) more times (= 11-11-11-11 (14-14) times in total) = 146-158-170-178 (202-214) sts. When piece measures approx. 15-17-18-20 (22-24) cm / 6"-6 ¾"-7"-8" (8 ¾"-9½") from armhole – make sure all that inc are done, work 1 row sc from WS AT THE SAME TIME inc 2-2-2-0 (0-0) sc evenly – READ INCREASE TIP = 148-160-172-178 (202-214) sc. Fasten off. Switch to off white and work 1 row sc from WS with 1 sc in every sc from previous row. Then work Fan pattern according to diagram A.1, i.e. work as follows: ROW 1 (= RS): ch 1, 1 sc in first st, * ch 3, skip 2 sc, 1 sc in next st *, repeat from *-* the entire row = 49-53-57-59 (67-71) ch-spaces, turn. ROW 2 (= WS): ch 3 (= 1 dc), 3 dc + 2 ch + 3 dc in first ch-space, * 1 dc in next ch-space, 3 dc + 2 ch + 3 dc in next ch-space *, repeat from *-* the entire row and finish with 1 dc in first sc from beg of previous row = 25-27-29-30 (34-36) dc-groups with 1 dc between every dc-group, turn piece. ROW 3 (= RS): ch 3 (= 1 dc), 3 dc + 2 ch + 3 dc in ch-space in the mid of first dc-group, * 1 dc in next dc, 3 dc + 2 ch + 3 dc in ch-space in the mid of next dc-group *, repeat from *-* the entire row and finish with 1 dc in 3rd ch from beg of previous row = 25-27-29-30 (34-36) dc-groups with 1 dc between every dc-group. Fasten off. SLEEVE: = 34-38-42-46 (50-54) sts. Insert 1 marker here – NOW MEASURE PIECE FROM HERE. Work 1st row from RS with powder as follows: work 3-3-3-3 (4-4) ch, work 1 dc in each stitch and work 3-3-3-3 (4-4) ch. Turn piece, work 1 sc in 2nd ch from hook, work 1 sc in each of the next 1-1-1-1 (2-2) ch, 1 sc in every dc from previous row and 1 dc in each of the 3-3-3-3 (4-4) ch from beg of previous row = 40-44-48-52 (58-62) sts on row. Then work TEXTURE ROWS back and forth as before with dc from RS and sc from WS. AT THE SAME TIME when sleeve measures 2-2-3-3 (3-3) cm / ¾"-¾"-1"-1" (1"-1") from marker, dec 1 st in each side - SEE DECREASE TIP! Repeat dec every 8-5-3-3 (2½-2½) cm / 3"-2"-1⅛"-1⅛" (7/8"-⅞"), 1-2-4-5 (7-8) more times (= 2-3-5-6 (8-9) times in total in each side) = 36-38-38-40 (42-44) sts. When sleeve measures approx. 13-14-16-19 (23-26) cm / 5"-5½"-6¼"-7½" (9"-10¼") from marker – finish after 1 row with sc from WS, fasten off. Switch to off white. Work 1 row sc from WS AT THE SAME TIME inc 4-2-2-6 (4-2) sc evenly = 40-40-40-46 (46-46) sc. Then work Fan pattern according to diagram A.1, beg from RS, the same way as on bottom of jacket. After 1st row there are 13-13-13-15 (15-15) ch-spaces on row and after 2nd row there are 7-7-7-8 (8-8) dc-groups with 1 dc between every dc-group. ASSEMBLY: Sew underarm seams tog edge to edge in outer loops of edge sts. Sew the openings under the sleeves. Sew the buttons on to left front piece. Upper button should be approx. 1 cm / ½" from neckline and there should be approx. 5 to 7 cm / 2-2¾" between each button. Button through dc in texture pattern. ELEVATION IN BACK OF NECK: For better fit work a small elevation at the back of neck. Insert 1 marker in st in each corner in neck, i.e. at beg of every raglan line. Work on hook size 3.5 mm/E with powder as follows: Begin in 11th st from mid front, work 1 sc in every st until 1 st remains before st with marker, work 1 hdc in next st, 1 dc in st with marker and 1 hdc in next st, then work 1 sc in every st until 1 st remains before next st with marker, 1 hdc in next st, 1 dc in st with marker and 1 hdc in next st. Continue like this until 10 sts remain before mid front in the other side. Turn piece and work 1 sc in every sc but at every marker work 3 sc tog, i.e. work 1 sc in hdc but wait with last YO and pull through, work 1 sc in st with marker but wait with last YO and pull through, work 1 sc in next hdc but now pull last YO through all 4 sts on hook (= 2 sc dec). Fasten off. COLLAR: Work on hook size 3.5 mm/E with powder as follows: Beg in 4th st from mid front and work 1 sc in every sc around the neck until 3 sc remain on row AT THE SAME TIME work 5th and 6th st tog – READ DECREASE TIP = approx. 57-60-64-64 (64-67) sc remain. Make sure that markers at each raglan line moves upwards - remove the markers from the sts they are in and place them between the st they were in and the next st toward the sleeve. Then work texture rows back and forth as on body with 1 st in every st. AT THE SAME TIME after 3-3-3-4 (4-4) cm / 1"-1"-1"-1½" (1½"-1½"), inc on the next 2 rows as shown in A.2. After last inc, collar measures approx. 5-5-5-6 (6-6) cm / 2"-2"-2"-2½" (2½"-2½"). Fasten off. CROCHET EDGE ALONG MID FRONT: Work with off white as follows: Begin from WS at the bottom on left front piece and work 1 row sc up along mid front and then over the 3 sts at the top of neck before collar beg - work approx. 2 sc in every dc-row and 1 sc in every sc-row. Turn piece and work as follows: * ch 3, skip 2 sc, 1 sc in next st *, repeat from *-* the entire row to bottom of band. Fasten off and repeat along right front piece, beg from WS at the top by neck. CROCHET EDGE AROUND COLLAR: Work with off white as follows: Beg from RS where collar beg after the 3 sts at the top of neck and work 1 row sc around the entire collar until where collar ends before the top 3 sts in neck in the other side. Turn piece and work as follows: * ch 3, skip approx. 2 sts, 1 sc in next sc *, repeat from *-*, NOTE: Make sure that no of ch-spaces can be divided by 2 + 1. Turn piece and work a finishing edge with fans as follows from RS: Work sl sts until mid of first ch-space, 3 ch (= 1 dc), * 3 dc + 2 ch + 3 dc in next ch-space, 1 dc in next ch-space *, repeat from *-* the entire row. Fasten off. BOW: Ch 11 on hook size 3.5 mm/E with off white. Work first row as follows: 1 dc in 4th ch from hook, 1 dc in each of the next 7 ch = 9 dc on row. Turn piece and work TEXTURE ROWS back and forth until piece measures approx. 10 cm / 4" – finish after 1 row with sc. Fasten off. Sew short sides tog to form a ring and twine some yarn around the mid of bow to tighten it neatly in the middle. Fasten bow at the top on right front piece. |
|||||||||||||
Diagram explanations |
|||||||||||||
|
|||||||||||||
|
|||||||||||||
|
|||||||||||||
|
Have you made this or any other of our designs? Tag your pictures in social media with #dropsdesign so we can see them! Do you need help with this pattern?You'll find tutorial videos, a Comments/Questions area and more by visiting the pattern on garnstudio.com. © 1982-2024 DROPS Design A/S. We reserve all rights. This document, including all its sub-sections, has copyrights. Read more about what you can do with our patterns at the bottom of each pattern on our site. |
|||||||||||||


With over 40 years in knitting and crochet design, DROPS Design offers one of the most extensive collections of free patterns on the internet - translated to 17 languages. As of today we count 304 catalogs and 11422 patterns - 11417 of which are translated into English (US/in).
We work hard to bring you the best knitting and crochet have to offer, inspiration and advice as well as great quality yarns at incredible prices! Would you like to use our patterns for other than personal use? You can read what you are allowed to do in the Copyright text at the bottom of all our patterns. Happy crafting!
Comments / Questions (111)
The yarn is discontinued. What would be a reasonable substitute?
17.02.2024 - 13:05DROPS Design answered:
Dear Wendy, you could use DROPS BabyMerino, DROPS Flora, DROPS Nord or DROPS Alpaca. Happy knitting!
18.02.2024 - 22:24Bonjour, Je ne comprend pas où je dois commencer pour la ré-hausse de l'encolure dos. J'ai mis les marqueurs dans les raclant mais je ne comprend pas "commencer à la 11e m", je ne commence pas au début de l'encolure? Merci d'avance pour votre réponse Cordialement. Katia
23.03.2023 - 11:17DROPS Design answered:
Bonjour Katia, non on ne commence par au bord des devants, mais après: comptez à partir de la 1ère maille du devant droit (sur l'endroit) et commencez dans la 11ème maille à partir du bord. Coupez le fil à la fin des rangs de la ré-hausse et crochetez ensuite le col en commençant dans la 4ème maille à partir du bord. Bon crochet!
23.03.2023 - 12:44Hei, og takk for tidligere svar! Jeg er helt amatør, og lurer nå på hvor jeg skal øke? Altså, jeg vet at jeg øker ved å hekle to st i samme fm. Det står at jeg skal øke på hver side av merkingen. Vil det si at jeg skal øke på samme sted hver gang, rett ved siden av merket? Eller skal jeg fordele økningen over flere steder for hver gang jeg øker?
13.03.2023 - 20:44DROPS Design answered:
Hei Karoline, Du skal alltid øke på hver side av merkene (rett før og rett etter). God fornøyelse!
20.03.2023 - 07:01Hvordan blir det 102 masker etter første gang jeg har lagt ut? Det skal jo legges ut 2st+2lm+2st og det er markert med tråd 4 ganger… For meg blir dette 16 økte masker fra start, ikke 12 som det står. Hva gjør jeg galt?
12.02.2023 - 20:17DROPS Design answered:
Hei Karoline, Du hekler 4 st i hver st med merketråd (3 st økt). Da blir det 12 st økt på raden. God fornøyelse!
13.02.2023 - 07:00Wanneer in een beschrijving bv staat: Maat: 0/1 - 1/3 - 6/9 - 12/18 maanden (2 - 3/4) jaar\ Maat in cm: 48/52 - 56/62 - 68/74 - 80/86 (92 - 98/104) is dan: 0/1-1/3 maat 48/52 zoals we die in Nederland in de winkel kopen? En is dan: Haak 83-87-91-91 (91-95) 83/87 voor bovenstaande voorbeeld? Ik denk het wel maar wil het zeker weten vóór ik begin . Zijn er meer haakpatronen voor babyvestjes? ik kan er maar een paar vinden, Met hartelijke dank voor de genomen moeite, José
03.01.2023 - 14:07DROPS Design answered:
Dag José,
In principe zou dit zo moeten zijn, dus dat de maten kloppen volgens de confectiematen. Je kunt ook altijd naar de maattekening kijken en deze vergelijken met een kledingstuk dat goed zit.
04.01.2023 - 21:07Jag har virkat 7 st raglanökningar 2 st 2 lm 2 st i varje markering . Virkar storlek 86, men har inte 214 m. Det fattas 16 m och det borde vara 1 ökning till. Vad har jag missat? Sen undrarjag på…. Hoppa över ärmmaskorna, lägg upp 6 lm….hur gör jag?
09.09.2022 - 10:59DROPS Design answered:
Hei Anette. Når du har satt 4 merker i arbeidet har du 17+1+14+1+24+1+14+1+17 masker = 90. Så hekler du 1 stav i hver fm, men i hver fm med merketråd i hekles det 2 st + 2 lm + 2 st = 102 st på raden (økt med 12 masker). Nå starter raglanøkningene, totalt 7 ganger. 16 økte masker pr økeomgang = 7x16=112 økte masker + de 102 du hadde i starten = 112+102= 214 masker. Angående hopp over armmaskene, Hekle slik det står i oppskriften, deretter hekles bol og ermene videre hver for seg. Når bolen er ferdig heklet, vil du se at du har 2 hull til ermene, som nå skal hekles hver for seg. mvh DROPS Design
12.09.2022 - 08:58Ok thank you. In regards to the sleeve where do we start? Do we only work in the stitches from yoke or do we work into the 6 chains under the arm (that we made fot the body) too?
14.03.2022 - 00:31DROPS Design answered:
Dear Mrs Elhusseini, start sleeve crocheting 3 chains, then work the stitches on sleeve and finish row with 5 chains, turn and crochet next row as explained. At the end of work you will sew together the opening under sleeves. Happy crocheting!
14.03.2022 - 13:50Thank you for this lovely pattern however Can you please upload a video or photos on how to do the sleeve as it is very confusing
13.03.2022 - 02:03DROPS Design answered:
Dear Amani, we don't make personalized videos, but you can find all of our related videos, which may help you make this pattern below the pattern. Happy crochetting!
13.03.2022 - 22:37Hej! Finns det inget mönster till mössan? Mvh Helen
29.01.2022 - 02:25DROPS Design answered:
Hei helen. Jo, oppskrift til luen finner du under DROPS Baby 25-14. Eller klikk på bildet av luen under det store bildet (og teksten: Du vil kanskje også like...) mvh DROPS Design
31.01.2022 - 13:53Jeg er gået igang med denne lækre jakke, men er gået i stå allerede i bærestykket. Jeg laver den i str 12-18 måneder. Jeg har slået 92 lm op, hæklet 1 fm i 2.lm fra nålen og hæklet 1 fm i resten af lm. Jeg er nu nået til det stykke, hvor der står “(inkl 5 kant-m i hver side mod midt foran)” men det forstår jeg simpelthen ikke? Jeg har ikke før hæklet kant-m, så er helt på bar bund, hvad skal der gøres og hvor henne? Håber i kan hjælpe.
06.11.2021 - 18:26DROPS Design answered:
Hej Line, det står bare at de yderste 5 masker (som du har hæklet) i hver side = kantmasker. :)
09.11.2021 - 15:38