
Popular categories
Looking for a yarn?


|
|
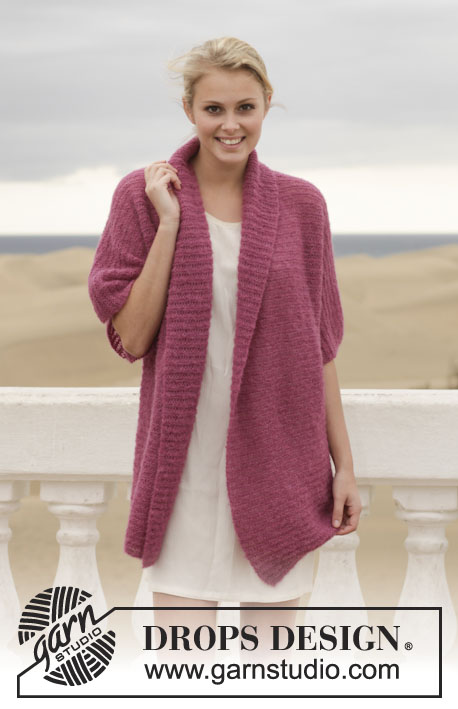
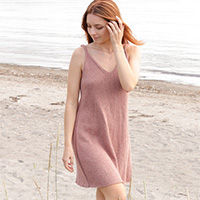
Sweet Rose |
|
|
|
|
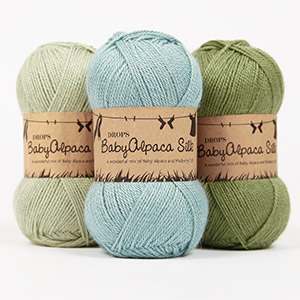
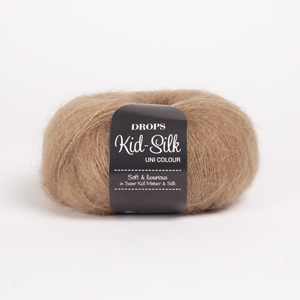
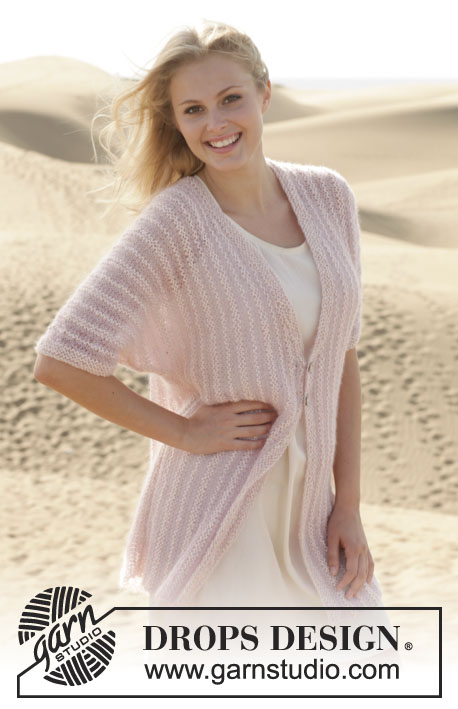
Knitted DROPS jumper in garter st in "Kid-Silk" and "BabyAlpaca Silk". Size: S - XXXL.
DROPS 155-34 |
|
|
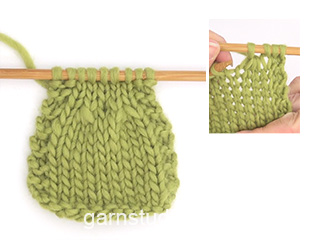
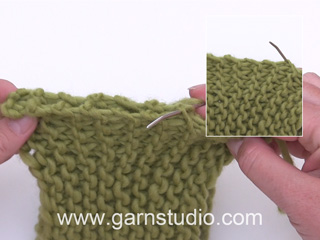
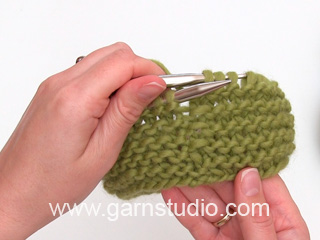
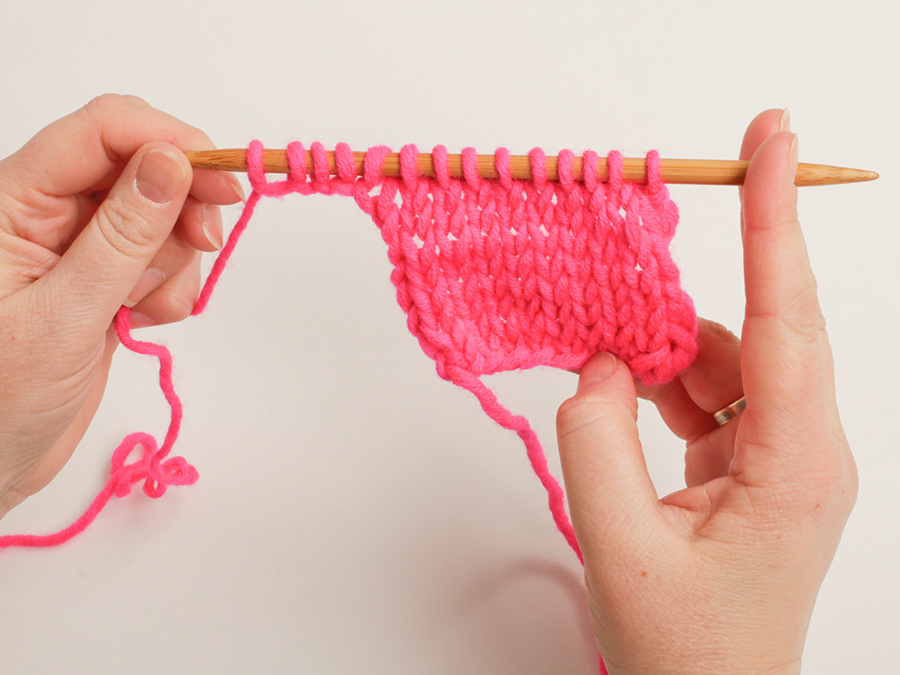
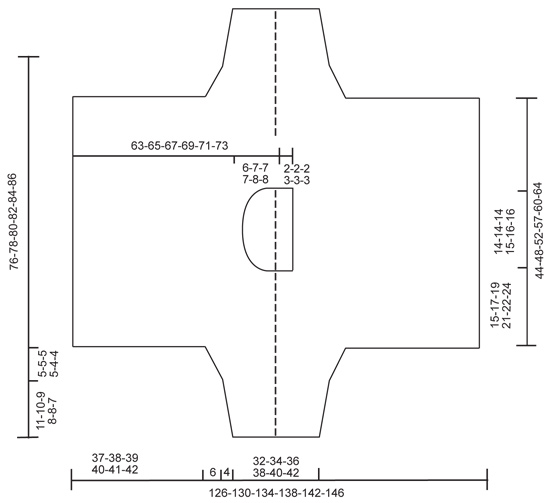
GARTER ST (back and forth on needle): K all rows. 1 ridge = K2 rows. GARTER ST (in the round on circular needle): * K 1 round and P 1 round *, repeat from *-*. 1 ridge = 2 rounds. PATTERN: Work pattern as follows, beg from RS: Row 1-4 = 2 ridges: K with 1 strand BabyAlpaca Silk and 1 strand Kid-Silk (= 2 strands). Row 5-8 = 2 ridges: K with 1 strand Kid-Silk. Row 9-10 = 1 ridge: K with 1 strand BabyAlpaca Silk and 1 strand Kid-Silk (= 2 strands). Row 11-14: = 2 ridges: K with 1 strand Kid-Silk. Repeat rows 1 to 14. INCREASE TIP: Inc 1 st by working 2 sts in 1 st. When inc 2 sts in each side, inc by working 2 sts in each of the 2 first and last sts on needle. DECREASE TIP: Dec 1 st inside 1 edge st by K 2 sts tog. Dec 2 sts inside 1 edge st by K 3 sts tog. MEASURING TIP: Measure when piece is flat, it is important not to stretch the piece when measuring. ---------------------------------------------------------- JUMPER: Worked sideways back and forth on needle. LEFT SLEEVE + BODY: Beg at edge of sleeve, cast on new sts for front and back piece and work until neck, then continue on front piece. Loosely cast on 48-52-54-58-60-64 sts on circular needle size 6 mm / US 10 with 1 strand BabyAlpaca Silk and 1 strand Kid-Silk (= 2 strands). Work 1 ridge in GARTER ST - see explanation above. On next row (from RS) work PATTERN - see explanation above REMEMBER THE GAUGE! AT THE SAME TIME when piece measures 3-2-4-3-3-2 cm / 1"-3/4"-1½"-1"-1"-3/4", inc 1 st in each side of piece from RS - READ INCREASE TIP! Continue same inc in each side of piece approx. every 1½-1½-1-1-1-1 cm / ½"-½"-3/8"-3/8"-3/8"-3/8" 5 more times (= 6 times in total) = 60-64-66-70-72-76 sts on needle and piece measures 11-10-9-8-8-7 cm / 4½"-4"-3½"-3"-3"-2 3/4". Continue as before, but now inc 1 st in each side of piece on every row from RS 7-7-7-7-5-5 times and then 2 sts in each side of piece 1-1-1-1-2-2 times = 15-15-15-15-15-15 sts inc in total in each side from beg and 78-82-84-88-90-94 sts on needle. Piece now measures 16-15-14-13-12-11 cm / 6 1/4"-6"-5½"-5"-4 3/4"-4½". On the next 2 rows loosely cast on 56-57-59-60-62-63 new sts at the end of every row = 190-196-202-208-214-220 sts. NOTE: Adjust pattern to cast on new sts on 2nd row in pattern with 2 strands. Continue back and forth with pattern as before until piece measures 31-32-33-33-34-35 cm / 12 1/4"-12½"-13"-13"-13½"-13 3/4"- in total. On next row from RS work the first 92-95-98-99-102-105 sts before slipping them on a stitch holder for back piece. Then bind off the next 3-3-3-5-5-5 sts for neck, insert a marker in the middle of the last bind off st and next st (= mid on top of shoulder), bind off the next 5-6-6-6-8-8 sts = 90-92-95-98-99-102 sts remain for front piece. Then continue pattern as before AT THE SAME TIME bind off sts for neck on every row from RS as follows: 2 sts 1 time and 1 st 3 times = 85-87-90-93-94-97 sts remain. Continue with pattern for 7½-7½-7½-8½-9-9 cm / 2 7/8"-2 7/8"-2 7/8"-3 1/4"-3½"-3½" before casting on new sts for neck at the end of every row from WS as follows: 1 st 3 times, 2 sts 1 time and 5-6-6-6-8-8 sts 1 time = 95-98-101-104-107-110 sts. Put piece aside and knit the back piece. BACK PIECE AND RIGHT SLEEVE: Slip sts from stitch holder back on needle and work back piece before slipping sts from front piece on to same needle. Then work the rest of body and right sleeve. Slip the 92-95-98-99-102-105 sts from stitch holder back on needle and continue with pattern from WS, AT THE SAME TIME dec 1 st at beg of row for neck – READ DECREASE TIP! = 91-94-97-98-101-104 sts remain on needle. Continue with pattern until piece measures 13-13-13-14-15-15 cm / 5"-5"-5"-5½"-6"-6" from marker mid on top of shoulder. NOTE! Jumper will be wider when used so it is important not to make it too long in the back of neck. At the end of next row from RS, inc 1 st for neck by working 2 sts in one st = 92-95-98-99-102-105 sts on needle. NOTE! Adjust according to pattern on front piece to beg on same row in pattern on next row from RS on both front and back piece. On next row from RS work all sts on needle before casting on 3-3-3-5-5-5 sts for neck. Then work all sts from stitch holder (= front piece) = 190-196-202-208-214-220 sts. Continue over all sts until piece measures 44-48-52-56-60-64 cm / 17 1/4"-19"-20½"-22"-23½"-25 1/4" in total at the bottom of body - adjust pattern so that next row is a row in pattern with 2 strands. Then at beg of the next 2 rows, loosely bind off 56-57-59-60-62-63 sts = 78-82-84-88-90-94 sts remain. Then dec sts for sleeve the same way as inc sts for left sleeve as follows: Dec sts in each side of piece in the beginning of following rows – READ DECREASE TIP! Dec 2 sts in each side of piece 1-1-1-1-2-2 times and 1 st 7-7-7-7-5-5 times. Continue as before but now dec 1 st in each side of piece approx. every 1½-1½-1-1-1-1 cm / ½"-½"-3/8"-3/8"-3/8"-3/8" 6 times in total = 48-52-54-58-60-64 sts remain. Continue with pattern and adjust length according to left sleeve. Work 1 ridge in garter st. Work 1 row and loosely bind off. NECK EDGE: Pick up 54-65 sts with 1 strand of each yarn (= 2 strands) on circular needle size 6 mm / US 10 around the neck. Work 3 ridges in GARTER ST in the round - see explanation above. Loosely bind off. ASSEMBLY: Fold at the top of shoulder, sew underarm and side seams in one, in outer loops of edge sts. Fasten off. |
|
|
|
|
Have you made this or any other of our designs? Tag your pictures in social media with #dropsdesign so we can see them! Do you need help with this pattern?You'll find tutorial videos, a Comments/Questions area and more by visiting the pattern on garnstudio.com. © 1982-2024 DROPS Design A/S. We reserve all rights. This document, including all its sub-sections, has copyrights. Read more about what you can do with our patterns at the bottom of each pattern on our site. |


With over 40 years in knitting and crochet design, DROPS Design offers one of the most extensive collections of free patterns on the internet - translated to 17 languages. As of today we count 304 catalogs and 11422 patterns - 11417 of which are translated into English (US/in).
We work hard to bring you the best knitting and crochet have to offer, inspiration and advice as well as great quality yarns at incredible prices! Would you like to use our patterns for other than personal use? You can read what you are allowed to do in the Copyright text at the bottom of all our patterns. Happy crafting!
Comments / Questions (21)
Planlægger at strikke denne i størrelse L. 150 g BabyAlpaca = 1002 meter og 125 g Kid-Silk = 1050 meter, dvs cirka lige meget af hver. Af de 14 pinde i mønstret strikkes 6 pinde med to tråde (BabyAlpaca + Kid-Silk) og 8 pinde med Kid-Silk alene. Dvs. 100% af pindene (14 p) strikkes med Kid-Silk og kun 43% af pindene (p 1-4 og p 9-10 = 6 p) strikkes med BabyAlpaca - burde der så ikke skulle bruges meget mere Kid-Silk end BabyAlpaca?
18.01.2022 - 15:37DROPS Design answered:
Hej Christine, 150 g DROPS BabyAlpaca Silk = 501 m - God fornøjelse!
19.01.2022 - 07:51Planlægger at strikke denne i str. L.\r\n150 g. BabyAlpaca = 1002 meter og 125 g. Kid-Silk = 1050 meter, dvs. cirka lige dele af hver.\r\nAf de 14 pinde i mønstret strikkes 6 pinde med to tråde (BabyAlpaca + Kid-Silk) og 8 pinde kun med Kid-Silk. Dvs. 100% af pindene (14 p) strikkes med Kid-Silk og kun 43% af pindene (p 1-4 og p 9-10 = 6 p) strikkes med BabyAlpaca - burde der så ikke skulle bruges meget mere Kid-Silk end BabyAlpaca?
17.01.2022 - 08:27Har 5 ngl. Malva no 31 kidsilk liggende. Er der en farve fra DROPS Baby Alpaca Silk der passer til Malva, så jeg kan strikke modellen 155-34. På forhånd tak Mvh Anette
15.02.2021 - 12:15DROPS Design answered:
Hei Anette. Fargevalg er ganske personlig, anbefaler deg til å ta en titt på fargekartet til Baby AlpacaSilk. F.eks lys grålilla nr. 1760 være noe, men kan bli litt melert. Evnt. så kan jo farge 9024 i DROPS Alpaca mørk blush være noe? mvh DROPS design
15.02.2021 - 12:56I want to work with 2mm/2.5mm needles and 2 strands Kid-Silk on this pattern so it a close knitted garment. please can you give me amended details. I realise it is an unusual request. I love knitting with 2mm needles and with this pattern in particular. your help would be greatly appreciated.
01.09.2020 - 16:58DROPS Design answered:
Dear Mrs Wheeler, we are unfortunately not able to adjust every pattern to every individual request, please contact your DROPS store for any individual assistance, thanks for your comprehension. Happy knitting!
02.09.2020 - 08:15Why does it say in garter stitch. that the first ridge is fine on knit. them the second garter it says 1 row knit and 1 row purl. just which is garter ridges and which is just stocking stitch? very unclear
28.06.2020 - 04:29DROPS Design answered:
Dear Janine, when you knit garter stitch in rows, you will knit all rows (see video) but when you work garter stitch in the round you will work alternately 1 round knit and 1 round purl (see video). Happy knitting!
29.06.2020 - 08:19Buongiorno, sono arrivata allo scollo davanti e volevo gentilmente sapere se i 7,5 cm. indicati da proseguire con il motivo si intendono da quel punto esatto oppure dall'inizio degli intrecci del collo. Grazie e cordiali saluti. Federica
25.08.2017 - 16:29DROPS Design answered:
Buongiorno Federica. I 7,5 cm vanno misurati dalla fine delle diminuzioni per lo scollo. Buon lavoro!
25.08.2017 - 17:24Buongiorno ho lasciato il lavoro in sospeso per iniziare la metà dietro e manica destra. Non ho chiaro cosa devo riportare nel ferro. Tutto il lavoro lasciato in sospeso più le 95 maglie messe prima nel fermamaglie? Perché io nel fermamaglie ho messo solo 95 m (sto facendo una M)
25.08.2017 - 12:00DROPS Design answered:
Buongiorno Donatella, per la prima parte del dietro deve lavorare solo sulle 95 maglie che aveva messo in sospeso, poi quando le viene indicato, lavora su tutte le maglie sul ferro, comprese quelle per il davanti. Buon lavoro!
25.08.2017 - 12:48Hoe moet ik de juiste maat vinden. Waarvoor staat BV s, m, l, xl en xxl
29.09.2014 - 22:55DROPS Design answered:
Hoi Lenie. Onderaan het patroon staan de afmetingen voor elke maat in cm. Vergelijk deze met je eigen afmetingen en kies jouw maat.
30.09.2014 - 16:29Bonjour, Question : où augmenter pour obtenir ces 220 m ? Merci de votre réponse. Cordialement
08.04.2014 - 11:24GALLIOT answered:
Bonjour, Je réalise un modèle en pancho pour la première fois. J'ai téléphoné à LUCE qui m'a gentiment aidé à comprendre les explications. Si cela peut servir à quelqu'un autre. Il faut augmenter de 63 m après chacun des 2 rangs
08.04.2014 - 11:40Bonjour, Je réalise ce pull en XXXL et les explications dans la partie MANCHE + 1/2 DOS & DEVANT ne sont pas justes dans le nombre de mailles. Lorsque que l'on augmente après la manche, il est dit 63 mailles. On en a déjà 94 et on doit avoir un total de 220 m après augmentations. 63 + 94 : 167 m et non 220 m.
08.04.2014 - 11:23