
Popular categories
Looking for a yarn?


|
|
Harlequin |
|
|
|
|
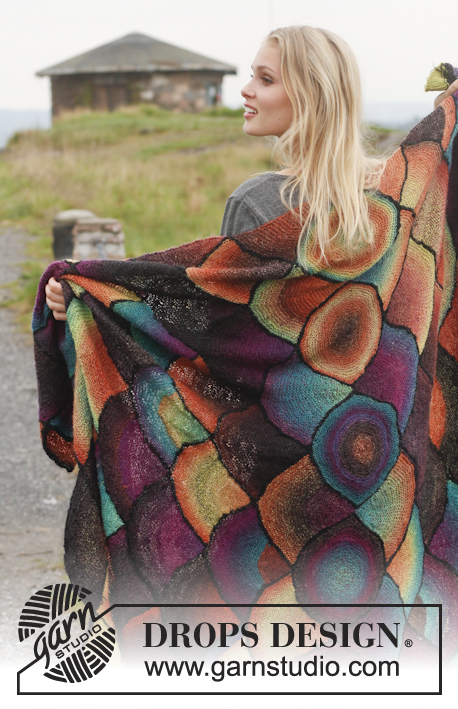
Knitted DROPS blanket with squares in 2 strands "Alpaca".
DROPS 151-39 |
|
|
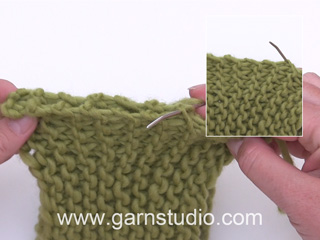
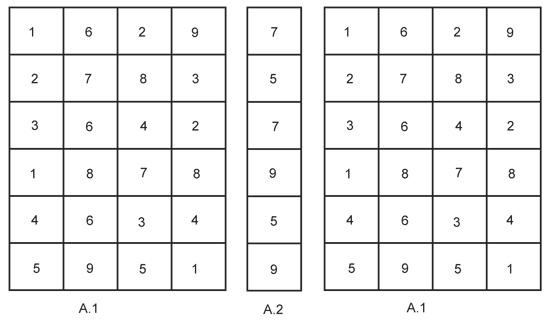
GARTER ST (back and forth on needle): K all rows. 1 ridge = K2 rows. INCREASE TIP: Inc 1 st at beg of every row as follows: K 2 in first st (work first in front loop then in back loop). DECREASE TIP: Dec 1 st at beg every row by K tog the first 2 sts on row. ASSEMBLY: See diagrams A.1 and A.2. COLOR OVERVIEW: SQUARE 1: 1 strand 8903, black and 1 strand 6309, medium petrol SQUARE 2: 1 strand 8903, black and 1 strand 7139, dark gray green SQUARE 3: 1 strand 8903, black and 1 strand 7233, olive SQUARE 4: 1 strand 8903, black and 1 strand 3770, dark pink SQUARE 5: 1 strand 8903, black and 1 strand 7238, dark olive SQUARE 6: 1 strand 8903, black and 1 strand 0607, light brown SQUARE 7: 1 strand 8903, black and 1 strand 2925, rust SQUARE 8: 1 strand 8903, black and 1 strand 2923, goldenrod SQUARE 9: 1 strand 8903, black and 1 strand 3900, tomato --------------------------------------------------------- BLANKET: Blanket consists of 54 squares, 6 squares in 9 different color combinations. Work squares as follows: SQUARE: The squares are in two colors - first part of square is worked with 2 strands black and second part with 1 strand black and 1 strand color – READ COLOR OVERVIEW. Cast on 3 sts on needle size 5 mm / US 8 with 2 strands black. K 1 row, on next row inc 1 st at beg of row - READ INCREASE TIP. Repeat inc at beg of every row until there are 35 sts on needle. Now switch 1 black strand with 1 strand color and finish the square as follows: K 1 row, on next row dec 1 st at beg of row - READ DECREASE TIP. Repeat dec at beg of every row until 3 sts remain on needle. K 1 row, slip 1 st as if to K, K 2 tog, psso, cut the yarn and pull through last st. Work 6 squares in total in every color combination. ASSEMBLY: Place the squares according to diagram A.1, A.2 and A.1, make sure that they are placed in the same order and that they have the same side up. Sew the squares tog edge to edge in outermost ridge. Sew first all along then across. Fasten off. |
|
|
|
|
Have you made this or any other of our designs? Tag your pictures in social media with #dropsdesign so we can see them! Do you need help with this pattern?You'll find tutorial videos, a Comments/Questions area and more by visiting the pattern on garnstudio.com. © 1982-2024 DROPS Design A/S. We reserve all rights. This document, including all its sub-sections, has copyrights. Read more about what you can do with our patterns at the bottom of each pattern on our site. |


With over 40 years in knitting and crochet design, DROPS Design offers one of the most extensive collections of free patterns on the internet - translated to 17 languages. As of today we count 304 catalogs and 11422 patterns - 11417 of which are translated into English (US/in).
We work hard to bring you the best knitting and crochet have to offer, inspiration and advice as well as great quality yarns at incredible prices! Would you like to use our patterns for other than personal use? You can read what you are allowed to do in the Copyright text at the bottom of all our patterns. Happy crafting!
Comments / Questions (33)
Könnten die Quadrate für 1 Reihe nicht auch an einem Stück gestrickt werden? Dann muss nicht soviel zusammengenäht werden.
08.04.2020 - 09:21DROPS Design answered:
Liebe Frau Gerlach, es sieht so aus, einfacher die Quadrate einzeln zu stricken, vielleicht können Sie aber die Anleitung anders anpassen aber leider können wir nicht jede Anleitung nach jeder individuellen Wunsch anpassen, gerne wird Ihnen Ihr DROPS Laden weiter helfen. Viel Spaß beim stricken!
09.04.2020 - 16:28Was mache ich falsch,bei mir wird es kein quadrat.hilfe!!!!
13.10.2017 - 18:21DROPS Design answered:
Liebe Barbara, jeder Quadrat wird so wie in diesem Video gestrickt, dh zunehmen bis Sie 35 M haben, dann abnehmen bis 3M bleiben, und diese 3 M noch zu 1 M abnehmen. Beachten Sie, daß Ihre Maschenprobe stimmt. Viel Spaß beim stricken!
16.10.2017 - 09:15Tak for svaret , det vil jeg prøve. Når det skal sys sammen vil det så skulle være på samme måde som vises på videoen med de retstrikkede masker, som ser nemt og pænt ud , eller skal man sørge for altid at starte og slutte med en retmaske
20.10.2016 - 12:41DROPS Design answered:
Hej Marianne. Jeg ville nok lave en kombi - altsaa samme methode og saa have en r maske til start og slut.
20.10.2016 - 15:38Hej. Jeg kunne godt tænke mig at strikke det her flotte tæppe i perle strik , er der noget jeg skal tage forbehold for, og er garnet egnet til det? På forhånd tak. Hilsen Marianne
19.10.2016 - 19:20DROPS Design answered:
Hej Marianne. Jeg vil umiddelbart sige at strikkefastheden aendrer sig, saa jeg ville pröve at strikke en pröverude först i perlestrik , maale strikkefastheden og eventuelt justere mönster eller pindestr. God fornöjelse med det.
20.10.2016 - 10:47Ble ikke pent i hjørnene når jeg sydde renser. Syr nå sammen to og to lapper. Hvordan tror du det blir. Er det en bedre måte og montere teppe.
26.06.2016 - 17:47DROPS Design answered:
Hei Anne-Beate. Du kan sy med den metode som du synes giver det paeneste resultat paa dit teppe.
27.06.2016 - 16:22Hvordan måler du. Er det fra 1 maske til man starter og strikke melert. Mitten av ruten. Takk for hjelpen.
12.10.2015 - 00:05DROPS Design answered:
Hej, Hvis du måler strikkefastheden må du måle i strikkeretningen. Men størrelsen på tæppet måler 90 x 135 cm og da vi ved at der er 6 ruder i bredden og 9 i længden så må hver kant på ruden måle 15 cm. God fornøjelse!
12.10.2015 - 11:10Takk for fine sider. Hvor stor er en rute. Når man har har byttet til en tråd farge og en tråd sort skal det strikkes en pinne rett. Skal det da strikkes 1 pinne rett uten og øke. Takk for hjelpen.
25.09.2015 - 11:07DROPS Design answered:
Hej, Ruderne måler 15x15 cm! Det stemmer, du strikker 1 pind først uden at felle. God fornøjelse!
01.10.2015 - 15:58Hallo, ik zou graag deze deken maken in de maat 200x200. Hoeveel heb ik dan van alles nog.
12.03.2014 - 08:49DROPS Design answered:
Hoi Corrien. Voor deze soort vragen kan je het beste contact opnemen met je verkooppunt. Zie het overzicht hier
12.03.2014 - 15:10Hallo! Ich finde die Decke sehr schön, würde sie mir allerdings gerne etwas größer stricken (150x200). Leider kann ich nicht abschätzen, wieviel mehr Wolle ich benötige. Doppelte Menge erscheint mir zuviel. Kann mir da jemand helfen? Danke!
18.02.2014 - 18:40DROPS Design answered:
Liebe Heidi, für eine Decke mit der Größe von 150x200cm bräuchten Sie sogar in etwa das 2,5-fache, denn die Fläche, die sich ergibt (3 Quadratmeter), ist etwa 2,5x so groß wie die der angegebenen Decke von 90x135cm (1,215 Quadratmeter). Für die bunten Farben sollte aber die doppelte Garnmenge reichen.
20.02.2014 - 13:17Hej Garnet liksom glider isär när jag gör knutar. Finns det nå´t annat knep att fästa alla trådar som blir med mormorsrutor?
10.10.2013 - 14:07