DROPS Cotton Viscose
54% Cotton, 46% Viscose
Discontinued
find alternatives
DROPS Kid-Silk
DROPS Kid-Silk
75% Mohair, 25% Silk
from 6.75 $ /25g
DROPS SS24

Allison

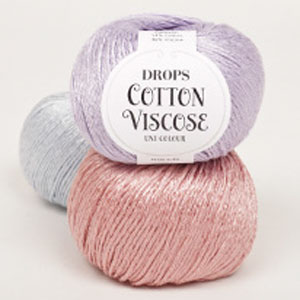
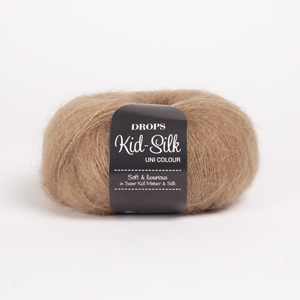
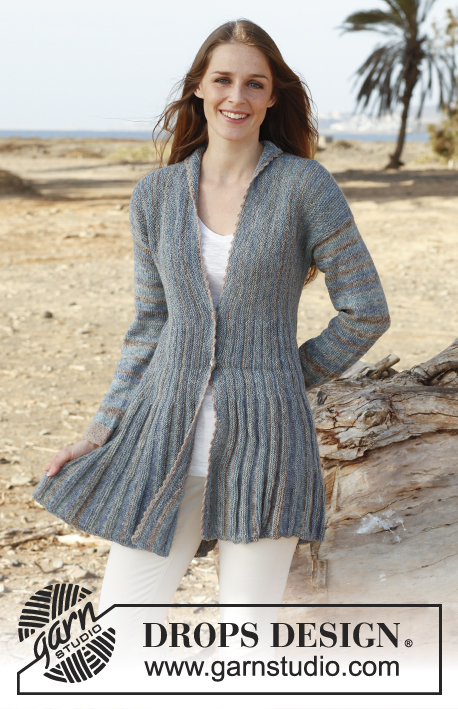
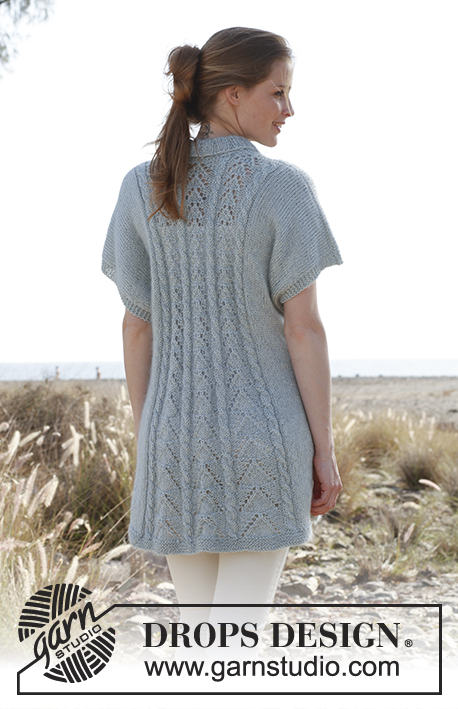
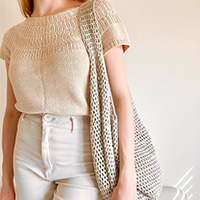
Knitted DROPS fitted jacket with lace pattern and cables in ”Cotton Viscose” and ”Kid Silk”. Size: S - XXXL.

DROPS 145-1
DROPS design: Pattern no n-145
Yarn group A + A
--------------------------------------------------------
Size: S - M - L - XL - XXL - XXXL
Finished measurements:
Bust: 102-110-120-130-134-144 cm /
40"-43½"-47¼"-51½"-52¾"-56½"
Full length: 70-73-75-78-80-83 cm /
27½"-28¾"-29½"-30¾"-31½"-32¾"

Materials: DROPS COTTON VISCOSE from Garnstudio
Color no 29, light gray green:
400-450-500-550-600-650 g
And use: DROPS KID-SILK from Garnstudio
Color no 06, light grayish green:
100-125-150-150-175-175 g

DROPS CIRCULAR NEEDLE size 5 mm / US 8 (80 cm / 32") - or size needed to get 17 sts x 22 rows in stockinette st with 1 strand of each yarn = 10 x 10 cm / 4" x 4" (approx. 18 sts x 23 rows in pattern).
DROPS CIRCULAR NEEDLE size 4.5 mm / US 7 (80 cm / 32") - for shawl collar.

DROPS MOTHER-OF-PEARL BUTTON, NO 522 (20 mm): 1 piece for all sizes

-------------------------------------------------------

Alternative Yarn – See how to change yarns here
Yarn Groups A to F – Use the same pattern and change the yarn here
Yarn usage using an alternative yarn – Use our yarn converter here

-------------------------------------------------------

DROPS Cotton Viscose
54% Cotton, 46% Viscose
Discontinued
find alternatives
DROPS Kid-Silk
DROPS Kid-Silk
75% Mohair, 25% Silk
from 6.75 $ /25g

Pattern instructions

NOTE: This pattern is written in American English. All measurements in charts are in cm. For conversion from inches to cm - click here. There are different terms for crocheting in American and British English. If this pattern includes crochet, click for "crochet terms" here. For this pattern in British English, please click here.
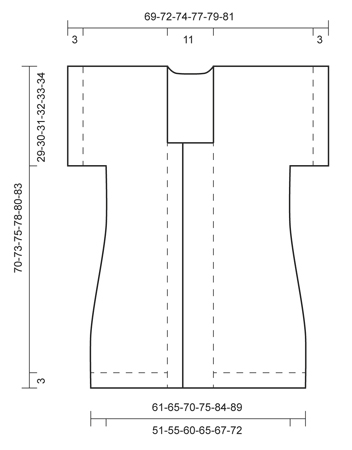
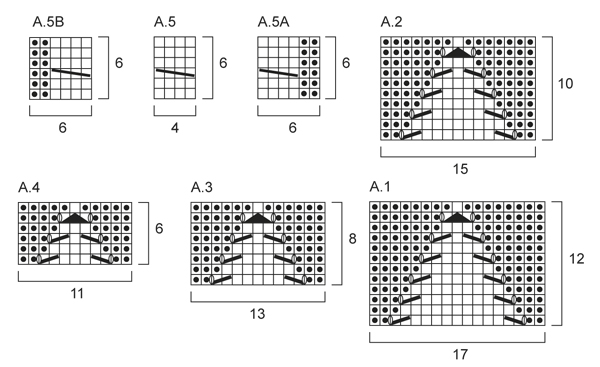
GARTER ST (back and forth on needle):
K all rows. 1 ridge = 2 rows K. NOTE: All edge sts in the sides are worked in garter st.

PATTERN:
See diagrams A.1 to A.5, diagrams show all rows in 1 pattern repetition seen from RS. The pattern is different in size S - M - L - XL/XXL - XXXL, the pattern on the picture is size M.

SHORT ROWS:
RIGHT FRONT PIECE:
Work short rows every 5 cm / 2" vertically as follows: Work 18 band sts from RS, turn and K back. Then work over all sts on row as before.
LEFT FRONT PIECE:
Work short rows every 5 cm / 2" vertically as follows: Work 18 band sts from WS, turn and K back. Then work over all sts on row as before.

BUTTONHOLE:
bind off for 1 buttonhole on band on right front piece.
1 BUTTONHOLE = K the first 5 sts from mid front, bind off the next 2 sts. On next row cast on 2 new sts over the bind off sts.
--------------------------------------------------------

BACK PIECE:
Worked back and forth on circular needle.
Cast on 109-117-125-133-151-159 sts (includes 1 edge st in each side) on circular needle size 5 mm / US 8 with 1 strand of each yarn.
Work in GARTER ST - read explanation above - for 3 cm / 1⅛" (1st row = RS). REMEMBER THE GAUGE!
Work next row from RS as follows: 1 edge st in garter st, 18-22-26-30-18-22 sts in stockinette st, work A.5A 1 time, * A.1, A.5 *, repeat from *-* a total of 2-2-2-2-4-4 times, work A.1 and then A.5B 1 time, work 18-22-26-30-18-22 sts in stockinette st, finish with 1 edge st in garter st.
Continue in pattern with 18-22-26-30-18-22 sts in stockinette st and 1 st in garter st in each side.
Work A.1 3 times vertically in total - but on last row from WS (= 12th row), dec in every repetition of A.1 as follows: K the first 2 tog, K 6, P 1, K 6, K the last 2 tog (2 dec sts in every repetition of A.1 = 15 sts remain) = 103-111-119-127-141-149 sts on row. Then work A.2 between the cables.
Work A.2 3 times vertically in total - but on last row from WS (= 10th row), dec in every repetition of A.2 as follows: K the first 2 tog, K 5, P 1, K 5, K the last 2 tog (2 dec sts in every repetition of A.2 = 13 sts remain) = 97-105-113-121-131-139 sts on row. Then work A.3 between the cables.
Work A.3 2 times vertically in total - but on last row from WS (= 8th row), dec in every repetition of A.3 as follows: K the first 2 tog, K 4, P 1, K 4, K the last 2 tog (2 dec sts in every repetition of A.3 = 11 sts remain) = 91-99-107-115-121-129 sts on row. Now piece measures approx. 39 cm / 15¼".
Then work A.4 between the cables until finished measurements.
When piece measures 41-43-44-46-47-49 cm / 16⅛"-17"-17¼"-18"-18½"-19¼", cast on new sts for sleeve in the side as follows: Cast on 16-14-12-10-10-8 sts at the end of the next 2 rows = 123-127-131-135-141-145 sts.
Work next row as follows: 5 edge sts in garter st, 30-32-34-36-24-26 sts in stockinette st, work pattern as before, 30-32-34-36-24-26 sts in stockinette st, finish with 5 edge sts in garter st.
Then continue pattern mid back with 30-32-34-36-24-26 sts in stockinette st and 5 sts in garter st in each side.
Work A.4 11-12-13-14-15-16 times vertically in total (piece measures approx. 67-70-73-75-78-80 cm / 26⅜"-27½"-28¾"-29½"-30¾"-31½", finish on last row in A.4). On next row from RS (1st row in A.4), bind off the middle 15 sts for neck and finish each shoulder separately. On next row from neck, bind off 1 st = 53-55-57-59-62-64 sts remain on shoulder.
When A.4 has been worked 1 time (= 6 rows), loosely bind off all sts (there are 12-13-14-15-16-17 repetitions of A.4 vertically in total), piece measures approx. 70-73-75-78-80-83 cm / 27½"-28¾"-29½"-30¾"-31½"-32¾".

RIGHT FRONT PIECE:
Worked back and forth on needle. Cast on 60-64-68-72-81-85 sts (incl 1 edge st in the side) on circular needle size 5 mm / US 8 with 1 strand of each yarn. Work in garter st for 3 cm / 1⅛" (1st row = RS).
Size S - XL:
Work next row from RS as follows: 18 sts in garter st (= band sts), work A.1 and A.5B 1 time, 18-22-26-30 sts in stockinette st, finish with 1 edge st in garter st. Continue in pattern with 18-22-26-30 sts in stockinette st in the side and 18 band sts mid front.
Size XXL and XXXL:
Work next row from RS as follows: 18 sts in garter st (= band sts), work A.1 and A.5 1 time, then A.1 and A.5B 1 time, 18-22 sts in stockinette st, finish with 1 edge st in garter st. Continue in pattern with 18-22 sts in stockinette st in the side and 18 band sts mid front.
All sizes: When piece measures 5 cm / 2", work SHORT ROWS - see explanation above.
Continue to work pattern as on back piece and dec 2 sts in the lace patterns the same way as on back piece.
When all dec are done (= 6-6-6-6-12-12 dec sts in total), 54-58-62-66-69-73 sts remain on row.
Continue with A.4 and cables with short rows until finished measurements.
When piece measures 41-43-44-46-47-49 cm / 16⅛"-17"-17¼"-18"-18½"-19¼", cast on new sts for sleeve as follows: At the end of next row from RS, cast on 16-14-12-10-10-8 sts = 70-72-74-76-79-81 sts. Work next row from WS as follows: 5 edge sts in garter st, 30-32-34-36-24-26 sts in stockinette st, work pattern as before, finish with 18 band sts.
Continue pattern as before until piece measures 45-47-49-51-53-55 cm / 17¾"-18½"-19¼"-20"-21"-21⅝", now bind off for BUTTONHOLE - see explanation above. Work pattern as before until piece measures 49-51-52-54-55-57 cm / 19¼"-20"-20½"-21¼"-21⅝"-22½".
On next row from RS, bind off the first 17 band sts = 53-55-57-59-62-64 sts remain. Insert 1 marker at beg of row (marks where to beg pick up for collar).
Continue with pattern as before with 5 sts in garter st in the side and 1 edge st in garter st mid front.
Work A.4 a total of 12-13-14-15-16-17 times vertically.
Loosely bind off all sts, piece measures approx. 70-73-75-78-80-83 cm / 27½"-28¾"-29½"-30¾"-31½"-32¾".

LEFT FRONT PIECE:
Cast on and work as right front piece but reversed - i.e. work A.5A instead of A.5B - and without buttonhole.

ASSEMBLY:
Sew shoulder seams inside bind off edges. Sew sleeve and side seams in one inside 1 edge st.

SHAWL COLLAR:
Pick up sts from RS inside 1 edge st on circular needle size 4.5 mm / US 7. Start mid front at marker on right front piece as follows:
Pick up approx. 50 to 60 sts up to shoulder, then approx. 20 sts along the neck, and 50 to 60 sts down along left front piece until marker = 120 to 140 sts.
K 1 row from WS - AT THE SAME TIME adjust no of sts along left front piece to 45-47-49-51-53-55, around the neck to 22, along right front piece to 45-47-49-51-53-55 = 112-116-120-124-128-132 sts. Then work rib on next row from RS as follows: 1 st in garter st, * K 2, P 2 *, repeat from *-* and finish with K 2 and 1 st in garter st. Continue like this until collar measures approx. 5 cm / 2".
Now inc 1 st in each of the middle 12-12-12-14-14-14 P-sections seen from RS (= back of neck) = 124-128-132-138-142-146 sts.
Continue rib until collar measures approx. 10 cm / 4", loosely bind off all sts with K over K and P over P.
Fasten collar with stitches at the bottom in each side towards band from WS (so that the seam is not visible from RS) – sew edge to edge to avoid a chunky seam.
Sew the button on to band on left front piece.

Diagram

All measurements in charts are in cm.

symbols = K from RS, P from WS
symbols = P from RS, K from WS
symbols = 1 YO between 2 sts
symbols = slip 1 st as if to K, K 2 tog, psso
symbols = K 2 tog
symbols = slip 1 st as if to K, K 1, psso
symbols = slip 2 sts on cable needle in front of piece, K 2, K 2 from cable needle
diagram
diagram
Do you have a question? See a list of frequently asked questions (FAQ)

Knitting tension is what determines the final measurements of your work, and is usually measured per 10 x 10 cm. It is provided like so: number of stitches in width x number of rows in height - eg: 19 stitches x 26 rows = 10 x 10 cm.

The knitting tension is very individual; some people knit/crochet loosely while others work tightly. You adjust the knitting tension with the needle size, which is why the suggested needle size only serve as a guide! You need to adjust this (up or down) to ensure that YOUR knitting tension matches the knitting tension provided in the pattern. If you work with a different knitting tension than provided you will have a different yarn consumption, and your work will have different measurements than what the pattern suggests.

The knitting tension also determines which yarns can replace each other. As long as you achieve the same knitting tension you can replace one yarn with another.

See DROPS lesson: How to measure your tension/gauge

See DROPS video: How to make a gauge tension swatch

The required amount of yarn is provided in grams, eg: 450 g. To calculate how many balls you’ll need you first need to know how many grams are in 1 ball (25g, 50g or 100g). This information is available if you click on the individual yarn quality on our pages. Divide the amount required with the amount of each ball. For example, if each ball is 50g (the most common amount), the calculation will be as follows: 450 / 50 = 9 balls.

The important thing when changing from one yarn to another is that the knitting/crochet tension remains the same. This is so that the measurements of the finished piece will be the same as on the sketch provided. It is easier to achieve the same knitting tension using yarns from the same yarn group. It is also possible to work with multiple strands of a thinner yarn to achieve the knitting tension of a thicker one. Please try our yarn converter. We recommend you to always work a test swatch.

Please NOTE: when changing yarn the garment might have a different look and feel to the garment in the photo, due to individual properties and qualities of each yarn.

See DROPS lesson: Can I use a different yarn than the one mentioned in the pattern?

All our yarns are categorised into yarn groups (from A to F) according to thickness and knitting tension – group A contains the thinnest yarns and group F the thickest. This makes it easier for you to find alternative yarns to our patterns, should you wish to switch yarn. All yarns within the same group have a similar knitting tension and can easily replace each other. However, different yarn qualities have different structures and properties which will give the finished work a unique look and feel.

Click here for an overview of the yarns in each yarn group

At the top of all our patterns you’ll find a link to our yarn converter, which is a helpful tool should you wish to use a different yarn than suggested. By filling in the yarn quality you wish to replace, the amount (in your size) and number of strands, the converter will present good alternative yarns with the same knitting tension. Additionally it will tell you how much you’ll require in the new qualities and whether you’ll need to work with multiple strands. Most skeins are 50g (some are 25g or 100g).

If the pattern is worked with multiple colours, every colour will have to be converted separately. Similarly, if the pattern is worked with several strands of different yarns (for example 1 strand Alpaca and 1 strand Kid-Silk) you will have to find alternatives for each, individually.

Click here to see our yarn converter

Since different yarns have different qualities and textures we have chosen to keep the original yarn in our patterns. However, you can easily find options among our available qualities by using our yarn converter, or simply pick a yarn from the same yarn group.

It is possible that some retailers still have discontinued yarns in stock, or that someone has a few skeins at home that they would like to find patterns for.

The yarn converter will provide both alternative yarn as well as required amount in the new quality.

If you think it's hard to decide what size to make, it can be a good idea to measure a garment you own already and like the size of. Then you can pick the size by comparing those measures with the ones available in the pattern's size chart.

You'll find the size chart at the bottom of the pattern.

See DROPS lesson: How to read size chart

The needle size provided in the pattern serves only as a guide, the important thing is to follow the knitting tension. And since knitting tension is very individual, you will have to adjust the needle size to ensure that YOUR tension is the same as in the pattern – maybe you’ll have to adjust 1, or even 2 needle sizes, up or down to achieve the correct tension. For this, we recommend that you work test swatches.

Should you work with a different knitting tension than the one provided, the measurements of the finished garment might deviate from the measurement sketch.

See DROPS lesson: How to measure your tension/gauge

See DROPS video: How to make a gauge tension swatch

Working a garment top-down provides more flexibility and room for personal adjustment. For example it is easier to try the garment on while working, as well as making adjustments to length of yoke and shoulder caps.

The instructions are carefully explaining every step, in the correct order. Diagrams are adjusted to the knitting direction and are worked as usual.

The diagram depicts all rows/rounds, and every stitch seen from the right side. It is read from bottom to top, from right to left. 1 square = 1 stitch.

When working back and forth, every other row is worked from the right side and every other row is worked from the wrong side. When working from the wrong side, the diagram will have to be worked reversed: from left to right, knit stitches are purled, purl stitches are knit etc.

When working in the round every round is worked from the right side and the diagram are worked from right to left on all rounds.

See DROPS lesson: How to read knitting diagrams

The diagram depicts all rows/rounds, and every stitch seen from the right side. It is worked from bottom to top, from right to left.

When working back and forth every other row is worked from the right side: from right to left and every other row is worked from the wrong side: from left to right.

When working in the round, every row in the diagram are worked from the right side, from right to left.

When working a circular diagram you start in the middle and work your way outwards, counter clockwise, row by row.

The rows usually start with a given number of chain stitches (equivalent to the height of the following stitch), this will either be depicted in the diagram or explained in the pattern.

See DROPS lesson: How to read crochet diagrams

Instructions for working several diagrams after each other on the same row/round, will often be written like so: “work A.1, A.2, A.3 a total of 0-0-2-3-4 times". This means you work A.1 once, then A.2 is worked once, and A.3 is repeated (in width) the number of times provided for your size – in this case like so: S = 0 times, M = 0 times, L=2 times, XL= 3 times and XXL = 4 times.

The diagrams are worked as usual: begin with the first row in A.1, then work the first row in A.2 etc.

See DROPS lesson: How to read knitting diagrams

See DROPS lesson: How to read crochet diagrams

The total width of the garment (from wrist-to-wrist) will be larger in the larger sizes, despite the actual sleeves being shorter. The larger sizes have longer sleeve caps and wider shoulders, so there will be a good fit in all sizes.

The measurement sketch/schematic drawing provides information regarding the full length of the garment. If it’s a jumper or a jacket the length is measured from the highest point on the shoulder (usually closest to the neckline), and straight down to the bottom of the garment. It is NOT measured from the tip of shoulder. Similarly, the length of yoke is measured from the highest point on the shoulder and down to where yoke is split into body and sleeves.

See DROPS lesson: How to read a schematic drawing

Diagrams are often repeated on the round or in height. 1 repeat is the diagram the way it appears in the pattern. If it says to work 5 repeats of A.1 in the round, then you work A.1 a total of 5 times after/next to each other in the round. If it says to work 2 repeats of A.1 vertically/in height you work the entire diagram once, then begin again at the start and work the entire diagram one more time.

Chain stitches are slightly narrower than other stitches and to avoid working the cast-on edge too tight, we simply chain more stitches to begin with. The stitch count will be adjusted on the following row to fit the pattern and measurement sketch.

The rib edge is more elastic and will contract slightly compared to, for example, stocking stitch. By increasing before the rib edge, you avoid a visible difference in width between the rib edge and the rest of the body.

It’s very easy to cast off too tightly, and by making yarn overs while casting off (and simultaneously casting these off) you avoid a too tight cast off edge.

See DROPS video: How to bind off with yarn overs (yo)

To achieve an even increase (or decrease) you can increase on, for example: every 3rd and 4th row alternately, like so: work 2 rows and increase on the 3rd row, work 3 rows and increase on the 4th. Repeat this until the increase is complete.

See DROPS lesson: Increase or decrease 1 st on every 3rd and 4th row alternately

Should you prefer to work in the round instead of back and forth, you may of course adjust the pattern. You’ll need to add steeks mid-front (usually 5 stitches), and follow the instructions. When you would normally turn and work from the wrong side, simply work across the steek and continue in the round. At the end you’ll cut the piece open, pick up stitches to work bands, and cover the cut edges.

See DROPS video: How to knit steeks and cut open

Should you prefer to work back and forth instead of in the round, you may of course adjust the pattern so you work the pieces separately and then assemble them at the end. Divide the stitches for the body in 2, add 1 edge stitch in each side (for sewing) and work the front and back pieces separately.

See DROPS lesson: Can I adapt a pattern for circular needles into straight needles?

Pattern repeats can vary slightly in the different sizes, in order to get the correct proportions. If you’re not working the exact same size as the garment in the photo, yours might deviate slightly. This has been carefully developed and adjusted so that the complete impression of the garment is the same in all sizes.

Make sure to follow instructions and diagrams for your size!

If you have found a pattern you like which is available in women’s size it’s not very difficult to convert it to men’s size. The biggest difference will be the length of sleeves and body. Start working on the women size that you think would fit across the chest. The additional length will be worked right before you cast off for the armhole/sleeve cap. If the pattern is worked top-down you can add the length right after the armhole or before the first decrease on sleeve.

Regarding additional yarn amount, this will depend on how much length you add, but it is better with a skein too many than too few.

All yarns will have excess fibres (from production) that might come off as lint or shedding. Brushed yarns (ie hairier yarns) have more of these loose, excess fibres, causing more shedding.

Shedding also depends on what is worn under or over the garment, and whether this pulls at the yarn fibres. It’s therefore not possible to guarantee that there will be no shedding

Below are some tips on how to get the best result when working with hairier yarns:

1. When the garment is finished (before you wash it) shake it vigorously so the looser hairs come off. NOTE: do NOT use a lint roller, brush or any method that pulls at the yarn.

2. Place the garment in a plastic bag and put it in your freezer - the temperature will cause the fibres to become less attached to each other, and excess fibres will come off easier.

3. Leave in the freezer for a few hours before taking it out and shaking it again.

4. Wash the garment according to the instructions on the yarn label.

Pilling is a natural process that happens to even the most exclusive of fibers. It's a natural sign of wear and tear that is hard to avoid, and that is most visible in high friction areas of your garment like a sweater's arms and cuffs.

You can make your garment look as new by removing the pilling, using a fabric comb or a pill/lint remover.

Still can't find the answer you need? Then scroll down and leave your question so one of our experts can try to help you. This will be done normally within 5 to 10 working days.
In the meantime, you can read the questions and answers that others have left to this pattern or join the DROPS Workshop on Facebook to get help from fellow knitters/crocheters!

You might also like...

Post a comment to pattern DROPS 145-1

We would love to hear what you have to say about this pattern!

If you want to leave a question, please make sure you select the correct category in the form below, to speed up the answering process. Required fields are marked *.

Comments / Questions (239)

country flag Van De Wetering wrote:

Ik heb een vraag over drops allison patroon.\r\n\r\nHet is een geweldig mooi patroon alleen klopt er iets niet volgens mij.Bij de voorpanden staat bij de beschrijving van xxl eerst steken voor de ribbel dan a1 dan a5 dan a1 dan a5b dan tricot steek.Maar volgens mij word er in de voorpanden maar 1 keer gebruik gemaakt van 1x patroon a1 en een kabel patroon???hoe is dan de verhouding?\r\nvriendelijke groet gerry

03.02.2021 - 12:47

country flag Johanna wrote:

Thank you. Stu ning

28.05.2019 - 22:12

country flag Simona wrote:

Buonasera, vorrei realizzarlo con un unico filato e in lana, quale filato mi consigliereste? E come mi regolo con la quantità? Grazie Simona

20.10.2017 - 22:20

DROPS Design answered:

Buongiorno Simona, questo modello è realizzato con due capi di filati del gruppo A, quindi se lo vuole a un capo solo può utilizzare filati del gruppo C, come Nepal, Alaska o big merino. Per la quantità provi a vedere qui. Buon lavoro!

21.10.2017 - 08:59

country flag Susanne Skibelund wrote:

Jeg har købt garn til model 145 nr 1 Jeg måler fra skulder til skulder 78 cm. Har et brystmælk på 123 cm Da jeg på målskemaet ikke kan se et brystmælk er jeg itvivl om størrelsen Ønsker ikkejakken for løs/slasket men den skal også nå sammen for Kan I oplyse brystmælk på de to sidste st? På forhånd tak Susanne

27.05.2016 - 13:32

DROPS Design answered:

Hej Susanne. Nederst paa maalskitsen ser du alle maal. Brystmaalet er de nederste tal = 67 og 72 cm i de to störste str.

30.05.2016 - 13:36

country flag Adinda wrote:

Sorry, ik had een vraag gesteld over de hoeveelheid garen, maar had even niet gezien dat er op de bollen van de Kid -Silk, maar 25 gram zit.

17.02.2016 - 09:46

DROPS Design answered:

Hoi Adinda. Helemaal oké, goed om te horen dat je verder bent.

17.02.2016 - 10:46

country flag Adinda wrote:

Ik heb een vraag over de hoeveelheid garen. Ik snap niet dat als je alles dubbel breid, je dan van het ene garen (kid Silk) minder meters nodig hebt dan het andere. Klopt dit wel?

17.02.2016 - 09:44

country flag Petra Stam wrote:

Kan dit vest ook met gewone breinaalden gedaan worden. ?

06.01.2016 - 13:40

DROPS Design answered:

Hoi Petra. Ja, dat kan omdat deze heen en weer wordt gebreid op de rondbreinaalden. Zorg wel ervoor dat je alle steken kwijt kan op de naald.

06.01.2016 - 16:29

country flag Christina Vogel wrote:

Gibt es eine Möglichkeit, diese Weste auch mit langen Ärmeln zu stricken? Wie setze ich da am besten an?

24.10.2015 - 13:52

DROPS Design answered:

Leider können wir Ihnen hier keine Möglichkeit für lange Ärmel bieten, die Ärmel werden hier ja direkt angestrickt.

30.10.2015 - 09:59

Maureen wrote:

In working the back piece, it says to 'continue in pattern with 30 stitches in sticking st and 1 edge in garter stitch in each side'. Does that refer to the entire pattern I just did in the instructions above, and if so for how long? Or, aftery first pattern line do I immediately go to Working A.1 3 times?

01.09.2015 - 23:46

DROPS Design answered:

Dear Maureen, you continue working as stated before, ie with A.1 and A.5B, but work then A.2 after you have worked A.1 3 times vertically in total, then A.3 after you have worked A.3 3 times vertically in total etc.. as explained in the pattern. Happy knitting!

02.09.2015 - 09:54

France Gagnon wrote:

How do I read the charts in pattern DROPS 145-1 Allison? For example, if I refer to chart A.5B, do I read Row 1 from right to left and Row 2 from left to right? Or vice versa? Or other? If other, how? Thank you, France

14.04.2015 - 20:49

DROPS Design answered:

Dear Mrs Gagnon, read more here about diagrams: 1 square = 1 st x 1 row, start from RS at the bottom corner on the right side and read towards the left - from WS read from the left towards the right. Happy knitting!

15.04.2015 - 08:50