
Popular categories
Looking for a yarn?


Comments / Questions (11)
![]() Bouquin wrote:
Bouquin wrote:
Bonsoir le modèle se fait en 3 et demi si je prend de la laine 5 sa feras un châle plus grand ? Merci de votre réponse.
08.02.2024 - 20:21DROPS Design answered:
Bonjour Mme Bouquin, vous pouvez effectivement utiliser une autre laine et le crochet adapté pour réaliser ce châle, en suivant les mêmes indications, et crocheter jusqu'à la longueur /largeur (envergure) souhaitée avant de faire la bordure. Notez que la quantité nécessaire sera probablement différente si votre échantillon ne correspond pas à celui du modèle. Bon crochet!
09.02.2024 - 07:46
![]() Tonje wrote:
Tonje wrote:
Jeg forstår ikke hvordan jeg øker, hvor i mønsteret på rad 4,6,8,10 osv skal jeg øke? Skal de doble stammene økes i første lm sammen med stammegruppen?
04.02.2020 - 20:47DROPS Design answered:
Hej Tonje, du øker i hver side (ifølge diagrammet) med 2 dobbelt stangmasker. God fornøjelse!
11.02.2020 - 11:08
![]() Marta wrote:
Marta wrote:
Dzień dobry! Bardzo spodobał mi się ten wzór. Ja nie mam wielkich umiejętności w szydełkowaniu ale staram się i próbuję. Do tej chusty zabieram się po raz kolejny raz i w ogóle mi nie wychodzi. A wydawała mi się taka prosta...
30.10.2019 - 09:02DROPS Design answered:
Witaj Marto! Wzór jest na całej długości taki sam, dodajesz tylko oczka na bokach. Zobacz film TUTAJ. Jeśli będziesz w przyszłości miała pytania, proszę zaznacz w formularzu PYTANIE, a nie KOMENTARZ, wtedy szybciej odpowiemy. A propos, czy już zagłosowałaś na nową kolekcję DROPS Jesień/Zima, zapraszamy serdecznie!
07.06.2020 - 17:14
![]() Cristina Borghetti wrote:
Cristina Borghetti wrote:
Buonasera, non cpisco se devo ripetere tutte le righe , dalla due alla cinque o solo le righe due e cinque grazie
30.11.2016 - 16:53DROPS Design answered:
Buonasera Cristina, deve ripetere i ferri dal 2 al 5 e poi 4 e 5. Buon lavoro!
30.11.2016 - 16:57
![]() Ellen wrote:
Ellen wrote:
In het patroon staat dat je vanaf rij 3 de oneven rijen begint met 2 vasten. Is het niet beter om de even rijen ook met 2 vasten te beginnen? Anders worden beide zijden toch verschillend? Alvast hartelijk dank voor uw reactie!
18.04.2015 - 14:09DROPS Design answered:
Hoi Ellen. Het wordt zo gedaan om het patroon correct te laten uitkomen. Uiteindelijk haak je ook hier de rand omheen en wordt de rand mooi even. Maar je mag natuurlijk altijd eigen aanpassingen maken als je het zelf mooier vindt.
22.04.2015 - 15:07
![]() DROPS NL wrote:
DROPS NL wrote:
Beste Tineke, je kunt het patroon zelf printen, klik bovenaan de pagina op de knop "afdrukken: patroon".
22.10.2013 - 08:48
![]() Tineke Van Oers wrote:
Tineke Van Oers wrote:
Zou graag het patroon op mijn e-mail adres hebben als het mag groetjes tineke
21.10.2013 - 17:08
![]() TINeke Van Oers wrote:
TINeke Van Oers wrote:
Geen ik wil alleen het patroon van u als dat mag
21.10.2013 - 17:03
![]() Paula wrote:
Paula wrote:
Me encanta el patrón. Estoy finalizando el patrón, en la 2ªvuelta de la orilla pero no entiendo esta última vuelta. ¿Se hacen 3 p.a., 3 cad. y punto bajo en el primer punto del bucle de cadeneta? ¿Y los otros tres p.a. uno en cada punto del bucle de cadeneta? Con la otra parte también tengo problemas, pb.tres cad y pb., se hace todo en el mismo punto del bucle de cadeneta o en distintos puntos? Gracias
23.12.2012 - 22:07
![]() Hanneke wrote:
Hanneke wrote:
DROPS Extra 0-859 Gehaakte DROPS omslagdoek voor Kerst van "Cotton Viscose" en "Glitter" Bij rij 4 zijn er nog 2 vasten nodig om naar de eerstvolgende ruimte te gaan. zo zijn rij 3 en 5 ook begonnen. Verder vind ik dit een erg leuk patroon!
08.12.2012 - 22:59DROPS Design answered:
Je begint rij 4 met 4 l net zoals rij 2 en 6 (8, 10 enz). Rij 3, 5 (7, 9 enz) beginnen met 2 vaste
11.12.2012 - 14:29
|
||||||||||||||||
Holly's Holiday#hollysholidayshawl |
||||||||||||||||
 |
 |
|||||||||||||||
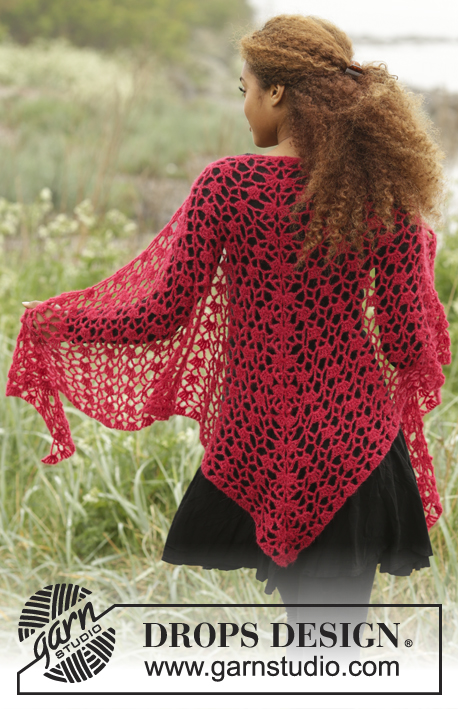
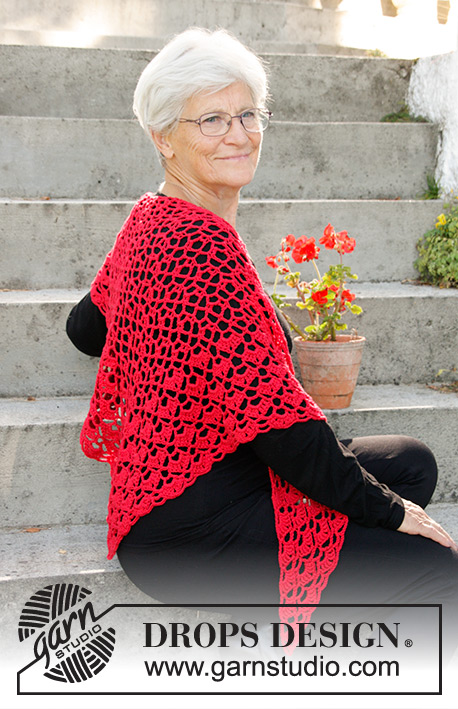
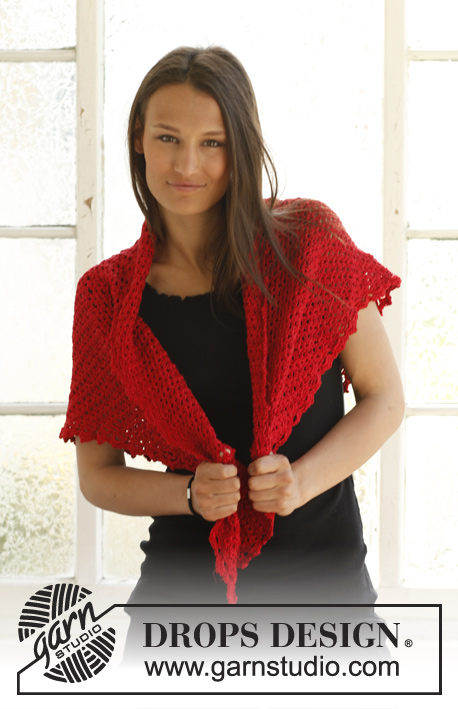
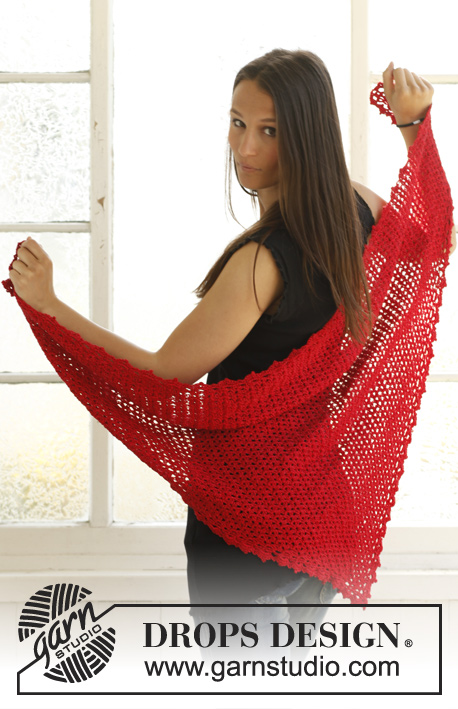
Crochet DROPS shawl for Christmas in "Cotton Viscose" and "Glitter"
DROPS Extra 0-859 |
||||||||||||||||
|
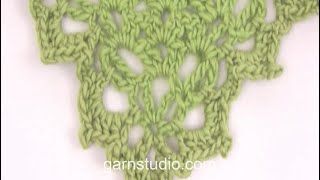
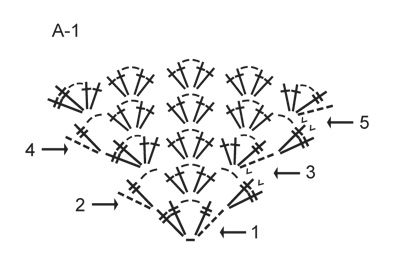
CROCHET INFO: 1 dc-group = 2 dc, ch 2, 2 dc in same ch space. PATTERN: See diagram A-1 (the diagram shows the pattern from RS). ---------------------------------------------------------- SHAWL: Ch 5 with 1 strand of each yarn on hook size 3.5 mm/E. Work in 1st ch as follows: 1 tr, ch 2, 2 tr = 1st row in diagram A-1, turn. Continue to work rows 2-5 in diagram A-1. Then repeat rows 4 and 5 so that 1 dc-group is worked in every ch space and inc 2 tr and 2 ch in each side on every even numbered row (ROW 6, 8, 10, etc.). Continue like this until piece measures approx. 65 cm / 25½" in length mid back (finish with an uneven numbered row), turn. Then work an edge around the entire shawl. EDGE: ROUND 1: Sl sts until 1st ch space, ch 1, 1 sc in same ch space, * ch 5, 1 sc in next ch space *, repeat from *-* the entire row. Continue to work along the diagonal edge as follows: Work * ch 5, 1 sc in next 4-ch space, ch 5, 1 sc in next tr *, repeat from *-* along both diagonal edges – NOTE: Work 1 sc, ch 5, 1 sc in the tip of shawl, finish with 1 sl st in 1st sc. Adapt the pattern so that the number of ch spaces are divisible by 2. ROUND 2: In first ch space work 3 dc, ch 3, 1 sl st in 1st ch, 3 dc, * in next ch space work 1 sc, ch 3, 1 sc, in next ch space work 3 dc, ch 3, 1 sl st in 1st ch, 3 dc *, repeat from *-* the entire round, finish with 1 sl in 1st, cut yarn and weave in the tails. |
||||||||||||||||
Diagram explanations |
||||||||||||||||
|
||||||||||||||||
 |
||||||||||||||||
Have you finished this pattern?Tag your pictures with #dropspattern #hollysholidayshawl or submit them to the #dropsfan gallery. Do you need help with this pattern?You'll find 6 tutorial videos, a Comments/Questions area and more by visiting the pattern on garnstudio.com. © 1982-2026 DROPS Design A/S. We reserve all rights. This document, including all its sub-sections, has copyrights. Read more about what you can do with our patterns at the bottom of each pattern on our site. |
||||||||||||||||


With over 40 years in knitting and crochet design, DROPS Design offers one of the most extensive collections of free patterns on the internet - translated to 17 languages. As of today we count 325 catalogs and 12298 patterns - 12288 of which are translated into English (US/in).
We work hard to bring you the best knitting and crochet have to offer, inspiration and advice as well as great quality yarns at incredible prices! Would you like to use our patterns for other than personal use? You can read what you are allowed to do in the Copyright text at the bottom of all our patterns. Happy crafting!
Post a comment to pattern DROPS Extra 0-859
We would love to hear what you have to say about this pattern!
If you want to leave a question, please make sure you select the correct category in the form below, to speed up the answering process. Required fields are marked *.