
Popular categories
Looking for a yarn?


|
|||||||||||||
Blues |
|||||||||||||
 |
 |
||||||||||||
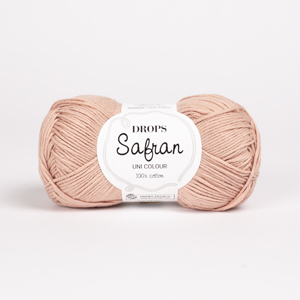
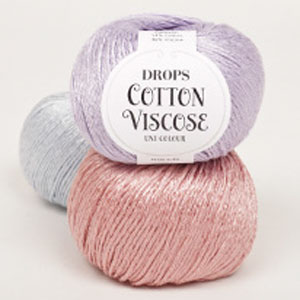
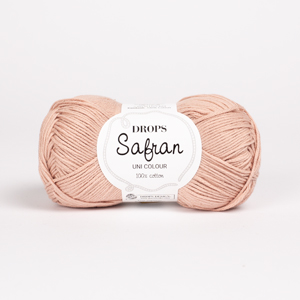
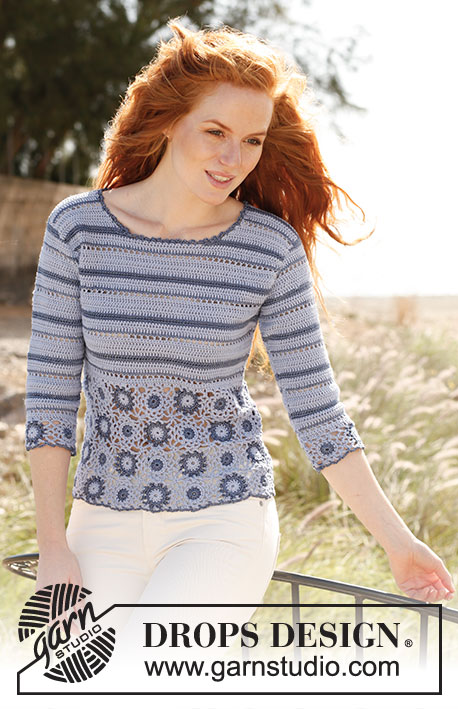
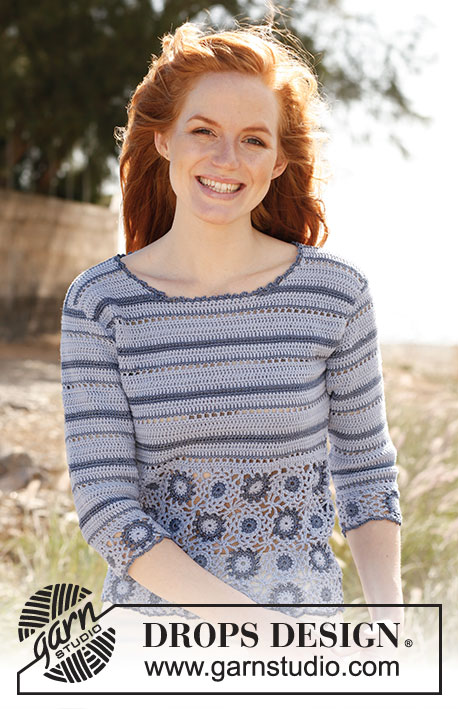
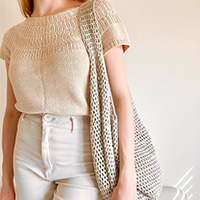
Crochet DROPS jumper in ”Safran” and ”Cotton Viscose”. With squares and stripes. Size: S - XXXL.
DROPS 136-23 |
|||||||||||||
|
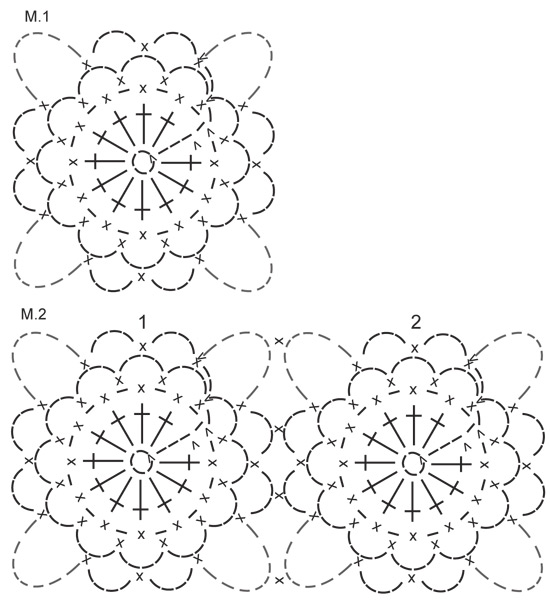
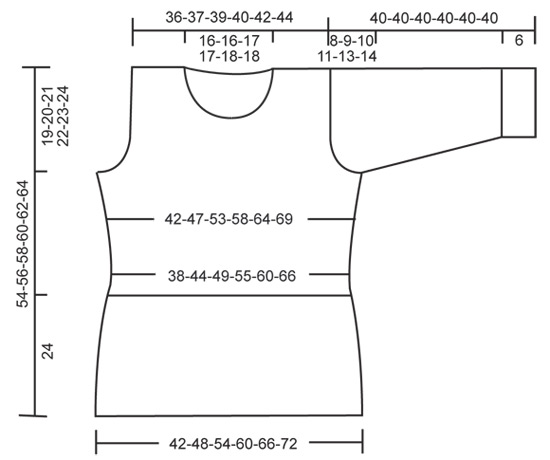
CROCHET INFO: Turn every dc row with ch 3 and turn every sc row with ch 1. PATTERN: Do not cut the yarn for each yarn change but let it follow upwards. ROW 1 (Safran): 1 sc in every dc. ROW 2 (Safran): 1 dc, ch 1, skip first sc, 1 dc in next sc, * ch 1, skip 1 sc, 1 dc in next sc *, repeat from *-* the rest of row. ROW 3 (Cotton Viscose): 1 sc in every dc and 1 sc in every ch. ROW 4 (Safran): 1 dc in every sc. ROW 5 (Safran): 1 dc in every dc. ROW 6 (Cotton Viscose): 1 sc in every dc. ROW 7 (Cotton Viscose): 1 dc in every sc. ROWS 8, 9 and 10 (Safran): 1 dc in every dc. Repeat rows 1 to 10. DECREASE TIP: Dec at end of row as follows: Work until no of sts to be dec remains, turn piece. Dec at beg of row as follows: Work sl st over no of sts to be dec. -------------------------------------------------------- JUMPER: First work the squares at the bottom. These are worked tog in rows vertically, then work the squares tog in the side to form a circle. Then work front and back piece back and forth separately, up from squares. Finish by working the sleeves. ROW 1: SQUARE 1 - also see diagram M.1: Ch 4 on hook size 3.5 mm/E/4 with Safran and form a ring with 1 sl st in first ch. ROUND 1: ch 3 (= 1 dc), work 11 dc in ch-ring, finish with 1 sl st in 3rd ch from beg of round, cut the yarn. ROUND 2 (switch to Cotton Viscose): ch 2, 1 sc in next dc, 1 ch * 1 sc in next dc, 1 ch *, repeat from *-* the entire round and finish with 1 sl st in first sc. ROUND 3: ch 1, 1 sc in 2nd ch from previous round, * ch 4, 1 sc in next ch from previous round *, repeat from *-*, finish with 1 sl st in first sc from beg of round = 12 ch-spaces, cut the yarn. ROUND 4 (switch back to Safran): ch 2, 1 sc in first ch-space, * ch 4, 1 sc in next ch-space, ch 4, 1 sc in next ch-space, ch 8, 1 sc in next ch-space (= corner) *, repeat from *-* the entire round but instead of last sc, finish with 1 sl st in first sc from beg of round. Fasten off. Square measures approx. 6 x 6 cm / 2½" x 2½". SQUARE 2: Start with Cotton Viscose and work as SQUARE 1 from 1st to 3rd round but switch yarn type so that Cotton Viscose is used on 1st round and Safran on 2nd and 3rd round. ROUND 4 – also see diagram M.2: Work with Safran as follows: ch 2, 1 sc in first ch-space, ch 4, 1 sc in next ch-space, ch 4, 1 sc in next ch-space, ch 4, place the square WS against WS with SQUARE 1, work 1 sc in one of the large ch-spaces on SQUARE 1 (= corner), ch 4, 1 sc in next ch-space on SQUARE 2, * ch 2, 1 sc in next small ch-space on SQUARE 1, ch 2, 1 sc in next ch-space on SQUARE 2 *, repeat from *-* 1 more time, ch 4, 1 sc in next large ch-space on SQUARE 1 (= corner), ch 4, 1 sc in next ch-space on SQUARE 2. Then work around SQUARE 2 as follows: ** ch 4, 1 sc in next ch-space, ch 4, 1 sc in next ch-space, 8 ch, 1 sc in next ch-space **, repeat from **-** 1 more time but instead of last sc, finish with 1 sl st in first sc from beg of round. Fasten off. SQUARE 3: Work as SQUARE 1 from 1st to 3rd round. ROUND 4: Work with Safran as follows: ch 2, 1 sc in first ch-space, ch 4, 1 sc in next ch-space, ch 4, 1 sc in next ch-space, ch 4, place the square WS against WS with SQUARE 2, work 1 sc in the large ch-space in one corner on SQUARE 2 (i.e. in the side where SQUARE 2 is not worked tog with SQUARE 1), ch 4, 1 sc in next ch-space on SQUARE 3, * ch 2, 1 sc in next small ch-space on SQUARE 2, ch 2, 1 sc in next ch-space on SQUARE 3 *, repeat from *-* 1 more time, ch 4, 1 sc in next large ch-space on SQUARE 2 (= corner), ch 4, 1 sc in next ch-space on SQUARE 3. Then work around SQUARE 3 as follows: ** ch 4, 1 sc in next ch-space, ch 4, 1 sc in next ch-space, 8 ch, 1 sc in next ch-space **, repeat from **-** 1 more time but instead of last sc, finish with 1 sl st in first sc from beg of round. Fasten off. SQUARE 4: Work as SQUARE 2 from 1st to 3rd round and work SQUARE 4 tog with SQUARE 3 the same way as SQUARE 3 was worked tog with SQUARE 2. ROW 2: SQUARE 5: Work 1st to 3rd round as SQUARE 2. ROUND 4: Work with Safran as follows: ch 2, 1 sc in first ch-space, ch 4, 1 sc in next ch-space, ch 4, 1 sc in next ch-space, ch 4, place the square WS against WS with SQUARE 1, work 1 sc in sc worked in the corner between SQUARE 1 and SQUARE 2, ch 4, 1 sc in next ch-space on SQUARE 5, * ch 2, 1 sc in next small ch-space on SQUARE 1, ch 2, 1 sc in next ch-space on SQUARE 5 *, repeat from *-* 1 more time, ch 4, 1 sc in next large ch-space on SQUARE 1 (= corner), ch 4, 1 sc in next ch-space on SQUARE 5. Then work around SQUARE 5 as follows: ** ch 4, 1 sc in next ch-space, ch 4, 1 sc in next ch-space, 8 ch, 1 sc in next ch-space **, repeat from **-** 1 more time but instead of last sc, finish with 1 sl st in first sc from beg of round. Fasten off. SQUARE 6: Work 1st to 3rd round as SQUARE 1. Then work this square tog with SQUARE 2 and SQUARE 5. ROUND 4: Work with Safran as follows: ch 2, 1 sc in first ch-space, ch 4, 1 sc in next ch-space, ch 4, 1 sc in next ch-space, ch 4, place the square WS against WS with SQUARE 2, work 1 sc in sc worked in the corner between SQUARE 2 and SQUARE 3, ch 4, 1 sc in next ch-space on SQUARE 6, * ch 2, 1 sc in next small ch-space on SQUARE 2, ch 2, 1 sc in next ch-space on SQUARE 6 *, repeat from *-* 1 more time, ch 4, 1 sc in sc worked in the corner between SQUARE 5, SQUARE 2 and SQUARE 1, ch 4, 1 sc in next ch-space on SQUARE 6, ** ch 2, 1 sc in next ch-space on SQUARE 5, ch 2, 1 sc in next ch-space on SQUARE 6 **, repeat from **-** 1 more time, ch 4, 1 sc in next large ch-space in the corner on SQUARE 5, ch 4, 1 sc in next ch-space on SQUARE 6, ch 4, 1 sc in next ch-space, ch 4, 1 sc in next ch-space, 8 ch, 1 sl st in first sc from beg of round. Fasten off. SQUARE 7: Work 1st to 3rd round as SQUARE 2. Then work the square tog with SQUARE 6 and SQUARE 3 the same way as SQUARE 6 was worked tog with SQUARE 5 and SQUARE 2. SQUARE 8: Work 1st to 3rd round as SQUARE 1. Then work the square tog with SQUARE 7 and SQUARE 4 the same way as SQUARE 7 was worked tog with SQUARE 6 and SQUARE 3. Continue to work rows the same way as ROW 2 but make sure to switch the yarn types so that every square alternately has Safran and Cotton Viscose in the middle. Work a total of 14-16-18-20-22-24 rows (i.e. 56-64-72-80-88-96 squares) - AT THE SAME TIME when working last row, work the squares tog in both the next to last row and the first row to form a circle. CONTINUING BODY: Then work front and back piece separately back and forth so that crochet pattern is the same the entire way. FRONT PIECE: READ CROCHET INFO. Work with Safran on hook size 3.5 mm/E/4 along 7-8-9-10-11-12 of the squares in one side. Work 3 dc in every ch-space, i.e. 12 dc along every square = 84-96-108-120-132-144 dc in total on row. Then work PATTERN until finished measurements - see explanation above. AT THE SAME TIME when piece measures 26 cm / 10¼" in total, inc 1 st in each side by working 2 sts in next to last st. Repeat inc every 2-2-2-2½-2½-2½ cm / ¾"-¾"-¾"-⅞"-⅞"-⅞" a total of 4 times = 92-104-116-128-140-152 sts. When piece measures 35-36-37-38-39-40 cm / 13¾"-14¼"-14½"-15"-15¼"-15¾" in total, dec for armholes on every row in each side: 4 sts 1 time, 3 sts 0-0-1-2-3-4 times, 2 sts 0-2-2-3-3-4 times and 1 st 2-3-4-4-5-4 times - SEE DECREASE TIP. = 80-82-86-88-92-96 sts remain. When piece measures 44-46-48-50-52-54 cm / 17¼"-18"-19"-19¾"-20½"-21¼", dec for neck. This is done by no longer working over the middle 18-18-20-20-22-22 sts (i.e. on 1st row only work over the 31-32-33-34-35-37 sts in the one side). Then dec towards the neck on every row: 3 sts 1 time, 2 sts 1 time and 1 st 4 times - SEE DECREASE TIP. After all dec are done, 22-23-24-25-26-28 sts remain on shoulder. Cut the yarn when piece measures 54-56-58-60-62-64 cm / 21¼"-22"-22¾"-23⅝"-24⅜"-25¼". Work the other shoulder the same way. BACK PIECE: Work as front piece but do not dec for neck. Continue to work until piece measures 52-54-56-58-60-62 cm / 20½"-21¼"-22"-22¾"-23⅝"-24⅜", now work 2 cm / ¾" over 22-23-24-25-26-28 sts on each shoulder before cutting the yarn. SLEEVE: Work 4-4-4-5-5-5 squares – as on row 1 on body but in addition work first and last square tog to form a circle. Then work dc along the one side of squares on hook size 3.5 mm/E/4 with Safran as follows: 3 dc in each of the 2 small ch-spaces on every square and 4 dc in every ch-space in the corners (= 14 dc per square) = 56-56-56-70-70-70 dc in total. Continue with PATTERN back and forth as on body. When piece measures 10-10-8-8-8-8 cm / 4"-4"-3⅛"-3⅛"-3⅛"-3⅛", inc 1 st in each side, repeat inc every 2½-1½-1½-2-1½-1 cm / ⅞"-½"-½"-⅞"-½"-⅜" a total of 9-12-14-10-12-16 times = 74-80-84-90-94-102 sts. When piece measures 32-31-30-29-27-26 cm / 12½"-12¼"-11¾"-11⅜"-10⅝"-10¼" (shorter measurements in the larger sizes because of longer sleeve cap and wider shoulders), dec for sleeve cap on every row in each side - SEE DECREASE TIP: 4 sts 1 time, 2 sts 3 times and 1 st 2-3-4-6-8-9 times, then dec 2 sts in each side until piece measures 39 cm / 15¼", then dec 3 sts 1 time in each side. Cut the yarn, sleeve measures approx. 40 cm / 15¾" in all sizes. ASSEMBLY: Sew side and sleeve seams tog edge to edge in front loop of outermost sts. Sew in the sleeves. Work at the bottom around the sleeves and around the body with Cotton Viscose as follows: 1 sc in first ch-space, * ch 5, 1 sc in next ch-space *, repeat from *-* and finish with ch 5 and 1 sl st in first sc. Work the same way around the neck but then skip approx. 1 cm / ½" between every ch-space. |
|||||||||||||
Diagram explanations |
|||||||||||||
|
|||||||||||||
|
|||||||||||||
|
|||||||||||||
|
Have you made this or any other of our designs? Tag your pictures in social media with #dropsdesign so we can see them! Do you need help with this pattern?You'll find tutorial videos, a Comments/Questions area and more by visiting the pattern on garnstudio.com. © 1982-2024 DROPS Design A/S. We reserve all rights. This document, including all its sub-sections, has copyrights. Read more about what you can do with our patterns at the bottom of each pattern on our site. |
|||||||||||||


With over 40 years in knitting and crochet design, DROPS Design offers one of the most extensive collections of free patterns on the internet - translated to 17 languages. As of today we count 304 catalogs and 11422 patterns - 11417 of which are translated into English (US/in).
We work hard to bring you the best knitting and crochet have to offer, inspiration and advice as well as great quality yarns at incredible prices! Would you like to use our patterns for other than personal use? You can read what you are allowed to do in the Copyright text at the bottom of all our patterns. Happy crafting!
Comments / Questions (58)
Hello, There seem to be three colours used in this pattern but only two are listed in the materials. It looks like a green. Can you help please? I love your yarns and patterns. You are the website I go to first. Everything I make is always admired.
10.04.2024 - 11:24DROPS Design answered:
Dear Rosemary, thank you very much. This pattern has been made with 2 yarns from yarn group A; as Cotton Viscose is now discontinued, use the yarn converter to see the possible alternatives and matching amount of yarn; Safran used here was colour no 05, colour name might have been changed but colour number is the right one. Happy crocheting!
10.04.2024 - 13:49Quisiera hacer este modelo pero parece que el hilo "Cotton Viscose" ya no está en su surtido: por qué hilo puedo sustituirlo? Puedo urilizar, por ejemplo, otro color o el color más similar dentro del surtido de Safran? Gracias.
22.02.2023 - 20:48DROPS Design answered:
Hola Monica, sí, puedes sustituirlo por Safran sin problemas.
26.02.2023 - 22:28Hej! Jag har en fundering över gur jag ska minska för ärmhålen. Jag virkar tröjan i storlek S och har precis maskat av de 4 första maskorna på vardera sida. Sedan står det att jag ska maska av 3 maskor 0 ggr och 2 maskor 0 ggr. Ska jag räkna detta som 2 varv innan jag maskar av nästa 1 maska 2 ggr eller maskar jag av 1 maska 2 ggr direkt pp varvet efter det att jag maskade av 4 maskor?
19.08.2021 - 20:42DROPS Design answered:
Hej Ellinor. Du maskar av 1 m 2 ggr direkt på varvet efter du maskade av 4 maskor. Mvh DROPS Design
20.08.2021 - 09:04Hej! Jag vill gärna virka denna tröjan, men cotton viscose har utgått. Vilket garn bör jag ersätta med för att få så lik struktur som möjligt? Mvh Sabina
02.07.2021 - 21:44DROPS Design answered:
Hei Sabina. Vi har nok dessverre ikke et garn som er helt lik den som er utgått. Siden denne genseren også er heklet i DROPS Safran, kan du erstatte Cotton Viscose med Safran, du vil ikke få den "glansen" som Cotton Viscose hadde, men Safran tilhører sammen garngruppe som Cotton Viscose gjorde. Bare husk å overholde heklefastheten som ståri oppskriften. mvh DROPS design
05.07.2021 - 14:13Beste, Waarom krijg ik geen antwoord op mijn vraag, de 22-10-2019?
30.10.2019 - 10:14DROPS Design answered:
Dag Anneloes,
Over het hoofd gezien, maar ik heb je vraag nu beantwoord, dus hopelijk kun je nu verder.
30.10.2019 - 10:46Beste, ik moet meerderen/minderen op het pant en de mouwen, maar nu is mijn vraag.... moet ik de steken dan achtereen meerderen/minderen per toer, of juist verspreid? Gr. Anneloes
22.10.2019 - 10:04DROPS Design answered:
Dag Annelies,
Op de panden meerder je aan de om de 2-2-2½-2½-2½ cm in de hoogte in totaal 4 keer. Je meerdert dan aan de zijkanten (zoals beschreven in het patroon). Voor de mouwen geldt het zelfde bij het meerderen en als je aan het einde moet minderen voor de mouwkop is dit ook telkens aan de zijkanten, dus je kant dan aan het begin van de naald de te minderen steken af.
30.10.2019 - 10:45Hoi, ik wil verdergaan met het patroon, maar ik kom met de open vierkantjes niet ui. Ik hen een rij van 6 vierkanten, waarin ik dus 72 stukjes in de lossen lussen heb gehaakt. Ik houd aan het eind telkens 1 steek over, bij het haken van de gaatjes. (1 stokje, 1 losse, 1 stokje, enz.) Wat doe ik fout? Gr. Anneloes
27.09.2019 - 07:51DROPS Design answered:
Dag Anneloes,
Als ik het goed begrijp heb haak je maat L en heb je dus in totaal 72 vierkantjes gehaakt. In de kleinste maat heb je al 7 vierkantjes op het voorpand en het achterpand (dus 14 in de rondte), ik begrijp dus niet goed hoe je op een rij van 6 vierkanten komt. (Als je verder gaat met de panden vanaf de vierkantjes haak je steeds 3 stokjes in elke lossenlus van de vierkantjes.)
27.09.2019 - 15:01Hallo! Ich bin nun beim Fertigstellen dieses schönen Pullis. Wie ist denn der allerletzte Satz in der Anleitung (bei: Zusammennähen) gemeint? "Rund um den Hals wiederholen jedoch zwischen jedem Lm-Bogen ca. 1cm überspringen." Heißt das, man soll nach jedem/ immer nach einem Zentimeter eine feste Masche stricken und dazwischen die 5 Lm? Danke für eine Antwort! Sara
04.09.2018 - 14:56DROPS Design answered:
Liebe Sara, ja genau so wird die Kante gehäkelt. Viel Spaß beim häkeln!
05.09.2018 - 07:44Barbara Lightfoot wrote:
Hi, I am not quite sure how to join the end of the bottom piece, when complete, to the front of itself? Before, we have been joining a square into an L shaped gap downwards, but now we must join two squares side by side together before one of them is complete, upwards?
04.06.2018 - 11:34DROPS Design answered:
Dear Mrs Lightfoot, on 2nd row with squares, crochet last round on 1st square together with the bottom square along only 1 side. When working next squares, crochet the last round on next square together with the side of the previous square on row 2, then along side of next square from previous row (= 2 sides are crocheted tog). When working last square on row, you crochet the last round to the previoius square on same row, to the next square on previous row and to the first square same row (= along 3 sides). Happy crocheting!
04.06.2018 - 13:22Hanaa Zahran wrote:
Hi, I will make this pattern and I want it a bit longer can u help me how to add rows in this pattern thank you for your help.
08.04.2018 - 10:47DROPS Design answered:
Dear Mrs Zahran, we are unfortunately not able to adapt every single pattern to each individual request. For any further assistance you are welcome to contact the store where you bought the yarn, even per mail or telephone. Happy crocheting!
09.04.2018 - 10:22