
Popular categories
Looking for a yarn?


|
|||||||||||||||||||||||||
Sunbeam |
|||||||||||||||||||||||||
 |
 |
||||||||||||||||||||||||
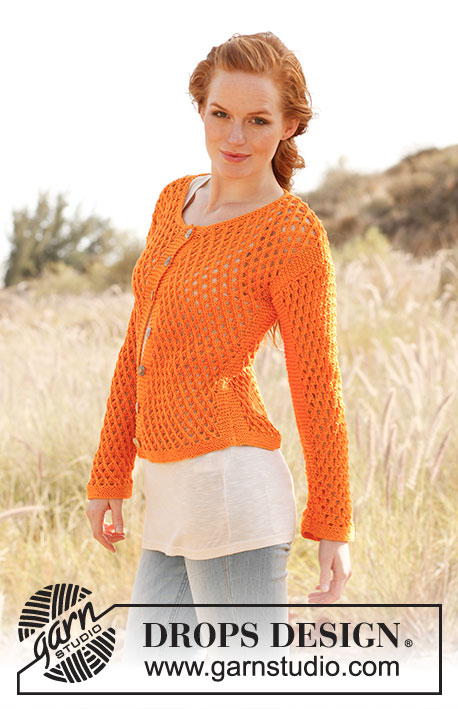
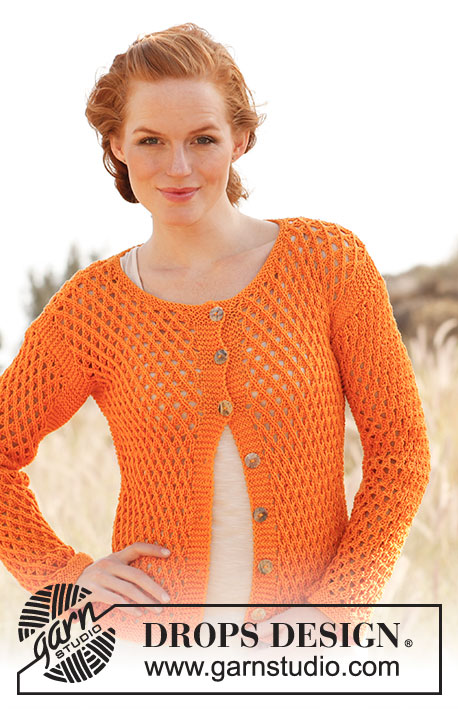
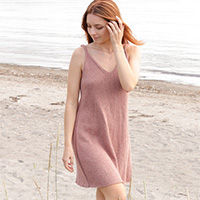
Knitted DROPS jacket with lace pattern in ”Muskat”. Size: S - XXXL
DROPS 139-12 |
|||||||||||||||||||||||||
|
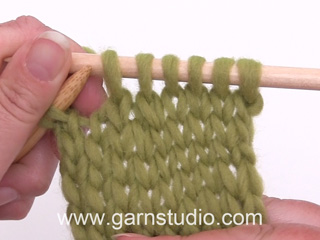
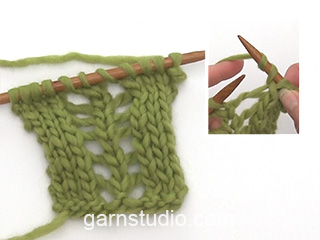
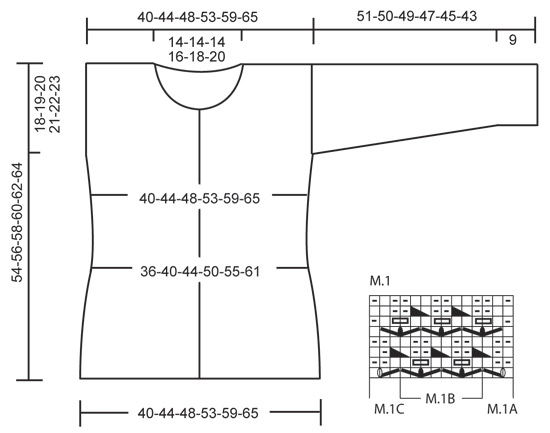
GARTER ST (back and forth on needle): K all rows. PATTERN: See diagram M.1. 1st row = RS. BUTTON HOLES: Bind off for button holes on right band from RS. 1 button hole = K tog 3rd and 4th st from mid front, then make 1 YO. Bind off for button holes when piece measures: SIZE S: 3, 10, 16, 23, 30, 37 and 43 cm / 1 1/8",4",6 1/4",9",11 3/4",14½" and 17". SIZE M: 3, 10, 17, 24, 31, 38 and 44 cm / 1 1/8",4",6 3/4",9½",12 1/4",15" and 17 1/4". SIZE L: 3, 10, 17, 24, 31, 38 and 45 cm / 1 1/8",4",6 3/4",9½",12 1/4",15" and 17 3/4". SIZE XL: 3, 11, 18, 25, 32, 39 and 46 cm / 1 1/8",4 3/8",7",9 3/4",12½",15 1/4" and 18". SIZE XXL: 3, 11, 18, 25, 32, 40 and 47 cm / 1 1/8",4 3/8",7",9 3/4",12½",15 3/4" and 18½". SIZE XXXL: 3, 11, 18, 26, 33, 41 and 48 cm / 1 1/8",4 3/8",7",10 1/4",13",16 1/8" and 19". (NOTE: bind off for last button hole when only 2 rows remain before neck dec.) -------------------------------------------------------- BACK PIECE: Worked back and forth on needle. Cast on 86-94-102-114-126-138 sts (includes 1 edge st in each side) on needle size 3 mm / US 2or3 with Muskat. Work 10 rows in GARTER ST - see explanation above. Switch to needle size 4 mm / US 6 and work as follows (seen from RS): 6 sts in garter st, diagram M.1A (= 3 sts), diagram M.1B until 9 sts remain, diagram M.1C and 6 sts in garter st. When piece measures 4 cm / 1½'', dec 1 st in each side by K tog the next to last 2 sts in garter st in each side. Repeat dec every 4 cm / 1½'' 3 more times = 78-86-94-106-118-130 sts (there are now only 2 sts in garter st in each side). When piece measures 20 cm / 8'', inc 1 st in each side by working 2 sts in next to last st in garter st in each side. Repeat inc every 4 cm / 1½'' 3 more times (work the inc sts in garter st) = 86-94-102-114-126-138 sts (there are now 6 sts in garter st in each side again). When piece measures 36-37-38-39-40-41 cm / 14¼''-14½''-15''-14 1/4''-15¾''-16 1/8'', bind off 1 st in each side for armholes = 84-92-100-112-124-136 sts. Then work diagram M.1 with 5 sts in garter st in each side. When piece measures 52-54-56-58-60-62 cm / 20½''-21¼''-22''-22¾''-23 5/8''-24 3/8'', bind off the middle 30-30-30-34-38-42 sts for neck on next row from WS. Finish each shoulder (= 27-31-35-39-43-47 sts) separately - continue pattern as follows: LEFT SHOULDER (seen from RS): Diagram M.1A (towards neck), diagram M.1B until 8 sts remain, diagram M.1C and 5 sts in garter st towards armhole. When piece measures approx. 54-56-58-60-62-64 cm / 21¼''-22''-22¾''-23 5/8''-24 3/8''-25¼'', bind off all sts from WS. RIGHT SHOULDER: Work as follows (seen from RS): 5 sts in garter st towards armhole, diagram M.1A, diagram M.1B until 3 sts remain, diagram M.1C (towards neck). Bind off when at the same length as left shoulder. RIGHT FRONT PIECE: Cast on 50-54-58-62-70-78 sts (includes 1 edge st in the side and 6 band sts towards mid front) on needle size 3 mm / US 2or3 with Muskat. Work 10 rows in garter st. Switch to needle size 4 mm / US 6 and work as follows (seen from RS): 6 band sts in garter st, diagram M.1A, diagram M.1B until 9 sts remain, diagram M.1C and 6 sts in garter st. Continue like this - AT THE SAME TIME when piece measures 3 cm / 1 1/8'', beg to bind off for BUTTON HOLES – see explanation above! When piece measures 4 cm / 1½'', beg dec in the side as on back piece and when piece measures 20 cm / 8'', beg inc in the side as on back piece. After all dec and inc there are 50-54-58-62-70-78 sts on the needle. When piece measures 36-37-38-39-40-41 cm / 14¼''-14½''-15''-14 1/4''-15¾''-16 1/8'', bind off 1 st in the side for armhole = 49-53-57-61-69-77 sts. Continue diagram M.1 with 5 sts in garter st towards the side and 6 sts in garter st towards mid front. When piece measures 44-45-46-47-48-49 cm / 17 1/4''-17 3/4''-18''-18½''-19''-19 1/4'', slip the 12-12-12-12-16-20 sts towards mid front on a stitch holder for neck (work them first). Then bind off at beg of every row from neck: 4 sts 1 time, 2 sts 2 times and 1 st 2 times = 27-31-35-39-43-47 sts remain on shoulder. Continue pattern as follows (seen from RS): Diagram M.1A (towards neck), diagram M.1B until 8 sts remain, diagram M.1C and 5 sts in garter st (towards armhole). Bind off all sts from WS when piece measures approx. 54-56-58-60-62-64 cm / 21¼''-22''-22¾''-23 5/8''-24 3/8''-25¼''. LEFT FRONT PIECE: Cast on and work as right piece but reversed. Work the shoulder as follows (seen from RS): 5 sts in garter st (towards armhole), diagram M.1A, diagram M.1B until 3 sts remain, diagram M.1C (towards neck). SLEEVE: Cast on 56-56-56-60-60-64 sts (includes 1 edge st in each side) on needle size 3 mm / US 2or3 with Muskat. Work 10 rows in garter st. Switch to needle size 4 mm / US 6 and work as follows (seen from RS): 1 st in garter st, diagram M.1A, diagram M.1B until 4 sts remain, diagram M.1C and 1 st in garter st. Continue like this. When piece measures 9 cm / 3½'', inc 1 st in each side which is worked in garter st. Repeat inc every 4-3-2½-2½-2-2 cm / 1½"-1 1/8"-7/8"-7/8"-3/4"-3/4" a total of 11-13-15-15-17-17 times (work the inc sts in garter st) = 78-82-86-90-94-98 sts. When piece measures 51-50-49-47-45-43 cm / 20"-19 3/4"-19 1/4"-18½"-17 3/4"-17" (shorter measurements in the larger sizes because of wider shoulders), bind off all sts. ASSEMBLY: Sew the shoulder seams. NECK EDGE: Pick up approx. 90 to 120 sts around the neck on needle size 3 mm / US 2or3 with Muskat (including sts on stitch holders at the front). K 3 rows back and forth, bind off with K. ASSEMBLY: Sew in sleeves and sew under arm and side seams in one inside 1 edge st. Sew on buttons. |
|||||||||||||||||||||||||
Diagram explanations |
|||||||||||||||||||||||||
|
|||||||||||||||||||||||||
|
|||||||||||||||||||||||||
|
Have you made this or any other of our designs? Tag your pictures in social media with #dropsdesign so we can see them! Do you need help with this pattern?You'll find tutorial videos, a Comments/Questions area and more by visiting the pattern on garnstudio.com. © 1982-2024 DROPS Design A/S. We reserve all rights. This document, including all its sub-sections, has copyrights. Read more about what you can do with our patterns at the bottom of each pattern on our site. |
|||||||||||||||||||||||||


With over 40 years in knitting and crochet design, DROPS Design offers one of the most extensive collections of free patterns on the internet - translated to 17 languages. As of today we count 304 catalogs and 11422 patterns - 11417 of which are translated into English (US/in).
We work hard to bring you the best knitting and crochet have to offer, inspiration and advice as well as great quality yarns at incredible prices! Would you like to use our patterns for other than personal use? You can read what you are allowed to do in the Copyright text at the bottom of all our patterns. Happy crafting!
Comments / Questions (37)
Is the gauge done in stockinette stitch.
28.02.2024 - 01:45DROPS Design answered:
Hi Robin, No, the gauge is taken with the lace pattern (M.1) Happy knitting!
28.02.2024 - 06:48Wie lese ich die Gesamtlänge? Sind das 54 cm insgesamt (Grösse S) oder 54 cm plus 18 cm, also 72 cm Gesamtlänge?
27.02.2019 - 09:42DROPS Design answered:
Liebe Bree, die Gesamtlänge ist 54 cm (Grösse S), dh 36 cm bis zum Armloch + 18 cm vom Armloch bis Schulter. Viel Spaß beim stricken!
27.02.2019 - 11:06Vraag over patroon 139-12 (S) telpatroon is ingedeeld in A B en C. M1b herhaal je 8,5 maal hoe maak je dan in de 3de naald (goede kant) de kruising vd 3de st v M1a en de 1ste st v M1b in de herhalingen van M1b? hetzelfe met de kruising vd 8ste st v M1b met de 1st st v M1c. En wat met de dubbele omslagen in nld 5 (goede kant)? kan u mij helpen aub
09.05.2016 - 18:04DROPS Design answered:
Hoi Greta. Het patroon is hetzelfde over de hele nld, en je gaat in de derde nld dan alleen even 1 st eerder "beginnen" met M.1B en C. Dus, brei M.1A over 2 st, dan brei je de kruising en herhaalt over x antaal st tot aan het einde (M.1C) en breit de "kruising" (en hebt 2 st over in M.1C ipv 3) en breit deze zoals aangegeven.
10.05.2016 - 15:43Modele : Sunbeam by DROPS Design Je ne comprends pas à quoi correspond "jusqu'à ce qu'il reste 9 mailles" lors du montage des mailles du dos. je ne réussis pas à tomber sur les 86mailles : 2*6 + 5*14=82 ! Merci
18.04.2016 - 14:11DROPS Design answered:
Bonjour Mme Herve, en taille S, on a 86 m que l'on tricote ainsi: 6 m point mousse, 3 m de M.1A, puis on répète 8 fois et demi les 8 m de M.1B ainsi: 8 fois les 8 m de M.1B puis 1 fois les 4 premières m de M.1B, il reste 9 m que l'on tricote ainsi: 3 m de M.1C et 6 m point mousse. Bon tricot!
18.04.2016 - 14:33Das Muster sieht bei mir nicht genau gleich aus, irgendetwas scheine ich nicht richtig zu machen. Liest man das Diagramm Hinreihe von links nach rechts, Rückreihe von rechts nach links? Danke.
31.01.2016 - 22:53DROPS Design answered:
Nein, Sie lesen Strickschriften grundsätzlich immer genau umgekehrt: Die Hin-R von rechts nach links und die Rück-R von links nach rechts, Sie beginnen ganz unten und arbeiten nach oben.
03.02.2016 - 20:08Hej! Jag har stickat denna underbara kofta till min dotter som blev förtjust i den.Jag måste bara påpeka att garnmängden som angivits på mönstret måste vara fel eftersom jag fick köpa till fyra mystan till för att det skulle räcka.Jag stickade storlek m.Jag har använt storlek på stickor som står på beskrivningen.Hälsningar Eva.
02.11.2015 - 13:10Stricke die schöne Jacke im original Garn, Muskat Nr. 51, mit den angegebenen Stärken der Stricknadeln! Das Garn reicht aber nicht aus. habe gerade noch 2 1/2 Knäuel für die langen Aermel! Danke für eine rasche Antwort. Grüsse
25.10.2015 - 11:03DROPS Design answered:
Antwort siehe unten!
05.11.2015 - 12:11Wie kann ich kurze Aermel stricken? bitte geben Sie mir schnell Bescheid. Danke
25.10.2015 - 11:00DROPS Design answered:
Antwort siehe unten!
05.11.2015 - 12:10Wie kann ich kurze Aermel stricken?
25.10.2015 - 10:59DROPS Design answered:
Antwort siehe unten!
05.11.2015 - 12:10Mir reicht die Menge Garn wohl nicht welches Sie für Grösse S angegeben haben! Für die Aermel habe ich nun nur noch 2 1/2 Knäuel, was wohl nicht reichen wird! Was mache oder habe ich falsch gemacht? Grüsse
25.10.2015 - 10:56DROPS Design answered:
Haben Sie die Maschenprobe genau eingehalten? Das ist immer wichtig, damit die Garnmenge reicht. Für kürzere Ärmel müssten Sie etwas rechnen, Sie können ja anhand der Zunahmen ausrechnen, bei welcher Ärmellänge wie viele Maschen vorhanden sind. Dann messen Sie, wie viel Ärmellänge Sie kürzen möchten und beginnen mit der Maschenzahl, die in etwa für diese Stelle zutrifft. Die 5 Krausrippen als Ärmelblende stricken Sie dann ebenfalls.
05.11.2015 - 12:10